By Rajeev Verma, Alibaba Cloud Tech Share Author. Tech Share is Alibaba Cloud's incentive program to encourage the sharing of technical knowledge and best practices within the cloud community.
Discourse is a modern, free, and open source forum system that runs on Ruby on Rails. It uses PostgreSQL for its database and Redis cache. Discourse is used by many top companies to develop communities and forums around their products as well as to provide support to customers.
In this guide we will be installing Discourse on Alibaba Cloud's Elastic Compute Service (ECS) with Ubuntu 16.06, and use DirectMail for sending emails. We will speed up static content delivery with Alibaba Cloud CDN for static content delivery.
You can get all these products for free by registering for a new account with Alibaba Cloud.
For this tutorial we need:
You need to complete the prerequisites before beginning the actual installation because Discourse installer will ask for these information at the beginning of setup process.
We are doing this step first because DNS propagation takes some time. We want it propagated before we run the installer as Let's Encrypt requires this to generate an SSL certificate.
For this step, you only have to add an "A" record in DNS configuration of your domain that points your domain or subdomain to ECS instance's IP address.
Record type: A
Name: forum.example.com
Value: your.server.ip.address (See the image in previous step to know where to find it)
If you are using Alibaba Cloud DNS, you can follow this guide to add and manage domain names, and this guide to add and manage records.
For official documentation of Alibaba Cloud CDN, please refer to the CDN quick start guide. However, I will be discussing this section in detail as there are a few settings that we need for Discourse.
Head over to CDN console by clicking here.
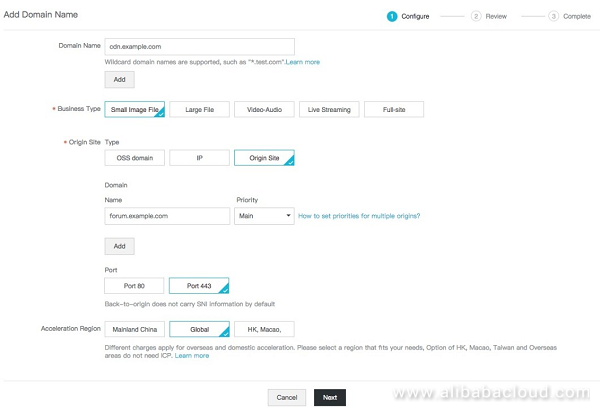
Click on CDN Domain Name List under the CDN menu, and click on Add domain. You will see a form to setup your CDN domain and origin.
In the CDN Domain field, enter a subdomain of your domain name. For example, if your domain name is example.com, you can enter cdn.example.com.
In Business Type select Images and Small file.
In Origin Site Type select Origin Site Domain Name.
Enter the domain name you are using for your forum in the field that appears.
In Port field select Port 443 as Discourse installer will install Lets encrypt SSL certificate and serve your forum on port 443.
In Accelerating Region, select Global Acceleration if you want to use nodes in Mainland China as well as rest of the world, or you can choose Overseas Acceleration (non-Chinese mainland) if you want to use only nodes outside of Mainland China. To use only Chinese POPs you should select Chinese Mainland from the menu.
On your CDN console, you should see something similar to this:
Afterward click Next.
Your CDN will be configured after a few minutes and you will be given a unique URL. You will have to create a CNAME in your domain's DNS setting pointing to this URL.
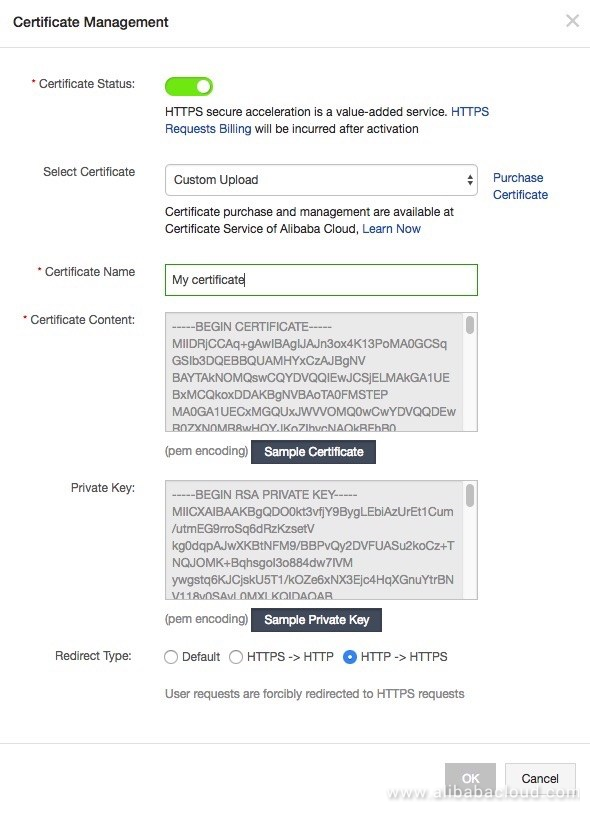
We need to setup SSL certificate for the CDN subdomain. If you already have a certificate, you can install it directly. If not, you can buy a certificate from Alibaba Cloud.
To install the certificate, go to the CDN console and click on Manage next to the URL in the CDN URL list. Then click on the edit icon next to HTTPS Secure Acceleration.
Turn on the Certificate Status switch.
In the Select Certificate field, choose Custom Upload.
Enter your name of choice in Certificate Name field.
Enter Certificate content and Private key in marked textboxes. These are provided by the certificate provider.
In Redirect Type click on the radio button that says HTTP -> HTTPS.
It should look like this:
Click OK to save the certificate.
This setting is required so your CDN does not do a 301 redirect to your origin server.
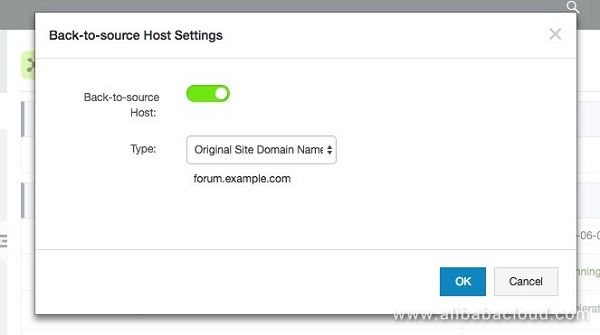
Click the edit icon on Back-to-source Host under Basic Configuration.
An overlay window will open.
Switch on the Back-to-source Host button.
From the dropdown menu, select domain name of your origin.
It should look like this
Click OK to save.
Now click on Set HTTP Header and click on Add HTTP header. A window will open.
Select Access control allow origin from the dropdown menu, and add * as the value.
After saving it should look like this:

Note the CDN URL as we will need it later.
DirectMail is an email-sending service by Alibaba Cloud and it is one of the cheapest and most reliable service available.
Note: Email setting is the most common step where users break their forum and have to rebuild it. Take extra precaution when performing these steps.
Head over to the DirectMail console by clicking here. If you have not activated it before, it will ask you to do so. You can read the DirectMail official documentation, but I will describe it here because there are a few things we need to do to make it work with Discourse.
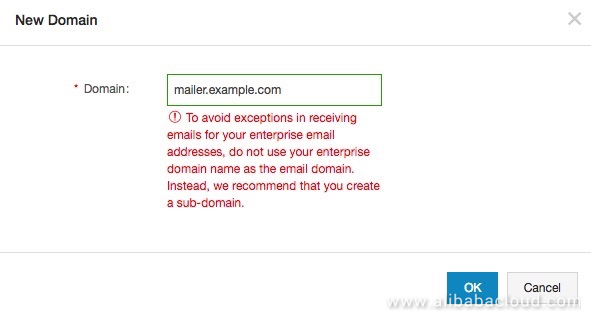
This will be the domain from where the email will be sent. Use your forum domain, this is important.
Click on the New Domain button on the top right, and a popup window will open.
Enter your forum's domain in the Domain field and click OK.
Domain verification is needed to activate it. To do this:
Click on the Sender Addresses in the left menu.
Click on Create Sender Address on the top right.
A window will open where you need to enter the data. Fill in all the fields to set up the sender email:
It should look like this
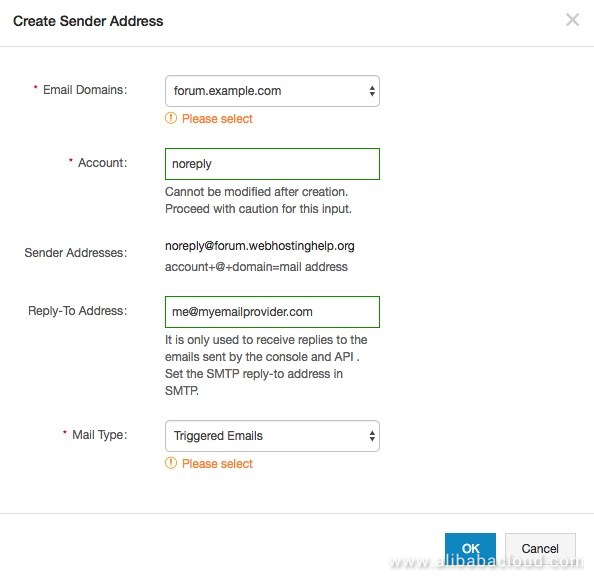
Press OK to create the sender address.
Click on the Set SMTP password link in front of the sender email address that you set up in previous step.
A window will open where you can set your password.
Read the instructions carefully as it requires mix of lower case upper case letter and number. Use at least 2 different uppercase letters, 2 different lowercase letters, and 2 different digits for your password.
Note the sender email address and SMTP password. It is required for running the Discourse installer. You will also need SMTP service address that you can find here. Choose the one for the region you set your Directmail account in.
Discourse team has built a nice installer that makes it very easy to install Discourse. You only have to install Docker first and download and run the installer. After a few minutes, you will get your new Discourse forum ready. Let's get started!
Log in to you server via SSH
ssh root@192.168.1.1Note: Replace 192.168.1.1 with your IP address.
After successful login, run the following command to update your system first.
sudo apt-get update && apt-get upgrade -yWe will be running all the steps as root user so run this command.
sudo -sDiscourse forum runs inside Docker container, so we will first install the latest version of Docker.
wget -qO- https://get.docker.com/ | sh
You need to install Git before proceeding. Use the command below to install Git.
apt-get install gitCreate a directory to install discourse
mkdir /var/discourseClone discourse Docker image inside this folder
git clone https://github.com/discourse/discourse_docker.git /var/discourseSwitch to this directory
cd /var/discourseInitiate the setup script.
./discourse-setupDiscourse will create a swap space first and then you will be asked for the following information.
Hostname for your Discourse? [discourse.example.com]: Email address for admin account(s)? [me@example.com,you@example.com]: SMTP server address? [smtp.example.com]: SMTP port? [587]: SMTP user name? [user@example.com]: SMTP password? [pa$$word]: Let's Encrypt account email? (ENTER to skip) [me@example.com]:The description for the entries are as follows:
After you have entered all the information, you will need to review and confirm the settings. Check it carefully and press Enter if it is correct. If you need to change something, type N and hit Enter.
After confirmation it will take around 10 minutes to set up everything. After the setup finishes you can see your forum in the browser by visiting the URL of your forum.
At this stage, although your forum is working, it is not currently using Alibaba Cloud CDN. We will set this up in the following step.
Go to the Discourse directory if you are not already in it.
cd /var/discourseOpen the app.yml file in nano for editing.
nano containers/app.ymlScroll down until you find this line.
#DISCOURSE_CDN_URL: //discourse-cdn.example.comAnd paste this line right below it. Make sure you keep the same indentation as above line.
DISCOURSE_CDN_URL: //cdn.example.comNote: Replace //cdn.example.com with the CDN URL we set in the Step 2.
Press Ctrl+O and Enter to save changes.
Press Ctrl+X and then Enter to exit nano.
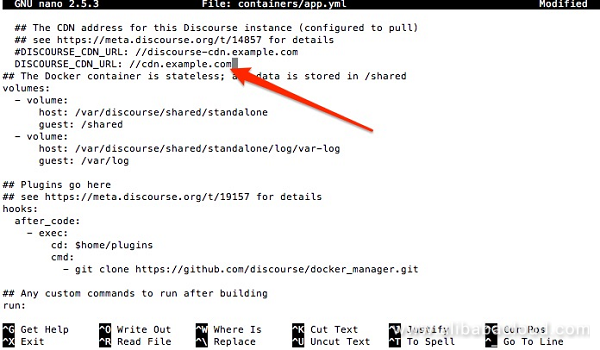
Now rebuild the app.
./launcher rebuild appThe rebuild process will take about 10 minutes.
Your forum will now use Alibaba Cloud CDN to serve static content. Visit your forum's URL and you will be greeted with this message.

Click on the register button and fill in all the fields as required to create an administrator account for the forum. Discourse forum will send you an email to confirm your email address.
If you do not get the activation email, review your DirectMail settings and make sure you have followed the tutorial carefully.
If you need to change the SMTP setting in forum, you can run the setup again by using this command inside Discourse directory.
./discourse-setupYou will be asked all the information again and the installer will also show you all the information you gave earlier.
After confirming your email, go through the initial Discourse setup and you will be soon see your forum's homepage like this
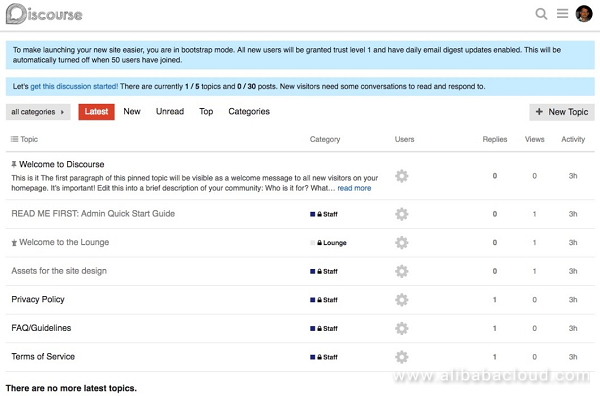
You have successfully installed Discourse. Enjoy your new Discourse forum!
You can install Discourse forum easily on Alibaba Cloud's infrastructure. You don't have to buy products from multiple providers as you can get all the required services like cloud servers, SMTP service, and CDN from Alibaba Cloud. If you have not signed up yet, register and get $300 worth in Free Trial to try out this guide and other Alibaba Cloud services.
Handling Complex Business Scenarios with Domain Modeling – Part 2
How to Deploy and Host a Joomla Website on Alibaba Cloud ECS

2,593 posts | 792 followers
FollowAlibaba Clouder - August 29, 2018
Alibaba Clouder - July 1, 2018
Alibaba Cloud Indonesia - December 28, 2022
francisndungu - October 19, 2018
Alibaba Clouder - May 15, 2018
Alibaba Clouder - May 16, 2018
Thanks for the detailed guide! This step-by-step approach to installing Discourse on Alibaba Cloud is really clear and helpful, especially for beginners setting up ECS with Ubuntu. Using DirectMail for emails and CDN for static content delivery makes a lot of sense to improve performance and reliability.

2,593 posts | 792 followers
Follow ECS(Elastic Compute Service)
Elastic and secure virtual cloud servers to cater all your cloud hosting needs.
Learn More DirectMail
A simple and efficient email service to help you send transactional notifications and batch email
Learn More CDN(Alibaba Cloud CDN)
A scalable and high-performance content delivery service for accelerated distribution of content to users across the globe
Learn MoreMore Posts by Alibaba Clouder
5538565010063440 December 6, 2025 at 9:06 am
Installing Discourse on Alibaba Cloud is simple. Start by creating an ECS Ubuntu server, install Docker, and run the Discourse setup script with your domain and DirectMail SMTP settings. DirectMail handles all forum emails like verification and notifications. To boost global speed, connect your site to Alibaba Cloud CDN, which caches static files for faster loading. You can also enhance your community with plugins and features similar to those found in WhatsApp Plus advanced options to offer better communication tools. https://whatsplusap.com