By Arslan Ud Din Shafiq, Alibaba Cloud Tech Share Author. Tech Share is Alibaba Cloud's incentive program to encourage the sharing of technical knowledge and best practices within the cloud community.
React is a JS library that is used to build user interfaces. It is mostly used in making single-page and mobile applications.
Webhook is a very friendly and helpful way to get notified when something happens. In a web application, when something happens or an event occurs a message is posted via URL. Sometimes you only need data when something happens, otherwise you don't require any data. In conventional ways, a web application keeps fetching data from database rather waiting for any event which overwhelm the server by compromising more resources. Webhooks gives relaxation to server and notify when some event happens.
Nowadays, webhooks are very important because every application uses live notifications. Webhooks are very helpful in making real-time applications. It can receive real-time data and can do some meaningful working on that data. Webhooks allow you to provide API to others to extend your app.
When a developer makes changes in an application continuously, using webhooks can be very helpful, especially when a team of developers is working on a project. It can also be very helpful to integrate Slack notifications if the team is depending on backend software or API.
In this tutorial, I will be using an Alibaba Cloud Elastic Compute Service (ECS) instance with Ubuntu 16.04 installed on it. I will build a React app and add the code to GitHub repository. After this, I will configure Nginx server, GitHub and set-up webhook server so that whenever the code is modified, GitHub and webhook server can communicate. In the end, I will configure Slack server. When an app is deployed successfully, Slack will receive a notification.
Before proceeding with installation of any kind of package, use the following command to update your Ubuntu system. To execute this command, remember to login from non-root user with sudo privileges. After execution of this command, you will be prompted to Is this ok? Type 'y' and hit Enter.
# sudo apt update && sudo apt upgradeYou will be required to install nginx server, for this purpose, you will need to follow the steps below.
Step 1:
To install execute the command.
# sudo apt-get install nginxStep 2:
Now you will need to start Nginx server by executing command below.
# sudo systemctl start nginxTo check status of Nginx server, execute the command below.
# sudo systemctl status nginxTo check installation, access IP address of your Alibaba Cloud ECS or your domain name that you have pointed to your IP address. In my case, I have accessed via domain name and the following screen loaded.
You will need to install git on your server as well as local machine. To install and configure Git, follow the steps below.
Step 1:
To install Git execute the command.
# sudo apt-get install gitStep 2 (Optional):
Now execute the commands below to configure Git by providing your name and valid email address so that commit messages may contain your correct information.
# git config --global user.name "Aareez"
# git config --global user.email "xyz@example.com"Node.js is a cross platform open source JS runtime environment that runs JS code outside the browser. A version of Node.js is available in Ubuntu's default repository. To install Node.js using PPA follow the steps below.
Retrieve your preferred version's script by running the command below.
# curl -sL https://deb.nodesource.com/setup_8.x -o nodesource_setup.shNow run the script by command below.
# sudo bash nodesource_setup.shTo install execute the command.
# sudo apt-get install -y nodejsNow Node.js has been installed successfully.
We may also need development tools to build native addons. To install them, execute the command.
# sudo apt-get install gcc g++To install Yarn package manager, execute the commands below.
 # curl -sL https://dl.yarnpkg.com/debian/pubkey.gpg | sudo apt-key add -
 #  echo "deb https://dl.yarnpkg.com/debian/ stable main" | sudo tee /etc/apt/sources.list.d/yarn.list
# sudo apt-get update && sudo apt-get install yarn
For working of npm, you will require to install build-essential. To do so, execute the command below.
# sudo apt-get install build-essentialFirst of all, you will build an application to test your webhooks with create-react-app. After this, you will have to create a GitHub repo and push the code of the project to that repo.
To add create-react-app node module to global repository, you will have to make it available in your shell by executing command below.
# sudo npm install -g create-react-appTo create the project named aareez-project, execute the command below.
# sudo create-react-app aareez-projectNavigate to created project directory by using the command below.
# cd aareez-projectNow initialize repository with git in your aareez-project directory. To do so, execute the command below.
# sudo git initNow add remote origin along with your GitHub URL.
# sudo git remote add origin https://github.com/itsaareez1/react-exampleNow stage the files in project directory.
# sudo git add Commit them and push them to repository by executing the following commands.
# sudo git commit -m "initial commit"
# sudo git push -f origin masterIn this part, you will need to fetch clone of react app from your Github repo.
Navigate to root directory
# cd ~Now clone files from Github.
# sudo git clone https://www.github.com/itsaareez1/react-example You can use the above git link to clone the project.
Navigate to clone directory by command.
# cd react-exampleTo create the folder which contains pages like index.html, JS files and CSS files, so that Nginx may serve, you will have to run build command of yarn.
# sudo yarn && sudo yarn buildNow you will have to create symlink for the files to make them publicly accessible via Nginx. Nginx will serve the application in directory /var/www. For creating symlink, execute the following command.
# sudo ln -s ~/react-example /var/www/react-exampleTo grant permissions so that Nginx may serve symlink correctly, execute the following command.
# sudo chmod -R 755 /var/wwwNow ## configure the nginx server block in available sites directory. To do so, execute the following command and a file will be opened.
# sudo nano /etc/nginx/sites-available/reactCopy the following text in opened file and change softpedia.xyz with your domain name or ECS IP address and save the file.
server {
        listen 80;

        root /var/www/react-example/build;
        index index.html index.htm index.nginx-debian.html;

        server_name softpedia.xyz;

        location / {
                try_files $uri /index.html;
        }
}
Now create symlink for react configuration in available sites directory to enabled sites directory.
# sudo ln -s /etc/nginx/sites-available/react /etc/nginx/sites-enabled/reactTo check whether the nginx syntax is correct or not, you can run the following command.
# sudo nginx -tTo load the configurations, restart your nginx server.
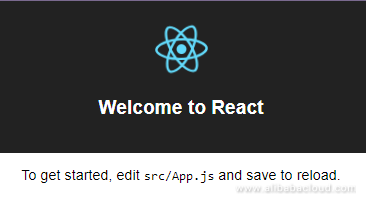
# sudo systemctl restart nginxTo confirm whether you have configured everything properly or not, you can access your IP address or domain in your browser, you will see the following screen.

The HTTP servers with configurable endpoints are called hooks. Webhook server executes customizable code adhering to set of configurable rules when some HTTP requests are received.
Navigate to home
# cd ~Download webhook.
# sudo wget https://github.com/adnanh/webhook/releases/download/2.6.6/webhook-linux-amd64.tar.gzExtract downloaded folder.
# sudo tar -xvf webhook-linux-amd64.tar.gzMove the binary to /usr/local/bin to make it available in your environment.
# sudo mv webhook-linux-amd64/webhook /usr/local/binRemove the downloaded folder.
# sudo rm -rf webhook-linux-amd64*Now create directories for scripts and hooks in opt folder where you mostly place third party applications.
# sudo mkdir /opt/scripts

# sudo mkdir /opt/hooks
Assign privileges for these directories to your username.
# sudo chown -R aareez:aareez /opt/scripts
# sudo chown -R aareez:aareez /opt/hooks
When GitHub sends HTTP request, webhook will be triggered on the basis of rules defined in JSON array file. Now you will have to create configuration file for webhooks. To do so, execute the command below.
# sudo nano /opt/hooks/hooks.jsonCopy the following text in the opened file.
[
  {
    "id": "redeploy-app",
    "execute-command": "/opt/scripts/redeploy.sh",
    "command-working-directory": "/opt/scripts",
    "pass-arguments-to-command":
    [
      {
        "source": "payload",
        "name": "head_commit.message"
      },
      {
        "source": "payload",
        "name": "pusher.name"
      },
      {
        "source": "payload",
        "name": "head_commit.id"
      }
    ],
    "trigger-rule":
    {
      "and":
      [
        {
          "match":
          {
            "type": "payload-hash-sha1",
            "secret": "654321Ab",
            "parameter":
            {
              "source": "header",
              "name": "X-Hub-Signature"
            }
          }
        },
        {
          "match":
          {
            "type": "value",
            "value": "refs/heads/master",
            "parameter":
            {
              "source": "payload",
              "name": "ref"
            }
          }
        }
      ]
    }
  }
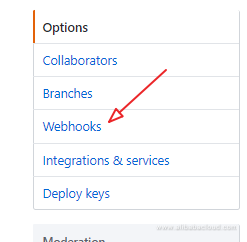
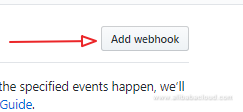
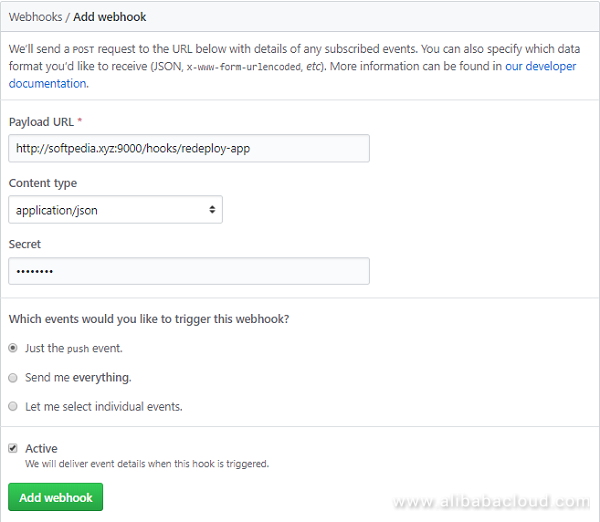
]To configure your GitHub repo for HTTP requests on any commit to master happens, you will need to follow the steps below.


Now whenever you or someone makes a commit to your GitHub repository, GitHub will send a POST request with Payload which will contain the information regarding the commit event.
As you have pointed your webhook to redeploy.sh script, you will have to create script. Execute the command below to open file for writing script.
# sudo nano /opt/scripts/redeploy.shCopy and paste the code below in opened file.
#!/bin/bash -e

function cleanup {
      echo "Error occoured"
      # !!Placeholder for Slack notification
}
trap cleanup ERR

commit_message=$1 # head_commit.message
pusher_name=$2 # pusher.name
commit_id=$3 # head_commit.id

# !!Placeholder for Slack notification

cd ~/react-example/
sudo git pull origin master
sudo yarn && yarn build

            # !!Placeholder for Slack notification
Now make the script executable by command below.
# sudo chmod +x /opt/scripts/redeploy.shAs Nginx is configured to serve react-example in /var/www folder, when the above script will be executed, the build directory will be updated and nginx will server new files.
## run webhook server to test configuration. Execute the command below for it.
# webhook -hooks /opt/hooks/hooks.json -verbose
If everything works properly, you will see the screen below.

For testing it, keep the webhook running, open a duplicate session and execute the commands below.
# sudo git commit --allow-empty -m "Trigger notification"
# sudo git push origin master
You should see the following screen.

To add Slack notifications, modify redeploy.sh to send and receive notifications from Slack. To configure Slack, follow the steps below.
You will see Slack webhook settings. Note the Webhook URL. Open the redeploy.sh script using the command.
# sudo nano /opt/scripts/redeploy.shRemove the previous code and add the following code. Remember to replace slack_webhook_url with your Webhook URL.
#!/bin/bash -e

function cleanup {
      echo "Error occoured"
      curl -X POST -H 'Content-type: application/json' --data "{
              \"text\": \"Error occoured while building app with changes from ${pusher_name} (${commit_id} -> ${commit_message})\",
              \"username\": \"buildbot\",
              \"icon_url\": \"https://i.imgur.com/JTq5At3.png\"
      }" your_slack_webhook_url
}
trap cleanup ERR

commit_message=$1 # head_commit.message
pusher_name=$2 # pusher.name
commit_id=$3 # head_commit.id

curl -X POST -H 'Content-type: application/json' --data "{
        \"text\": \"Started building app with changes from ${pusher_name} (${commit_id} -> ${commit_message})\",
        \"username\": \"buildbot\",
        \"icon_url\": \"https://i.imgur.com/JTq5At3.png\"
}" your_slack_webhook_url

cd ~/react-example/
sudo git pull origin master
sudo yarn && sudo yarn build

curl -X POST -H 'Content-type: application/json' --data "{
        \"text\": \"Build and deploy finished with changes from ${pusher_name} (${commit_id} -> ${commit_message})\",
        \"username\": \"buildbot\",
        \"icon_url\": \"https://i.imgur.com/JTq5At3.png\"
}" your_slack_webhook_url
For testing it, let the webhook running, open duplicate session and execute the commands below.
# sudo git commit --allow-empty -m "Trigger notification"
# sudo git push origin master
That's it! In your Slack channel, you will receive notifications and messages regarding application build that has started and finished.

2,597 posts | 773 followers
FollowJDP - July 2, 2021
Alibaba Clouder - March 4, 2019
Alibaba Cloud Indonesia - October 27, 2021
Alibaba Container Service - October 30, 2024
Alibaba Developer - June 19, 2020
XianYu Tech - September 11, 2020

2,597 posts | 773 followers
Follow ECS(Elastic Compute Service)
Elastic and secure virtual cloud servers to cater all your cloud hosting needs.
Learn More OSS(Object Storage Service)
An encrypted and secure cloud storage service which stores, processes and accesses massive amounts of data from anywhere in the world
Learn MoreLearn More
More Posts by Alibaba Clouder
Start building with 50+ products and up to 12 months usage for Elastic Compute Service
Get Started for Free Get Started for Free