By Roha Gagan, Alibaba Cloud Community Blog author.
If you are planning to host a Node.js application or dynamic website on Alibaba Cloud, then an optimal and economical solution with high bandwidth, SSD and powerful CPU might interests you. Introducing Alibaba Cloud's Starter Package Program, which provides SSD Cloud servers powered by 2nd Generation Intel Xeon Scalable Processors at highly affordable prices compared to other cloud providers. It allows you to access a powerful CPU at a much lower cost and supports both, Linux and Windows servers worldwide.
Alibaba Cloud's Starter Package helps you get started instantly through simple, scalable, and cost-effective Elastic Compute Service (ECS) that caters to all your cloud hosting needs. The new SSD Cloud Server Packages provide easy-to-use, high-performance virtual machines with higher data transfer plans at hugely discounted rates for enabling you to start from as low as $2.50 a month. Since it is available across 14 global regions, you can easily choose the Datacenter Region for your servers to meet any specific requirements. It allows each user to have up to five ECS instances with the simultaneous Data Transfer Plans.
So, once you have reserved your SSD Cloud Server via Starter Package 2.0, you can go ahead and easily deploy a Node.js project on CentOS operating system by following the instructions below:
To build your dynamic website by deploying a Node.js project on CentOS, you should meet the following requirements:
Step 1: Go to the URL: https://www.alibabacloud.com/starter-packages/general
Step 2: Select Operating System as Linux or Windows according to your OS requirements for SSD Cloud Server to evaluate various packages. The prices for Linux and Windows servers are different, and the screenshots below show different SSD Cloud Server packages for Linux and Windows respectively.
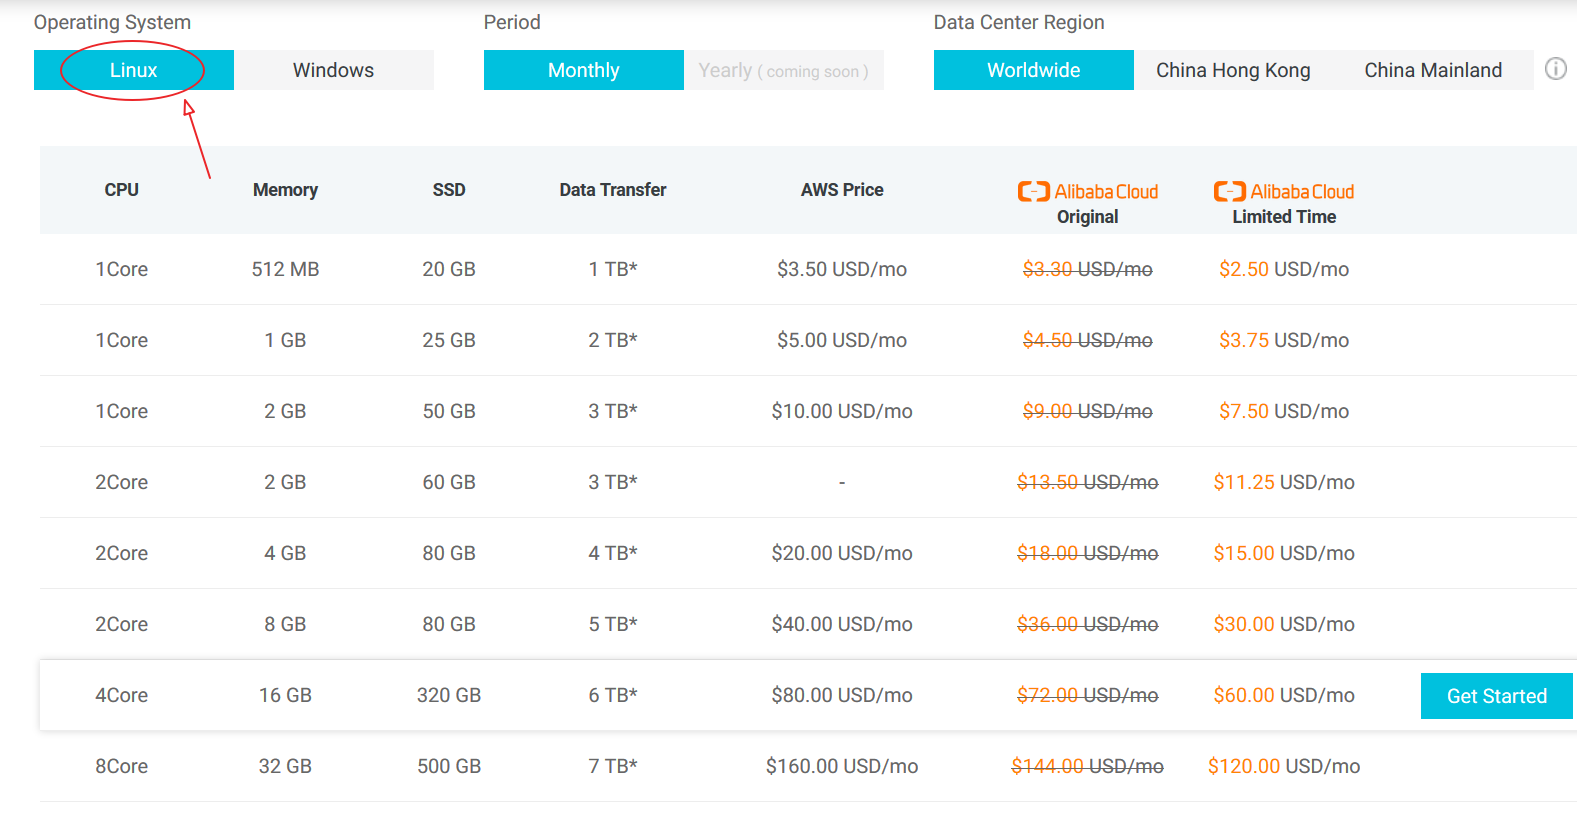
Figure1.a: SSD Cloud Server Packages for Linux
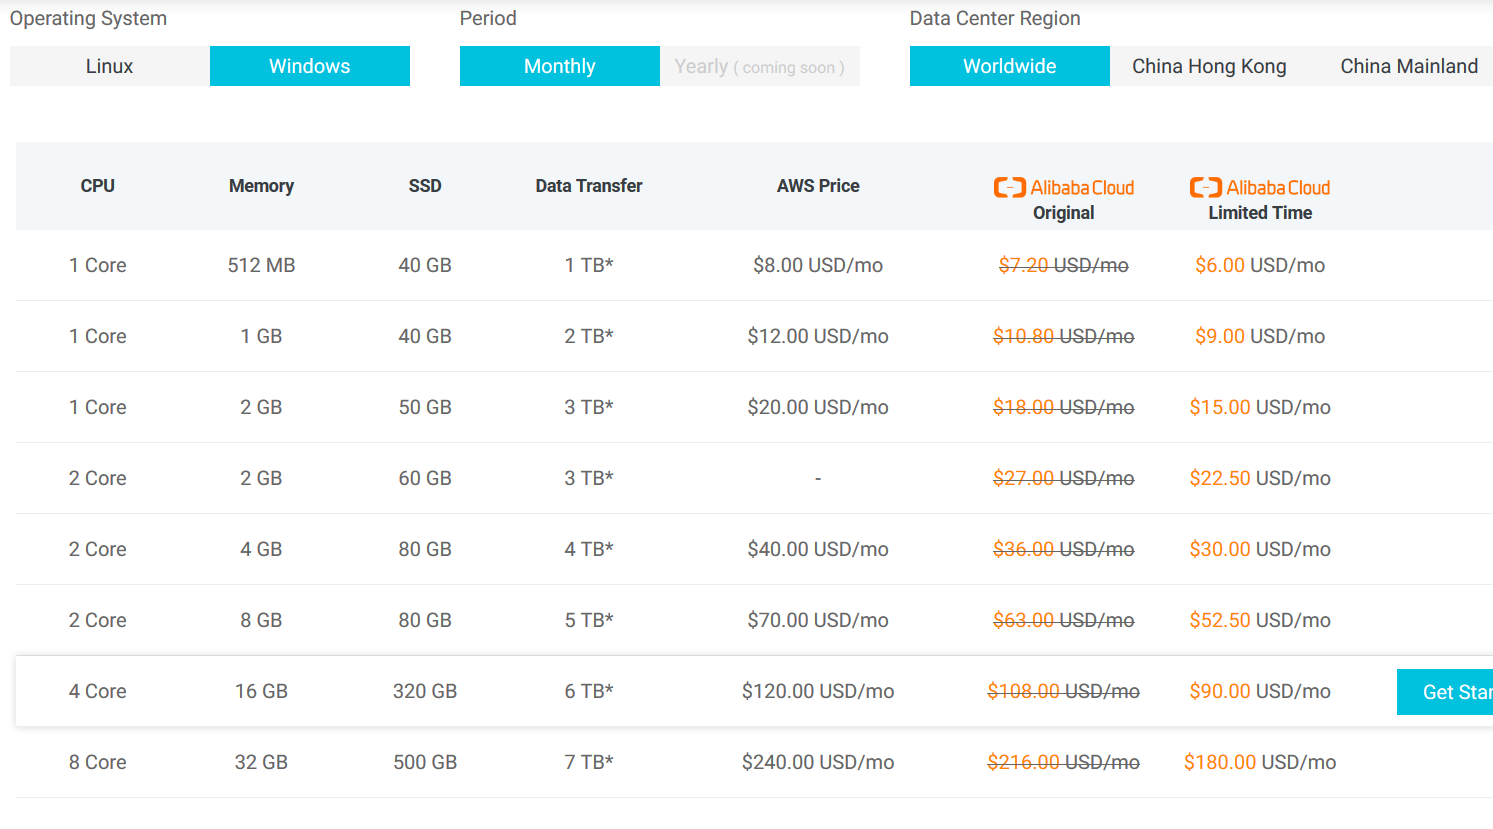
Figure1.b: SSD Cloud Server Packages for Windows
Step 3: You can select the Period for which you are going to reserve a server along with Data Center Region where you want to deploy your Node.js application.

Step 4: To buy your desired SSD Cloud Server, just click the Get Started button next to each server specification.
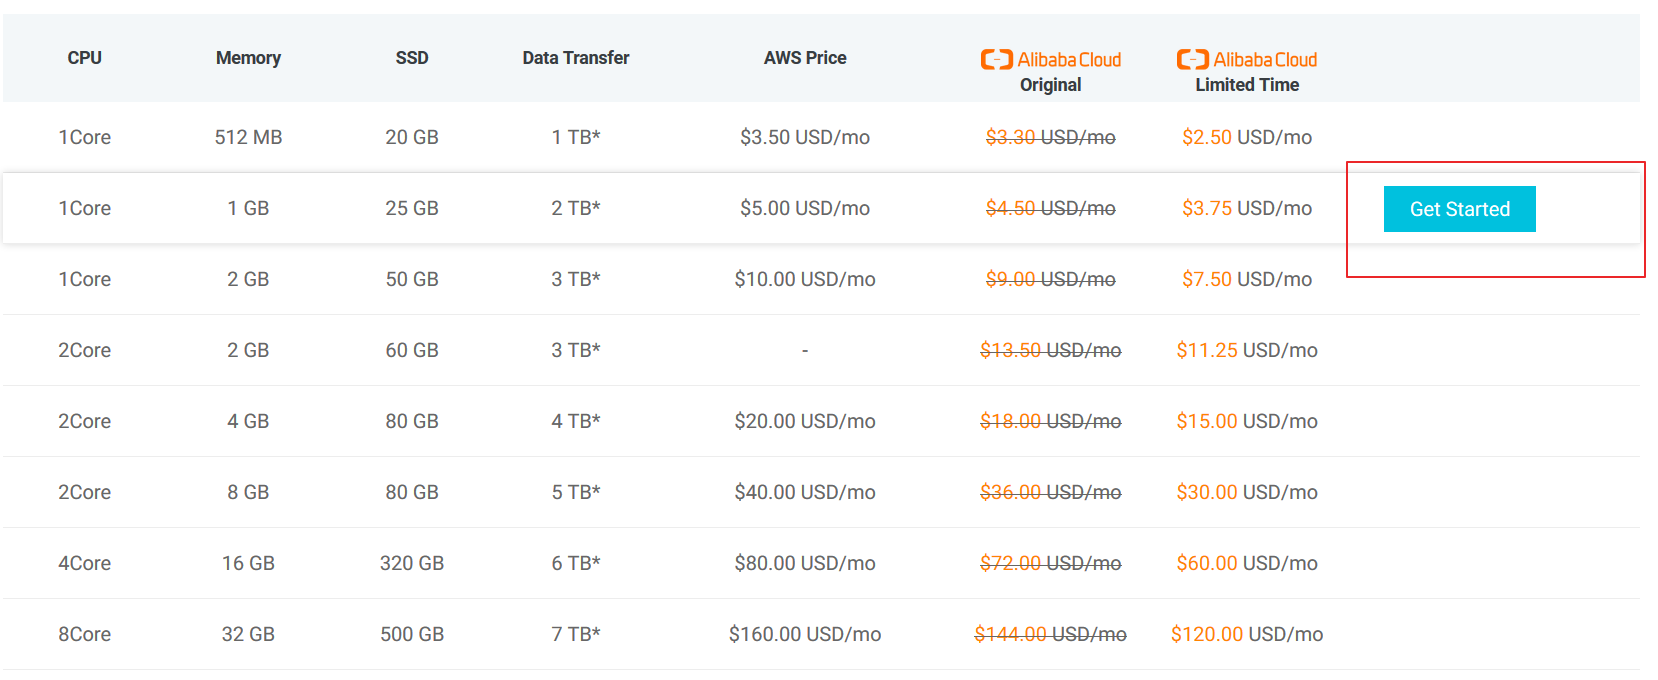
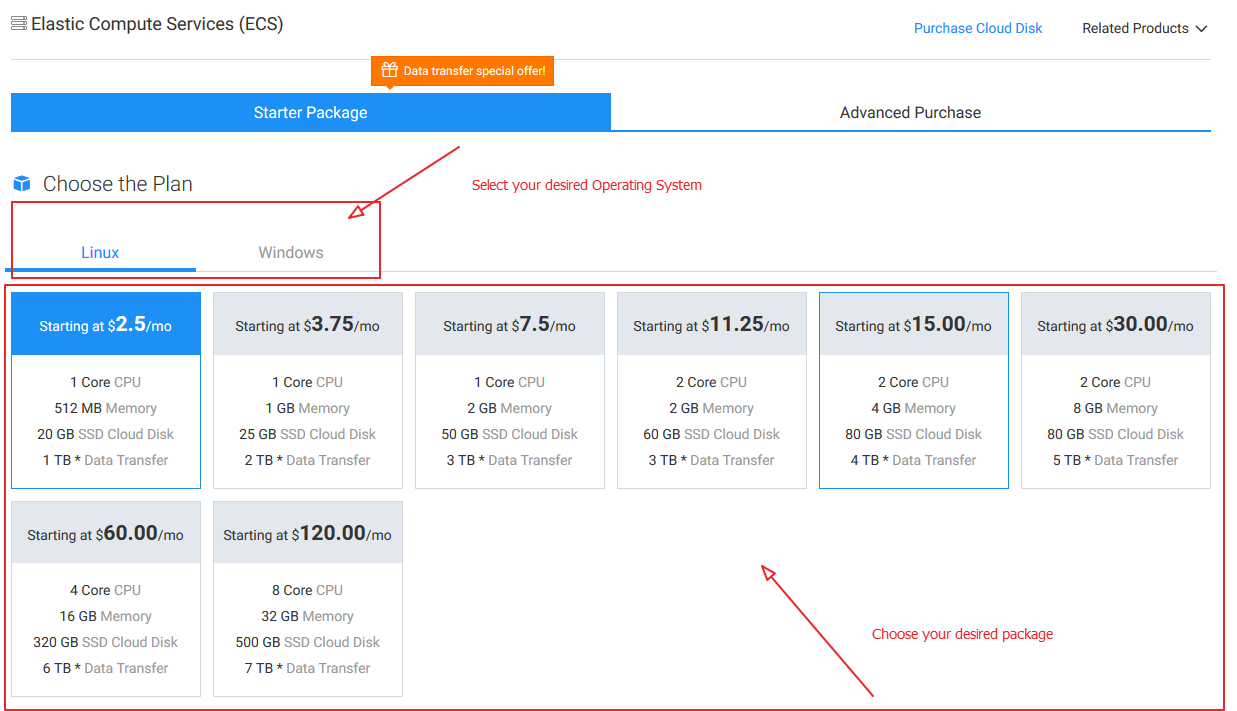
Step 5: Now, you will be redirected to the following detailed page for selecting OS and required server specifications as shown below.
Step 6: Next, Alibaba Cloud allows you to choose your desired data center region from 14 data centers globally, as shown in the image below. Select as per your requirements and scroll down the page.
Note: The location of the IP address assigned to your ECS will be according to the selected data center region. For example, if you need a Chinese IP address, you must buy ECS in the Chinese data center region.

Step 7: On the next screen, you can review the detailed specifications of the operating system. Alibaba Cloud allows you to choose different versions of Ubuntu, SUSE Linux, FreeBSD, Debian, CentOS and Aliyun Linux in the Linux OS category, while in Windows OS option, it offers MS Windows Server 2008 to MS Windows Server 2012 (English and Chinese versions).
Note: Once you have purchased the server, you can change Linux versions, but cannot convert Linux server into Windows server and vice versa.

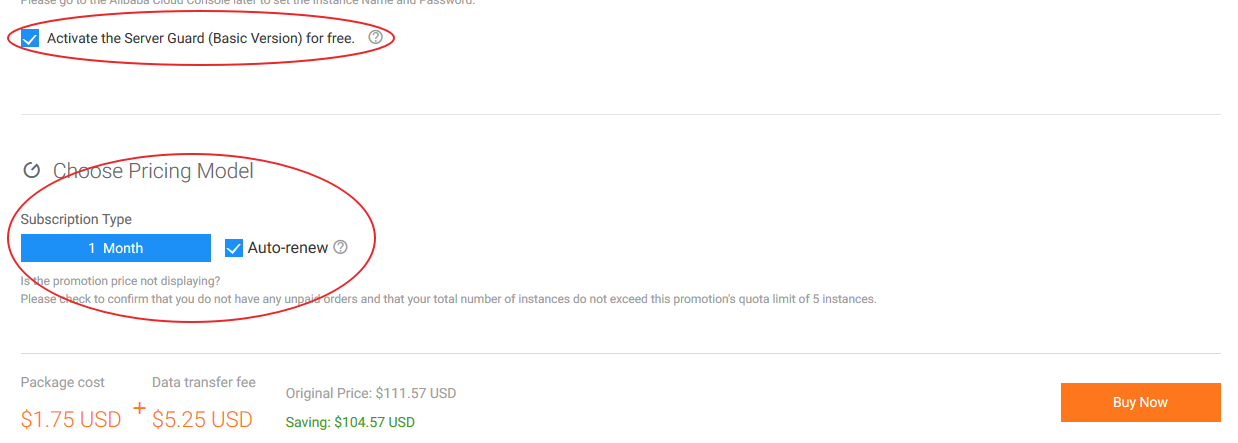
Step 8: Now, if you wish to add Server Guard to enhance security, you may activate it for FREE by clicking a check-box option as shown in the image below. Next, choose the pricing model for either 1 month or 1 year according to your requirements and tick the check-box if you wish to enable auto-renewal on expiration to avoid any data loss. Once you have selected all the required options, click the Buy Now button.
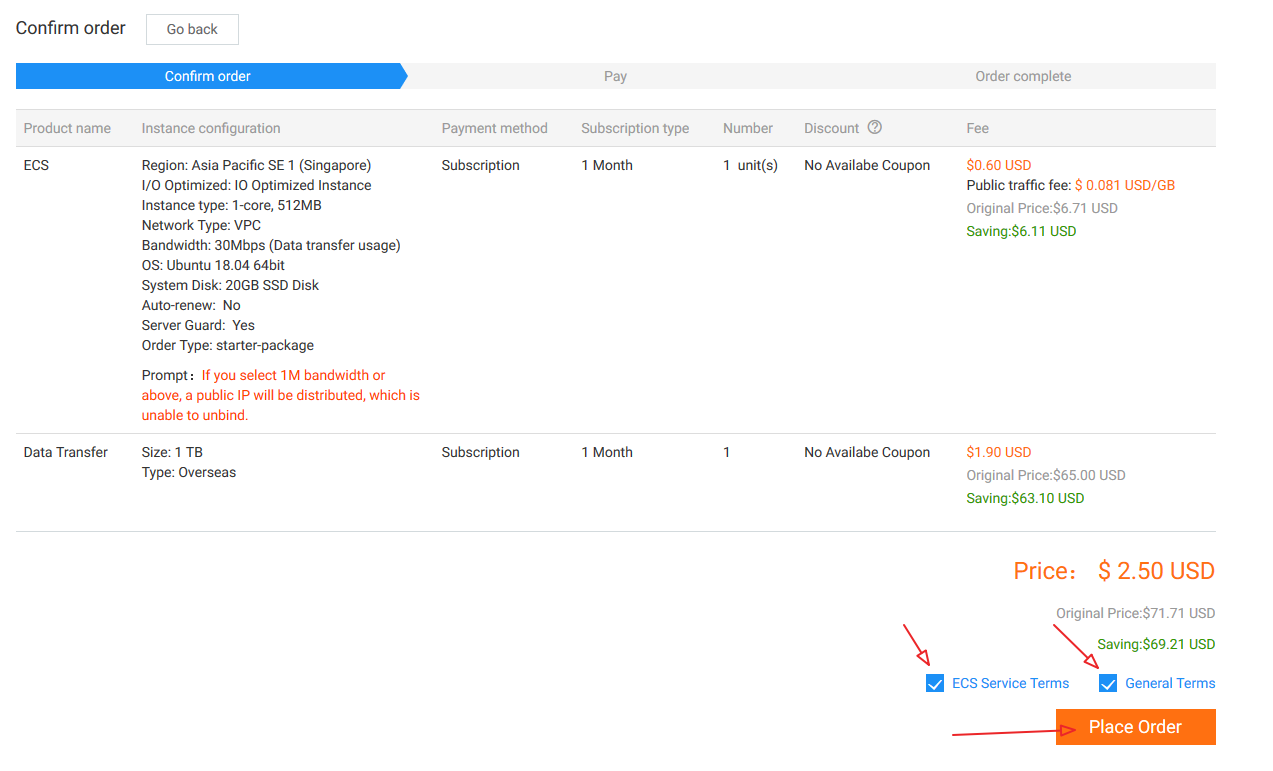
Step 9: On the following screen, you can mark tick the check-boxes to agree on general terms and ECS service terms and then click the Place Order button to proceed for payment.
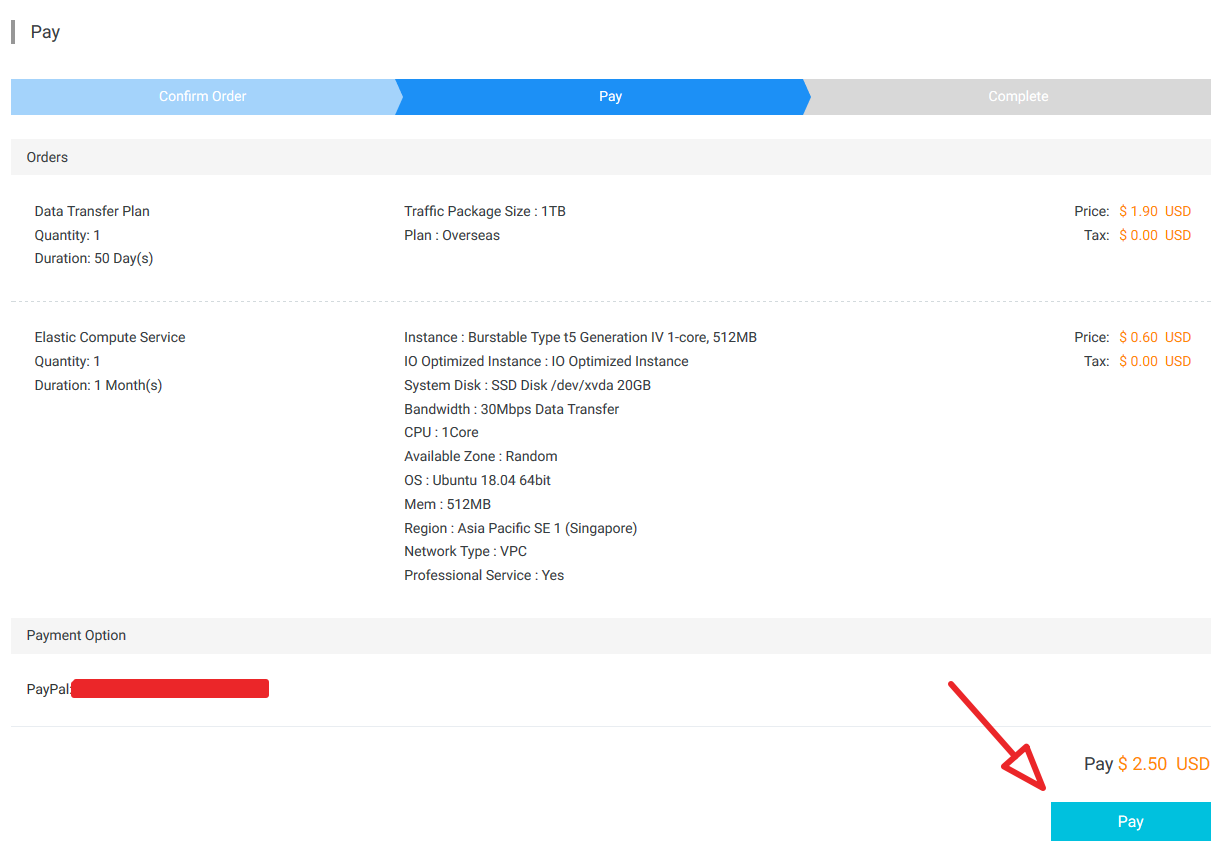
Step 10: Once you click the Place Order button, you will be redirected to make payment depending on your selected payment method. Alibaba Cloud supports credit cards, debit cards, and PayPal as payment methods.
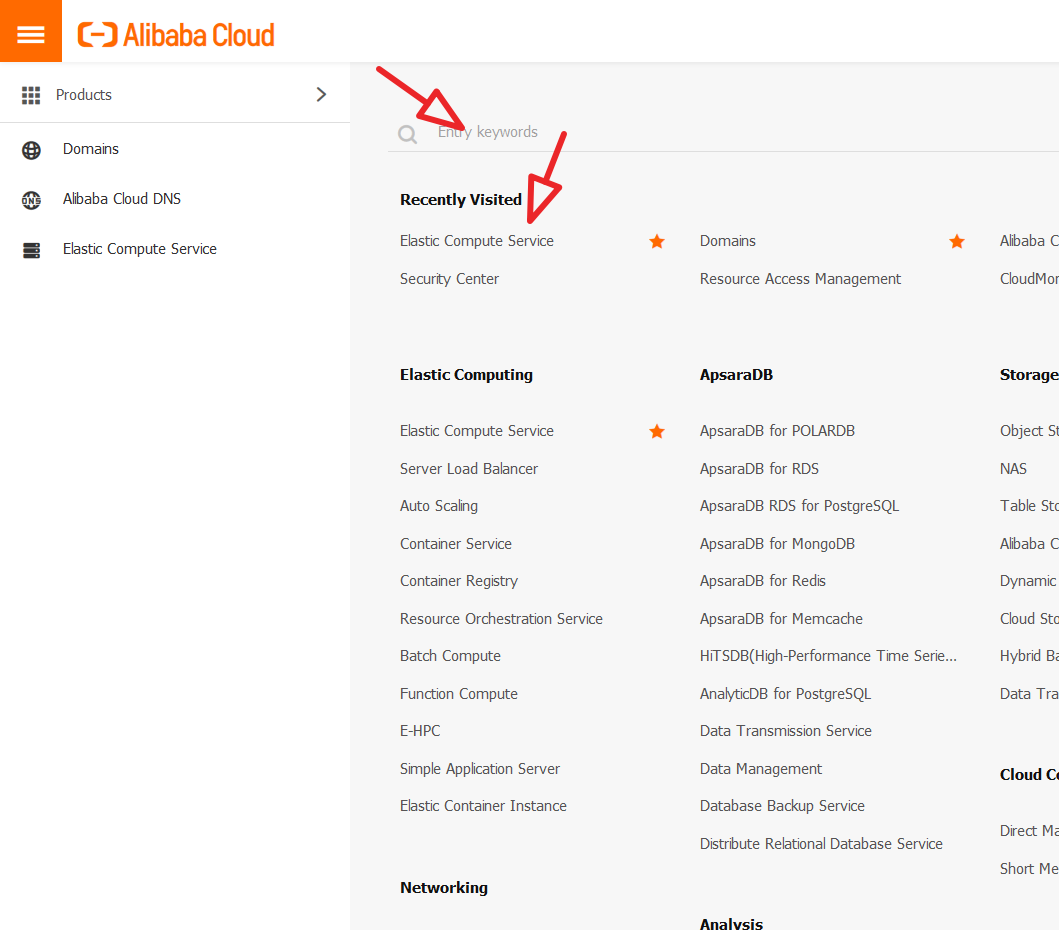
Step 11: Once payment is successfully processed, you can navigate to the account Console and select Elastic Compute Service from the sidebar menu. If you are an existing user, you might see the Recently Visited area, else, you may directly search using keywords via the search box on top of the page.
Step 11.a: After you select the Elastic Compute Service, You will be redirected to the ECS dashboard, where you can access the list of data center regions and number of instances you have bought along with their status.
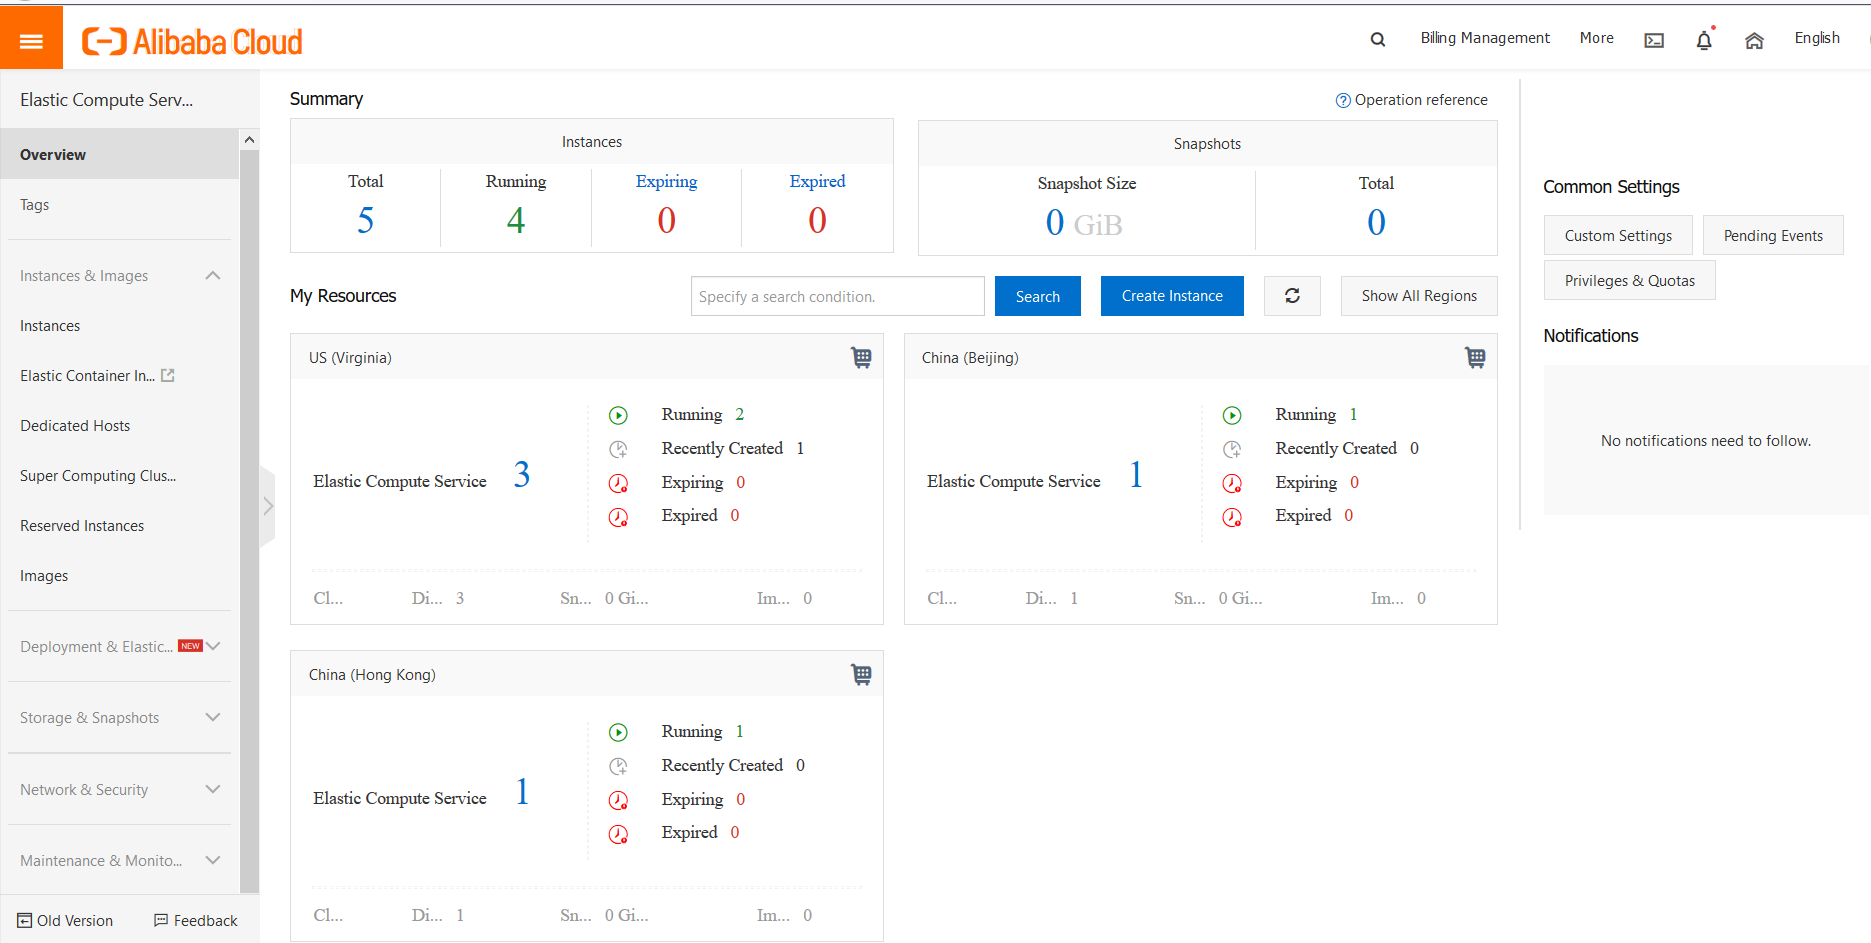
Step 11.b: You can click on your selected region to see the list of purchased instances in that region.
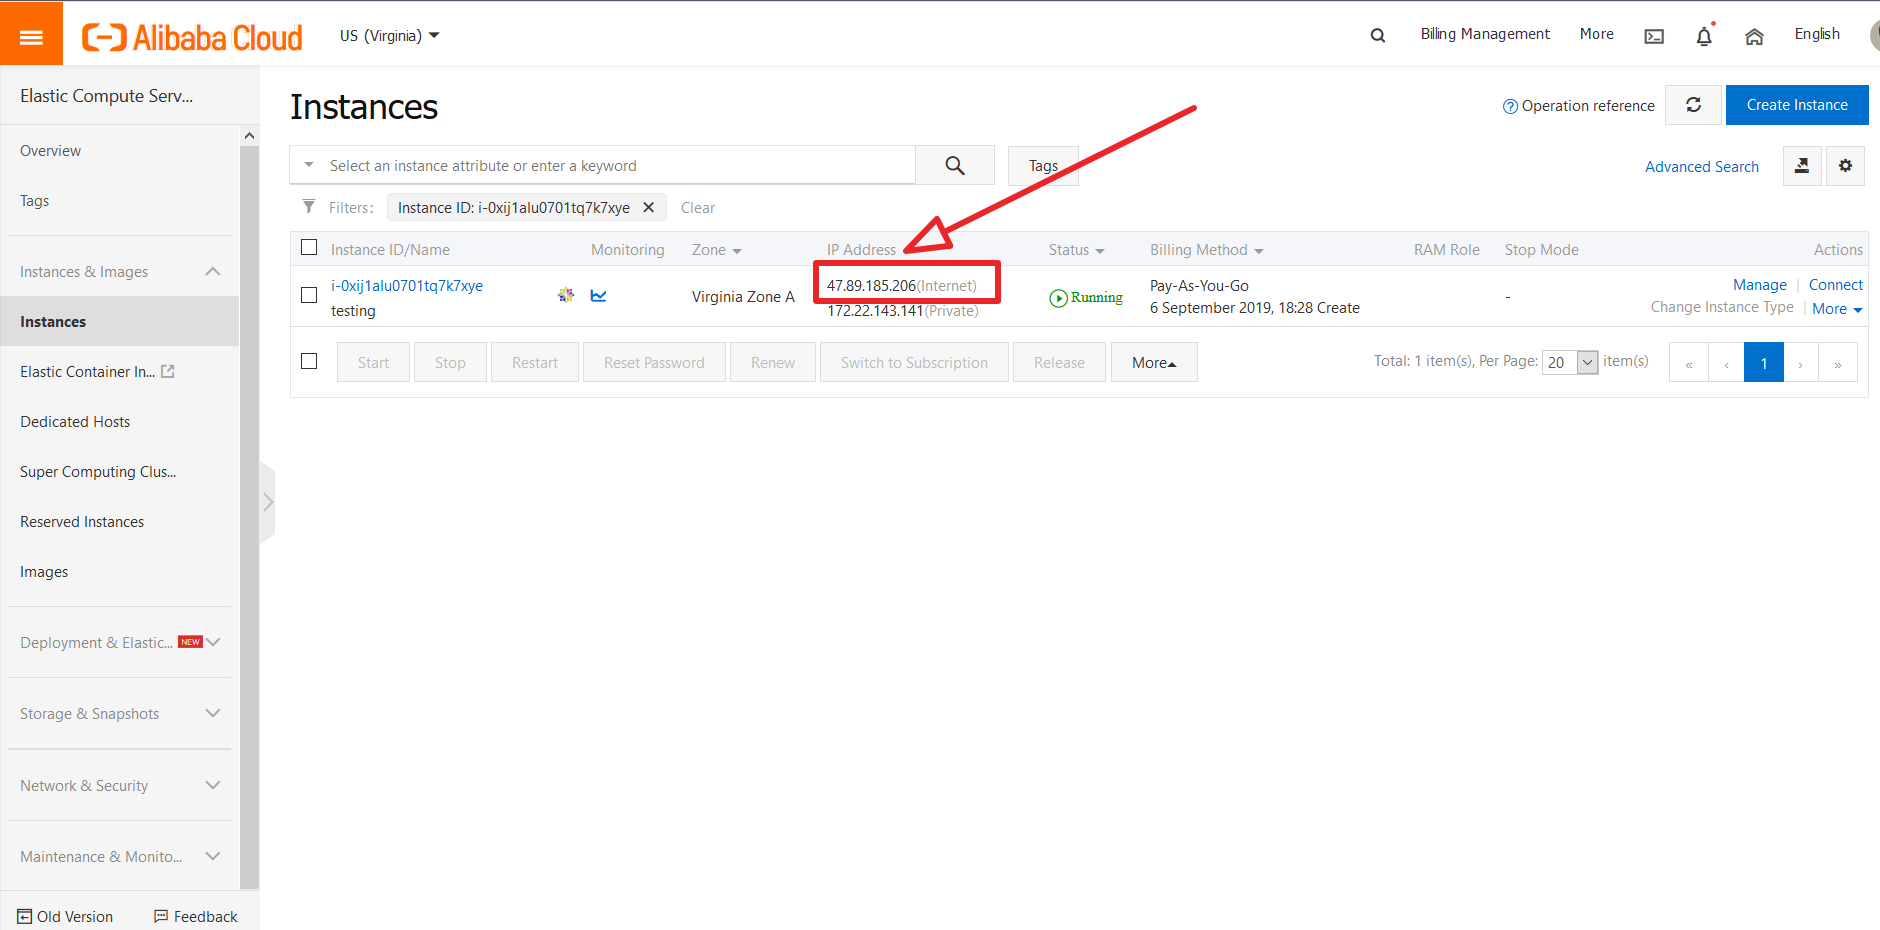
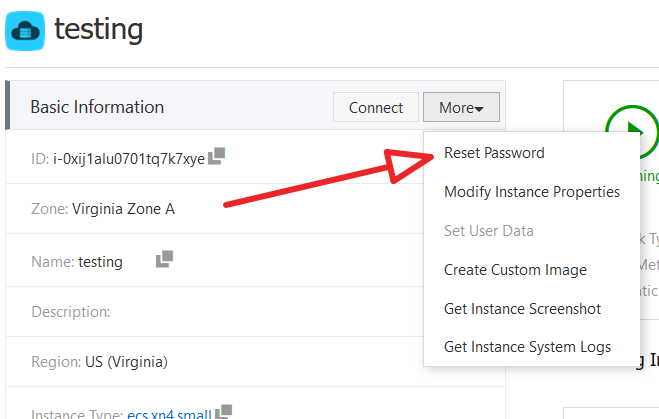
Furthermore, to set up the password for your ECS instance, click Manage. Now click More and then select Reset Password from the drop-down menu as shown below.

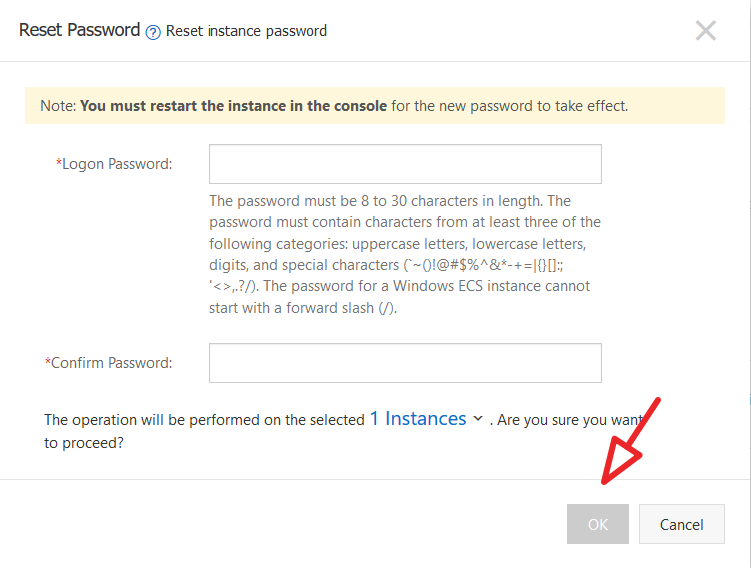
Now, type a new password and click OK to reset the password.
Note: The following part of this tutorial is specific for CentOS. You may use any OS of your choice but make a note that the steps will be different for various OS.
PuTTy is an SSH client to access the Linux server via command line to execute different commands for installing and configuring various apps.
Once you launch PuTTy, you will see the screen below.
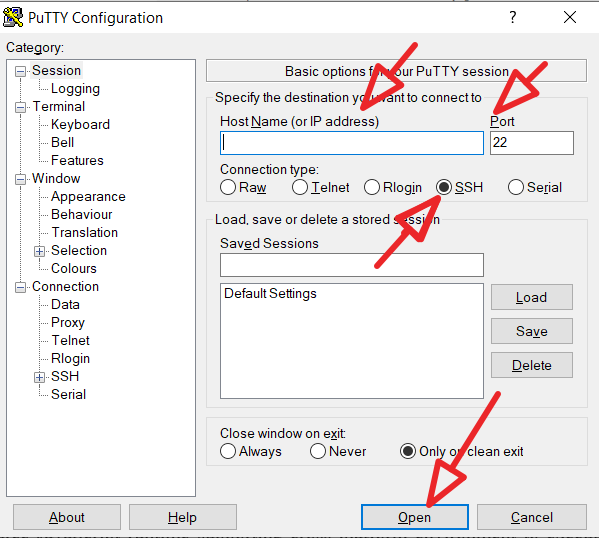
Step1: Write your ECS IP address, Add port 22 (specific for SSH), choose the connection type as SSH and click Open. You will see the following screen.
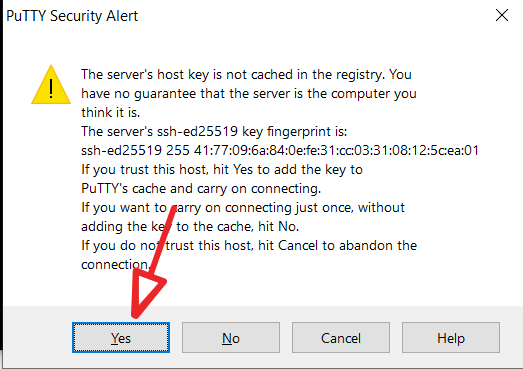
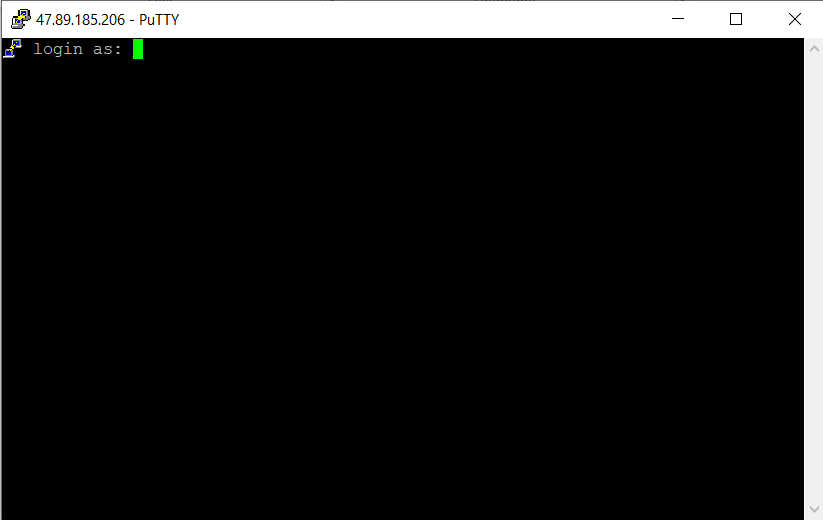
Step 2: On clicking Yes, you will see the command prompt screen, where, you need to type username as root and password will be the same as you reset in the previous step for resetting the password.
Before proceeding with installation, it is recommended that you update CentOS packages using the command - $ yum -y update
Node.js is an open-source JavaScript runtime supporting cross-platform environment to execute JS code outside the browser. It follows a non-blocking IO and event-driven model. It allows running JS on the server-side and helps in building scalable network applications. Node.js does not employ any locks hence, there are no deadlocks. Although, it does not use threads but still supports multicore. It's lightweight with enhanced rendering performance and is utilized in gaming, realtime, utilities and web applications.
There are two popular ways to install Node.js. The first method allows you to install only a single version and the other allows to install multiple versions of Node.js.
Follow the steps listed below to execute a single version installation of Node.js:
Step 1: Download the binary package by executing the following command. The binary package already contains npm and node files.
$ wget https://nodejs.org/dist/v6.9.5/node-v6.9.5-linux-x64.tar.xzStep 2: Now decompress the downloaded file by executing the command mentioned below.
$ tar xvf node-v6.9.5-linux-x64.tar.xzStep 3: To run npm and node commands directly from command line, you have to create soft links or symlink by executing the commands below:
$ ln -s /root/node-v6.9.5-linux-x64/bin/node /usr/local/bin/node
$ ln -s /root/node-v6.9.5-linux-x64/bin/npm /usr/local/bin/npm
Step 4:To check if node and npm are working fine, you may execute the following commands and verify the current installed version of node and npm.
$ node -v
$ npm -v
Step 5: By default, node and npm are installed in /root/node-v6.9.5-linux-x64/. However, to change the installation directory for example /opt/node, you may execute the following commands:
$ mkdir -p /opt/node/$ mv /root/node-v6.9.5-linux-x64/* /opt/node/$ rm -f /usr/local/bin/node
$ rm -f /usr/local/bin/npm$ ln -s /opt/node/bin/node /usr/local/bin/node
$ ln -s /opt/node/bin/npm /usr/local/bin/npmTo install multiple node.js versions simultaneously, you can use NVM for installation. NVM helps in managing multiple versions of node.js. Developers need multiple versions mostly to develop new apps and maintain existing apps. Follow the steps below to install multiple versions of Node JS:
Step 1: NVM is required for the multi-version installation of NodeJS. To install NVM, you need to install Git for cloning NVM from Github easily. To install Git, execute the command below:
$ yum install -y gitStep 2: Now clone NVM to your ECS's local directory at ~/.nvm path by executing the following command:
$ git clone https://github.com/cnpm/nvm.git ~/.nvm && cd ~/.nvm && git checkout `git describe --abbrev=0 --tags`Step 3: Don't forget to activate NVM before using it by executing the commands below.
$ echo ". ~/.nvm/nvm.sh" >> /etc/profile
$ source /etc/profile
Step 4:You can retrieve a list of all Node JS versions by executing the command below.
$ nvm list-remoteStep 5: To install the available version, you need to follow the format of the command given below. Where v6.9.5 can be replaced with other versions respectively. For multiple versions, you may execute the below command multiple times, each time by changing the version number.
$ nvm install v6.9.5Step 6: You can check the installed Node JS versions by executing the command below.
$ nvm lsStep 7: To switch between multiple versions of Node.js, execute the command below by changing the "v6.9.5" to another version.
$ nvm use v6.9.5To check whether Node.js is correctly installed, deploy a test project by following the steps below:
Step 1: Create a new file named index.js using the command below.
$ cd ~
$ touch index.js
Step 2: To edit the project file, you will require a text editor. You can install a nano editor by executing the following command:
$ yum install -y nanoStep 3: Now open the index.js file in the nano editor by using the command below.
$ nano index.jsStep 4: Copy the code snippet given below in the open file and save the updated file by pressing Ctrl + x and then type y and hit the enter key.
const http = require('http');
const hostname = '0.0.0.0;
const port = 80;
const server = http.createServer((req, res) => {
    res.statusCode = 200;
    res.setHeader('Content-Type', 'text/plain');
    res.end('Hello Alibaba Cloud\n');
});

server.listen(port, hostname, () => {
    console.log(`Server running at http://${hostname}:${port}/`);
});
Step 5: Now you can run the project by running the following command:
$ node ~/index.js &Note: In the above code, port 80 (open by default) is used. If you are using port 80, you may skip all steps below and jump to the conclusion. In case, you want to use port 3000, then follow the steps below.
Step 6: By default, node.js operates on port 3000. To check if the required port is open or not, execute the command below.
$ netstat -tplnYou will get the result as shown below.

By default, port 3000 is closed, hence, you need to open it. If the port is already open, you can skip this step.
By default, the port 3000 is blocked by the firewalls and to enable it you have to define a rule in Alibaba Cloud security group for your cloud server by adding an exception for port 3000. Follow the instructions mentioned below:
1. Go to your Elastic Compute Service section
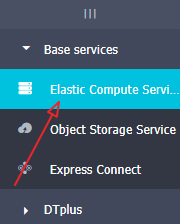
2. Click on more button next to ECS tab
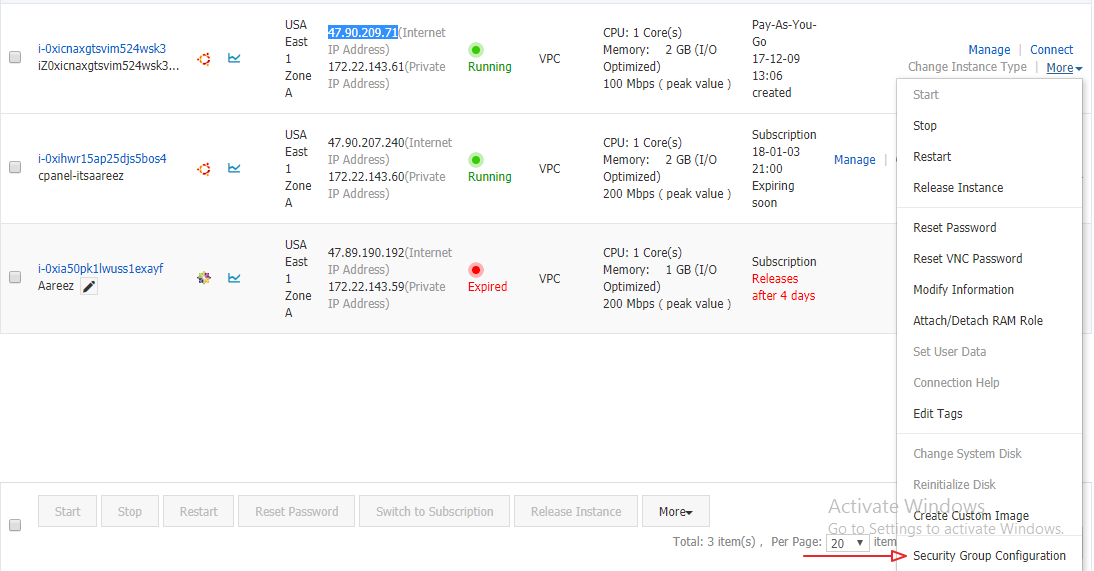
3. Click on Configure Rules

4. Click on Quickly Create Rules

5. Add the configurations for port TCP 3000 as shown in the screenshot below and click OK.
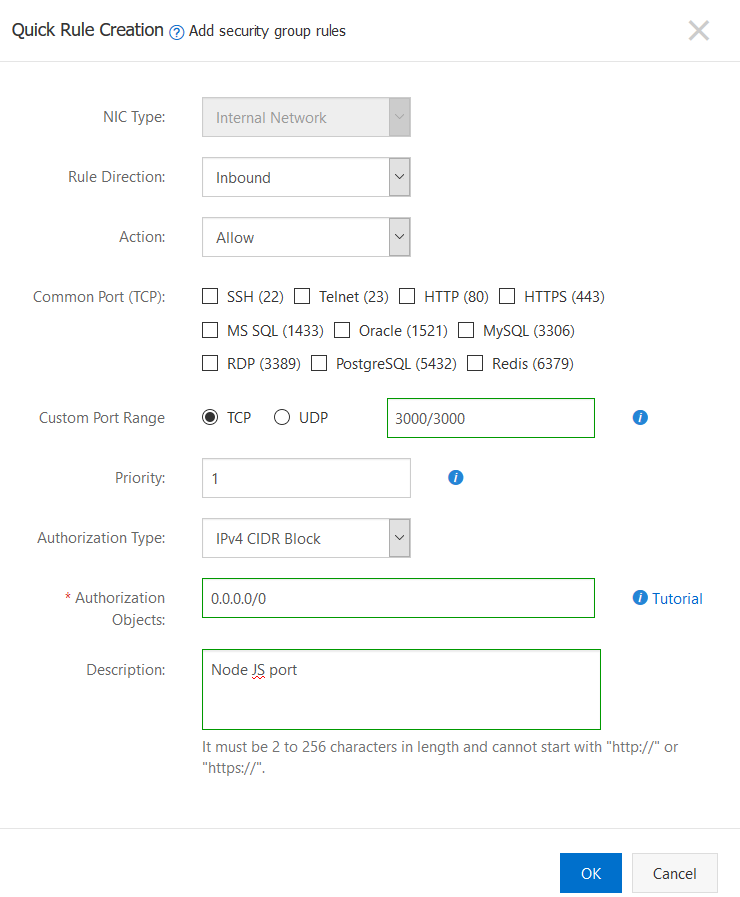
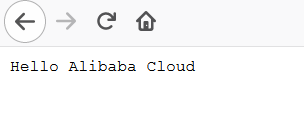
You have successfully deployed Node JS on SSD Cloud Server by Alibaba Cloud. To confirm installation, you can open your browser and navigate to http://IP_Address in case of port 80, and http://<IPaddress>:3000 in case of port 3000, to get the following output.

2,598 posts | 769 followers
FollowAlibaba Clouder - August 13, 2020
Alibaba Clouder - November 15, 2019
Alibaba Cloud Indonesia - October 25, 2022
Alibaba Clouder - September 16, 2019
Alibaba Clouder - May 5, 2019
Alibaba Clouder - November 14, 2017

2,598 posts | 769 followers
FollowLearn More
 ECS(Elastic Compute Service)
Elastic and secure virtual cloud servers to cater all your cloud hosting needs.
Learn More OSS(Object Storage Service)
An encrypted and secure cloud storage service which stores, processes and accesses massive amounts of data from anywhere in the world
Learn MoreMore Posts by Alibaba Clouder