By Kati Frantz, Alibaba Cloud Tech Share Author. Tech Share is Alibaba Cloud's incentive program to encourage the sharing of technical knowledge and best practices within the cloud community.
Nowadays, modern web applications can be accessed from multiple locations, such as from the web, through mobile apps, or even progressive web applications. To be able to support all these platforms, web applications have to be developed in a specific way.
In this tutorial, we'll build a REST API backend and frontend using React and the Adonis Node.js framework on Alibaba Cloud.
Adonis is a Node.js framework that we can use to build scalable, stable and efficient web applications and REST APIs. Using React, we'll build a modern and robust front-end web application to consume the REST API built with Adonis.
The web application that we are going to build will store events in a MySQL database, read these events and delete them.
When you're finished, you'll be able to:
Before you begin this guide you'll need the following:
In this step, we'll install the Adonis CLI that will help us scaffold Adonis projects, and also install dependencies needed to set up a database connection for our application.
Open up your terminal and run the following command to install the Adonis.js CLI globally:
npm i -g @adonisjs/cliOnce this is done installing, you should be able to run adonis from anywhere in your terminal. You can try this out by running the following command to check the version of the CLI you have installed:
adonis --versionNext, we need to scaffold a new Adonis application. Navigate to the directory of your choice and run the following command:
adonis new adonis-events --api-onlyThe new command scaffolds a new project called adonis-events, and the --api-only specifies that the generated project should specifically be for a REST API. The new command also installs all the npm dependencies needed for our new project.
The generated project should have a structure like this:
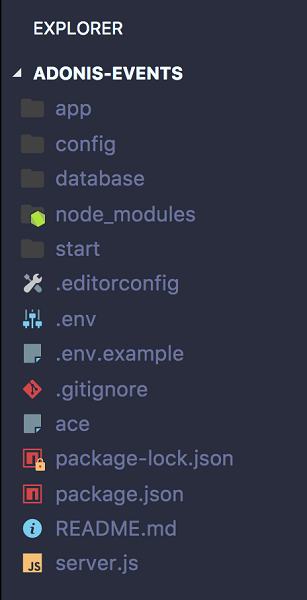
Next, we need to set up our database connection. Adonis supports many SQL databases out of the box, but we need to install a package for the specific database we'll be using, in this case, MySQL. Navigate into your project folder and run the following command:
npm i --save mysqlIn our project, the file called .env contains different environment variables for configuring our application. Make sure the database connection is set to mysql as such:
[~/adonis-events/.env]
...
DB_CONNECTION=mysql
...
Finally, we need to create a MySQL database locally to be used in this project. If you have MySQL installed locally then you can run the following commands to create a database:
mysql -u rootmysql> CREATE DATABASE events;After creating a new database, update the credentials in your .env file to match the database you created.
[~/adonis-events/.env]
...
DB_CONNECTION=mysql
DB_USERNAME=root
DB_DATABASE=events
DB_PASSWORD=
...
Once this is done, we can proceed to create the REST API and React frontend.
In this step, we are going to create the front-end of our application using React. We'll use a popular package called create-react-app to quickly scaffold a React application, without having to worry about webpack configurations and production build processes. If you don't have create-react-app installed locally, run the following command:
npm i -g create-react-appOnce you have it installed, navigate to a new folder, and run the following command to create a new React project:
create-react-app adonis-events-reactThe newly generated React project structure looks like this:
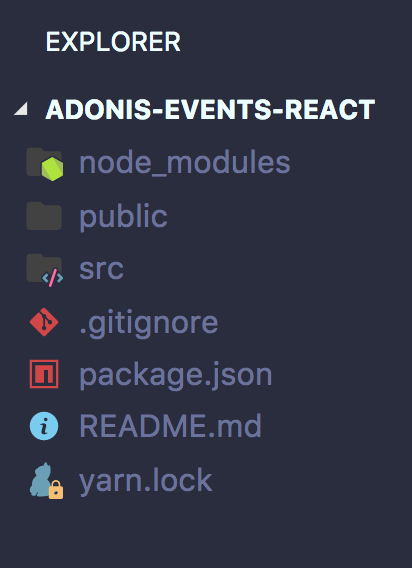
To start the newly created React project, navigate into the React project directory and run the following command:
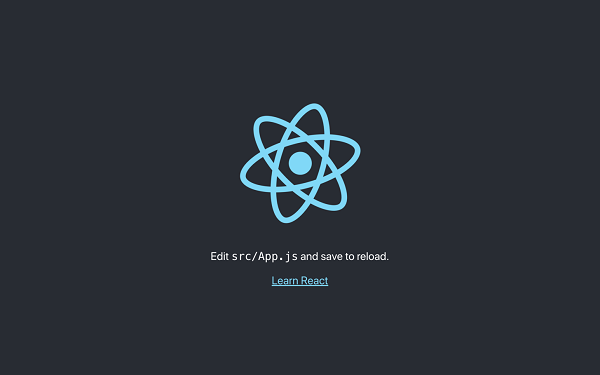
npm startThis starts a development server, and should open the React application in your default browser that looks like this:
Finally, let's install the bootstrap CSS framework for basic styling.
In the React project, go into the src folder and open the index.css file. Replace the content of this file with the following:
[~/adonis-events-react/src/index.css]
@import 'https://maxcdn.bootstrapcdn.com/bootstrap/4.0.0/css/bootstrap.min.css';
The above imports a link to the bootstrap CSS file, which includes all its styles and classes we can use to rapidly style our frontend project.
Now that we have our frontend application setup, let's develop our database model and migrations.
In this step, we'll set up our migrations, which decide how our database tables would be structured, and also set up our model, which would help us interact with this database table.
First, navigate to the Adonis application in your terminal and run the following command:
adonis make:model Event -mThis command is a quick way to create a model and it's corresponding migration. You'll receive the following output:
 create  app/Models/Event.js
 create  database/migrations/1541120387036_event_schema.js
Two files were created: app/Models/Event.js which looks like this:
'use strict'

const Model = use('Model')

class Event extends Model {
}

module.exports = Event
This is a basic ES6 class that extends a base Model class. As we'll see, this class has a lot of static methods that helps us easily interact with the database.
The second file is database/migrations/1541120387036_event_schema.js which looks like this:
'use strict'

const Schema = use('Schema')

class EventSchema extends Schema {
  up () {
    this.create('events', (table) => {
      table.increments()
      table.timestamps()
    })
  }

  down () {
    this.drop('events')
  }
}

module.exports = EventSchema
A migration in Adonis is an ES6 class that extends the base Schema class and contains two important methods: up, which is used to make changes to our database, which can include creating or altering database tables, and down which is used to reverse those changes. In the up function, we call methods provided by Adonis that describe the structure of our database table.
At the moment, the function this.create('events') in the up function will create the events table in our database. Also, the function this.drop('events') in the down will delete the events table in our database if we need to.
Our events table would have the following fields:
title - The title of the eventstart_date - The start date of the eventend_date - The end date of the eventlocation - The even locationprice - The cost of this eventWe'll define these fields in our migration as follows:
Next, we have to run this migration file, so that Adonis can affect these changes to our connected database.
Make sure you are in the project folder and run the following command to do so:
adonis migration:runYou should see the following output:
migrate: 1503250034279_user.js
migrate: 1503250034280_token.js
migrate: 1541120387036_event_schema.js
Database migrated successfully in 206 ms
When we run this command, Adonis reads each migration file and runs the up function in these files. Therefore at the moment, in our database, we have three newly created tables; users, tokens, and events. The first two are shipped by default with a new installation of Adonis.
With the database setup, we can proceed to create our REST API.
In this step we'll create the REST API. We'll create several API endpoints to handle different actions on events. The endpoints we'll have are:
[POST] /api/events create events[DELETE] /api/events/:id delete a specific event[GET] /api/events get a list of all events.Let's start by generating a controller for handling these endpoints. A controller is basically an ES6 class that contains methods in which we'll handle all business logic. Run the following command to do so:
adonis make:controller EventControllerYou should receive the following output:
> Select controller type For HTTP requests
 create  app/Controllers/Http/EventController.js
Next, we have to register the route that will handle this specific endpoint. Open the start/routes.js file and add the following:
The Route class has a static function called post, and this method registers a POST endpoint. The first parameter is the path, api/events and the second is the controller and method that will handle any request made to this endpoint. In this case, the store method in the EventController. This means we need to create this method. Add the following to your EventController:
Adonis injects an object called context, and this context contains a lot of functions and objects about the request, including the request and response objects. The request object contains all the information about the request. In our store method at the moment, we call the request.all() function and it returns all the data sent in the POST request. In this case, to create an event, we are expecting that the title, start_date, end_date, location and price are provided in the request data.
Next, we have to save this data to our database. To communicate with our database, specifically our events table, we'll use our model. Adonis automatically connects to the events table if we use the Event model.
We used the Event model, and called the create function. This automatically saves a new row to the events database table using the data we got from the POST request. This function returns the newly created event, and we return a JSON response with this event.
Note: The use function in Adonis is a wrapper around the Node.js require function. It uses namespaces and helps us easily require files as we did above. So instead of require('../../../Models/Event.js'), we simply write `use('App/Models/Event')
Let's try out the /POST endpoint we just implemented. To do that, we need to run our Adonis API.
Run the adonis server using the following command:
adonis serve --devinfo: serving app on http://127.0.0.1:3333To try out the newly created POST /api/events endpoint, we can use any REST client of our choice. I'll use POSTMAN in this case.
Here's the result of the operation:
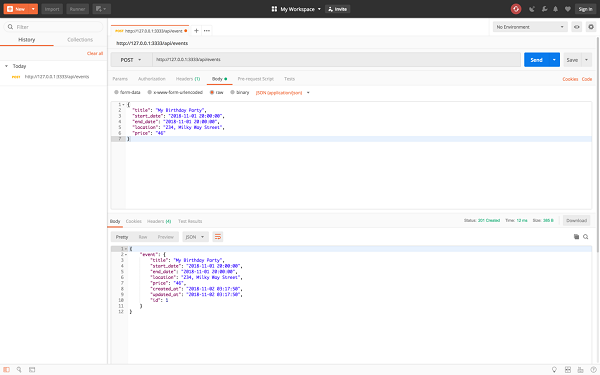
Note: Don't forget to set Content-type to application/json on POSTMAN.
Let's add a route for this endpoint. In our routes.js file, add the following:
[~/adonis-events/start/routes.js]

Route.get(api/events', 'EventController.index')
This maps the endpoint to the index method in our EventController. In this controller, let's add the following:
The index method fetches all database rows from the events table using the all() function on the Event model. Trying it out on POSTMAN should yield the following result:
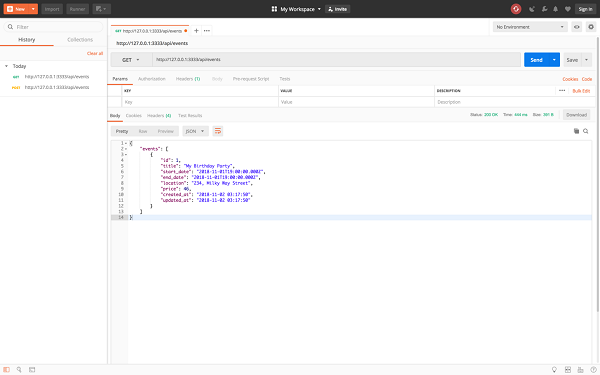
The final endpoint we have to implement is for deleting an event. This endpoint is a little different from the others we have had so far because it uses a dynamic parameter. Let's register the route for this endpoint:
[~/adonis-events/start/routes.js]

Route.delete(api/events/:id', 'EventController.delete')
The :id in the route is a dynamic parameter, and we can pass the specific id of the event we wish to delete. We match this route to the delete method in the EventController.
In the delete method, we find the event using the dynamic id we get from the route, and call the delete function on the found event. Here's how a test looks on POSTMAN:
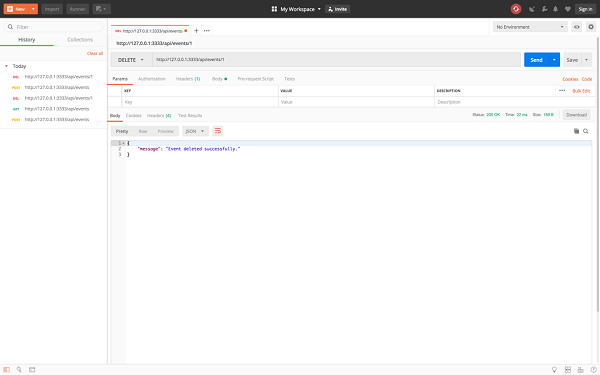
That's it! That's how easy it is to create a fully functional API with Adonis. One more thing before we switch to the frontend. At the moment, the Adonis API will not permit requests coming from another server or domain. This is called CORS protection, and is really important, to make sure unauthorized requests are not made to our API. In this specific case, we have to tell Adonis to authorize the React frontend to make API requests. To do this, Adonis has a configuration file already set, so we can modify the application CORS settings. Navigate to config/cors.js and modify this file as such:
[~/adonis-events/config/cors.js]

  origin: ['http://localhost:3000'],
Here, we create an array of all authorized origins, and all the domains listed in this array would be able to make API requests to the Adonis application. The domain of our client-side React development server is http://localhost:300, so we added this to the origin array.
Next step, let's switch to our React frontend and start consuming this data to build a robust client-side application.
The first component we'll be setting up is our App component. This is the component we see when we first visit our application. We'll also clean up all the other files we do not need:
And here's the current folder structure after deleting files not needed:
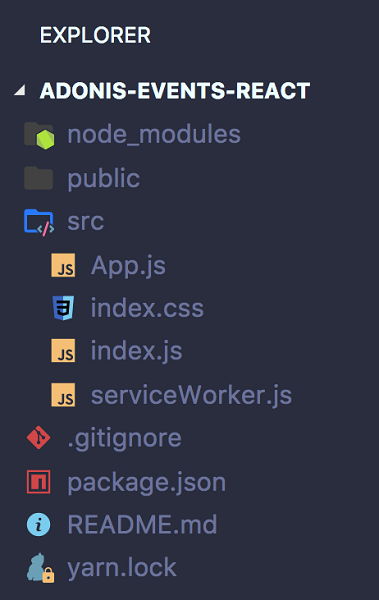
Next, let's create a component we'll use to represent a single event. Navigate into the project folder, and in the src folder, create a file called Event.js.
This component displays static data at the moment and represents the template for displaying a single event.
Finally, create another file called AddEvent.js. this will serve as the form for adding a new event.
Now that we are done creating the components we need, let's create our API service, which will help us communicate with our API to perform event actions.
To be able to communicate with our Adonis API, we will be using a simple HTTP client. To install this client, navigate to your React project and run the following command:
npm install axios --saveOnce this is installed, create a file called apiService.js in the src folder and add the following class:
This class is a simple wrapper around axios and provides helper functions to make HTTP requests to our Adonis API. In the constructor, we set the baseURL for all requests to be the URL to our Adonis application.
Now that we have our service ready, let's start making these components functional.
To create an event, we'll have a Create Event Button. When the user clicks on this button, the component with the form for creating an event will be shown. Let's modify our App component as shown below:
Here's how it functions at the moment:
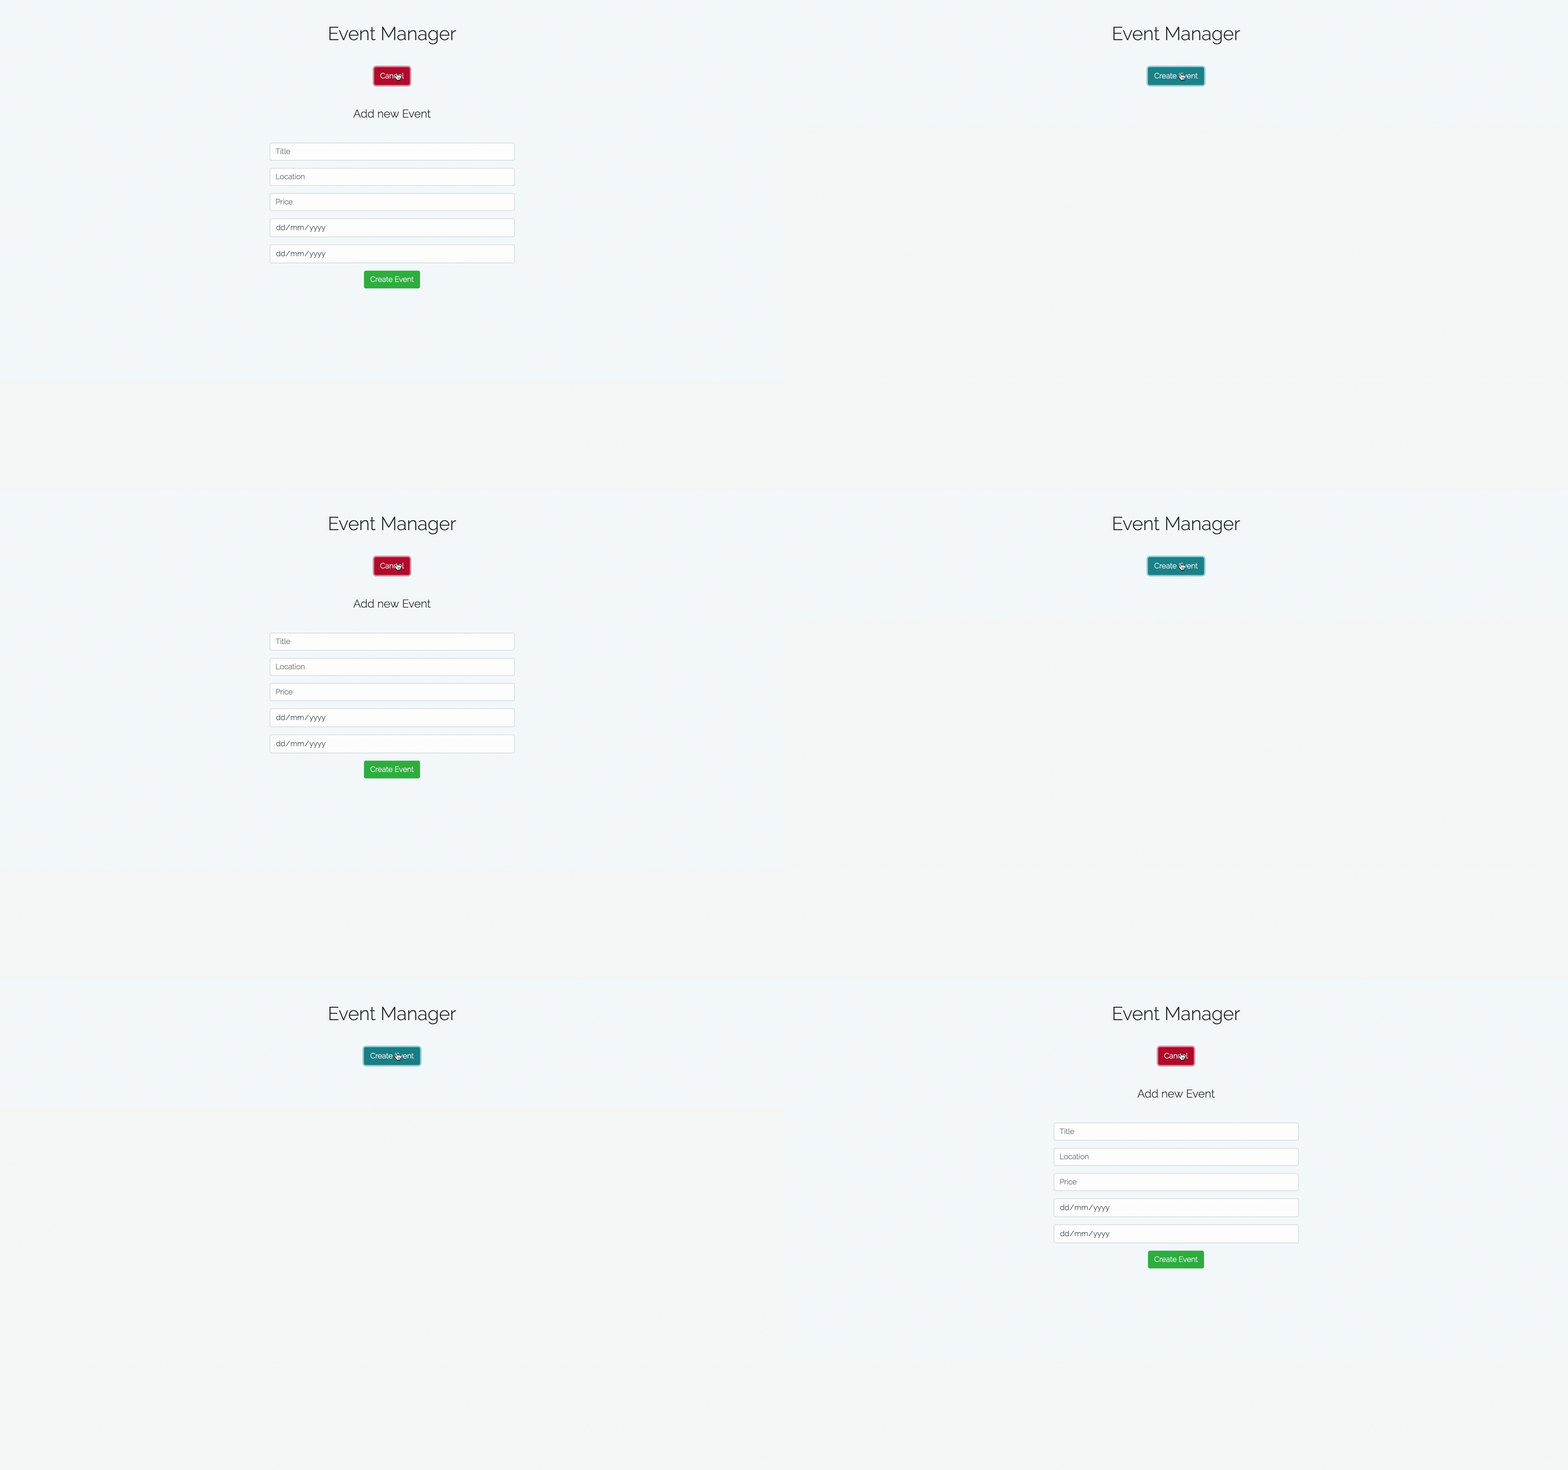
First, we imported the AddEvent component. We set up a state property called showCreateEventForm, and in the render function, if this property is true, then we mount the AddEvent component, otherwise, we don't. When the Create Event button is clicked, it toggles the value of this state property. Also, we dynamically add a btn-danger class to the Create Event button if showCreateEventForm is true, and btn-info if this property is false.
Our next step is to actually make this form work, so the user can put in details about the event and save it.
The first step is getting the input the user puts in. We'll use the state to manage this. Here's the updated version of the AddEvent.js component:
At this point, everytime an input field changes, it's value is automatically set to the state of this component.
At the moment, we are using the default browser date picker, and this doesn't have a time picker integrated. More to that, this date picker's behavior is very inconsistent across browsers. Therefore, for our start_date and end_date fields, we'll use a third party date picker called FlatPickr. To install this date picker, run the following command:
npm i --save react-flatpickrOnce installed, let's modify our form to this:
First, we import the FlatPickr component we installed. In place of the previous date inputs, we mount the FlatPickr and pass in a different handler called handleDateChange. This pretty much does the same thing and sets the values of start_date and end_date to the state when they change.
Now it's time to actually make the API request to save this event. To do this, we'll pass down a function from the App component, and when called, will save the event. Let's modify the App component to this:
Let's update our component to this:
First, we import the ApiService and create a new instance in the constructor of the App component. Then, we pass a prop to the AddEvent component called storeEvent which is a function from the apiService.
Next, we need to call this prop when the Create Event button in the AddEvent component is created.
When the Create Event button is clicked, it calls this.props.storeEvent() and passes in the state as a parameter. This function calls axios, which makes an HTTP request to save the event. If you check your developer tools to see outgoing HTTP requests, you should see the HTTP response from our Adonis server.
We won't be so sure that it was created until we see a list of all events, right? In the next step, we'll fetch and display a list of all events from the Adonis API.
To fetch all events, we'll make a [GET] request immediately the component mounts, and once we get results, we'll set these results to state and display them in our component. To achieve this, let's add a React lifecycle hook called componentDidMount. This function will be executed immediately the component is mounted.
First, we set a new state property called events to an empty array. Then, in the componentDidMount function, we make an api request to fetch all events, and once we get a response, we set the results to state. If you inspect your component state using a tool like React Dev tools at this point, you should see a list of all events.
The next step is to display this list of events on our component. We'll use the Event component we created for this. Let's modify the App component like this:
We map through each event and display a single Event in place. At the moment, you should see a corresponding list of events once your application is mounted.
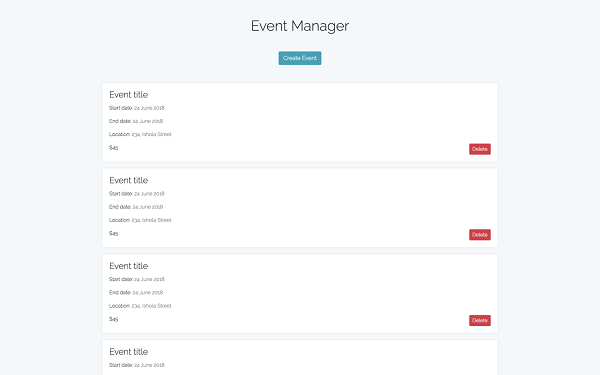
Our Event component is not dynamic yet. It should receive props for the specific event (passed from the App component), and display those instead. Let's modify it to support this behavior.
Now each event displays custom data passed down an event prop.
At the moment, when we create an event, nothing happens. For a better experience, we'll modify the App component so that it hides the AddEvent form, and also fetches all the events again, so the user can see the newly created Event.
First, we create a new function called fetchEvents, so we can reuse this function everytime we want to fetch events. Then we create a new function called storeEvent. This function calls the API to store a new event, and once it gets a response, it calls fetchEvents to get all events, and calls toggleShowCreateEventForm to hide the create event form.
Our final task is to be able to delete an event. We'll create a function that deletes an event on the App component, and pass this function as a prop to the Event component, and everytime a user clicks the delete button, this function will be called. Here's what the App component looks like:
The newly added function deleteEvent calls the API service, and once the event is deleted, it calls fetchEvents again, to fetch a fresh copy of all the events. Finally, in the Event component, we'll call this function with the id parameter. Modify the Event component as such:
Here's how the project works after making all changes:
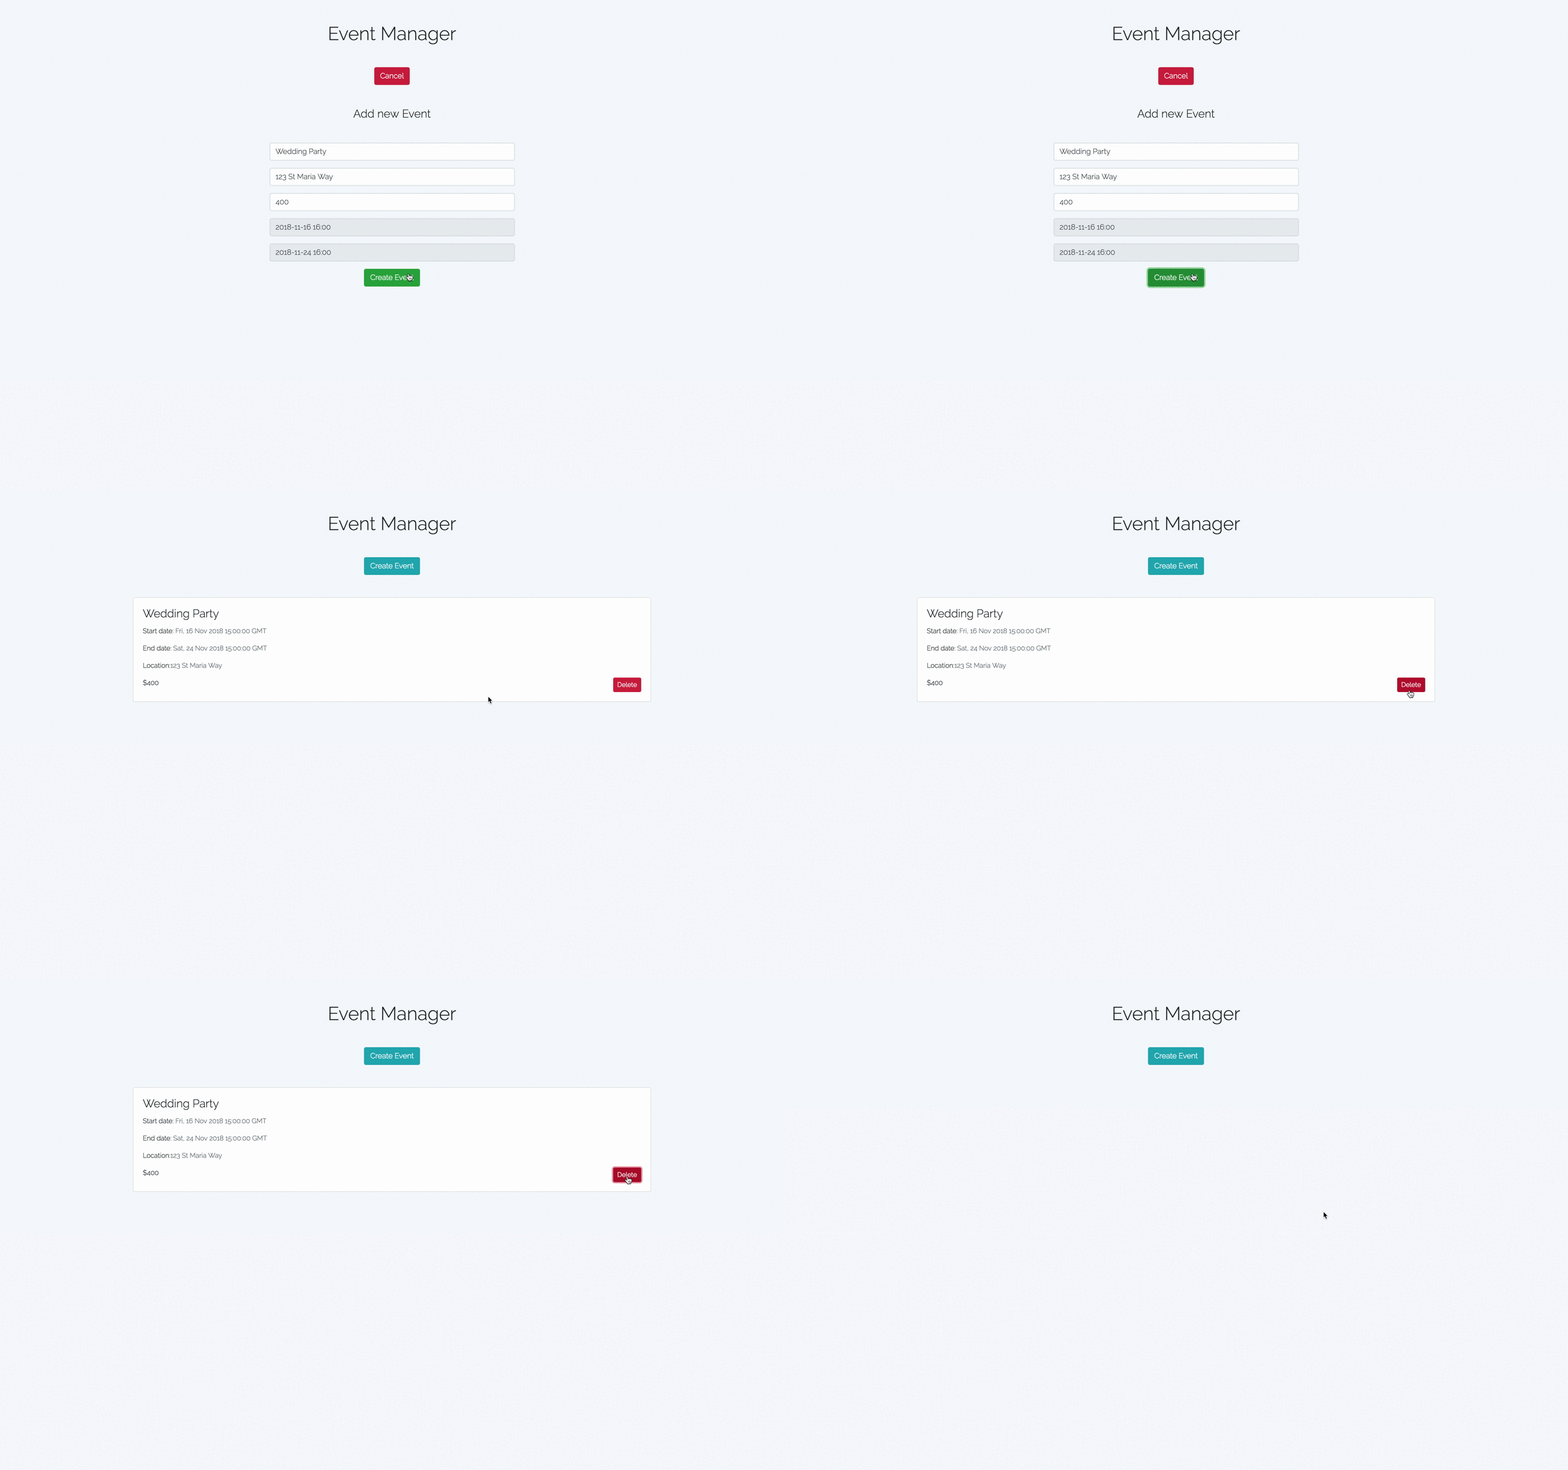
With this application completed, you now have the basis of a modern full-stack Javascript application which you can use as a reference for your real-world projects.
In this tutorial, we created a full-stack Javascript demo application with Adonis.js and React.js. We used Adonis.js to build the REST API, React to consume the API and Bootstrap 4 for styling the application. You can find the source code of the Adonis REST API on this GitHub repository and the source code of the React frontend application on this GitHub repository.
To learn more about the Adonis framework, the official documentation would be really helpful, and would also provide video tutorials you can follow.

2,593 posts | 775 followers
FollowAlibaba Clouder - June 23, 2020
SunLuyong - August 15, 2023
HaydenLiu - December 5, 2022
XianYu Tech - August 10, 2021
ApsaraDB - October 14, 2021
Neel_Shah - April 11, 2025
After reading the whole tutorial, I just realized that there are many missing pieces of codes everywhere. It sad, because it would have been a really great tutorial otherwise. It would be nice if you could fix it. Thank you!

2,593 posts | 775 followers
Follow ECS(Elastic Compute Service)
Elastic and secure virtual cloud servers to cater all your cloud hosting needs.
Learn More ApsaraDB for MongoDB
A secure, reliable, and elastically scalable cloud database service for automatic monitoring, backup, and recovery by time point
Learn More OSS(Object Storage Service)
An encrypted and secure cloud storage service which stores, processes and accesses massive amounts of data from anywhere in the world
Learn MoreMore Posts by Alibaba Clouder
Start building with 50+ products and up to 12 months usage for Elastic Compute Service
Get Started for Free Get Started for Free
5278071701813961 October 21, 2019 at 11:50 pm
Thank you, great tutorial!I noticed that you miss some code sample, after the following sentences: - Next, we have to register the route that will handle this specific endpoint. Open the start/routes.js file and add the following:- Add the following to your EventController:- This maps the endpoint to the index method in our EventController. In this controller, let's add the following:Cheers