
By Suce
Flutter is a UI framework that enables the rendering of a set of code on multiple terminals. It adopts a simple rendering pipeline design and provides a rendering engine. Therefore, it provides a better performance and user experience than React Native, Weex, WebView, and other solutions. This article describes the design and implementation of the Flutter rendering mechanism from the architecture and source code perspectives.
Cross-platform technologies show great vitality with improved capabilities resulting from one set of code for multiple terminals. Evolved from hybrid apps, React Native, Weex, applets, and fast apps to Flutter, cross-platform technologies strive to maximize the performance and user experience while improving efficiency. However, all cross-platform technologies face the following challenges:
All cross-platform technologies can solve the efficiency issue because efficiency is a basic feature of such technologies. However, it is difficult to solve the performance and user experience issues. The following three solutions are available for rendering:
Flutter adopts an implementation method similar to the native implementation method with its rendering engine and has excellent rendering performance.
Flutter has development tools, development language, virtual machine (VM), compilation mechanism, thread model, and rendering pipeline. Flutter is like a lightweight operating system (OS), similar to but less resource intensive than Android.
If you are using Flutter for the first time, you can watch the interview entitled, "What is Flutter?" with Eric Seidel, the founder of Flutter. He was previously dedicated to the design and development of the Chromium rendering pipeline. Flutter rendering has some similarities with Chromium rendering, and we will compare them later in this article.
Next, we will describe the design and implementation of the Flutter rendering mechanism from the architecture and source code perspectives. Before that, it would be great to take a look at the Flutter official document "How Flutter Renders Widgets?" This document uses videos, text, and graphics to help you gain a general understanding of the Flutter rendering mechanism.
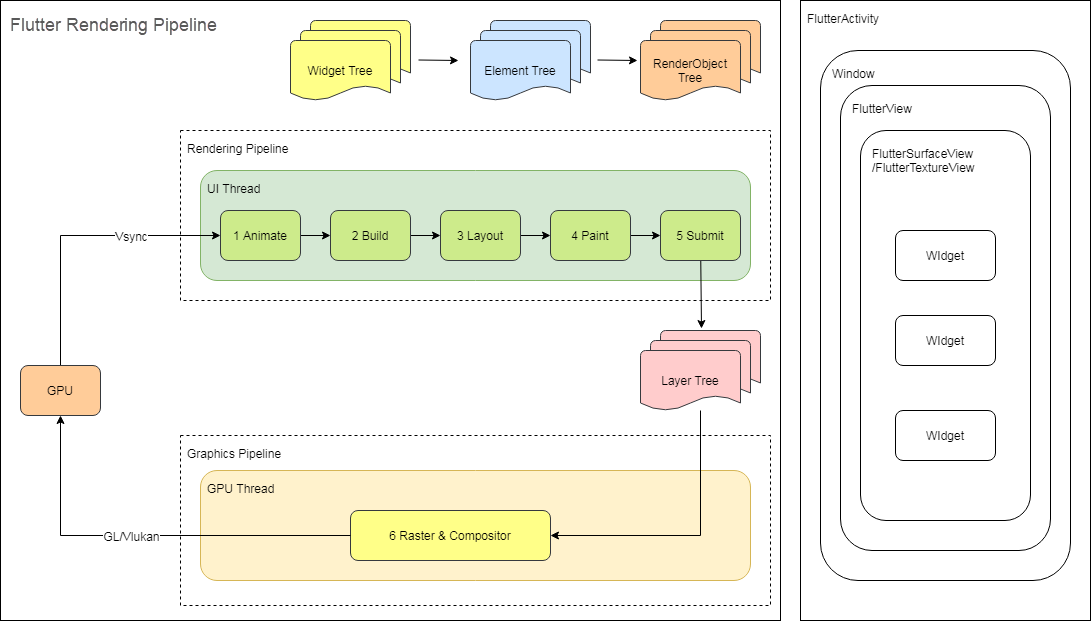
In the architecture, the UI thread and GPU thread perform the Flutter rendering.
1. The UI Thread
The UI thread performs steps 1 to 5 in the preceding architecture diagram. Specifically, it executes Dart code (including application code and the Flutter framework code) in the Dart VM. Then, it builds, lays out, and draws the Widget tree, Element tree, and RenderObject tree to generate drawing instructions and generates the Layer tree. The Layer tree stores the drawing instructions.
2. The GPU Thread
The GPU thread performs steps 6 and 7 in the preceding architecture diagram. It runs graphics-related code (Skia) in the Flutter engine, communicates with the GPU to obtain the Layer tree, rasterizes and composites the Layer tree, and displays the tree on the screen.
Note: Flutter uses the Layer tree to organize drawing instructions, which is similar to View DisplayList in Android rendering.
The UI thread functions as the producer, and the GPU thread functions as the consumer.
Rendering on Android is driven by VSync signals, and Flutter rendering on Android is no exception. Flutter registers with the Android system and waits for a VSync signal. When Flutter receives the VSync signal, Flutter calls rendering from the Dart framework through the C++ engine and the Java engine. The Dart framework runs Dart code and generates a Layer tree through the Layout, Paint, and other processes. Then, Flutter stores drawing instructions in the Layer tree and posts the rasterization task to the GPU thread. Then, the GPU thread rasterizes and composites the Layer tree and displays it on the screen.
The following figure shows the detailed process:
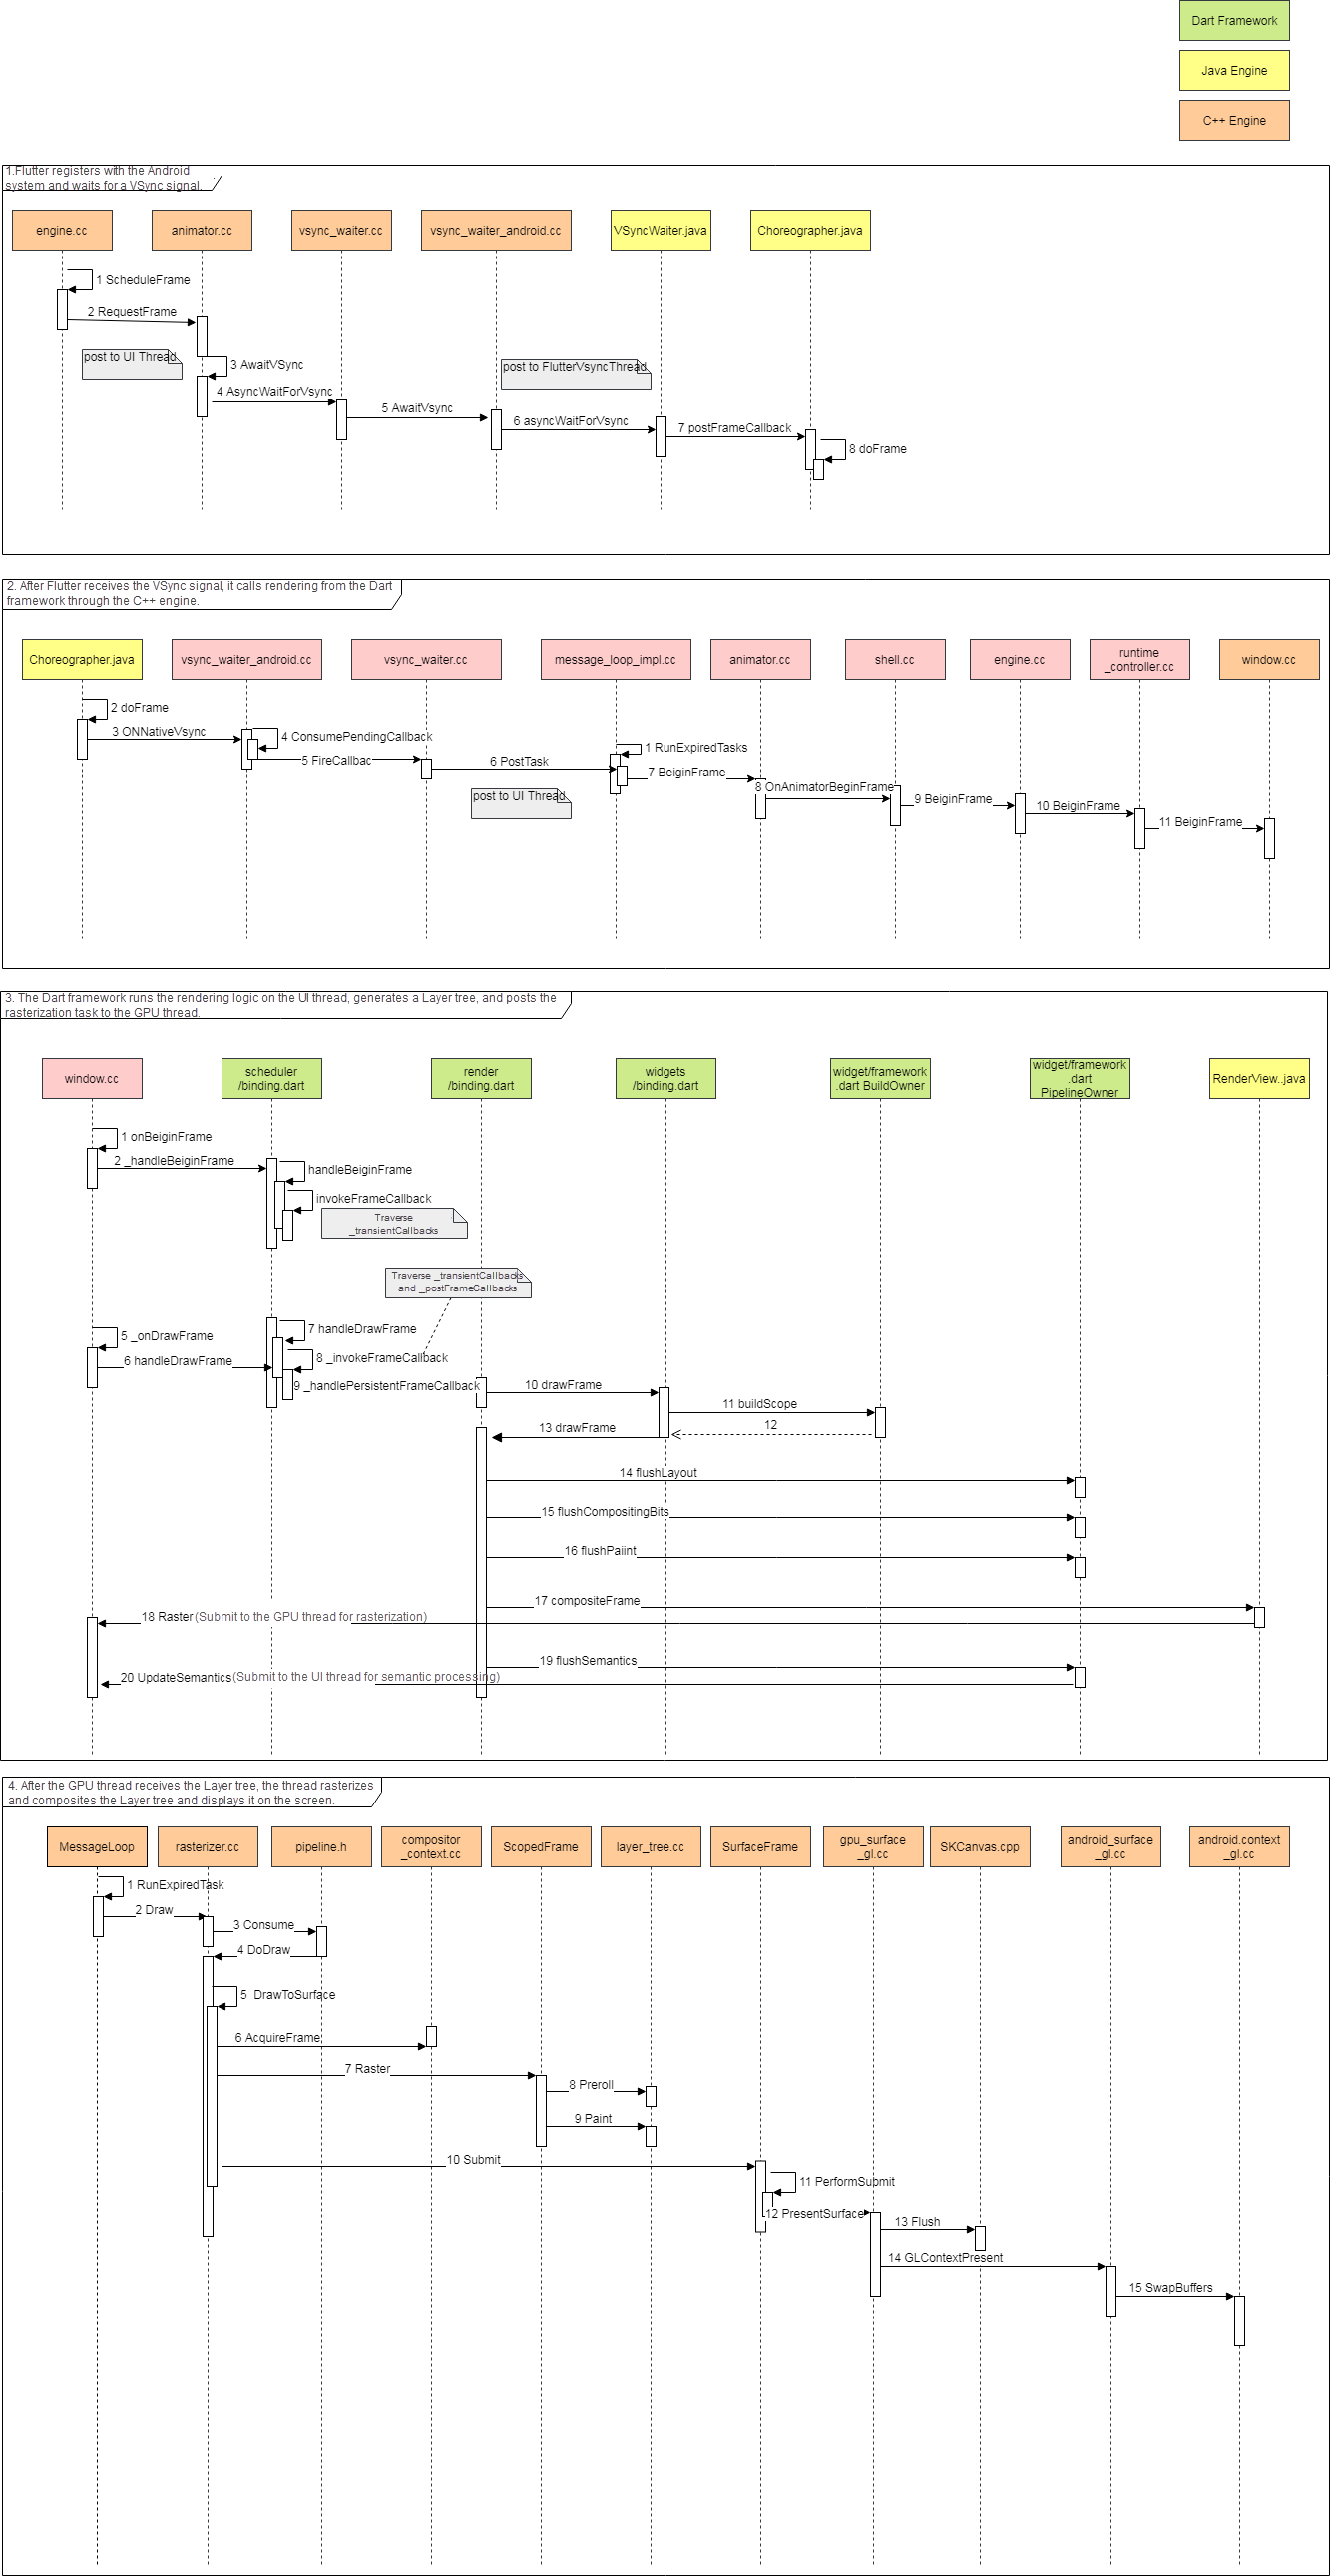
1. Flutter registers with the Android system and waits for a VSync signal.
When the Flutter engine starts, it registers with an Android system Choreographer and receives the VSync signal callback. A Choreographer is a class for managing VSync signals in Android.
2. After Flutter receives the VSync signal, it calls rendering from the Dart framework through the C++ engine.
After Flutter receives the VSync signal, the Flutter-registered VsyncWaiter::fireCallback() callback is called. Then, Animator::BeginFrame() is executed. Finally, the Window::BeginFrame() method is called. The Windows instance is an important bridge between the underlying engine and the Dart framework. This instance performs most of the platform-related operations, such as input events, rendering operations, and accessibility operations.
3. The Dart framework runs the rendering logic in the UI thread, generates a Layer tree, and posts the rasterization task to the GPU thread.
Then, Window::BeginFrame() is called, and the RenderBinding::drawFrame() method is called in the RenderBinding class. This method relays outs and redraws dirty nodes on the UI, that is, nodes that need to be redrawn. If images are involved during rendering, the images are loaded and decoded in the worker thread and then transferred into the I/O thread to generate image textures. The I/O thread shares the EGL context with the GPU thread. Therefore, the GPU thread can directly access the image textures generated by the I/O thread.
4. After the GPU thread receives the Layer tree, the thread rasterizes and composites the Layer tree and displays it on the screen.
After the Dart framework completes drawing, it generates drawing instructions and stores them in the Layer tree. Then, it calls Animator::RenderFrame() to submit the Layer tree to the GPU thread. Then, the GPU thread rasterizes and composites the Layer tree and displays it on the screen. Finally, the GPU thread calls Animator::RequestFrame() to receive the next VSync signal from the system. This way, the UI can be updated continuously.
Although the call process seems long and complex, it involves few key joints. Therefore, you do not need to focus on the call chain but only need to understand the key implementations. As shown in the following class diagram, we use different colors to mark the key classes. Based on the class diagram, you can determine and understand the Flutter rendering process.
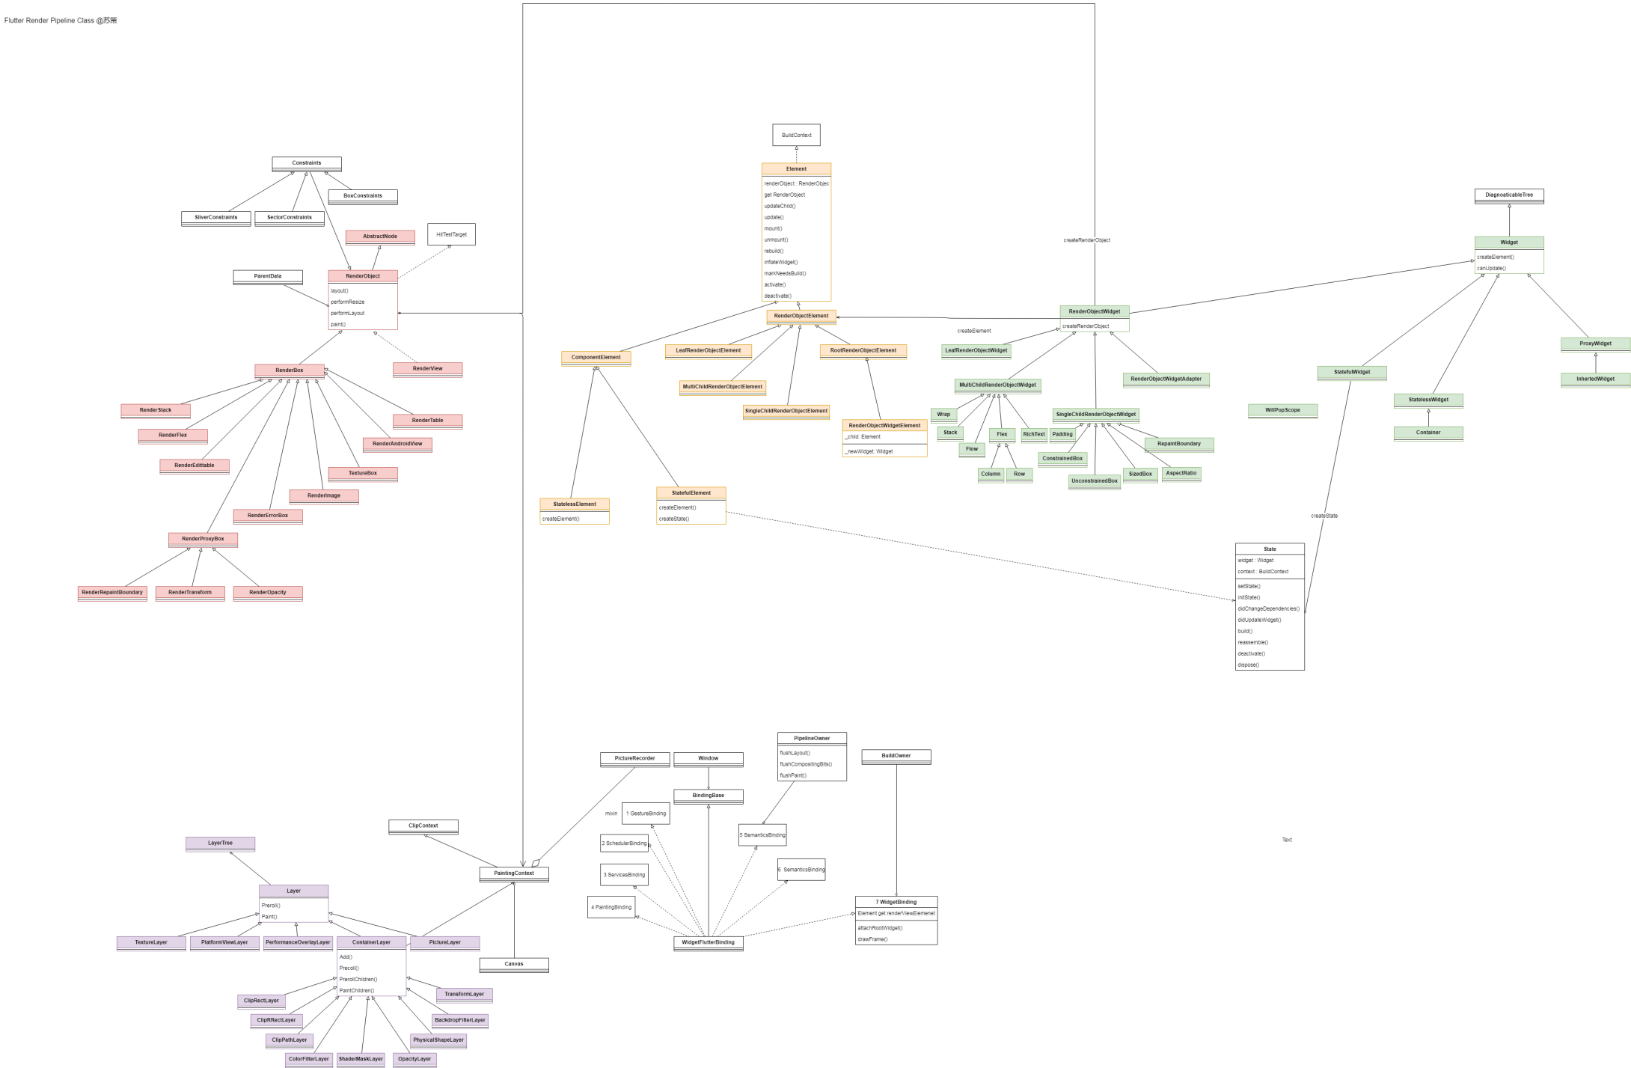
In the preceding class diagram, green cells belong to the Widget, yellow ones belong to the Element, and red ones belong to the RenderObject.
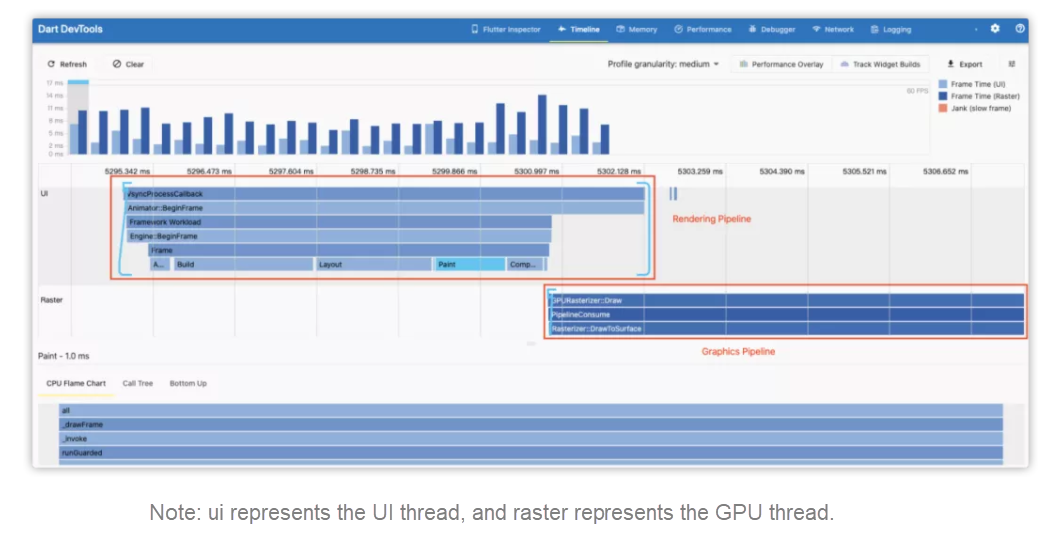
That is all about the overall Flutter rendering process, which involves multiple threads and modules. Next, we will analyze each step in detail. During the preceding architecture analysis, we classified the Flutter rendering process into seven steps. You can also clearly see these steps along the Flutter timeline, as shown in the following figure:
1. Animate
This step is triggered by transientCallbacks of the handleBeginFrame() method. If no animations exist, the callback of this step returns null. If there are animations, Ticker.tick() is called back to trigger the animation widget to update the value of the next frame.
2. Build
This step is triggered by BuildOwner.buildScope(). It is used to build or update the three trees: Widget tree, Element tree, and RenderObject tree.
3. Layout
This step is triggered by PipelineOwner.flushLayout(). Specifically, it calls RenderView.performLayout() to traverse the whole RenderObject tree, calls layout() of each node, updates the RenderObject layout in the dirty area based on information recorded in the Build process. This way, each RenderObject has the correct size and position, which are stored in parentData.
4. Compositing Bits
This step is triggered by PipelineOwner.flushCompositingBits() to update render objects with dirty compositing positions. In this step, each RenderObject determines whether its subitems need to be composited. In the Paint step, this information is used to implement visual effects, such as cropping.
5. Paint
This step is triggered by PipeOwner.flushPaint() and will call RenderView.paint(). Finally, the paint() of each node is triggered to generate a Layer tree, and the drawing instructions are stored in the Layer tree.
6. Submit (Compositing)
This step is triggered by the renderView.compositeFrame() method. This step is officially called Compositing. However, I think it is more appropriate to call it Submit because this step submits the Layer tree to the GPU thread.
7. Compositing
This step is triggered by Render.compositeFrame(). It builds a scene based on the Layer tree and transmits the scene to the Windows instance for rasterization.
The GPU thread draws a frame of data to the GPU through Skia. The GPU stores the frame information in the frame buffer. Then, it periodically reads frame data from the frame buffer based on VSync signals and submits the data to the monitor for final display.
When the Flutter engine starts, it registers with an Android system Choreographer and receives VSync signals. After the GPU hardware generates a VSync signal, the system triggers a callback and drives the UI thread to render.
transientCallbacks of the handleBeginFrame() methodAnimate is triggered by the transientCallbacks of the handleBeginFrame() method. If no animations exist, the callback returns null. If there are animations, Ticker._tick() is called back to trigger the animation widget to update the value of the next frame.
void handleBeginFrame(Duration rawTimeStamp) {
    ...
    try {
      // TRANSIENT FRAME CALLBACKS
      Timeline.startSync('Animate', arguments: timelineWhitelistArguments);
      _schedulerPhase = SchedulerPhase.transientCallbacks;
      final Map<int, _FrameCallbackEntry> callbacks = _transientCallbacks;
      _transientCallbacks = <int, _FrameCallbackEntry>{};
      callbacks.forEach((int id, _FrameCallbackEntry callbackEntry) {
        if (! _removedIds.contains(id))
          _invokeFrameCallback(callbackEntry.callback, _currentFrameTimeStamp, callbackEntry.debugStack);
      });
      ...
    } finally {
      ...
    }
  }
After handleBeginFrame() ends, handleDrawFrame() is called and triggers the following callbacks:
postFrameCallbacks are used to inform the listener that the drawing is completed.pesistentCallbacks are used to trigger rendering.These two callbacks are callback queues in SchedulerBinding.
_transientCallbacks are used to store temporary callbacks. It is registered in the Ticker.scheduleTick() to drive animations._persistentCallbacks are used to store persistent callbacks. You cannot request a new drawing frame in this callback. Persistent callbacks cannot be removed after they are registered. A persistent callback is added in RenderBinding.initInstaces().addPersitentFrameCallback() to trigger drawFrame()._postFrameCallbacks are called after a frame is processed and then removed.It is used to inform the listener that the processing of the frame is completed. Then, the WidgetBinder.drawFrame() method is called. First, it calls the BuildOwner.buildScope() to trigger the tree update and then performs drawing.
@override
void drawFrame() {
  ...
  try {
    if (renderViewElement ! = null)
      buildOwner.buildScope(renderViewElement);
    super.drawFrame();
    buildOwner.finalizeTree();
  } finally {
    assert(() {
      debugBuildingDirtyElements = false;
      return true;
    }());
  }
  ...
}
Next, RenderingBinding.drawFrame() is called to trigger the Layout, Paint, and other processes.
void drawFrame() {
  assert(renderView ! = null);
  pipelineOwner.flushLayout();
  pipelineOwner.flushCompositingBits();
  pipelineOwner.flushPaint();
  if (sendFramesToEngine) {
    renderView.compositeFrame(); // Sends the bits to the GPU.
    pipelineOwner.flushSemantics(); // Sends the semantics to the OS.
    _firstFrameSent = true;
  }
}
The preceding code is the core process code. Now, let's take a look at the implementation of the Build process.
BuildOwner.buildScope()
As mentioned previously, handleDrawFrame() triggers tree updates. BuildOwner.buildScope() is triggered at the following two time points:
scheduleAttachRootWidget() method called by the runApp() method builds three trees: Widget tree, Element tree, and RenderObject tree.The tree building and updating are done by the BuildOwner.buildScope() method. The only difference between tree building and updating is that an element.mo unt(null, null) callback is passed in during tree building. This callback is triggered during the buildScope() process.
This callback builds three trees because a widget is an abstract description of a UI element. We need to inflate the widget into an element and then generate the corresponding render object to drive the rendering.
createElement method is called to create elements and determine whether they need to be updated. Flutter uses the difference algorithm to compare Widget tree changes to determine whether the element status is changed.createRenderObject method is called to create a render object. The Element tree holds widgets and render objects and manages widget configurations and render object rendering. Flutter maintains the statuses of elements, and therefore, developers only need to maintain widgets.PipelineOwner.flushLayout()
PipelineOwner.flushLayout()
Layout is implemented based on one-way data flows. More specifically, the parent node passes constraints to the child node, and the child node passes the size to the parent node. The size data is stored in the parentData variable of the parent node. First, the RenderObject tree is deeply traversed, and then the constraints are recursively traversed. One-way data flows simplify the Layout process and improve the layout performance.
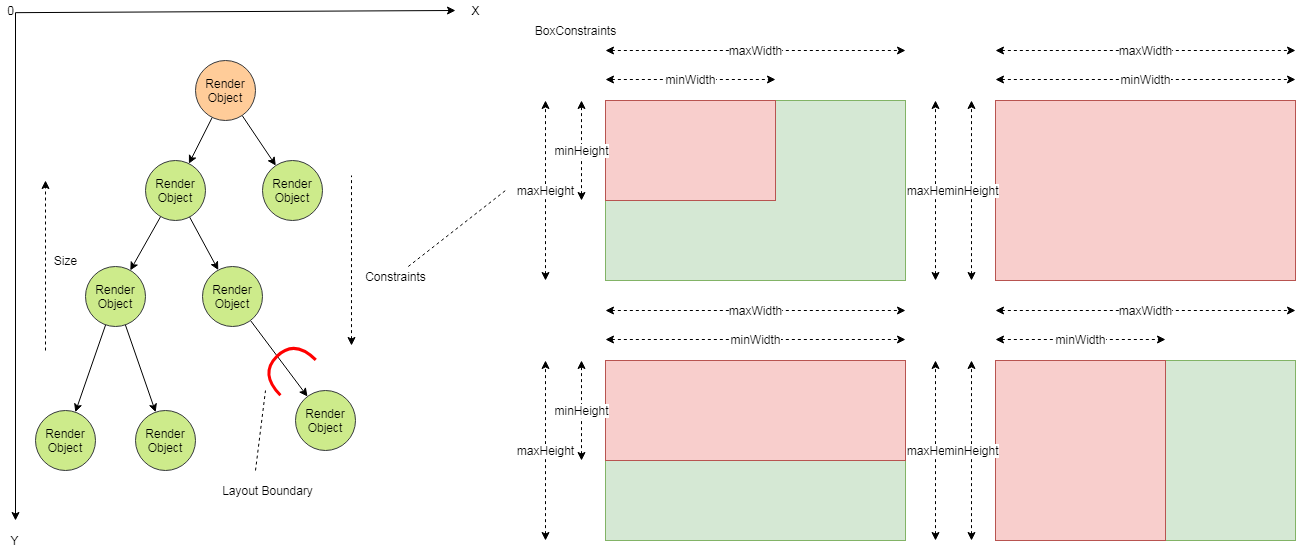
The RenderObject class only provides a set of basic layout protocols and does not define the child node model, coordinate system, and specific layout protocol. Its subclass RenderBox provides a Cartesian coordinate system, which is the same as the Android or iOS native coordinate system. Most RenderObject classes are implemented by inheriting RenderBox. RenderBox has several subclass implementations that correspond to different layout algorithms.
Next, I will introduce two concepts in the layout process: Constraints and RelayoutBoundary.
Constraints, such as BoxConstraints and SliverConstraints, are used by the parent node to limit the size of its child nodes.
RenderBox provides a set of BoxConstraints, which apply the following restrictions:
We can flexibly implement many common layouts with these BoxConstraints, such as a layout where the child node has the same size as the parent node, a vertical layout where the child node has the same width as the parent node, and a horizontal layout where the child node has the same height as the parent container.
You can calculate the size of a child node with child node size information and these constraints. Then, you need to calculate the position of the child node. The position of a child node is determined by the parent node.
RelayoutBoundary is used for boundary relayout of a child node. When the size of the child node is changed, the parent node does not need to be laid out again. RelayoutBoundary is a flag bit. In the markNeedsLayout() method for marking a dirty area, the flag bit is checked to determine whether relayout is required. The RelayoutBoundary mechanism improves layout performance.
We can obtain the positions and sizes of all nodes after going through the Layout process. Then, we need to draw the nodes.
PipelineOwner.flushCompositingBits()
After the Layout process ends, the Compositing Bits process is run before the Paint process. This process checks whether render objects need to be redrawn and updates the needCompositing flag of each node in the RenderObject tree. If the value of needCompositing is true, redrawing is required.
PipeOwner.flushPaint()
Related Source Code:
painting.dart
Modern UI systems divide a UI into different graphics layers that can reduce the drawing workload and improve the drawing performance. Therefore, the core concern in the Paint process is to determine the layer where drawing instructions are stored.
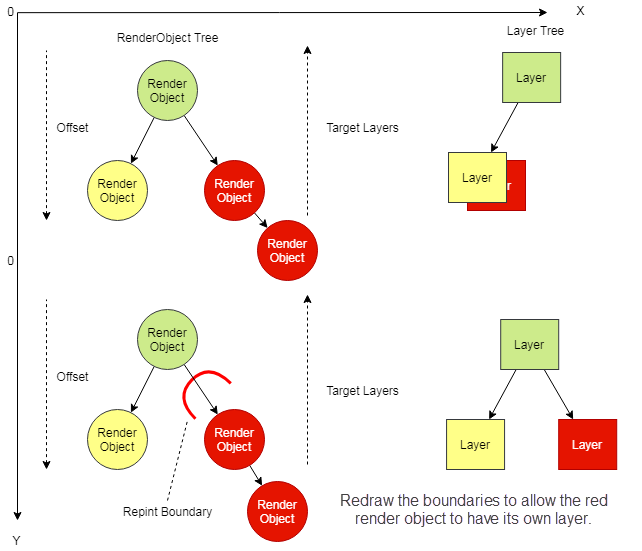
The Paint process also uses one-way data flows. First, the RenderObject tree is deeply traversed up down. Then, child nodes are recursively traversed. During the traversal process, the layers and the drawing instructions of each child node to be stored are determined. Finally, a Layer tree is generated.
RepaintBoundary is introduced in the Paint process to improve the drawing performance. RepaintBoundary is similar to RelayoutBoundary in the Layout process.
RepaintBoundary is a flag bit. In the markNeedsPaint() method for marking a dirty area, this flag bit is checked to determine whether redrawing is required.The RepaintBoundary mechanism opens the graphics layer division function to developers. Developers can determine which part of a page does not need to be redrawn with this function, such as scrolling containers. This improves the overall performance of the whole page. Redrawing the boundaries changes the final Layer tree structure.
We do not need to redraw all boundaries. Most widgets will automatically redraw boundaries, which are called automatic layering.
When RepaintBoundary is configured for a node, an additional graphics layer is generated and all child nodes of the node are drawn on the new graphics layer. In Flutter, a graphics layer is used to describe all render objects in a drawing instruction buffer. RenderView of the root node will create a root layer that contains several sublayers. Each sublayer contains multiple render objects that form a Layer tree. When a render object is drawn, drawing instructions and parameters are generated and stored at the corresponding layer.
Related layers will inherit the following layer classes:
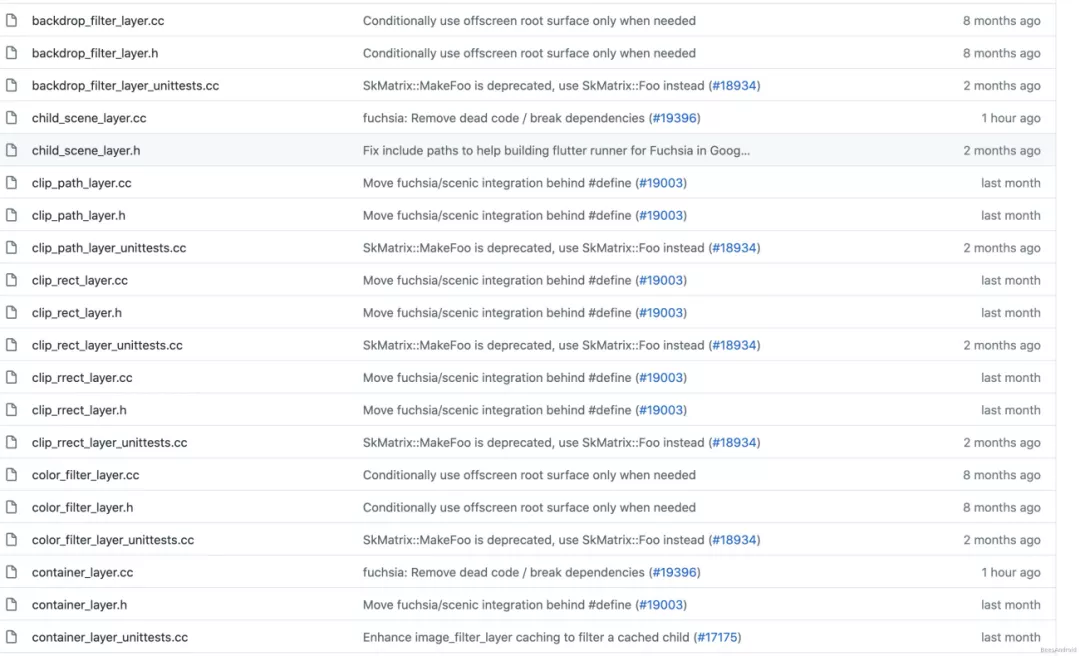
ClipRectLayer is the rectangular cropping layer. You can specify the cropping and rectangular behavioral parameters. Four cropping behaviors are available: none, hardEdge, antiAlias, and antiAliashWithSaveLayer.ClipRRectLayer is the cropping layer for rectangular with rounded corners. Its behaviors are the same as ClipRectLayer.ClipPathLayer is the path cropping layer. You can specify the path and cropping behavior parameters. Its behaviors are the same as ClipRRectLayer.OpacityLayer is the transparency layer. You can specify the transparency and offset parameters. The offset is the distance from the origin of the canvas coordinate system to the origin of the caller's coordinate system.ShaderMaskLayer is the shading layer. You can specify the shader matrix and hybrid mode parameters.ColorFilterLayer is the color filtering layer. You can specify the color and hybrid mode parameters.TransformLayer is the transformation layer. You can specify the transformation matrix parameters.BackdropFilterLayer is the background filtering layer. You can specify the background image parameters.PhysicalShapeLayer is the physical shape layer. You can specify eight parameters, including the color.For more information about other parameters, please see the preceding Flutter class diagram.
After we learn the basic concepts of drawing, let's take a look at the drawing process. As mentioned previously, when the first frame is rendered, rendering starts from RenderView of the root node, and then all child nodes are traversed. The drawing process is listed below:
1. Create a canvas object
The canvas object is obtained through PaintContext. In PaintContext, a PictureLayer class is created and called to the C++ layer through ui.PictureRecorder to create a SkPictureRecorder instance. This instance is used to create SkCanvas, and the created SkCanvas is returned to the Dart framework for further use. SkPictureRecorder can be used to record the generated drawing instructions.
2. Perform drawing on the canvas
Drawing instructions are recorded by the SkPictureRecorder
3. Perform rasterization
After the drawing is completed, the Canvas.stopRecordingIfNeeded() method is called, which calls the SkPictureRecorder::endRecording() method at the C++ layer to generate a picture object and store it in PictureLayer. The picture object contains all the drawing instructions. After all of the layers are drawn, a Layer tree is formed.
After drawing is completed, the Layer tree is submitted to the GPU thread.
renderView.compositeFrame()
compositing.dart widow.dart
scene.cc scene_builder.cc
Note: This step is officially called Compositing. However, I think it is more appropriate to call it Submit because this step submits the Layer tree to the GPU thread.
void compositeFrame() {
    Timeline.startSync('Compositing', arguments: timelineArgumentsIndicatingLandmarkEvent);
    try {
      final ui.SceneBuilder builder = ui.SceneBuilder();
      final ui.Scene scene = layer.buildScene(builder);
      if (automaticSystemUiAdjustment)
        _updateSystemChrome();
      _window.render(scene);
      scene.dispose();
      assert(() {
        if (debugRepaintRainbowEnabled || debugRepaintTextRainbowEnabled)
          debugCurrentRepaintColor = debugCurrentRepaintColor.withHue((debugCurrentRepaintColor.hue + 2.0) % 360.0);
        return true;
      }());
    } finally {
      Timeline.finishSync();
    }
}SceneBuilder object and use SceneBuilder.addPicture() to add pictures generated previously to the SceneBuilder object.SceneBuilder.build() method to generate a Scene object. Then, window.render(scene) is used to submit the Layer tree with drawing instructions to the GPU thread for rasterization and composition.In this process, layers at the Dart framework layer are converted to flow::layer used at the C++ layer. The flow module is a simple Skia-based compositor. It runs on the GPU thread and uploads instructions to Skia. The Flutter engine uses the flow module to cache drawing instructions and pixel information generated in the Paint process. Layers in the Paint process map to the layers in the flow module.
With the Layer tree that contains rendering instructions, rasterization and compositing can be performed.
Rasterization converts the drawing instructions into pixel data. Compositing overlays and processes the rasterized data of each layer. This process is called the graphics pipeline.
Flutter adopts synchronous rasterization.
Rasterization and compositing are performed in one thread. Alternatively, thread synchronization or another method is used to ensure the sequence of rasterization and compositing.
DisplayList at a visible layer are executed for rasterization. In the pixel buffer area of the target surface, color values of pixels are generated.View.setLayerType to allow the application to provide a pixel buffer for a specified view, and Flutter provides the Relayout Boundary mechanism to allocate additional buffers for specific layers. During the rasterization of a layer, data is written to the pixel buffer of the layer first. The rendering engine composites the pixel buffers of different layers and exports the composited buffer to the pixel buffer of the target surface.A graphics layer is divided into blocks of the same size based on certain rules. Rasterization is performed by the block. Each rasterization task executes instructions in a block area and writes the execution result to the pixel buffer area of the block. Rasterization and compositing are performed in different threads asynchronously. If a block is not rasterized during compositing, it is left blank, or a checkerboard graphic is drawn.
Android and Flutter adopt the synchronous rasterization strategy and mainly use direct rasterization. Rasterization and compositing are performed simultaneously, and rasterization is completed in the compositing process. Chromium adopts asynchronous block-based rasterization. Graphics layers are divided into different blocks, and rasterization and compositing are performed asynchronously.
Based on the preceding sequence diagram, the rasterization entry is the Rasterizer::DoDraw() method. It will call the ScopedFrame::Raster() method, which is the core implementation of rasterization. This method performs the following tasks:
LayerTree::Preroll() makes preparations for drawing.LayerTree::Paint() calls drawing methods of different layers in nested mode.SkCanvas::Flush() flushes data to the GPU.AndroidContextGL::SwapBuffers() submits the frame buffer to the monitor for display.So far, we have explained the overall rendering implementation of Flutter.
Android, Chromium, and Flutter are Google's star projects. They have similar and different designs in the rendering mechanism. Next, we will compare each one.
The following figure shows the basic design of the modern rendering pipeline:
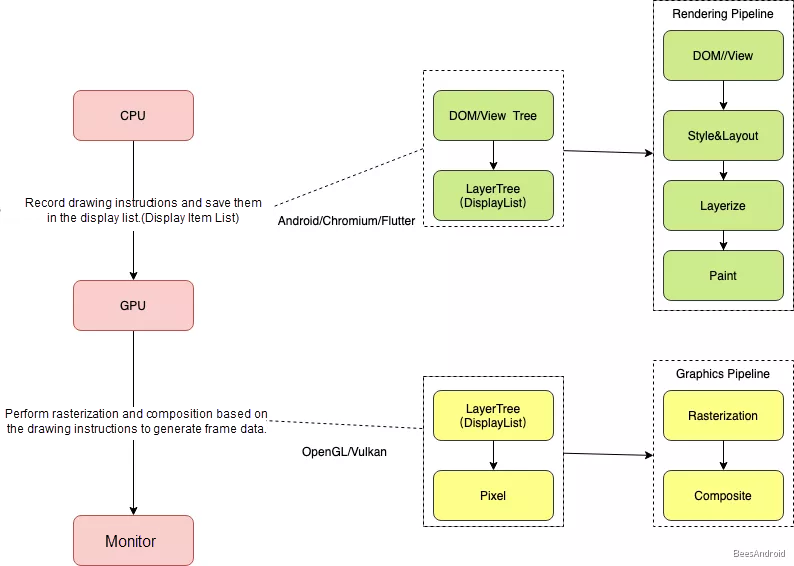
Let's take a look at how Android, Chromium, and Flutter are implemented. The following figure shows the Android rendering pipeline:
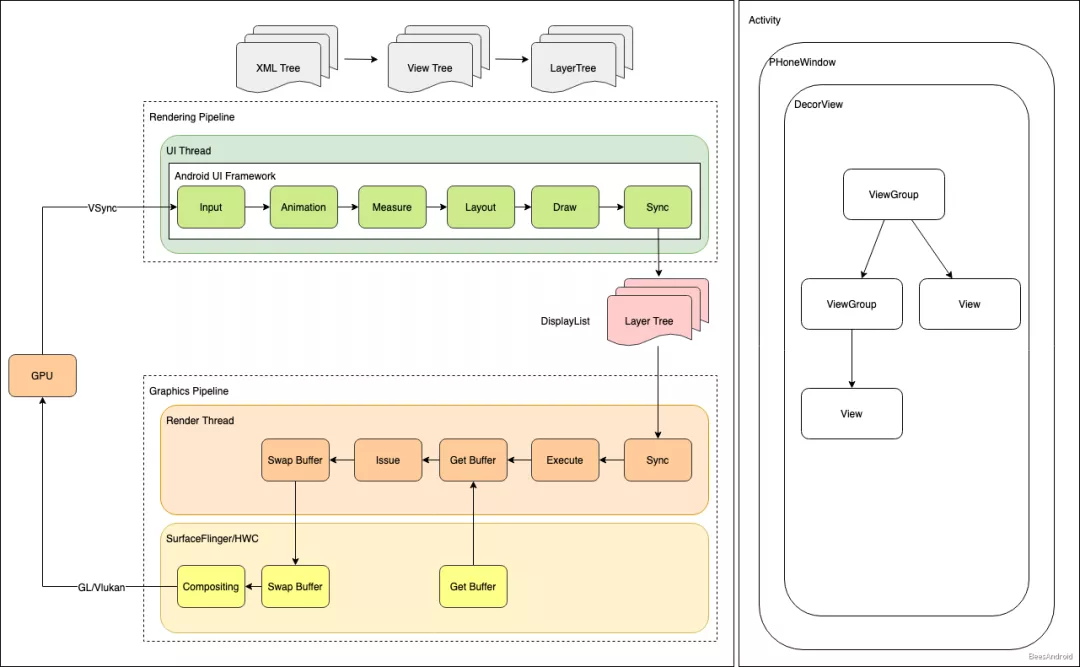
The following figure shows the Chromium rendering pipeline:
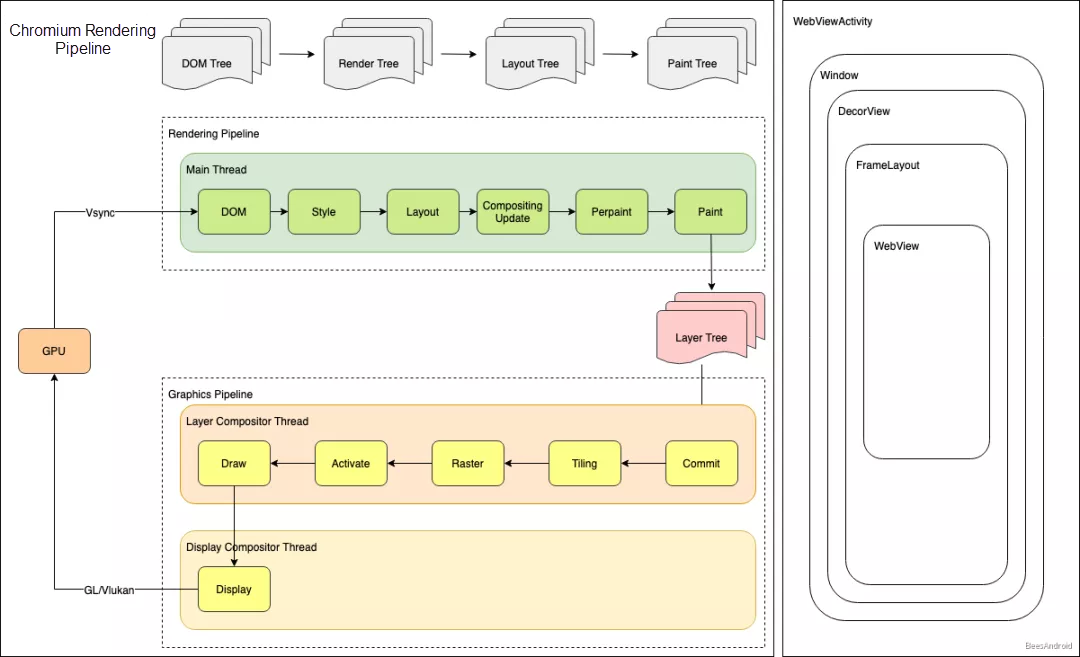
The following figure shows the Flutter rendering pipeline:
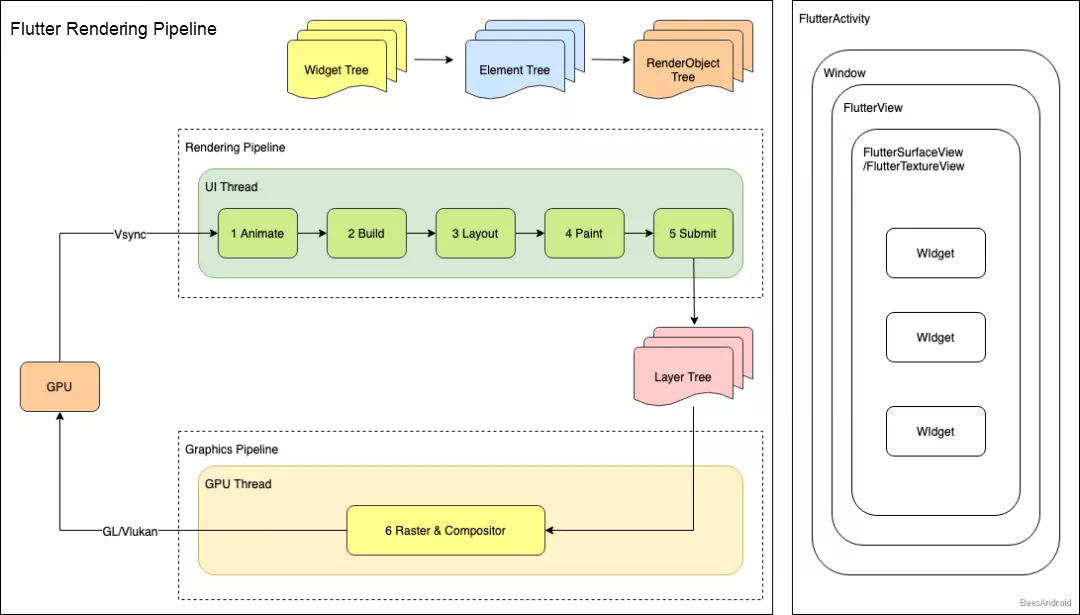
The following table compares the three projects:
| DOM/View | Style/Layout | Paint/Layerize | Rasterization/Compositing | |
| Android | Java and XML :arrow_right: View Tree | Box and Flex | Synchronous rasterization | |
| Chromium | JavaScript and HTML :arrow_right: DOM Tree | Box and Flex | Synchronous rasterization | |
| Flutter | Dart :arrow_right: Widget | Box and Flex | Asynchronous block-based rasterization | |
| Summary | Flutter provides better performance by eliminating Document Object Model (DOM) parsing. | The three projects are almost the same in this term. Even though their implementation methods are different, the basic concepts, such as the box model and Flex layout, are the same. The core concern behind these concepts is to improve layout algorithm efficiency. | The core mission of drawing is to record drawing instructions and allocate them to appropriate layers. The three projects adopt different implementation mechanisms in this term. However, their cores are the same, implementing reasonable laying to reduce repeated drawing and improve drawing efficiency. | These two rasterization and compositing methods are on a par with each other and are used in different scenarios. Asynchronous block-based rasterization uses blocks for caching to improve the drawing utilization. However, it also increases the memory usage. Synchronous rasterization consume a small amount of memory. However, it is less efficient to process layer animations because it has no buffer. |
Lastly, I would like to talk about my understanding of the cross-platform ecosystem. The cross-platform container ecosystem includes at least three layers, as shown in the following figure:
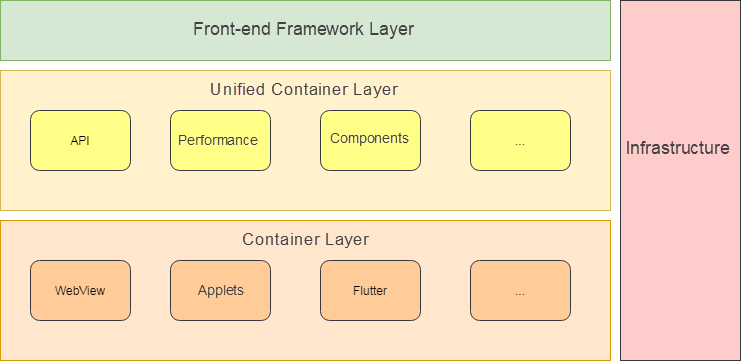
The frontend framework layer directly orients to businesses and requires the following characteristics:
First, it needs to interface with the W3C ecosystem. The W3C ecosystem is (and will be) prosperous and dynamic long-term. If you leave the W3C ecosystem behind and choose to build subsets by yourself, it is difficult to go further.
Second, it must be stable. We need to prevent frontend businesses from being redeveloped when a set of containers is replaced. For example, if we create H5 containers and then applet containers that use different domain-specific languages (DSLs), the frontend team spends a lot of time redeveloping businesses. Although applets support one set of code for multiple terminals, I do not think that this effectively solves the efficiency problem, which contains two major issues:
If this is the case, it is difficult to run businesses fast. Therefore, no matter how the underlying containers transform, the frontend framework must be constant and stable. However, this stability depends on the unified container layer.
The unified container layer is between the frontend framework layer and the container layer. It defines the basic capabilities provided by containers, which are relatively stable like protocols.
Protocols are important. For example, with the OpenGL protocol, upper-layer calls do not need to change regardless of how the underlying rendering solution is implemented. For our businesses, we also need to provide common solutions based on the unified container layer:
It is inappropriate to redevelop these solutions when a new set of containers are provided. If a solution needs to be redone due to new technologies, the solution is not robust because it does not consider unified or extended cases. Also, the businesses will not wait for us to develop technical solutions with repeated functions.
Iterations at the container layer aim to maximize the performance and user experience while improving efficiency.
The early React Native mode solves the efficiency problem but introduces a communication layer, which leads to performance issues. React Native implements native rendering by passing the information of the virtual DOM to the native system that builds the corresponding native widget tree based on the layout information. In addition, this translation method needs to adapt to the system version, which incurs additional compatibility issues.
WeChat has launched the applet solution. In my opinion, the applet solution is not a technical solution but a commercial solution because it manages and distributes large traffic of platforms and provides common technical solutions to the businesses. The rendering solutions at the applet underlying layer are also varied.
Flutter solves the performance issue. It builds a GUI system, and the underlying layer directly calls the Skia graphics library for native rendering. This rendering mechanism is the same as Android. However, Flutter chooses the Dart framework due to development efficiency, performance, its own ecosystem, and other factors. This approach abandons the prosperous frontend ecosystem. By looking at the development history of cross-platform containers, embracing the W3C ecosystem as much as possible after solving efficiency and performance issues is probably the best practice for the future. Flutter has also launched Flutter for Web, which aims to support Android and iOS and gradually penetrate the web. We look forward to its performance.
Container technologies are moving forward dynamically. We launched Flutter in 2020 and possibly other technical solutions in 2021. During the solution transition, we need to ensure quick and hitless business migration instead of repeating the same work every time.
WebView performance is also getting better with the improvement of mobile phone performance. Flutter provides a new idea to solve the performance problem. We can look forward to a cross-platform container ecosystem with a complete infrastructure, excellent user experience, and one set of code for multiple terminals.
Alibaba Cloud Databases Help Accelerate Digital Transformations
[Infographic] Phillipine Businesses Increasingly Rely on Cloud-Based IT Solutions for Growth

2,599 posts | 764 followers
FollowXianYu Tech - August 6, 2020
XianYu Tech - September 4, 2020
Alibaba Clouder - December 22, 2020
XianYu Tech - May 13, 2021
XianYu Tech - May 20, 2021
Alibaba Tech - June 4, 2019

2,599 posts | 764 followers
Follow mPaaS
mPaaS
Help enterprises build high-quality, stable mobile apps
Learn More Super App Solution for Telcos
Alibaba Cloud (in partnership with Whale Cloud) helps telcos build an all-in-one telecommunication and digital lifestyle platform based on DingTalk.
Learn More YiDA Low-code Development Platform
A low-code development platform to make work easier
Learn More Mobile Testing
Provides comprehensive quality assurance for the release of your apps.
Learn MoreMore Posts by Alibaba Clouder