By Bo Yang, Alibaba Cloud Community Blog author.
This article details the deployment process for Redis to be deployed on Alibaba Cloud Container Service for Kubernetes using one single master node and multiple slave nodes.
Kubernetes is an extensible open source platform for managing containerized workloads and services. By extension, Alibaba Cloud Container Service for Kubernetes (ACK) provides enterprise-level high-performance and flexible management of Kubernetes containerized applications. This service simplifies cluster creation and expansion and integrates Alibaba Cloud's capabilities in virtualization, storage, network, and security, providing an improved running environment for Kubernetes containerized applications.
Redis is an open source, in-memory data structure store that is designed to be fast and simple. Built for real-time performance, most requests to Redis complete in less than a millisecond, allowing a single server to handle millions of concurrent requests per second.
Whether used in single-instance or cluster mode, Redis can be set up for high availability. Redis Sentinel is a component that provides service discovery, failure detection and quorum-based failover from a primary to secondary replica for single-instance databases. When running Redis in cluster mode, these capabilities are provided by the cluster itself.
The Redis cluster enables horizontal scaling by automatically partitioning data across multiple Redis servers. The cluster provides near-linear scalability while growing across hundreds of nodes, and an interface that allows client applications to optimize access by discovering the cluster's topology.
Redis utilizes a slave-master model in which the master node has a read/write capability while the slave nodes are read-only nodes. If the master node is down, then the sentinel conducts the election process among the slave nodes to select the new master node. Deploying on Container Engine allows us to identify pods as master and slave nodes within the cluster while utilizing the benefits and features of having routing and access managed by Alibaba Cloud.
1. Install and Configure Alibaba Cloud CLI
The first step is to install and configure Alibaba Cloud CLI.
Note: The Alibaba Cloud CLI is a tool to manage and use Alibaba Cloud resources through a command line interface. It is written in Go and built on the top of Alibaba Cloud OpenAPI.
First, use the brew to install Alibaba Cloud CLI. If you have installed brew in your Mac, you can use it to install Alibaba Cloud CLI as following:
$ brew install aliyun-cliNext, configure Alibaba Cloud CLI. To do this, run the aliyun configure command. An Alibaba Cloud account and a pair of AccessKey ID and AccessKey Secret are required for this action. You can get the AccessKey on the AccessKey page or get it from your system administrator.
A default profile is created with information provided which is in cn-hangzhou region in Simple Chinese language.
aliyun configure
Configuring profile 'default' ...
Aliyun Access Key ID [None]: <Your AccessKey ID>
Aliyun Access Key Secret [None]: <Your AccessKey Secret>
Default Region Id [None]: cn-hangzhou
Default output format [json]: json
Default Languate [zh]: zh
2. Create a Container Engine Cluster
To create a Container Engine cluster on which you'll run the Redis service, create a container cluster named redis-cluster with 3 ecs.n1.small nodes in cn-hangzhou region. Change the VPC ID and VSwitch ID to the ID of the VPC and VSwtich you are using. Update the disk size and category to your use case.
vi create.json
{
    "password": "TestPwd124",
    "region_id": "cn-hangzhou",
    "instance_type": "ecs.n1.small",
    "name": "redis-cluster",
    "size": 3,
    "network_mode": "vpc",
    "vpc_id":"vpc-xxxx",
    "vswitch_id":"vsw-xxxx",
    "subnet_cidr":"172.28.1.0/24",
    "data_disk_category": "cloud_ssd",
    "data_disk_size": 40,
    "need_slb":true,
    "ecs_image_id":"centos_7_04_64_20G_alibase_201701015",
    "io_optimized":"true",
    "release_eip_flag":false
}


aliyun cs  POST /clusters --header "Content-Type=application/json" --body "$(cat create.json)"
3. Set up the Initial Master Node and Sentinel Pod
Set SSH to the master node by key pair followed by official help document:
kubectl create -f redis-master.yaml
kubectl get pods
NAME           READY     STATUS    RESTARTS   AGE
redis-master           2/2       Running   0          1m
redis-sentinel-tjldv   1/1       Running   0          34s
The config file for the initial master and sentinel pod is redis-master.yaml.
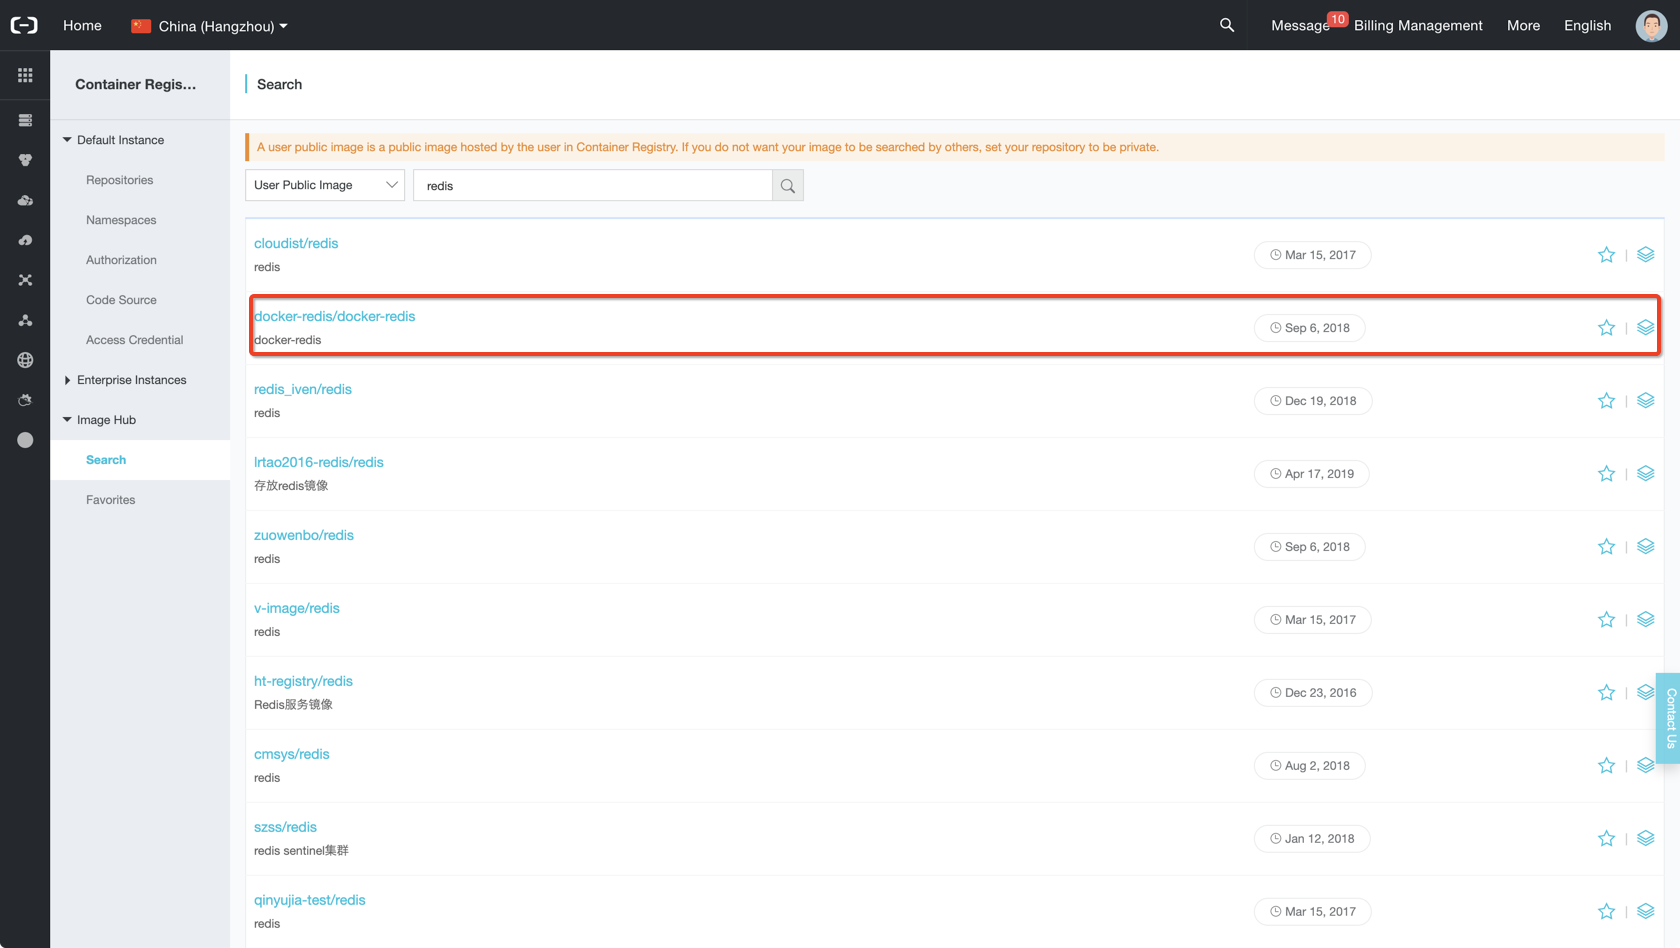
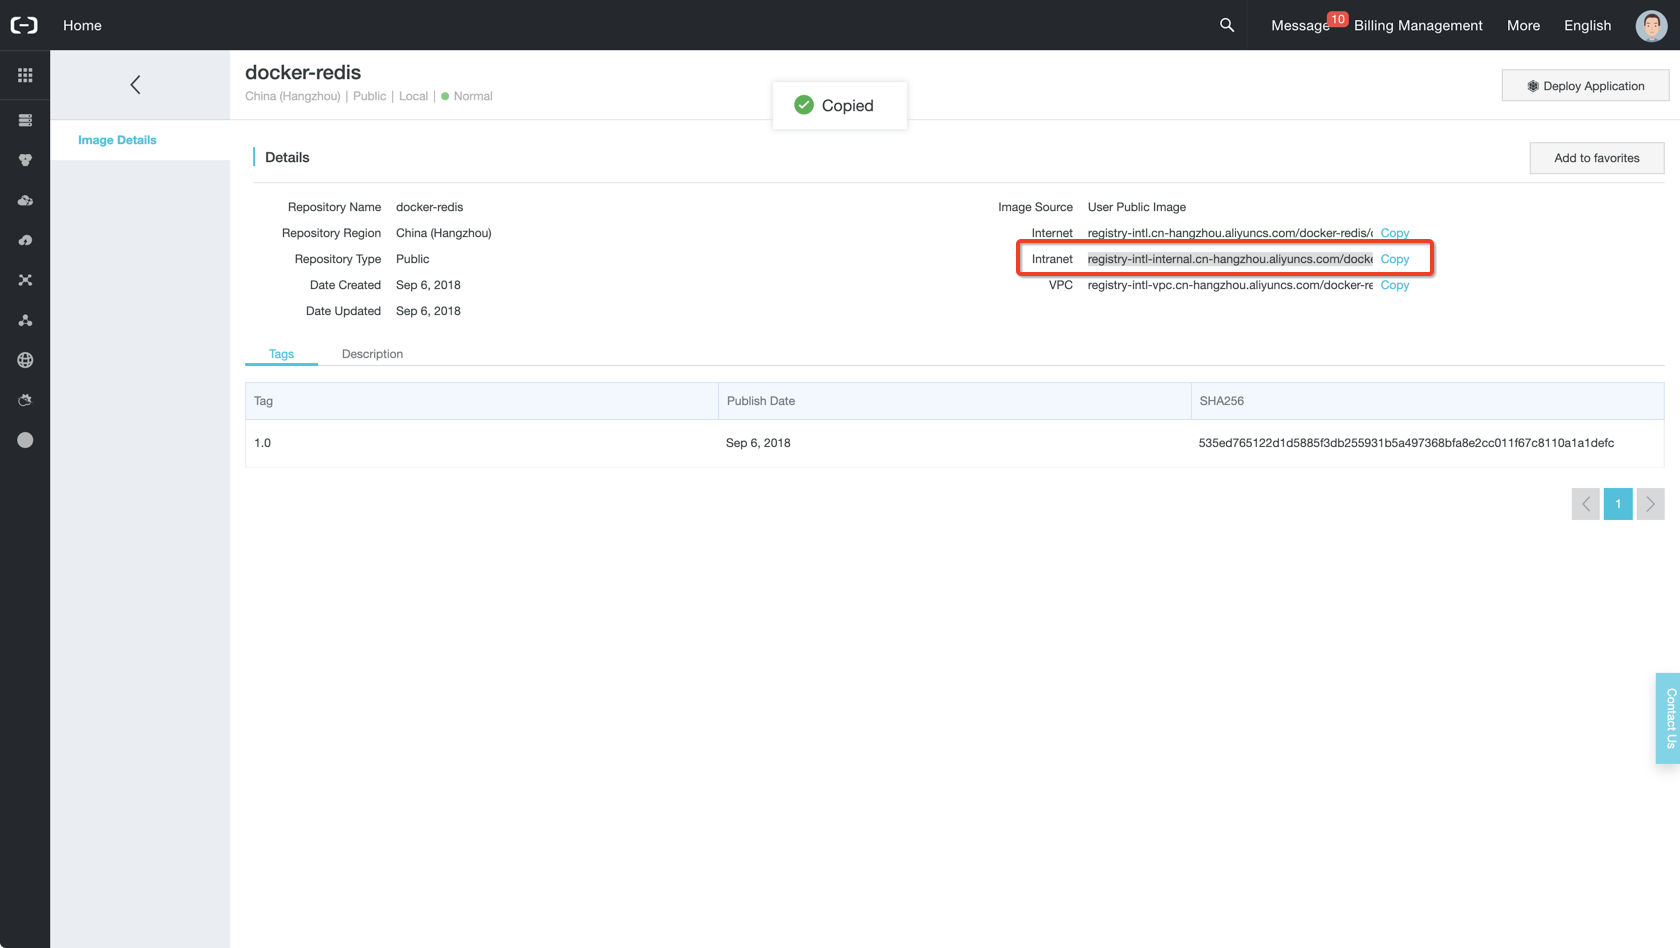
Using official redis image in container registry with intranet for cost saving and best network performance.


apiVersion: v1
kind: Pod
metadata:
  labels:
    name: redis
    redis-sentinel: "true"
    role: master
  name: redis-master
spec:
  containers:
    - name: master
      image: registry-intl-internal.cn-hangzhou.aliyuncs.com/docker-redis/docker-redis:1.0
      env:
        - name: MASTER
          value: "true"
      ports:
        - containerPort: 6379
      resources:
        limits:
          cpu: "0.1"
      volumeMounts:
        - mountPath: /redis-master-data
          name: data
    - name: sentinel
      image: kubernetes/redis:v1
      env:
        - name: SENTINEL
          value: "true"
      ports:
        - containerPort: 26379
  volumes:
    - name: data
      emptyDir: {}
4. Set up the Sentinel Service
kubectl create -f sentinel-service.yamlConfig for the sentinel service is sentinel-service.yaml.
apiVersion: v1
kind: Service
metadata:
  labels:
    name: sentinel
    role: service
  name: redis-sentinel
spec:
  ports:
    - port: 26379
      targetPort: 26379
  selector:
    redis-sentinel: "true"
5. Set up a Redis Replication Controller
kubectl create -f redis-controller.yamlThe Config file for the redis replication controller is redis-controller.yaml.
apiVersion: v1
kind: ReplicationController
metadata:
  name: redis
spec:
  replicas: 1
  selector:
    name: redis
  template:
    metadata:
      labels:
        name: redis
    spec:
      containers:
      - name: redis
        image: registry-intl-internal.cn-hangzhou.aliyuncs.com/docker-redis/docker-redis:1.0
        ports:
        - containerPort: 6379
        resources:
          limits:
            cpu: "0.1"
        volumeMounts:
        - mountPath: /redis-master-data
          name: data
      volumes:
        - name: data
          emptyDir: {}
6. Set up a Sentinel Replication Controller
kubectl create -f sentinel-controller.yaml

kubectl get rc
NAME             DESIRED   CURRENT   READY     AGE
redis            1         1         1         16s
redis-sentinel   1         1         1         5s
Config for the sentinel replication controller: sentinel-controller.yaml.
apiVersion: v1
kind: ReplicationController
metadata:
  name: redis-sentinel
spec:
  replicas: 1
  selector:
    redis-sentinel: "true"
  template:
    metadata:
      labels:
        name: redis-sentinel
        redis-sentinel: "true"
        role: sentinel
    spec:
      containers:
      - name: sentinel
        image: registry-intl-internal.cn-hangzhou.aliyuncs.com/docker-redis/docker-redis:1.0
        env:
          - name: SENTINEL
            value: "true"
        ports:
          - containerPort: 26379
7. Scale Redis and the Sentinel Pods
Now scale up both redis pods and sentinel pods to three replicas.
kubectl scale rc redis --replicas=3
kubectl scale rc redis-sentinel --replicas=3
kubectl get pods
NAME                   READY     STATUS    RESTARTS   AGE
redis-l9w48            1/1       Running   0          25s
redis-master           2/2       Running   0          3m
redis-r43mk            1/1       Running   0          25s
redis-sentinel-8k933   1/1       Running   0          11s
redis-sentinel-jhl6v   1/1       Running   0          11s
redis-sentinel-tjldv   1/1       Running   0          2m
Verify redis master information
kubectl exec redis-master -i -t -- bash -il
root@redis-master:/data# redis-cli ROLE
1) "master"
2) (integer) 38785
3) 1) 1) "10.4.2.6"
     2) "6379"
     3) "38640"
   2) 1) "10.4.0.5"
     2) "6379"
3) "38640"1. Delete the Redis Master Pod
kubectl delete pod redis-masterVerify that the replication controller created a new pod.
kubectl get pods
NAME                   READY     STATUS    RESTARTS   AGE
redis-4bzrb            1/1       Running   0          39s
redis-l9w48            1/1       Running   0          8m
redis-r43mk            1/1       Running   0          8m
redis-sentinel-8k933   1/1       Running   0          8m
redis-sentinel-jhl6v   1/1       Running   0          8m
redis-sentinel-tjldv   1/1       Running   0          10m
Verify that an existing slave is elected to be the master.
kubectl exec redis-l9w48 -i -t -- bash -il
root@redis-l9w48:/data# redis-cli ROLE
1) "master"
2) (integer) 15093
3) 1) 1) "10.4.0.5"
      2) "6379"
      3) "14962"
   2) 1) "10.4.1.9"
      2) "6379"
      3) "14962"
Verify the status of the new pod.
kubectl exec redis-4bzrb -i -t -- bash -il
root@redis-4bzrb:/data# redis-cli ROLE
1) "slave"
2) "10.4.2.6"
3) (integer) 6379
4) "connected"
5) (integer) 63651
2. Delete a Redis Slave Pod
kubectl delete pod redis-r43mkVerify that the replication controller created a new pod.
kubectl get pods
NAME                   READY     STATUS    RESTARTS   AGE
redis-2xdlv            1/1       Running   0          41s
redis-4bzrb            1/1       Running   0          10m
redis-l9w48            1/1       Running   0          18m
redis-sentinel-8k933   1/1       Running   0          17m
redis-sentinel-jhl6v   1/1       Running   0          17m
redis-sentinel-tjldv   1/1       Running   0          20m
Verify the status of the new pod.
kubectl exec redis-2xdlv -i -t -- bash -il
root@redis-2xdlv:/data# redis-cli ROLE
1) "slave"
2) "10.4.2.6"
3) (integer) 6379
4) "connected"
5) (integer) 114997
3. Delete a Sentinel Pod
kubectl delete pod redis-sentinel-tjldvVerify the replication controller created a new sentinel pod.
kubectl get pods
NAME                   READY     STATUS    RESTARTS   AGE
redis-2xdlv            1/1       Running   0          4m
redis-4bzrb            1/1       Running   0          14m
redis-l9w48            1/1       Running   0          22m
redis-sentinel-2rpdd   1/1       Running   0          38s
redis-sentinel-8k933   1/1       Running   0          21m
redis-sentinel-jhl6v   1/1       Running   0          21m
Verify the status of redis master and slave pods and the sentinel service to confirm it remains the same.
4. Scale up the Redis Pods
kubectl scale rc redis --replicas=5Verify that the replication controller created new pods and their status.
kubectl get pods
NAME                   READY     STATUS    RESTARTS   AGE
redis-16lm8            1/1       Running   0          32s
redis-2xdlv            1/1       Running   0          12m
redis-4bzrb            1/1       Running   0          22m
redis-l9w48            1/1       Running   0          29m
redis-sentinel-2rpdd   1/1       Running   0          8m
redis-sentinel-8k933   1/1       Running   0          29m
redis-sentinel-jhl6v   1/1       Running   0          29m
redis-sl9pq            1/1       Running   0          32s
kubectl exec redis-16lm8 -i -t -- bash -il
root@redis-16lm8:/data# redis-cli ROLE
1) "slave"
2) "10.4.2.6"
3) (integer) 6379
4) "connected"
5) (integer) 259108
kubectl exec redis-sl9pq -i -t -- bash -il
root@redis-sl9pq:/data# redis-cli ROLE
1) "slave"
2) "10.4.2.6"
3) (integer) 6379
4) "connected"
5) (integer) 281808kubectl exec redis-l9w48 -i -t -- bash -il
root@redis-l9w48:/data# redis-cli ROLE
1) "master"
2) (integer) 319409
3) 1) 1) "10.4.1.9"
2) "6379"
3) "319147"
2) 1) "10.4.1.10"
2) "6379"
3) "319409"
3) 1) "10.4.1.11"
2) "6379"
3) "319147"
4) 1) "10.4.0.7"
2) "6379"
3) "319409"5. Scale down the Redis Pods
Now scale up both redis pods 2 replicas.
kubectl scale rc redis --replicas=2Verify that pods were deleted and status of existing pods.
kubectl get pods
NAME                   READY     STATUS    RESTARTS   AGE
redis-4bzrb            1/1       Running   0          32m
redis-l9w48            1/1       Running   0          40m
redis-sentinel-2rpdd   1/1       Running   0          19mr
edis-sentinel-8k933   1/1       Running   0          40m
redis-sentinel-jhl6v   1/1       Running   0          40m
kubectl exec redis-4bzrb -i -t -- bash -il
root@redis-4bzrb:/data# redis-cli ROLE
1) "slave"
2) "10.4.2.6"
3) (integer) 6379
4) "connected"
5) (integer) 384454
kubectl exec redis-l9w48 -i -t -- bash -il
root@redis-l9w48:/data# redis-cli ROLE
1) "master"
2) (integer) 403327
3) 1) 1) "10.4.1.9"
2) "6379"
3) "403327"
2,593 posts | 791 followers
FollowAlibaba Container Service - December 19, 2024
Neel_Shah - February 14, 2025
Alibaba Clouder - May 14, 2018
Alibaba Clouder - June 9, 2020
Alibaba Container Service - September 14, 2024
Alibaba Container Service - March 12, 2024

2,593 posts | 791 followers
Follow Tair (Redis® OSS-Compatible)
A key value database service that offers in-memory caching and high-speed access to applications hosted on the cloud
Learn More Container Service for Kubernetes
Alibaba Cloud Container Service for Kubernetes is a fully managed cloud container management service that supports native Kubernetes and integrates with other Alibaba Cloud products.
Learn MoreLearn More
More Posts by Alibaba Clouder