By Evan Wong, Solutions Architect
Before going through the step-by-step guides, the user should have the following prerequisites:
This tutorial uses a number of third party resources including the sample application source codes. Special thanks to Satya Depareddy for the application source codes on GitHub -
https://github.com/depareddy/java-webapp-docker
In the previous article of this series, we discussed the steps to automate the flow of continuous deployment on the cloud. This is the third and final part of the DevOps series that focuses on the deployment strategies on a Kubernetes cluster with Alibaba Cloud Container Service.
This is the default deployment strategy on the Kubernetes cluster. Rolling updates allow Deployments' update to take place with zero downtime by incrementally updating Pods instances with new ones. The new Pods will be scheduled on Nodes with available resources.
This strategy aims to prevent application downtime by keeping at least some instances up-and-running at any point in time while performing the updates. Old pods are only shutdown after new pods of the new deployment version have started-up and became ready to handle traffic.
Canary deployment is a pattern for reducing risk involved with releasing new software versions. But in software, releasing canaries can be a strategic tactic for teams adopting continuous delivery practices. The idea is that you'll rollout a new release incrementally to a small subset of servers side by side with its Stable version. Once you test the waters, you can then rollout the changes to the rest of the infrastructure. This effectively exposes new versions to a small set of users, which acts as an early indicator for failures that might happen. Canaries are very handy for avoiding problematic deployments and angry users! If one canary deployment fails, the rest of your servers aren't affected and you can simply ditch it and fix the root cause.
To experience the canary release process in Alibaba Cloud, you would be creating a new image based on the different version of the source codes.
To create a new branch from the tag,
$git branch release-v2.0-branch release-v2.0Checkout the source codes from the new branch
$git checkout release-v2.0-branchGo to the home directory of the project source code – java-webapp-docker. Change the directory to src/main/webapp. Open the index.jsp with an editor such as vi or vim. Change the header <h2> to "Welcome to Alibaba Cloud DevOps v2.0" and also change the font of the header to red
<html>
<body>
<h2><font color="red">Welcome to Alibaba Cloud DevOps v1.0</font></h2>
</body>
</html>Add the file to the Git for commit by typing:
$git add index.jspThen, to commit the code to the repository:
$git commit -m "changed header text"To delete the previous tag, type
$git tag -d release-v2.0To create a new tag, type
$git tag release-v2.0Delete and recreate the tag remotely
$git push origin :release-v2.0To create the new tag
$git push origin release-v2.0Go back to the Container Registry->Build page to check out the latest build of the image. If the build is successful, the latest image with tag 2.0 should appear on the list.
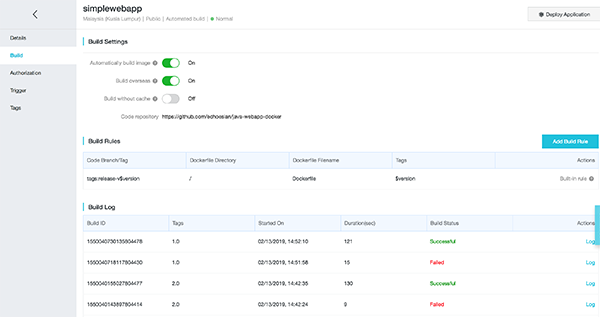
Next, we would need to create a new deployment for the image to the Kubernetes cluster.
Go to the Container Service -> Deployment page. Click on the "Create by Template" button.

Refer the YAML script, modify the image URL based on your private registry image URL.
In case if you cannot remember the URL of the image registry, go to the Container Registry details page and copy from the VPC link.

Paste the following YAML script onto the template and click Deploy.
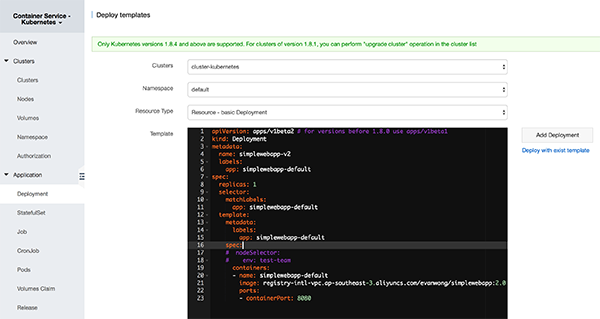
apiVersion: apps/v1beta2 # for versions before 1.8.0 use apps/v1beta1
kind: Deployment
metadata:
  name: simplewebapp-v2
  labels:
    app: simplewebapp-default
spec:
  replicas: 1
  selector:
    matchLabels:
      app: simplewebapp-default
  template:
    metadata:
      labels:
        app: simplewebapp-default
    spec:
    #  nodeSelector:
    #    env: test-team
      containers:
      - name: simplewebapp-default
        imagePullPolicy: Always
        image: registry-intl-vpc.ap-southeast-3.aliyuncs.com/evanwong/simplewebapp:2.0
        ports:
        - containerPort: 8080
Once it is successfully deployed, the new version of the deployment will be appeared on the Deployment list.

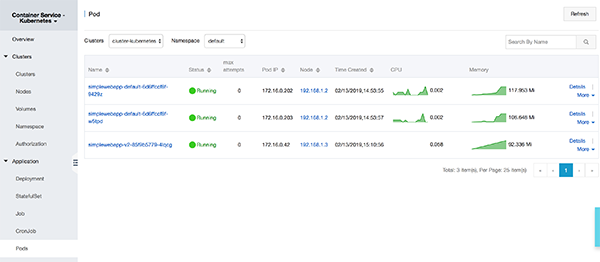
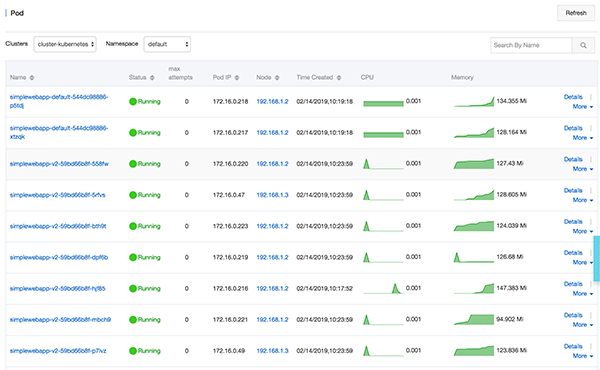
Go to the Pods section, there would be a new pod running. This new pod is based on the latest image with the version 2.0.
Use the terminal and type the below command, replace the URL of the endpoint with your IP address of the Load Balancer external endpoint. The URL can be found on the Container Service->Discovery and Load Balancing->Service.

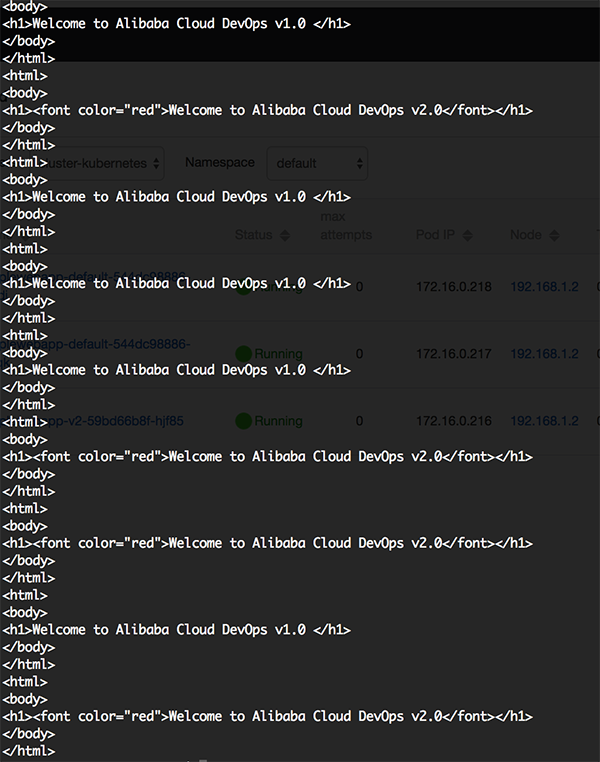
$for x in {1..10}; do curl <URL of the LB endpoint>/simplewebapp; doneThe result will appear as below. The response would be the output from Pods that have different version of codes. This is because the load balancer is distributing the request to the Pods averagely.
To distribute the load to the new image (2.0), you could increase the number of replicas on the deployment, to do this navigate to the Deployment. Click more->YAML to open up the YAML script file. Change the replicas attribute to more than 1, e.g. 10. Click update.
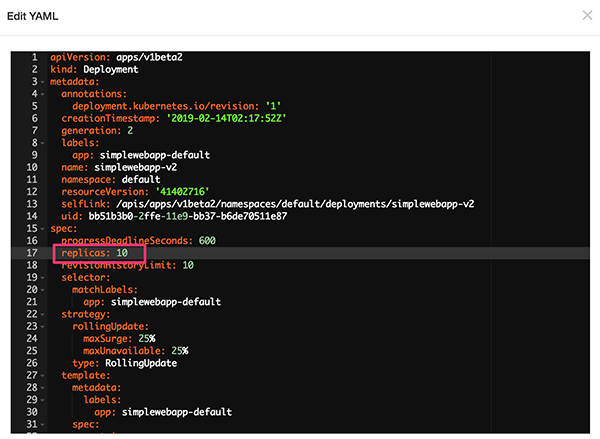
Check out the number of Pods, the new Pods based on version 2.0 would appear more than 1.
Go to the terminal and do another round of CURL command. There would be more responses output from the new Pods.
$for x in {1..10}; do curl <URL of the LB endpoint>/simplewebapp; done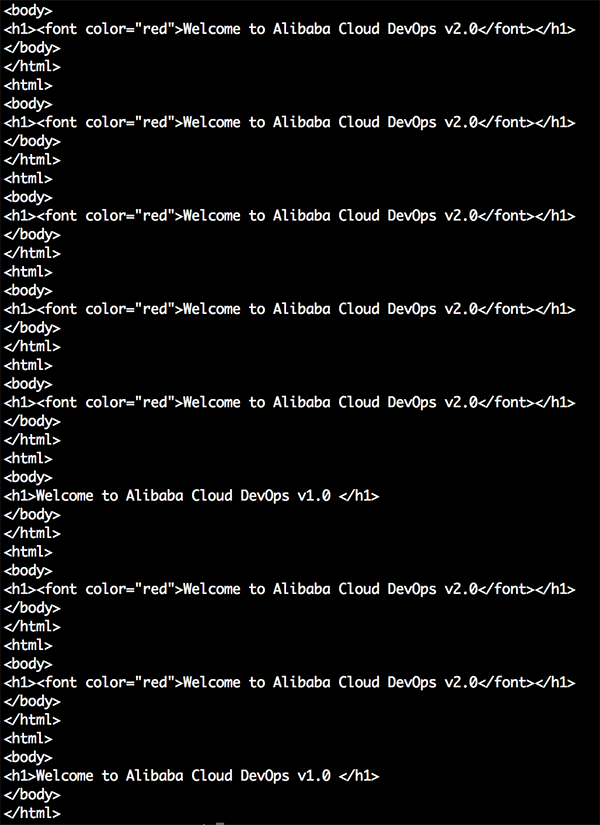
This section describes how to implement a gray release and a blue/green deployment by using the Ingress function provided by Alibaba Cloud Container Service for Kubernetes.
With a gray release or a blue/green deployment, you can create two identical production environments for the latest version of the target software and an earlier version. Then you can apply specific rules to reroute traffic from the earlier version to the latest version without affecting the software of the earlier version. After the software of the latest version has run without exceptions for a specified period, you can reroute all traffic from the earlier version to the latest version.
A/B testing is a type of comparative and incremental gray release. Specifically, with A/B testing, you can keep some users using the service of an earlier version, and reroute traffic of other users to the service of the latest version. If the service of the latest version runs without exceptions for the specified period of time, then you can gradually reroute all user traffic to the service of the latest version.
6.1.1 Scenario 1
For example, assume that Service A already runs online to provide an externally accessible Layer-7 service, and a new version of this service with new features, namely, Service A', is developed. You want to release Service A', but you do not want it to directly replace Service A at once. Additionally, you want the client requests of which the request headers contain foo=bar or the cookies contain foo=bar to be forwarded to Service A'. Then, after Service A' has run without exceptions for a specified period, you want to reroute all traffic from Service A to Service A', and then smoothly bring Service A offline.
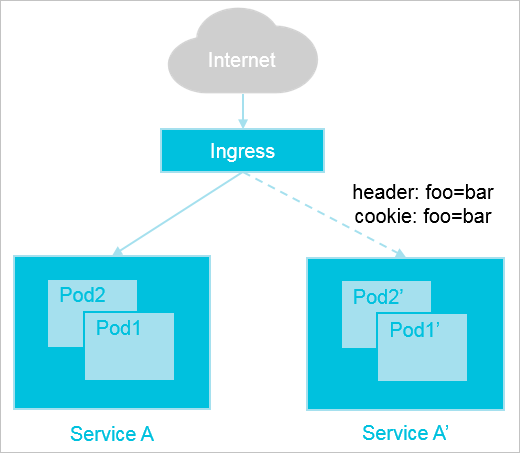
6.1.2 Scenario 2
For example, assume that an earlier version of a service, named Service B, is running online to provide an externally accessible Layer-7 service. However, it has known problems. A new version, namely Service B' is developed with the problems fixed and you want to release this latest version. However, you initially want to reroute only 20% of all client traffic to Service B'. Then, after Service B' has run without exceptions for a period, you want to reroute all traffic from Service B to Service B', and then smoothly bring Service B offline.
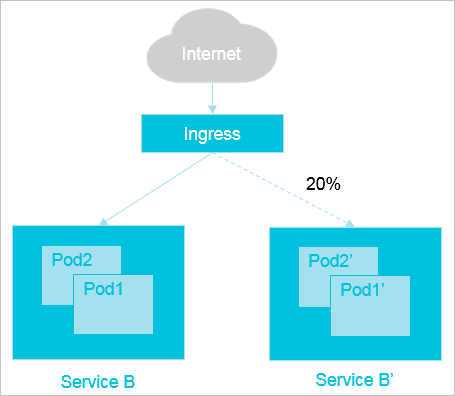
To meet the preceding application release requirements, Alibaba Cloud Container Service for Kubernetes uses the Ingress function to provide the following four methods of traffic distribution:
In A/B testing
In a blue/green deployment
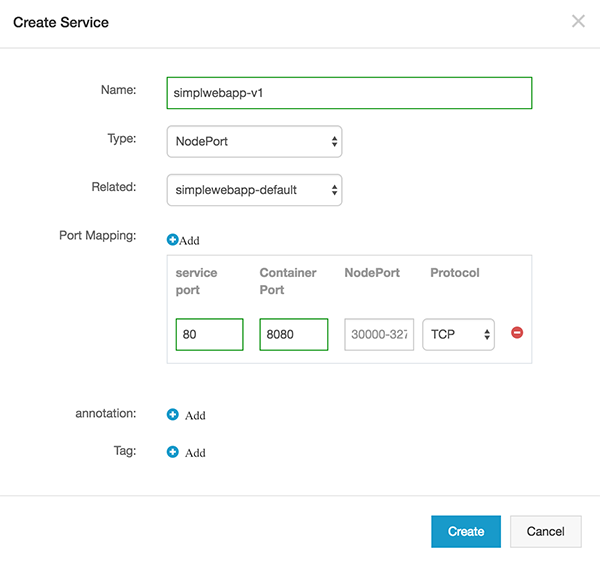
Before we create the ingress, first we would need to create two NodePort services for v1 and v2 respectively. Go to the Container Service->Service page and click Create button.
Key in the name of the service, choose NodePort and choose simplewebapp-default from the drop-down box. Enter 80 for service port and 8080 for container port, leave the NodePort and choose TCP as protocol.
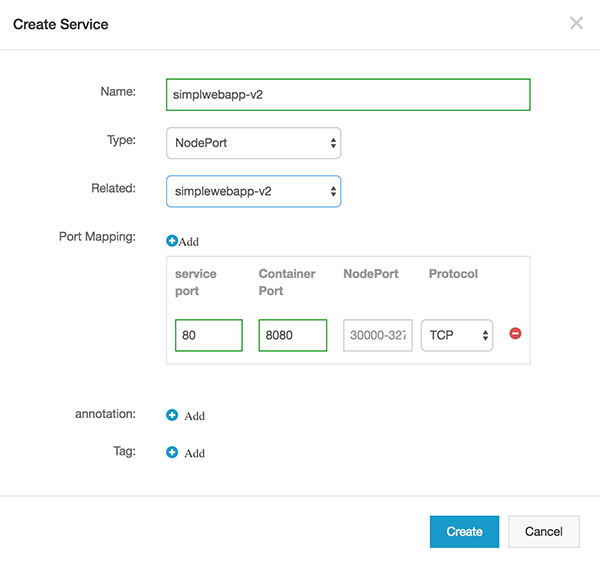
Create another service for the version 2.
Navigate to Container Service->Ingress. Click on Create button to create a new ingress.
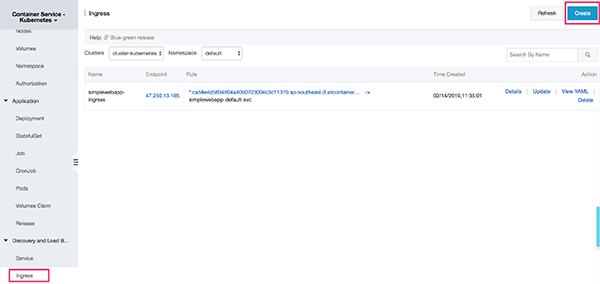
On the pop-up screen, key in the following details and click Create.
Notes:
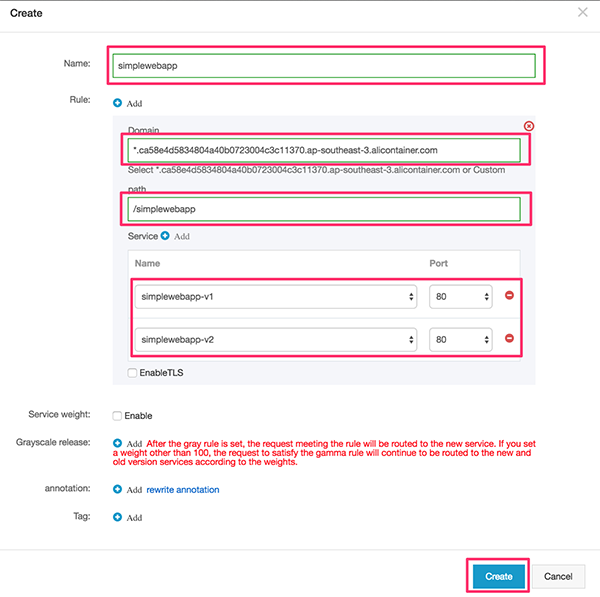
After the ingress is created, the new ingress should appear on the landing page as below

To view the website, simple copy the link on the rule, replace the * with the username that was used to activate the service earlier.

At this stage, even though there are two services created for this ingress but if the website is refreshed, it would only send the request to the version 1.0 application. This is because the service weight is not enabled.
In order to distribute the load to both versions, you would need to enable the service weight. To do that, click update on the ingress. On the pop-up dialog, check the Service Weight enable checkbox. To distribute the load evenly, set the weight on each of the service to 50.
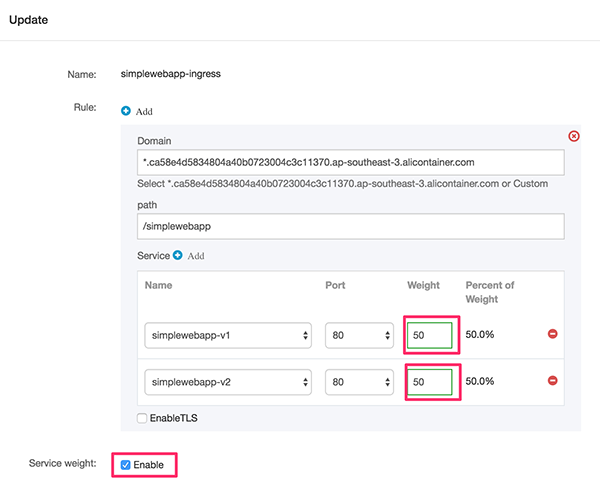
Now, the requests would be forwarded to the both version in a random manner. In ingress, you could also specify rules to match to a certain service. For e.g., if the query param matches the criteria, it will forward the request to the service.
Go back to the ingress page and click Update. On the pop-up dialog, add gray rule set, select the simplewebapp-v2 as the service, choose Query as type, choose Value match as matching rules and key in 2 as match value.
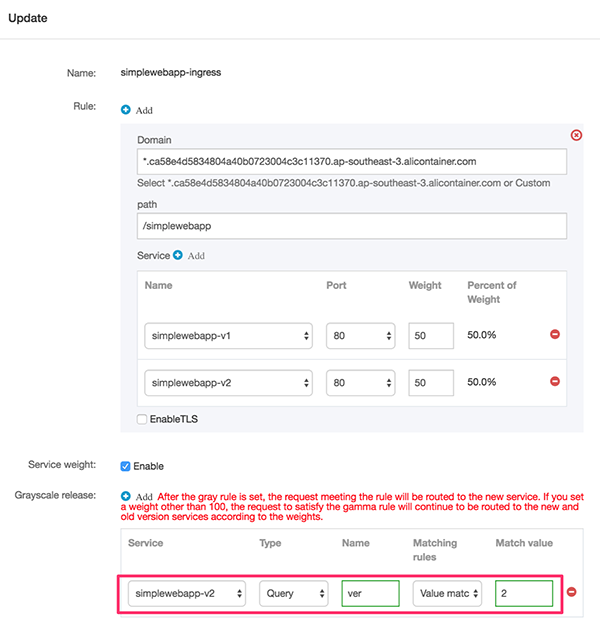
Refresh the URL on the browser, now the header text should be coming from the application v2. The response could be output from the application v1 due to the service weight enabled for 50/50. If there is a need to only forward request to the new version (v2), the weight on the simplewebapp-v1 should be reduced to 0.

Continuous Deployment Automation on Alibaba Cloud: CI/CD Automation on Container Service (2)
Deploying ASP.NET Core App in Visual Studio and Deploying on Simple Application Server

2,598 posts | 769 followers
FollowAlibaba Clouder - March 5, 2019
Alibaba Clouder - March 5, 2019
Alibaba Container Service - June 12, 2019
Alibaba Clouder - July 3, 2019
Alibaba Container Service - July 16, 2019
Alibaba Clouder - July 27, 2020

2,598 posts | 769 followers
FollowLearn More
 Container Registry
A secure image hosting platform providing containerized image lifecycle management
Learn More Container Service for Kubernetes
Alibaba Cloud Container Service for Kubernetes is a fully managed cloud container management service that supports native Kubernetes and integrates with other Alibaba Cloud products.
Learn MoreMore Posts by Alibaba Clouder