Common IoT solutions include the device, the cloud, and the application. Some solutions also involve big data and AI data analysis. Traditional Internet of Things (IoT) development emphasizes an ordered data transfer. That is, data collected by devices (things) will be sent to the cloud, which will then be sent to the application sequentially. However, with the rapid growth of IoT devices, this approach is not ideal as it is not scalable. Alibaba Cloud introduces a new approach to IoT development called the "Thing Model". In this model, two ends of the IoT development can run in parallel, significantly saving labor and material costs.
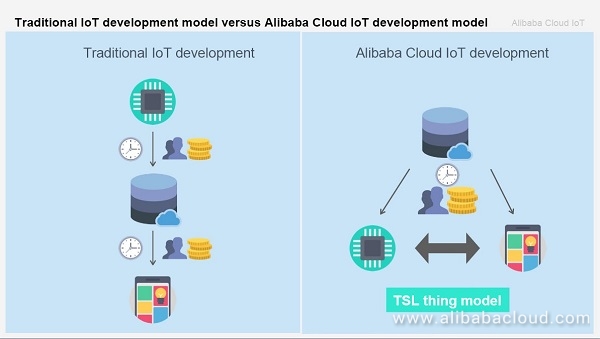
The "object model" is actually a description of what the device is, what it can do, and what services it can provide. In general, the thing model appears as a "feature" of the device, including at least one property, service or event. Alibaba Cloud IoT Platform's "Link Platform" and "Link Develop" both integrate the "thing model". After the developer defines the product's functionality, the system will automatically generate the "thing model" of the product.
When incorporated into development, this abstract concept is actually a few pieces of JSON format data, called TSL (Thing Specification Language). For example, if a developer wants to develop a "motorized curtain", the "thing model" can be defined as:
It seems quite standard, because these also need to be defined in traditional IoT device development. However, the charm of the "thing model" lies in the standardization and patterning of repetitive work, and an ICA standard is eventually formed.
Previously, various embedded software developers developed a "thing model" for a project, but it couldn't be reused for other projects due to differences between devices. When Internet developers received an IoT application project and finished development, the functions of the device were changed, and all of their development work became useless. These unfortunate situations are no longer an issue with the emergence of the "thing model".
Developers of all production lines first define the "object model" of the product. Then, the device-side production line only needs to consider the implementation of the device-side application, and the application-side production line can synchronously start related application development using a virtual device. During the development of the equipment production line, it is not necessary to start all over again to add functions, and incremental development can be leveraged. Also, when requirements change, the application line can be adjusted synchronously, enabling highly-efficient development.
At present, Alibaba Cloud ICA standard has identified hundreds of common "thing models", and innovative products such as pet feeding machines are also included. Of course, if the existing standard does not meet your needs, we also strongly encourage developers to submit their own thing models, and to be proud "creators".
Let's now look at how we can quickly set up a simple IoT network on Alibaba Cloud, as well as integrate other Alibaba Cloud products into our network.
A typical IoT solution includes device, cloud, and application. This example uses the Developerkit demoboard with built-in AliOS Things as the device, to upload the three-axis coordinate value of the onboard accelerometer to the cloud, dump the data in Table Store, and finally display it through a visual line chart.
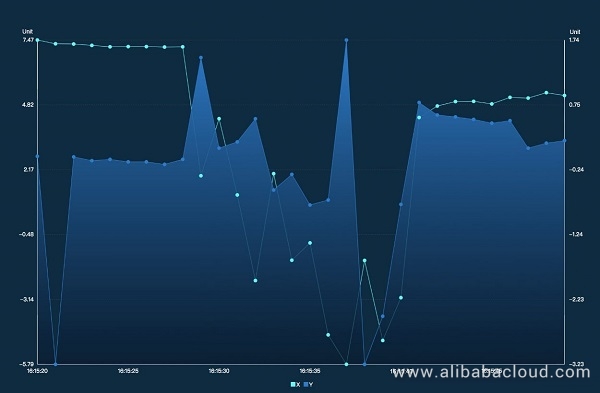
The Alibaba Cloud products used in this example include: IoT platform, Table Store, and DataV.
Alibaba Cloud IoT platform provides secure and reliable device connection and communication capabilities to help users collect massive device data to the cloud. The platform also provides feature-rich device management to help users remotely maintain devices. The platform further provides rich APIs and the Rule Engine that is incorporated with various cloud products from Alibaba Cloud, to help users quickly integrate applications.
To create a similar project, sign up for an Alibaba Cloud account and head towards the IoT Platform console.
Create advanced product - data format: Alink JSON

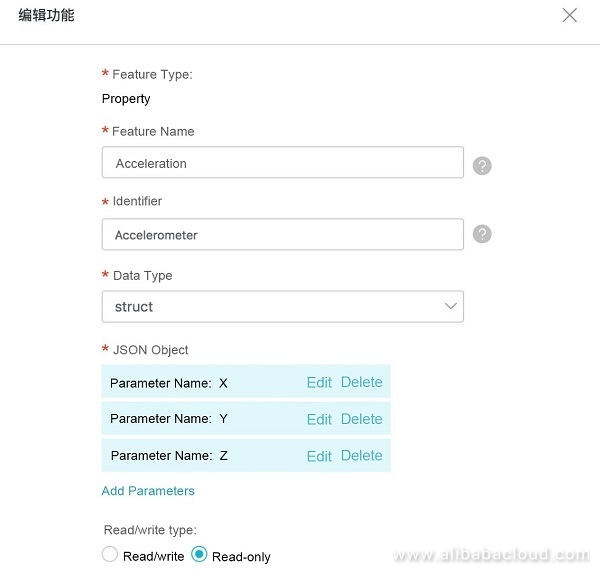
Because there is no accelerometer-related "thing model", we need to define the relevant features first:
Define properties for an accelerometer:
The member definitions are X, Y, and Z, respectively, indicating the acceleration values in each axial direction:
Type: float (double)
Once defined, it is shown as follows:
Go to "Device Management" - "Add Device" - select the corresponding product - "Get Device Identity Triplet"
At this point, the early stages of the platform-related operations are complete. Throughout the process, we established the "thing model" and got the device identity, which are the basis of the subsequent device development.
After operations on the platform are complete, let's go back to the device development line.
AliOS Things is a Linux-based highly scalable IoT operating system. The purpose is to provide developers with better cloud integration and optimization, simpler development experience, more protection, and better overall performance and algorithm support. Compared to other embedded operating systems, lightweight and fast cloud connection are its core features.
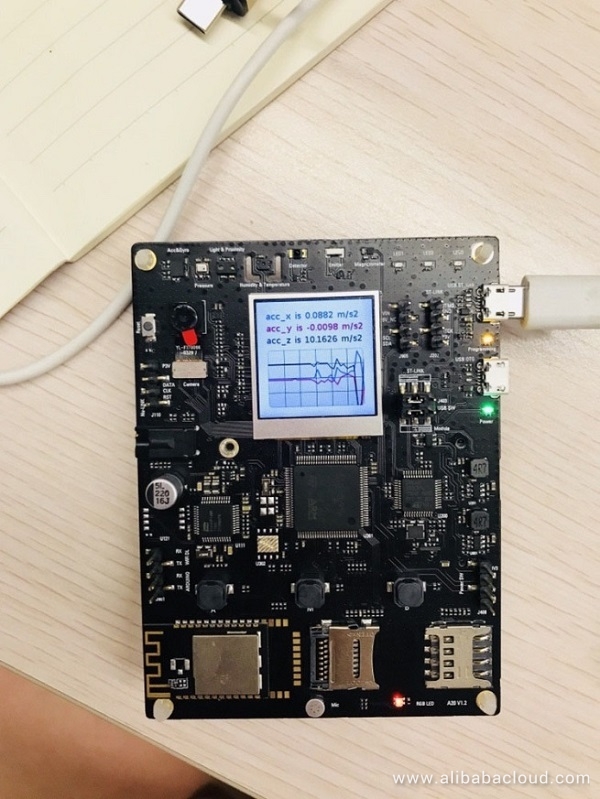
Currently, AliOS Things supports various common MCUs and demoboards. A detailed list can be found in the GitHub official repository. This document uses the Developerkit with built-in AliOS Things as an example. The board is equipped with an accelerometer.
First use Git to clone the open source AliOS Things code. It is recommended to use the developer branch: git clone git@github.com:alibaba/AliOS-Things.git. Then use the Visual Studio Code software and install the AliOS Studio plug-in. After that, open the AliOS-Things folder and the code will be imported automatically. Here we're going to use example/ldapp as the sample code, to update the device activation credential in example/ldapp/mqtt-example.c. You can fill the activation credentials generated in the previous section in the code, so that the application will use the new credentials to connect to the cloud, for example:
#define PRODUCT_KEY             "a1xxxxxxxxo"
#define DEVICE_NAME             "QSxxxxxxxxxxxxxxxxHc"
#define DEVICE_SECRET           "O6xxxxxxxxxxxxxxxxxxxxxxxxxxxxEi"
When all is done, save the changes through Command+s (Mac) or Ctrl+s (Windows). Then click the compile object button (magnifying glass) at the bottom of the window and select ldapp - developkit.

Then click the √ button to compile:

It appears as:
Build complete
Making .gdbinit
This means that the compilation succeeded. Finally, connect the development board to your computer by clicking the plug button.

After the connection is successful, click the lightning button to program.

It appears as:
firmware upload succeedThat means the programming is successful, the demoboard will automatically restart, and the screen will display the acceleration line chart.
After confirming that the demoboard is properly programed and running, click the plug button again to connect and select "Restart Task".

Here we directly connect to Wi-Fi to complete the network configuration by entering commands in the serial port:
netmgr connect SSID PASSWORDFor example:
# netmgr connect mywifi mypassword
[330060]<I> Will connect via at cmd: AT+WJAP=mywifi,mypassword
# [330100]<I> AT command AT+WJAP=mywifi,mypassword succeed, rsp:
OK
[337560]<I> AT command AT+WJAPIP? succeed, rsp:
+WJAPIP?:192.168.1.19,255.255.255.0,192.168.1.1,192.168.1.1
OK
[337580]<I> AT command AT+WMAC? succeed, rsp:
+WMAC:c8936840aa40
OK
After the device is successfully connected to Wi-Fi, the MQTT connection is automatically established, and the sensor-collected data will be periodically reported to the cloud.
After the device development is complete, we go back to the IoT Platform to view the real-time device status:

At this point, work related to embedded developers has come to an end, and data is on the cloud. As for whether application and data development is to be self-developed or outsourced, it is up to you.
By default, the IoT Platform stores the data uploaded by the device in the public cloud. In actual business scenarios, there is often a need to dump data to a private database. In this case, we need to use the data forwarding function.
Before data forwarding, we must first understand what the data uploaded by the device to the cloud is. Specifically, we need to know what the topic of the data reported by the device is.
In the IoT Platform, open "Device Management" - "View" - "Topic List", you can see the default topic of the upstream and downstream device data:
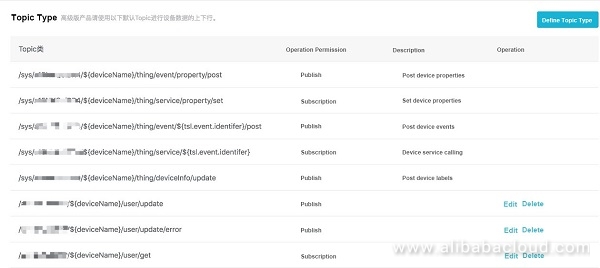
With the topic, we know how to extract the data. Then we go to the "Rule Engine" section and select "Create Rule" - "JSON Format" - "Process Data" - "Edit" - and enter the following query fields:
items.Accelerometer.value.X, items.Accelerometer.value.Y, items.Accelerometer.value.Z, deviceName() as deviceName, timestamp('yyyy-MM-dd HH:mm:ss') as timeThen the data is filtered.
After handling the Rule Engine, you need to select the database. There are various existing databases, two of which are suitable for IoT scenarios: Table Store and Time Series Database. Here we choose the former, which is simpler.
Activate the Table Store service and create an OTS instance. Here, the primary key is recommended to be filled in with deviceName and time, both in string format:
Then we will go back to the IoT Platform, select "Forward Data" under "Process Data" and select the operation "Forward to Table Store".
Finally, power on the device, configure the network, and go back to the Table Store to confirm that the data has been properly forwarded:
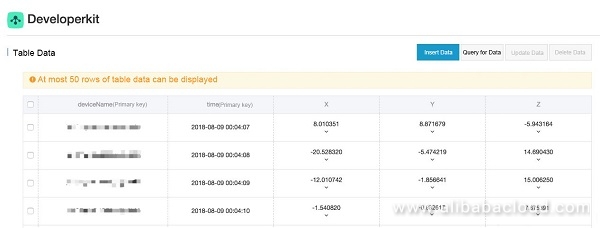
If the table shows the above data, your data has been successfully forwarded to the Table Store. Then you can use the data for data modeling, deep learning, etc.
We now have a functional IoT system with all data under our control. But if we want to visualize this data in real time, we can integrate Alibaba Cloud DataV. DataV is a data visualization tool launched by Alibaba Cloud. It can help non-professional engineers to easily build professional visual applications through a graphical UI, so that more people can experience the charm of data visualization.
In this example, we use DataV to read the IoT device data from the aforementioned Table Store and make a line chart.
First, activate the DataV service. Note that it is a paid service, which is the only service requiring prepayment in this series. (At present, only the enterprise version supports the Table Store as a data source)
After activating the service, we can see various templates. The scenario of this example is relatively simple, so we select "New Visualization" - "Blank Template", drag the "Dual Axis Chart" component from above:
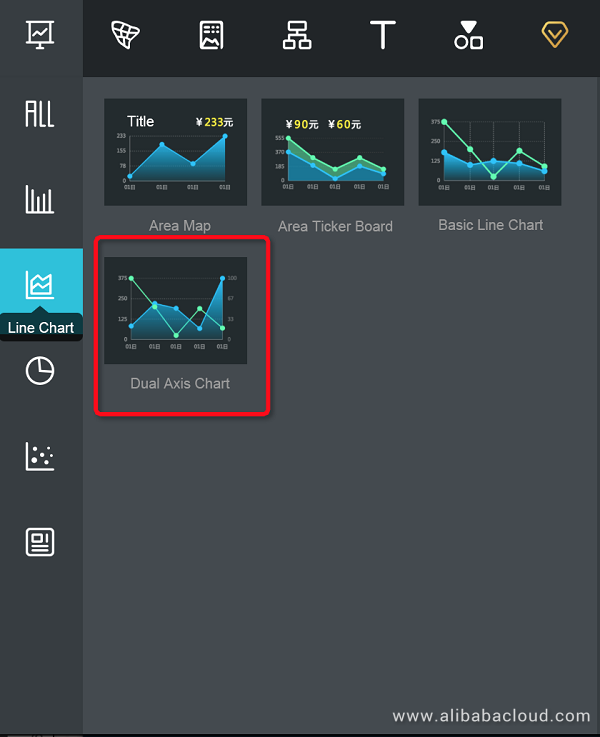
Click the newly added "Dual Axis Chart" - Data, we first integrate the data source, select TableStore, and New Configuration.
Note: AK means accesskey, which is accessible on the upper right corner of the Alibaba Cloud console.
For the External Network, you can copy the external access address of the table in Table Store and paste it.
The "Select Operation" section is relatively complicated. In fact, it let you set the value range for the data table, but this range must be written in JSON code. You may be confused here, but don't worry, we provide generic code for this example. First, select "getRange", then fill in the following data:
{
  "table_name": "your table name",
  "direction": "BACKWARD",
  "columns": [],
  "range": {
    "limit": 30,
    "start": {
      "deviceName": "your device name",
      "time": "2019-01-30 17:12:44"
    },
    "end": {
      "deviceName": "your device name",
      "time": "2018-08-08 17:56:14"
    }
  }
}
The start time can be set to a relatively distant point in the future, so that the chart will change in real time over time.
Then check "Automatically Update Request", and the time can be set to any value according to the time interval of device data upload.
Finally, click "View Data Results" to verify the previous operations. If you can filter out the appropriate data, then you have completed the previous steps correctly.
The last step, go back to the "Style" section, properly adjust the axis label and interval, power the device, configure the network, and click "Preview" to see final chart:
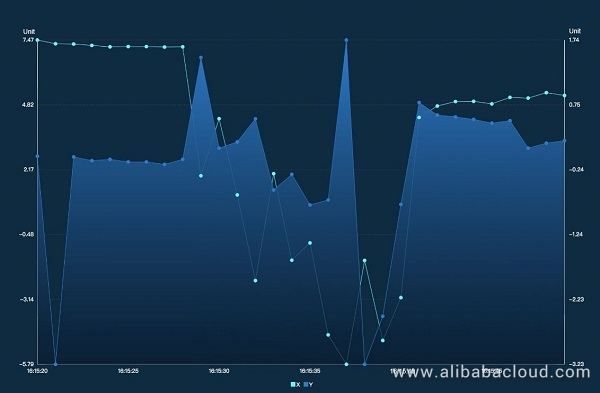
Of course, you can also click "Publish" to share the chart with everyone on an external network.
In this article, we have built an end-to-end IoT accelerometer solution using Alibaba Cloud's suite of IoT products. We first came into contact with the concept of the thing model, and then built two IoT-related platforms of Alibaba Cloud. After that, we learned device application development based on AliOS Things, and then gave some developers a better understanding of how data dump and data visualization are implemented.
To learn more about Alibaba Cloud IoT Platform, visit www.alibabacloud.com/product/iot
How to Implement Dynamic Registration of IoT Devices Using Alibaba Cloud Function Compute
Alibaba Clouder - September 16, 2019
GeekHouse - October 19, 2018
Alibaba Cloud Native Community - November 27, 2025
GXIC - February 27, 2019
Alibaba Clouder - November 7, 2018
Alibaba Clouder - July 10, 2018
 IoT Platform
Provides secure and reliable communication between devices and the IoT Platform which allows you to manage a large number of devices on a single IoT Platform.
Learn More IoT Solution
A cloud solution for smart technology providers to quickly build stable, cost-efficient, and reliable ubiquitous platforms
Learn More Accelerated Global Networking Solution for Distance Learning
Alibaba Cloud offers an accelerated global networking solution that makes distance learning just the same as in-class teaching.
Learn More Global Internet Access Solution
Migrate your Internet Data Center’s (IDC) Internet gateway to the cloud securely through Alibaba Cloud’s high-quality Internet bandwidth and premium Mainland China route.
Learn MoreMore Posts by GXIC