After microservices, Service Mesh has been the next revolutionary technology to push the software industry forward. Its service governance methodology changed the application of technology and the process of service development.
With Service Mesh, the rules of user services and governance services running on the data plane are independent of each other. Its rule-definition component running on the control plane pushes specific traffic control rules to its proxy component running on the data plane. Then, the proxy controls the ingress and egress traffic of user services to manage the services.
Capabilities originally implemented by service developers, such as service discovery, fault tolerance, grayscale, and traffic replication, can be implemented by Service Mesh non-intrusively. Additionally, Service Mesh provides various features, such as access control, authentication, and authorization, to further reduce the costs of developing user services.
Alibaba Cloud Service Mesh (ASM) is a managed service mesh based on Alibaba Cloud Container Service for Kubernetes (ACK)., ASM horizontally integrates the cloud-native capabilities of Alibaba Cloud in the underlying layer while providing comprehensive Service Mesh capabilities. This eliminates the tedious work of building and operating Istio for users. Istio is an open-source independent service mesh that provides the fundamentals you need to successfully run a distributed microservice architecture. This article explains how to host gRPC services on ASM.
Similar to the HTTP protocol, the gRPC protocol supports communication between services written in different programming languages or running on different operating systems. The gRPC protocol also supports stream-based communication. gRPC has gradually become an industry standard. If your gRPC service is mesh-based, services that support different protocols than yours can connect to your service mesh at low costs after the protocols are converted to gRPC. This allows services to communicate across different technology stacks.
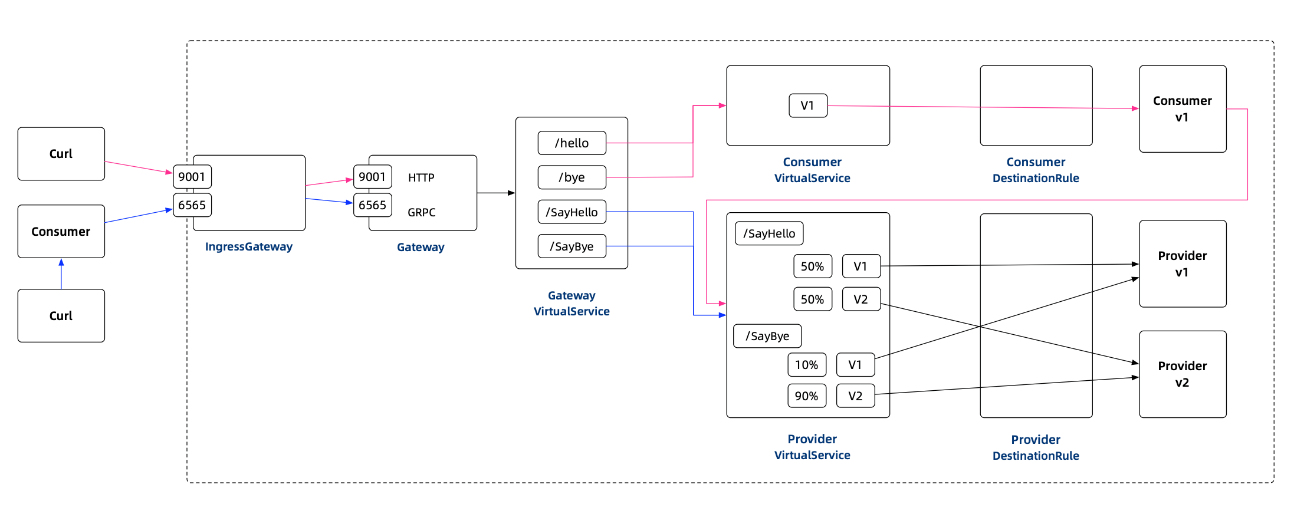
This sample project of a gRPC service is written in Java (the most popular programming language) and uses Spring Boot (the most efficient programming framework.) The following figure shows the topology of the sample project:

The sample project consists of three modules: Common, Provider, and Consumer. The Common module converts the protobuf that defines the gRPC service into the Java RPC template code. The Provider and the Consumer modules depend on the Common module and serve as the server and client of the gRPC service, respectively.
The protobuf of the sample project is defined in the following snippet to implement two methods: SayHello and SayBye. The input and output parameters of the SayHello methods are strings. SayBye has only one output parameter, which is also a string.
syntax = "proto3";
import "google/protobuf/empty.proto";
package org.feuyeux.grpc;

option java_multiple_files = true;
option java_package = "org.feuyeux.grpc.proto";

service Greeter {
  rpc SayHello (HelloRequest) returns (HelloReply) {}
  rpc SayBye (google.protobuf.Empty) returns (HelloReply) {}
}

message HelloRequest {
  string name = 1;
}

message HelloReply {
  string reply = 1;
}
You can use the protobuf-maven-plugin to automatically generate the RPC template code. Then, you can use the RPC template code to build the Common module.
grpc-spring-boot-starter
The Provider module uses the grpc-spring-boot-starter package to minimize coding and implement the gRPC server logic. This sample implements two gRPC methods to show you how different results are returned when the traffic is different.
The code sample for the first method is shown below:
@GRpcService
public class GreeterImpl extends GreeterImplBase {

    @Override
    public void sayHello(HelloRequest request, StreamObserver<HelloReply> responseObserver) {
        String message = "Hello " + request.getName() + "!";
        HelloReply helloReply = HelloReply.newBuilder().setReply(message).build();
        responseObserver.onNext(helloReply);
        responseObserver.onCompleted();
    }

    @Override
    public void sayBye(com.google.protobuf.Empty request, StreamObserver<HelloReply> responseObserver) {
        String message = "Bye bye!";
        HelloReply helloReply = HelloReply.newBuilder().setReply(message).build();
        responseObserver.onNext(helloReply);
        responseObserver.onCompleted();
    }
}
The code sample for the second method is shown below:
@GRpcService
public class GreeterImpl2 extends GreeterImplBase {

    @Override
    public void sayHello(HelloRequest request, StreamObserver<HelloReply> responseObserver) {
        String message = "Bonjour " + request.getName() + "!";
        HelloReply helloReply = HelloReply.newBuilder().setReply(message).build();
        responseObserver.onNext(helloReply);
        responseObserver.onCompleted();
    }

    @Override
    public void sayBye(com.google.protobuf.Empty request, StreamObserver<HelloReply> responseObserver) {
        String message = "au revoir!";
        HelloReply helloReply = HelloReply.newBuilder().setReply(message).build();
        responseObserver.onNext(helloReply);
        responseObserver.onCompleted();
    }
}The Consumer module is used to expose RESTful services to external users and to call the gRPC provider (server) as a gRPC client. The code sample is shown below:
@RestController
public class GreeterController {
    private static String GRPC_PROVIDER_HOST;

    static {
        GRPC_PROVIDER_HOST = System.getenv("GRPC_PROVIDER_HOST");
        if (GRPC_PROVIDER_HOST == null || GRPC_PROVIDER_HOST.isEmpty()) {
            GRPC_PROVIDER_HOST = "provider";
        }
        LOGGER.info("GRPC_PROVIDER_HOST={}", GRPC_PROVIDER_HOST);
    }

    @GetMapping(path = "/hello/{msg}")
    public String sayHello(@PathVariable String msg) {
        final ManagedChannel channel = ManagedChannelBuilder.forAddress(GRPC_PROVIDER_HOST, 6565)
                .usePlaintext()
                .build();
        final GreeterGrpc.GreeterFutureStub stub = GreeterGrpc.newFutureStub(channel);
        ListenableFuture<HelloReply> future = stub.sayHello(HelloRequest.newBuilder().setName(msg).build());
        try {
            return future.get().getReply();
        } catch (InterruptedException | ExecutionException e) {
            LOGGER.error("", e);
            return "ERROR";
        }
    }

    @GetMapping("bye")
    public String sayBye() {
        final ManagedChannel channel = ManagedChannelBuilder.forAddress(GRPC_PROVIDER_HOST, 6565)
                .usePlaintext()
                .build();
        final GreeterGrpc.GreeterFutureStub stub = GreeterGrpc.newFutureStub(channel);
        ListenableFuture<HelloReply> future = stub.sayBye(Empty.newBuilder().build());
        try {
            return future.get().getReply();
        } catch (InterruptedException | ExecutionException e) {
            LOGGER.error("", e);
            return "ERROR";
        }
    }
}
Note: The variable GRPC_PROVIDER_HOST in ManagedChannelBuilder.forAddress(GRPC_PROVIDER_HOST, 6565) is used to obtain the address of the Provider service. As you can see, there is no service discovery capability in the service development process. The value of the GRPC_PROVIDER_HOST variable is obtained from the system environment variable. Also, when the value is empty, a hardcode value provider is used. This value is used as the default value of the Provider service configured in Istio.
This section shows you how to locally run and test the sample project. First, run the following scripts to build and run the Provider and Consumer services:
# terminal 1
mvn clean install -DskipTests -U
java -jar provider/target/provider-1.0.0.jar

# terminal 2
export GRPC_PROVIDER_HOST=localhost
java -jar consumer/target/consumer-1.0.0.jar
Then, use cURL to send an HTTP request to the Consumer:
# terminal 3
$ curl localhost:9001/hello/feuyeux

Hello feuyeux!

$ curl localhost:9001/bye

Bye bye!
Finally, use gRPCurl to test the Provider:
$ grpcurl -plaintext -d @ localhost:6565 org.feuyeux.grpc.Greeter/SayHello <<EOM
{
  "name":"feuyeux"
}
EOM

{
  "reply": "Hello feuyeux!"
}

$ grpcurl -plaintext localhost:6565 org.feuyeux.grpc.Greeter/SayBye
{
  "reply": "Bye bye!"
}After you test the service, create three Docker images, and deploy them on Kubernetes as Deployments. Take the Dockerfile of the Provider as an example:
FROM openjdk:8-jdk-alpine
ARG JAR_FILE=provider-1.0.0.jar
COPY ${JAR_FILE} provider.jar
COPY grpcurl /usr/bin/grpcurl
ENTRYPOINT ["java","-jar","/provider.jar"]
Use the following script to build the images and push them to a remote repository:
docker build -f grpc.provider.dockerfile -t feuyeux/grpc_provider_v1:1.0.0 .
docker build -f grpc.provider.dockerfile -t feuyeux/grpc_provider_v2:1.0.0 .
docker build -f grpc.consumer.dockerfile -t feuyeux/grpc_consumer:1.0.0 .

docker push feuyeux/grpc_provider_v1:1.0.0
docker push feuyeux/grpc_provider_v2:1.0.0
docker push feuyeux/grpc_consumer:1.0.0
Use the following script to run and test a service locally:
# terminal 1
docker run --name provider2 -p 6565:6565 feuyeux/grpc_provider_v2:1.0.0

# terminal 2
docker exec -it provider2 sh
grpcurl -v -plaintext localhost:6565 org.feuyeux.grpc.Greeter/SayBye
exit
# terminal 3
export LOCAL=$(ipconfig getifaddr en0)
docker run --name consumer -e GRPC_PROVIDER_HOST=${LOCAL} -p 9001:9001 feuyeux/grpc_consumer
# terminal 4
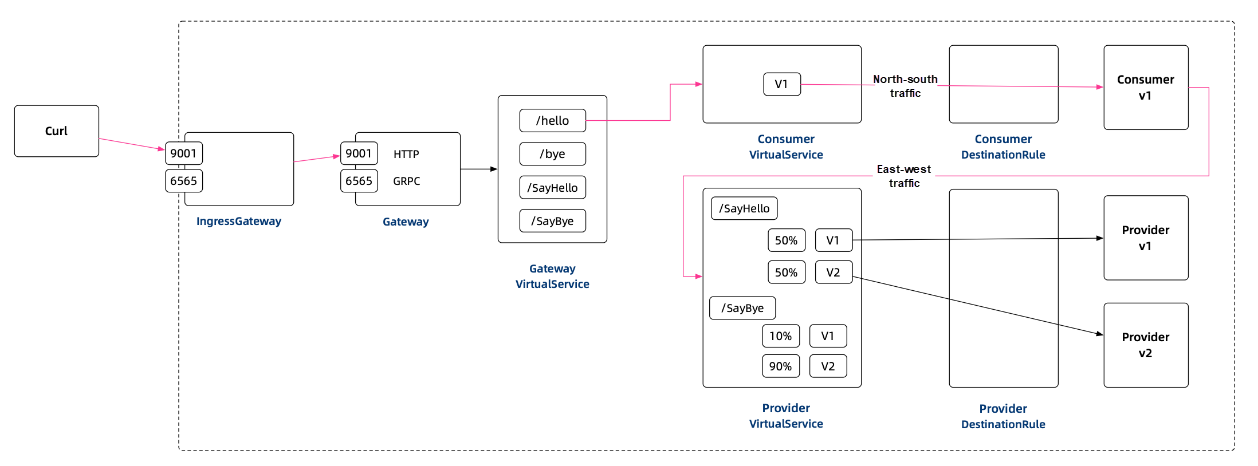
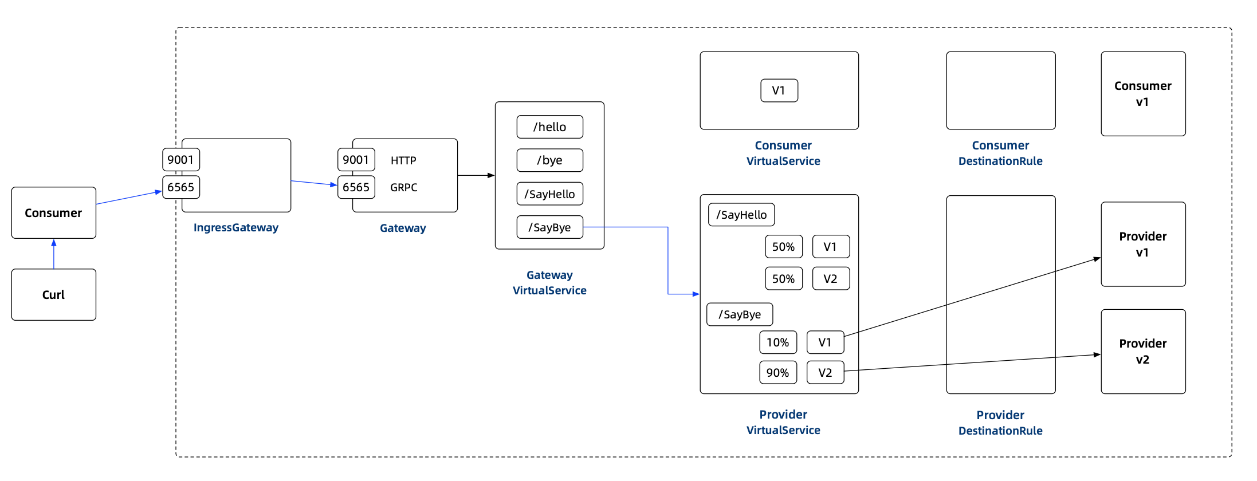
curl -i localhost:9001/byeAfter you test the images, proceed to the next step. This section comprehensively describes the service governance configuration for the following topology:

The Deployment of the Consumer is declared below:
apiVersion: apps/v1
kind: Deployment
metadata:
  labels:
    app: consumer
    version: v1
...
      containers:
        - name: consumer
          image: feuyeux/grpc_consumer:1.0.0
          imagePullPolicy: IfNotPresent
          ports:
            - containerPort: 9001
The Deployment of Provider 1 is declared below:
apiVersion: apps/v1
kind: Deployment
metadata:
  name: provider-v1
  labels:
    app: provider
    version: v1
...
      containers:
        - name: provider
          image: feuyeux/grpc_provider_v1:1.0.0
          imagePullPolicy: IfNotPresent
          ports:
            - containerPort: 6565
The Deployment of Provider 2 is declared below:
apiVersion: apps/v1
kind: Deployment
metadata:
  name: provider-v2
  labels:
    app: provider
    version: v2
...
      containers:
        - name: provider
          image: feuyeux/grpc_provider_v2:1.0.0
          imagePullPolicy: IfNotPresent
          ports:
            - containerPort: 6565
The three images that you created in previous steps are used in Deployments. When the value of imagePullPolicy is set to IfNotPresent, these images are pulled when they are not present locally.
Note: The values of the labels.app fields of Provider 1 and Provider 2 are both set to "provider." This label is the unique identifier of a Provider. Two Providers are discovered and recognized by the Selector component of the Service Module as two versions of the same Provider service only when values of their labels.app fields are the same.
The Service of a Provider is declared below:
apiVersion: v1
kind: Service
metadata:
  name: provider
  labels:
    app: provider
    service: provider
spec:
  ports:
    - port: 6565
      name: grpc
      protocol: TCP
  selector:
    app: provider
As mentioned earlier, as a service developer, you do not need to implement the service registration and service discovery functions. You do not need to call components, such as ZooKeeper, etcd, and Consul, from the client to implement the sample project. The domain name of a service is used as the name for service registration, and the corresponding instance can be found based on this name when the service is discovered. Therefore, the hard-coded value "provider" is used.
In a classic scenario of service governance, different RESTful methods are routed to HTTP services by matching the paths. gRPC routing is similar and is implemented through HTTP/2. The service API and method name of gRPC in HTTP/2 format is: Path:/Service-Name/{method name}. Therefore, you can define the following matching rules for the VirtualService of Gateway:
apiVersion: networking.istio.io/v1alpha3
kind: VirtualService
metadata:
  name: grpc-gw-vs
spec:
  hosts:
    - "*"
  gateways:
    - grpc-gateway
  http:
...
    - match:
        - uri:
            prefix: /org.feuyeux.grpc.Greeter/SayBye
        - uri:
prefix: /org.feuyeux.grpc.Greeter/SayHelloAfter understanding path-based gRPC routing, you can define AB traffic like this:
apiVersion: networking.istio.io/v1alpha3
kind: VirtualService
metadata:
  name: provider
spec:
  gateways:
    - grpc-gateway
  hosts:
    - provider
  http:
    - match:
        - uri:
            prefix: /org.feuyeux.grpc.Greeter/SayHello
      name: hello-routes
      route:
        - destination:
            host: provider
            subset: v1
          weight: 50
        - destination:
            host: provider
            subset: v2
          weight: 50
    - match:
        - uri:
            prefix: /org.feuyeux.grpc.Greeter/SayBye
      name: bye-route
...
At this point, the core capabilities of the sample project have been outlined. For more information about the code, clone this sample project. The next section shows you how to deploy your gRPC service instance on ASM.
Log on to the ACK console with your Alibaba Cloud account to create a Kubernetes cluster. For more information, please see the help document: Quickly create a Kubernetes cluster.
Log on to the ASM console to create an ASM instance. For more information, please see the help document: Alibaba Cloud Service Mesh > Quick Start > Use Process.
After you create an ASM instance, ensure that an ACK cluster has been added to the data plane. Then, configure the data plane.
You must check the following two kubeconfig files before you deploy your app on the data plane.
~/shop/bj_config.~/shop/bj_asm_config.Note: Use the ~/shop/bj_config during deployment on the data plane, and use the ~/shop/bj_asm_config during deployment on the control plane.
kubectl \
--kubeconfig ~/shop/bj_config \
label namespace default istio-injection=enabled
Log on to the ACK console, and choose "Clusters > Namespaces" in the left-side navigation pane to configure auto-injection.
export DEMO_HOME=

kubectl \
--kubeconfig ~/shop/bj_config \
apply -f $DEMO_HOME/istio/kube/consumer.yaml

kubectl \
--kubeconfig ~/shop/bj_config \
apply -f $DEMO_HOME/istio/kube/provider1.yaml

kubectl \
--kubeconfig ~/shop/bj_config \
apply -f $DEMO_HOME/istio/kube/provider2.yaml
You can go to the following pages on the ACK console to view existing deployments, pods, and services:
You can run the following command to verify whether the pod status meets your expectations:
$ kubectl \
--kubeconfig ~/shop/bj_config \
get pod

NAME                           READY   STATUS    RESTARTS   AGE
consumer-v1-5c565d57f-vb8qb    2/2     Running   0          7h24m
provider-v1-54dbbb65d8-lzfnj   2/2     Running   0          7h24m
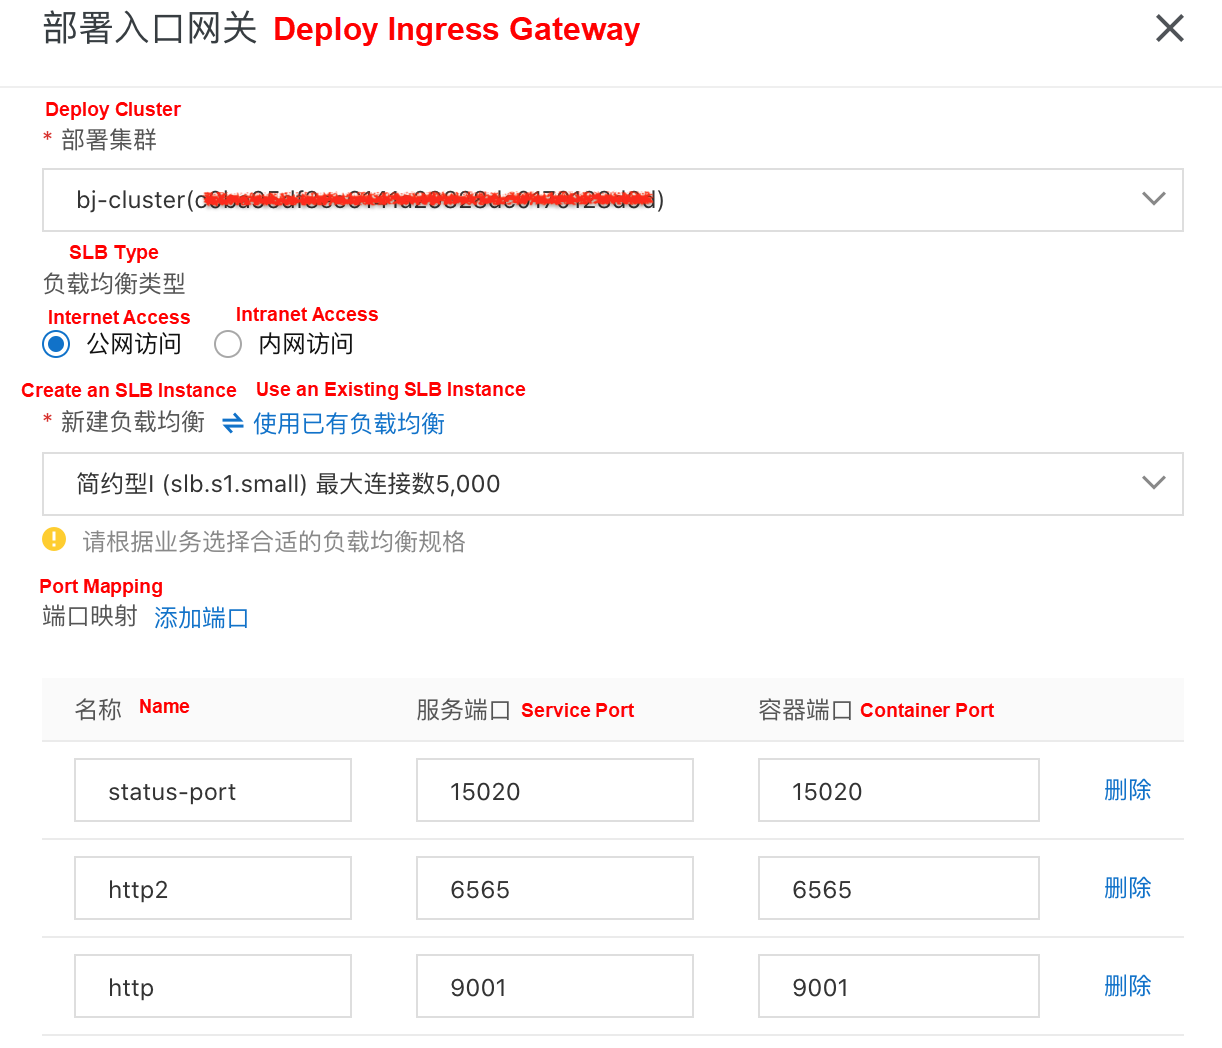
provider-v2-9fdf7bd6b-58d4v 2/2 Running 0 7h24mFinally, configure the Ingress Gateway Service on the ASM console to expose port 9001 for HTTP and port 6565 for gRPC.

The Ingress Gateway IP address 39.102.37.176 will be used in the test and verification process later.

kubectl \
--kubeconfig ~/shop/bj_asm_config \
apply -f $DEMO_HOME/istio/networking/gateway.yaml
After you deploy a gateway instance, you can view it on the Service Gateway page of the Control Plane on the ASM console. You can also create and delete Gateway instances of ASM on this page.

kubectl \
--kubeconfig ~/shop/bj_asm_config \
apply -f $DEMO_HOME/istio/networking/gateway-virtual-service.yaml

kubectl \
--kubeconfig ~/shop/bj_asm_config \
apply -f $DEMO_HOME/istio/networking/provider-virtual-service.yaml


kubectl \
--kubeconfig ~/shop/bj_asm_config \
apply -f $DEMO_HOME/istio/networking/consumer-virtual-service.yaml
After you deploy a virtual service, you can view a list of VirtualService instances on the VirtualService page of the Data Plane on the ASM console. You can also create and delete ASM VirtualService instances on this page.

kubectl \
--kubeconfig ~/shop/bj_asm_config \
apply -f $DEMO_HOME/istio/networking/provider-destination-rule.yaml

kubectl \
--kubeconfig ~/shop/bj_asm_config \
apply -f $DEMO_HOME/istio/networking/consumer-destination-rule.yaml
After you deploy a destination rule, you can view a list of DestinationRule instances on the DestinationRule page of the Control Plane of the ASM console. You can also create and delete ASM DestinationRule instances on this page.

After you deploy the gRPC service on ASM, you must verify the traffic of the following link:

HOST=39.102.37.176
for ((i=1;i<=10;i++)) ;
do
curl ${HOST}:9001/hello/feuyeux
echo
done
Then, verify the traffic of the following link:

# terminal 1
export GRPC_PROVIDER_HOST=39.102.37.176
java -jar consumer/target/consumer-1.0.0.jar

# terminal 2
for ((i=1;i<=10;i++)) ;
do
curl localhost:9001/bye
echo
done
So far, the gPRC service has been successfully deployed on ASM. You can explore more ASM capabilities based on your business requirements. We encourage you to share your ideas with us.
Alibaba Container Service - September 13, 2024
Alibaba Cloud Blockchain Service Team - August 29, 2018
Alibaba Cloud Native Community - April 6, 2023
Alibaba Cloud Native Community - December 19, 2022
feuyeux - May 8, 2021
Alibaba Cloud Native - October 9, 2021
 Container Service for Kubernetes
Alibaba Cloud Container Service for Kubernetes is a fully managed cloud container management service that supports native Kubernetes and integrates with other Alibaba Cloud products.
Learn More ACK One
Provides a control plane to allow users to manage Kubernetes clusters that run based on different infrastructure resources
Learn More Cloud-Native Applications Management Solution
Accelerate and secure the development, deployment, and management of containerized applications cost-effectively.
Learn More Managed Service for Grafana
Managed Service for Grafana displays a large amount of data in real time to provide an overview of business and O&M monitoring.
Learn MoreMore Posts by feuyeux