As a CNCF member, Weave Flagger provides continuous integration and delivery capabilities. Flagger divides progressive releases into three types:
This article introduces the progressive Canary release with Flagger on Alibaba Service Mesh (ASM).
Run the following command to deploy Flagger (For the complete script, please see demo_canary.sh).
alias k="kubectl --kubeconfig $USER_CONFIG"
alias h="helm --kubeconfig $USER_CONFIG"

cp $MESH_CONFIG kubeconfig
k -n istio-system create secret generic istio-kubeconfig --from-file kubeconfig
k -n istio-system label secret istio-kubeconfig istio/multiCluster=true

h repo add flagger https://flagger.app
h repo update
k apply -f $FLAAGER_SRC/artifacts/flagger/crd.yaml
h upgrade -i flagger flagger/flagger --namespace=istio-system \
    --set crd.create=false \
    --set meshProvider=istio \
    --set metricsServer=http://prometheus:9090 \
    --set istio.kubeconfig.secretName=istio-kubeconfig \
--set istio.kubeconfig.key=kubeconfigDuring the Canary release, Flagger will request ASM to update the VirtualService for Canary traffic configuration, which involves the gateway named public-gateway. To this end, the relevant gateway configuration file public-gateway.yaml is created:
apiVersion: networking.istio.io/v1alpha3
kind: Gateway
metadata:
  name: public-gateway
  namespace: istio-system
spec:
  selector:
    istio: ingressgateway
  servers:
    - port:
        number: 80
        name: http
        protocol: HTTP
      hosts:
        - "*"
Run the following command to deploy the gateway:
kubectl --kubeconfig "$MESH_CONFIG" apply -f resources_canary/public-gateway.yamlFlagger-loadtester
Flagger-loadtester is the application used for detecting the Canary PODs in the Canary release.
Run the following command to deploy the flagger-loadtester:
kubectl --kubeconfig "$USER_CONFIG" apply -k "https://github.com/fluxcd/flagger//kustomize/tester?ref=main"Use the O&M-level HPA provided by the Flagger release version first. Use the application-level HPA after the entire process is completed.
Run the following command to deploy PodInfo and its HPA:
kubectl --kubeconfig "$USER_CONFIG" apply -k "https://github.com/fluxcd/flagger//kustomize/podinfo?ref=main"Canary is the core CRD for the Canary release based on Flagger. For more detailed information, please see How it works. First, deploy the podinfo-canary.yaml Canary configuration file to complete the whole progressive Canary release. Then, introduce the application-level monitoring metrics to implement the application-aware progressive Canary release.
apiVersion: flagger.app/v1beta1
kind: Canary
metadata:
  name: podinfo
  namespace: test
spec:
  # deployment reference
  targetRef:
    apiVersion: apps/v1
    kind: Deployment
    name: podinfo
  # the maximum time in seconds for the canary deployment
  # to make progress before it is rollback (default 600s)
  progressDeadlineSeconds: 60
  # HPA reference (optional)
  autoscalerRef:
    apiVersion: autoscaling/v2beta2
    kind: HorizontalPodAutoscaler
    name: podinfo
  service:
    # service port number
    port: 9898
    # container port number or name (optional)
    targetPort: 9898
    # Istio gateways (optional)
    gateways:
    - public-gateway.istio-system.svc.cluster.local
    # Istio virtual service host names (optional)
    hosts:
    - '*'
    # Istio traffic policy (optional)
    trafficPolicy:
      tls:
        # use ISTIO_MUTUAL when mTLS is enabled
        mode: DISABLE
    # Istio retry policy (optional)
    retries:
      attempts: 3
      perTryTimeout: 1s
      retryOn: "gateway-error,connect-failure,refused-stream"
  analysis:
    # schedule interval (default 60s)
    interval: 1m
    # max number of failed metric checks before rollback
    threshold: 5
    # max traffic percentage routed to canary
    # percentage (0-100)
    maxWeight: 50
    # canary increment step
    # percentage (0-100)
    stepWeight: 10
    metrics:
    - name: request-success-rate
      # minimum req success rate (non 5xx responses)
      # percentage (0-100)
      thresholdRange:
        min: 99
      interval: 1m
    - name: request-duration
      # maximum req duration P99
      # milliseconds
      thresholdRange:
        max: 500
      interval: 30s
    # testing (optional)
    webhooks:
      - name: acceptance-test
        type: pre-rollout
        url: http://flagger-loadtester.test/
        timeout: 30s
        metadata:
          type: bash
          cmd: "curl -sd 'test' http://podinfo-canary:9898/token | grep token"
      - name: load-test
        url: http://flagger-loadtester.test/
        timeout: 5s
        metadata:
          cmd: "hey -z 1m -q 10 -c 2 http://podinfo-canary.test:9898/"
Run the following command to deploy Canary:
kubectl --kubeconfig "$USER_CONFIG" apply -f resources_canary/podinfo-canary.yamlAfter this, Flagger will copy the deployment named podinfo as podinfo-primary and scale up the number of PODs in podinfo-primary to the minimum number defined by HPA. Then, the number of PODs in podinfo will be gradually scaled down to zero. podinfo will be the Canary-version deployment, while podinfo-primary will be the production-version deployment.
Meanwhile, create three services – podinfo, podinfo-primary, and podinfo-canary. The first two correspond to the deployment named podinfo-primary, and the last one corresponds to the deployment named podinfo.
podinfo
Run the following command to upgrade the Canary deployment from version 3.1.0 to 3.1.1:
kubectl --kubeconfig "$USER_CONFIG" -n test set image deployment/podinfo podinfod=stefanprodan/podinfo:3.1.1Now, Flagger will start to implement the progressive Canary release described in the first article of this series. The main steps are listed below:
Run the following command to check the progressive traffic shifting:
while true; do kubectl --kubeconfig "$USER_CONFIG" -n test describe canary/podinfo; sleep 10s;doneThe output log information is listed below:
Events:
  Type     Reason  Age                From     Message
  ----     ------  ----               ----     -------
  Warning  Synced  39m                flagger  podinfo-primary.test not ready: waiting for rollout to finish: observed deployment generation less then desired generation
  Normal   Synced  38m (x2 over 39m)  flagger  all the metrics providers are available!
  Normal   Synced  38m                flagger  Initialization done! podinfo.test
  Normal   Synced  37m                flagger  New revision detected! Scaling up podinfo.test
  Normal   Synced  36m                flagger  Starting canary analysis for podinfo.test
  Normal   Synced  36m                flagger  Pre-rollout check acceptance-test passed
  Normal   Synced  36m                flagger  Advance podinfo.test canary weight 10
  Normal   Synced  35m                flagger  Advance podinfo.test canary weight 20
  Normal   Synced  34m                flagger  Advance podinfo.test canary weight 30
  Normal   Synced  33m                flagger  Advance podinfo.test canary weight 40
  Normal   Synced  29m (x4 over 32m)  flagger  (combined from similar events): Promotion completed! Scaling down podinfo.test
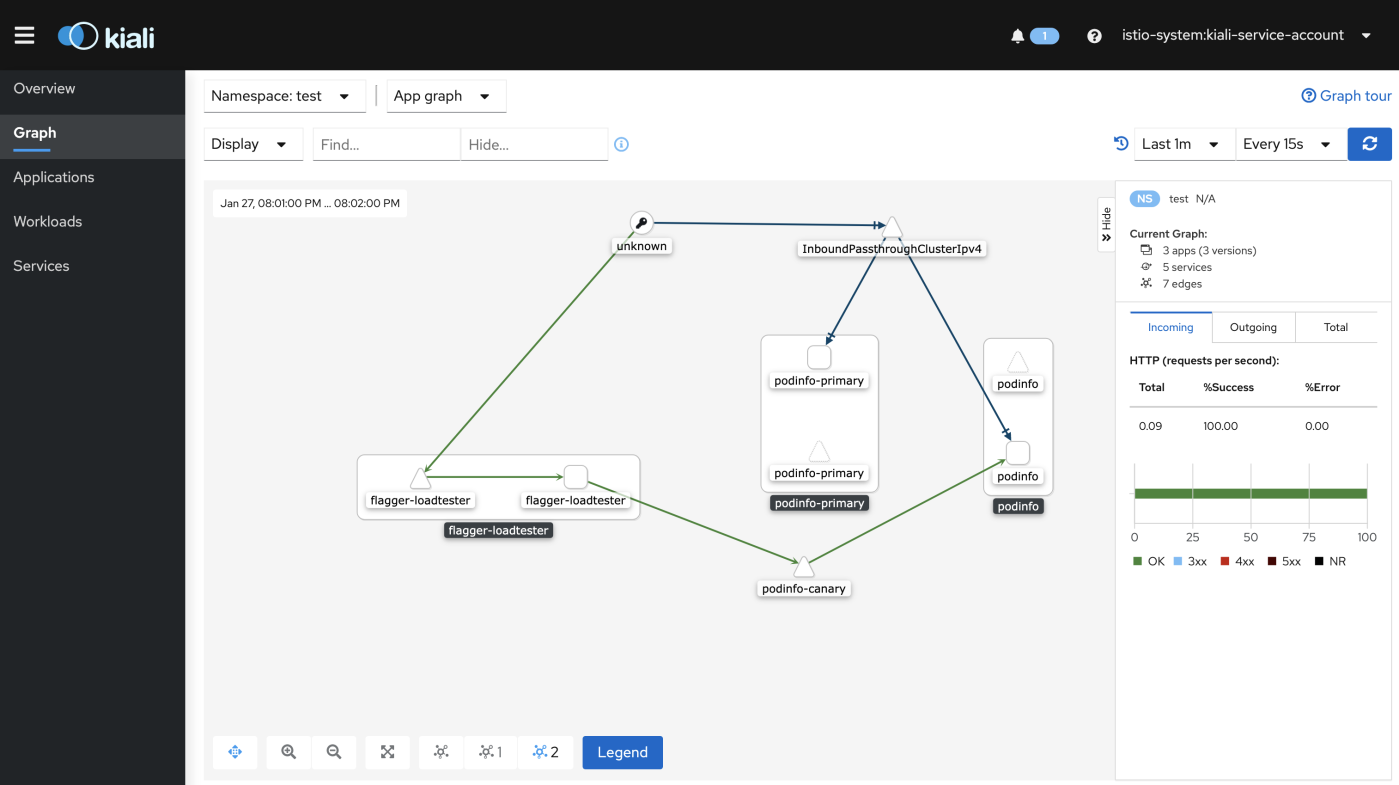
The corresponding Kiali view (optional) is shown in the following figure:

An entire progressive Canary release process has been completed so far. Additional knowledge about the Canary release is listed below.
Now, let's take a look at the HPA configuration based on the completed progressive Canary release above.
  autoscalerRef:
    apiVersion: autoscaling/v2beta2
    kind: HorizontalPodAutoscaler
    name: podinfo
Flagger has its own HPA configuration called podinfo. It scales up the Canary POD when the CPU used by the Canary deployment reaches 99% of the requested CPU. The complete configurations are listed below:
apiVersion: autoscaling/v2beta2
kind: HorizontalPodAutoscaler
metadata:
  name: podinfo
spec:
  scaleTargetRef:
    apiVersion: apps/v1
    kind: Deployment
    name: podinfo
  minReplicas: 2
  maxReplicas: 4
  metrics:
    - type: Resource
      resource:
        name: cpu
        target:
          type: Utilization
          # scale up if usage is above
          # 99% of the requested CPU (100m)
          averageUtilization: 99
The application-level scaling described in the second article is applied to the Canary release here.
Run the following command to deploy the HPA that senses the application request totals to implement scaling when QPS reaches 10. (For the complete script, please see advanced_canary.sh):
kubectl --kubeconfig "$USER_CONFIG" apply -f resources_hpa/requests_total_hpa.yamlAccordingly, the Canary configuration is updated:
  autoscalerRef:
    apiVersion: autoscaling/v2beta2
    kind: HorizontalPodAutoscaler
name: podinfo-totalPodinfo
Run the following command to upgrade the Canary deployment from version 3.1.0 to 3.1.1:
kubectl --kubeconfig "$USER_CONFIG" -n test set image deployment/podinfo podinfod=stefanprodan/podinfo:3.1.1The command to check the progressive traffic shifting is listed below:
while true; do k -n test describe canary/podinfo; sleep 10s;doneIn the process of progressive Canary release, especially after the Advance podinfo.test canary weight 10 information appears, run the following command to initiate a request from the ingress gateway to increase the QPS:
INGRESS_GATEWAY=$(kubectl --kubeconfig $USER_CONFIG -n istio-system get service istio-ingressgateway -o jsonpath='{.status.loadBalancer.ingress[0].ip}')
hey -z 20m -c 2 -q 10 http://$INGRESS_GATEWAY
Run the following command to check the progress of the progressive Canary release:
watch kubectl --kubeconfig $USER_CONFIG get canaries --all-namespacesRun the following command to check the change in the number of HPA replicas:
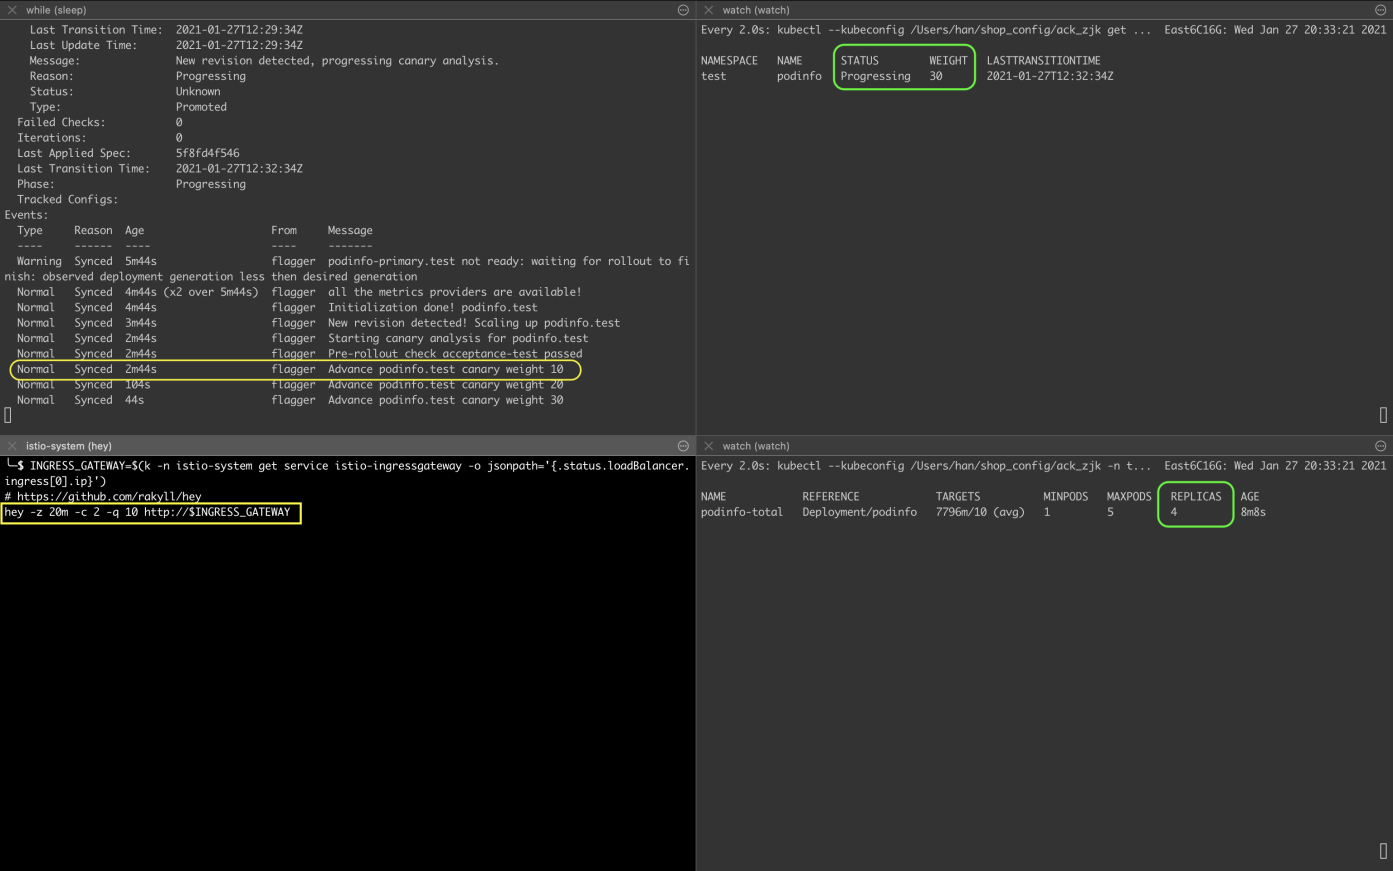
watch kubectl --kubeconfig $USER_CONFIG -n test get hpa/podinfo-totalThe result is shown in the following figure. During the progressive Canary release, when there is 30% of traffic switching, there are four Canary deployment replicas:

Now that the application-level scaling in Canary is completed, let's take a look at the metrics configuration:
  analysis:
    metrics:
    - name: request-success-rate
      # minimum req success rate (non 5xx responses)
      # percentage (0-100)
      thresholdRange:
        min: 99
      interval: 1m
    - name: request-duration
      # maximum req duration P99
      # milliseconds
      thresholdRange:
        max: 500
      interval: 30s
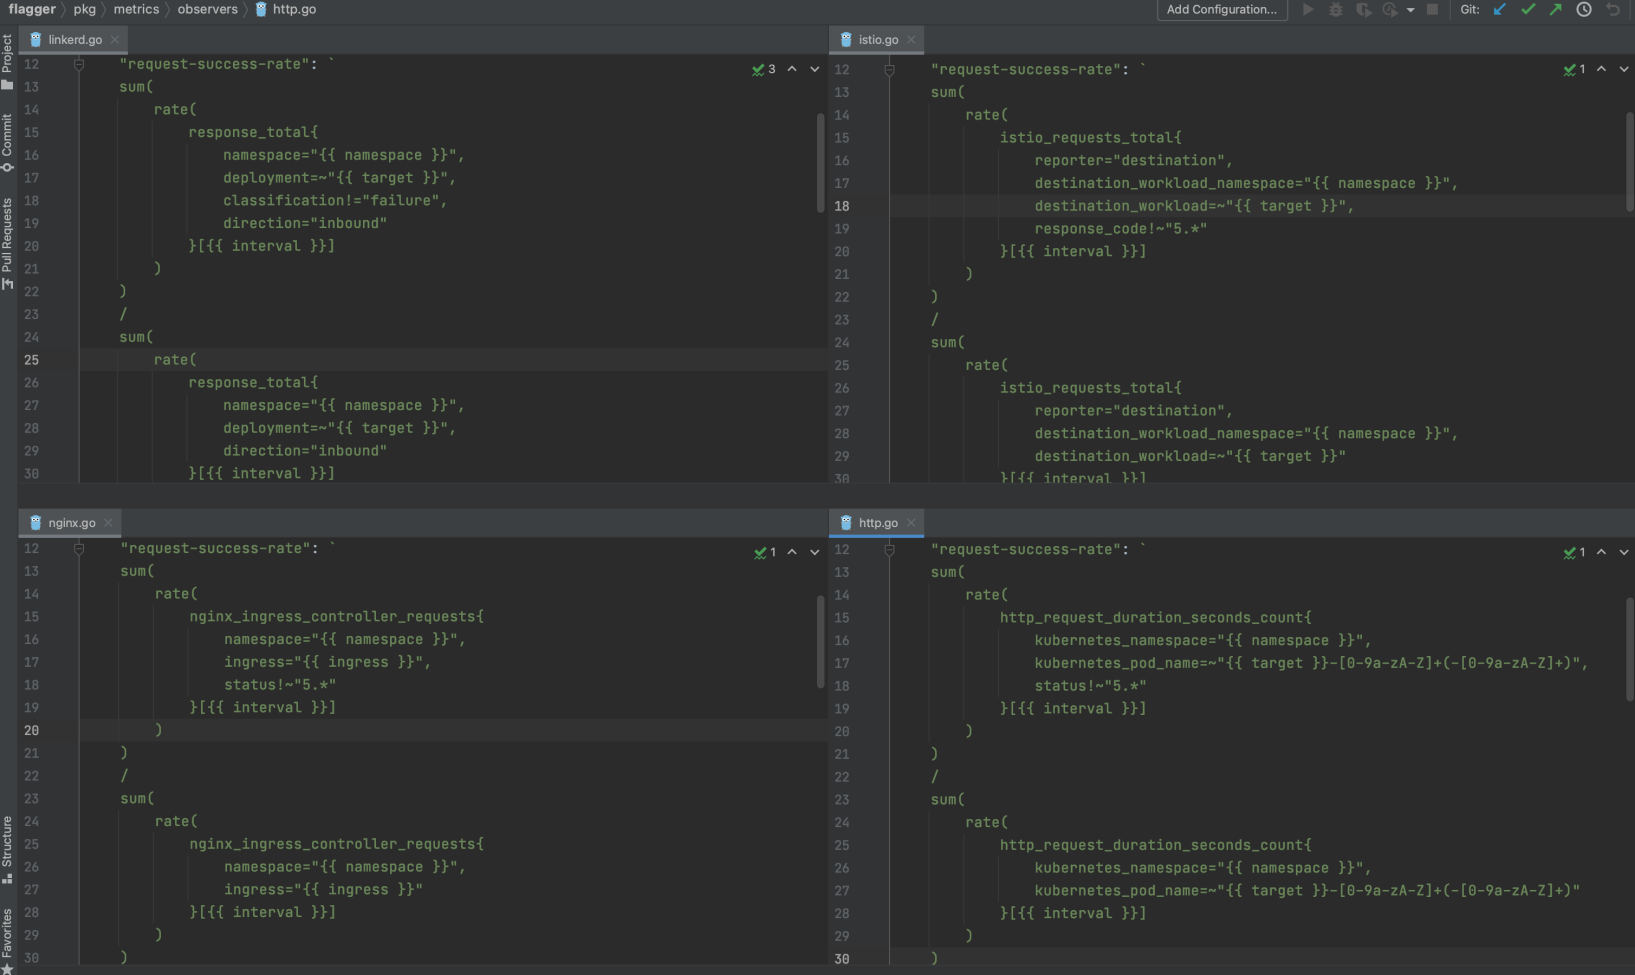
# testing (optional)So far, the two Flagger built-in monitoring metrics have always been used as the metric configuration for Canary, which are request success rate (request-success-rate) and request latency (request-duration). The following figure shows the definitions of built-in metrics by different platforms in Flagger. Among them, istio uses the telemetry data related to Mixerless Telemetry described in the first article of this series.

Let's use istio_requests_total again as an example to demonstrate the flexibility in Canary environment testing brought by telemetry data during the Canary release. Create a MetricTemplate named not-found-percentage to calculate the percentage of requests with the 404 error code in the total requests.
The metrics-404.yaml configuration file is listed below (For the complete script, please see advanced_canary.sh):
apiVersion: flagger.app/v1beta1
kind: MetricTemplate
metadata:
  name: not-found-percentage
  namespace: istio-system
spec:
  provider:
    type: prometheus
    address: http://prometheus.istio-system:9090
  query: |
    100 - sum(
        rate(
            istio_requests_total{
              reporter="destination",
              destination_workload_namespace="{{ namespace }}",
              destination_workload="{{ target }}",
              response_code!="404"
            }[{{ interval }}]
        )
    )
    /
    sum(
        rate(
            istio_requests_total{
              reporter="destination",
              destination_workload_namespace="{{ namespace }}",
              destination_workload="{{ target }}"
            }[{{ interval }}]
        )
    ) * 100
Run the following command to create the MetricTemplate mentioned above:
k apply -f resources_canary2/metrics-404.yamlAccordingly, the metrics configuration in the Canary is updated:
  analysis:
    metrics:
      - name: "404s percentage"
        templateRef:
          name: not-found-percentage
          namespace: istio-system
        thresholdRange:
          max: 5
interval: 1mFinally, execute the complete experiment script at the same time. The advanced_canary.sh script is listed below:
#!/usr/bin/env sh
SCRIPT_PATH="$(
    cd "$(dirname "$0")" >/dev/null 2>&1
    pwd -P
)/"
cd "$SCRIPT_PATH" || exit

source config
alias k="kubectl --kubeconfig $USER_CONFIG"
alias m="kubectl --kubeconfig $MESH_CONFIG"
alias h="helm --kubeconfig $USER_CONFIG"

echo "#### I Bootstrap ####"
echo "1 Create a test namespace with Istio sidecar injection enabled:"
k delete ns test
m delete ns test
k create ns test
m create ns test
m label namespace test istio-injection=enabled

echo "2 Create a deployment and a horizontal pod autoscaler:"
k apply -f $FLAAGER_SRC/kustomize/podinfo/deployment.yaml -n test
k apply -f resources_hpa/requests_total_hpa.yaml
k get hpa -n test

echo "3 Deploy the load testing service to generate traffic during the canary analysis:"
k apply -k "https://github.com/fluxcd/flagger//kustomize/tester?ref=main"

k get pod,svc -n test
echo "......"
sleep 40s

echo "4 Create a canary custom resource:"
k apply -f resources_canary2/metrics-404.yaml
k apply -f resources_canary2/podinfo-canary.yaml

k get pod,svc -n test
echo "......"
sleep 120s

echo "#### III Automated canary promotion ####"

echo "1 Trigger a canary deployment by updating the container image:"
k -n test set image deployment/podinfo podinfod=stefanprodan/podinfo:3.1.1

echo "2 Flagger detects that the deployment revision changed and starts a new rollout:"

while true; do k -n test describe canary/podinfo; sleep 10s;done
Run the following command to execute the complete experiment script:
sh progressive_delivery/advanced_canary.shThe results are listed below:
#### I Bootstrap ####
1 Create a test namespace with Istio sidecar injection enabled:
namespace "test" deleted
namespace "test" deleted
namespace/test created
namespace/test created
namespace/test labeled
2 Create a deployment and a horizontal pod autoscaler:
deployment.apps/podinfo created
horizontalpodautoscaler.autoscaling/podinfo-total created
NAME            REFERENCE            TARGETS              MINPODS   MAXPODS   REPLICAS   AGE
podinfo-total   Deployment/podinfo   <unknown>/10 (avg)   1         5         0          0s
3 Deploy the load testing service to generate traffic during the canary analysis:
service/flagger-loadtester created
deployment.apps/flagger-loadtester created
NAME                                      READY   STATUS     RESTARTS   AGE
pod/flagger-loadtester-76798b5f4c-ftlbn   0/2     Init:0/1   0          1s
pod/podinfo-689f645b78-65n9d              1/1     Running    0          28s

NAME                         TYPE        CLUSTER-IP      EXTERNAL-IP   PORT(S)   AGE
service/flagger-loadtester   ClusterIP   172.21.15.223   <none>        80/TCP    1s
......
4 Create a canary custom resource:
metrictemplate.flagger.app/not-found-percentage created
canary.flagger.app/podinfo created
NAME                                      READY   STATUS    RESTARTS   AGE
pod/flagger-loadtester-76798b5f4c-ftlbn   2/2     Running   0          41s
pod/podinfo-689f645b78-65n9d              1/1     Running   0          68s

NAME                         TYPE        CLUSTER-IP      EXTERNAL-IP   PORT(S)   AGE
service/flagger-loadtester   ClusterIP   172.21.15.223   <none>        80/TCP    41s
......
#### III Automated canary promotion ####
1 Trigger a canary deployment by updating the container image:
deployment.apps/podinfo image updated
2 Flagger detects that the deployment revision changed and starts a new rollout:

Events:
  Type     Reason  Age                  From     Message
  ----     ------  ----                 ----     -------
  Warning  Synced  10m                  flagger  podinfo-primary.test not ready: waiting for rollout to finish: observed deployment generation less then desired generation
  Normal   Synced  9m23s (x2 over 10m)  flagger  all the metrics providers are available!
  Normal   Synced  9m23s                flagger  Initialization done! podinfo.test
  Normal   Synced  8m23s                flagger  New revision detected! Scaling up podinfo.test
  Normal   Synced  7m23s                flagger  Starting canary analysis for podinfo.test
  Normal   Synced  7m23s                flagger  Pre-rollout check acceptance-test passed
  Normal   Synced  7m23s                flagger  Advance podinfo.test canary weight 10
  Normal   Synced  6m23s                flagger  Advance podinfo.test canary weight 20
  Normal   Synced  5m23s                flagger  Advance podinfo.test canary weight 30
  Normal   Synced  4m23s                flagger  Advance podinfo.test canary weight 40
Normal Synced 23s (x4 over 3m23s) flagger (combined from similar events): Promotion completed! Scaling down podinfo.testfeuyeux - July 6, 2021
feuyeux - July 6, 2021
Alibaba Cloud Native - November 3, 2022
Alibaba Cloud Native Community - September 20, 2022
Xi Ning Wang(王夕宁) - July 21, 2023
Alibaba Cloud Native Community - November 22, 2023
 Managed Service for Prometheus
Multi-source metrics are aggregated to monitor the status of your business and services in real time.
Learn More Cloud-Native Applications Management Solution
Accelerate and secure the development, deployment, and management of containerized applications cost-effectively.
Learn More Container Service for Kubernetes
Alibaba Cloud Container Service for Kubernetes is a fully managed cloud container management service that supports native Kubernetes and integrates with other Alibaba Cloud products.
Learn More ACK One
Provides a control plane to allow users to manage Kubernetes clusters that run based on different infrastructure resources
Learn MoreMore Posts by feuyeux