By Liu Xiaoguo, an Evangelist of the Elasticsearch Community in China and edited by Zhang Lei and Dayu
Released by ELK Geek
Alibaba Cloud Logstash, a Java Database Connectivity (JDBC) input plug-in, is the key to synchronizing data between Alibaba Cloud Elasticsearch and ApsaraDB for RDS (RDS) instances. It runs a loop to poll RDS instances regularly to find any records that have been inserted or changed in this loop after the last iteration. The following conditions must be met before running the plug-in properly:
1) While writing RDS documents to Elasticsearch, the "_id" field in Elasticsearch must be set to the value of the "id" field in RDS instances. This establishes a direct mapping between RDS records and Elasticsearch documents. If an RDS record is updated, it is overwritten in Elasticsearch.
Note: In Elasticsearch, document overwriting is as efficient as record updating because record updating involves deleting the old document and indexing the new document.
2) When data is inserted or updated in an RDS instance, a field for the insertion or updating time must be included in the record. This field allows Logstash to request only the documents that were edited or inserted in the loop after the last iteration. The update or insertion time of the last record it reads from the RDS instance is saved upon each polling loop. Upon the next iteration, Logstash only needs to request records that meet the condition - the update or insertion time is later than that of the last record received in the last iteration of the polling loop.
Note: The Logstash JDBC input plug-in cannot implement the "sql delete" operation. You need to manually delete the corresponding data in Elasticsearch. If the preceding condition is met, Logstash is configured to periodically request all new or edited records from the RDS instance and write them into Elasticsearch.
1) Prepare the Alibaba Cloud Elasticsearch 6.7 environment and use the created account and password to log on to Kibana.
2) Prepare the Alibaba Cloud Logstash 6.7 environment.
3) Activate the RDS service and enable the Virtual Private Cloud (VPC) whitelist of Alibaba Cloud Logstash.
Prepare a student table as follows:
create table student(
id BIGINT(20) UNSIGNED NOT NULL,
PRIMARY KEY (id),
UNIQUE KEY unique_id (id),
stuName nvarchar(5) not null,
stuSex nchar(1) check (stuSex in('男', '女')) default '男' ,
stuAge int check(stuAge>1),
stuDept nvarchar(20),
create_time TIMESTAMP NOT NULL DEFAULT CURRENT_TIMESTAMP,
update_time TIMESTAMP NOT NULL DEFAULT CURRENT_TIMESTAMP ON UPDATE CURRENT_TIMESTAMP
);
Pay special attention to the following fields in the preceding RDS configuration:
1) student: The name of the table from which data is read and synchronized to Elasticsearch.
2) Id: The unique identifier of the record. In this experiment, IDs must be mapped to Elasticsearch IDs, so data uniqueness must be guaranteed. "id" is defined as the primary key and the unique key to ensuring that each "id" appears only once in the current table. This field will be converted to "_id" for updating documents in Elasticsearch and inserting documents to Elasticsearch.
3) update_time: When any record is inserted or changed in the table, the value of this field is set to the editing time. Then, it's possible to extract any records that have been edited since the last time Logstash requested a record from the RDS instance.
4) create_time: This field is used to track and record the time when a record is first inserted into the table.
Other fields are user-defined. You can customize multiple fields as required.
The following figure shows the created table.

The following Logstash pipelines implement the synchronization code described in the previous section:
input {
  jdbc {
    jdbc_driver_class => "com.mysql.jdbc.Driver"
    jdbc_driver_library => "/ssd/1/share/ls-cn-4591f1y6i003/logstash/current/config/custom/mysql-connector-java-8.0.17.jar"
    jdbc_connection_string => "jdbc:mysql://rm-bp1p4vl011t9w9ksf.mysql.rds.aliyuncs.com:3306/terms? useUnicode=true&characterEncoding=utf-8&useSSL=false&allowLoadLocalInfile=false&autoDeserialize=false"
    jdbc_user => "zl_manager"
    jdbc_password => "Elastic@123"
    jdbc_driver_class => "com.mysql.jdbc.Driver"
    jdbc_paging_enabled => true
    jdbc_page_size => 50
    statement => "SELECT *, UNIX_TIMESTAMP(update_time) AS unix_ts_in_secs FROM student WHERE (UNIX_TIMESTAMP(update_time) > :sql_last_value AND update_time < NOW()) ORDER BY update_time ASC"
    record_last_run => true
    clean_run => true
    tracking_column_type => "numeric"
    tracking_column => "unix_ts_in_secs"
    use_column_value => true
    last_run_metadata_path => "/ssd/1/ls-cn-4591f1y6i003/logstash/data/student"
    schedule => "*/5 * * * * *"
  }
}
filter {
  mutate{
    copy => { "id" => "[@metadata][_id]"}
    remove_field => ["id", "@version", "unix_ts_in_secs"]
  }
}
output {
 elasticsearch {
    hosts => "es-cn-mp91kzb8m0009pjzh.elasticsearch.aliyuncs.com:9200"
    index => "student"
    user => "elastic"
    password => "Elastic@123"
    doc_as_upsert => true
    action => "update"
    document_id => "%{[@metadata][_id]}"

  }
}
Let's take a look at the following key fields:
1) tracking_column: This field specifies unix_ts_in_secs, which marks the last document that Logstash read from the database. It is stored in the file specified by last_run_metadata_path. The value of this field determines the starting value of the document that Logstash requests in the next iteration of its polling loop.
2) unix_ts_in_secs: This field is generated by the preceding SELECT statement, which contains "update_time" as the standard UNIX timestamp (number of seconds since Epoch). This field is referenced by the "tracking_column" field. The UNIX timestamp is used to track progress. If it is used as a simple timestamp, errors may occur because conversion between Universal Metric Time (UMT) and local time is very complicated.
3) sql_last_value: The built-in parameter, including the start time of the current iteration in the Logstash polling loop. This field is referenced by the SELECT statement in the preceding JDBC input configuration. This field is set to the latest value of unix_ts_in_secs. It is used as the start point for the returned documents during a query in the Logstash polling loop. By adding this variable to the query, ensure that inserted or updated records get transferred to Elasticsearch and are not re-sent to Elasticsearch.
4) schedule: The frequency at which Logstash polls the RDS instance for changes. The cron syntax is used for this field. The value "/5" indicates that Logstash contacts the table every five seconds.
5) filter: You only need to copy the "id" value in the RDS record to the metadata field named "_id". This field will be referenced in the output so that each document written to Elasticsearch contains a correct "_id" value. Using the metadata field, this temporary value does not create a new field. We have also removed the "id", "@version" and "unix_ts_in_secs" fields from the documents because we do not want to write these fields into Elasticsearch.
6) output: It specifies that each document should be written into Elasticsearch and assigned with an "_id" field (extracted from the metadata fields created in the filter section).
This section explains in detail why it is crucial to add update_time < NOW() to the SELECT statement. First, let's take a look at a few examples that show why the two most intuitive methods do not work. Then, we will deep dive into how update_time < NOW() overcomes the problems caused by these two intuitive methods.
In this section, we will demonstrate what will happen if "UNIX_TIMESTAMP(update_time) > :sql_last_value" without "update_time < NOW()" is included in the WHERE clause. Then, the SELECT statement is as follows:
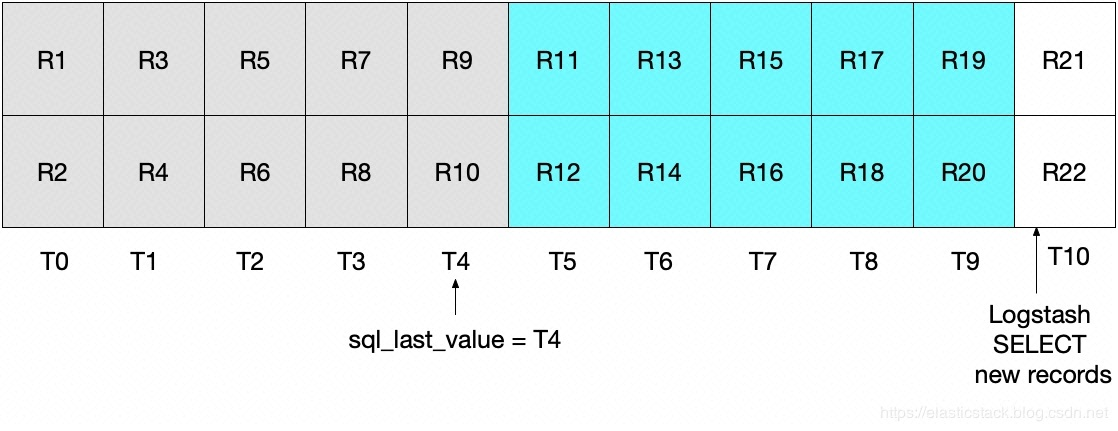
statement => "SELECT *, UNIX_TIMESTAMP(update_time) AS unix_ts_in_secs FROM student WHERE (UNIX_TIMESTAMP(update_time) > :sql_last_value AND update_time < NOW()) ORDER BY update_time ASC"At first glance, this method seems to work. However, in certain edge cases, some documents are not available. For example, assume that two documents are inserted into the RDS instance per second and the SELECT statement is run in Logstash every 5 seconds. As shown in the following figure, T0 to T10 each represents a second, and R1 to R22 specify the data in the RDS instance. Assume that the first iteration of the Logstash polling loop occurs at T5. Then, it reads documents R1 to R11, as shown in the bluish-green boxes. The value stored in the sql_last_value is T5 because this is the timestamp of the last read record (R11). Assume that after Logstash reads all the documents from the RDS instance, document R12 with the timestamp T5 is inserted into the RDS instance immediately.
In the next iteration of the preceding SELECT statement, only documents with a timestamp later than T5 are extracted (as specified by WHERE (UNIX_TIMESTAMP(update_time) > :sql_last_value)). This means that the record R12 will be skipped. As shown in the following figure, records in the bluish-green boxes are read by Logstash in the current iteration, and records in gray boxes were previously read by Logstash.
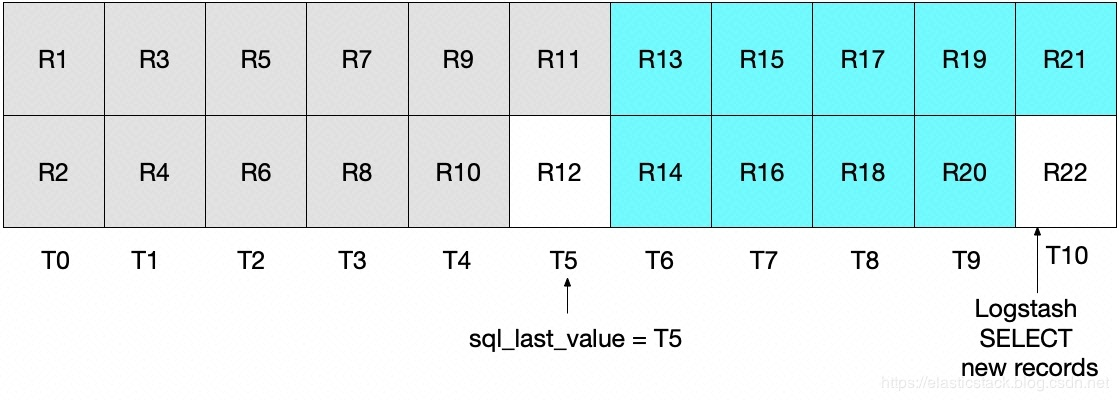
Note that if you use the SELECT statement in this case, the record R12 will never be written to Elasticsearch.
To solve the preceding problem, you may change the logic in the WHERE clause to "greater than or equals" as follows:
statement => "SELECT *, UNIX_TIMESTAMP(update_time) AS unix_ts_in_secs FROM student WHERE (UNIX_TIMESTAMP(update_time) > :sql_last_value AND update_time < NOW()) ORDER BY update_time ASC"However, this method also has a problem. The documents read from the RDS instance during the latest interval are repeatedly sent to Elasticsearch. Although this is unnecessary, it will not affect the correctness of the results. After the first iteration of the Logstash polling loop, the documents marked as 'read' from the RDS instance are shown in the following figure.
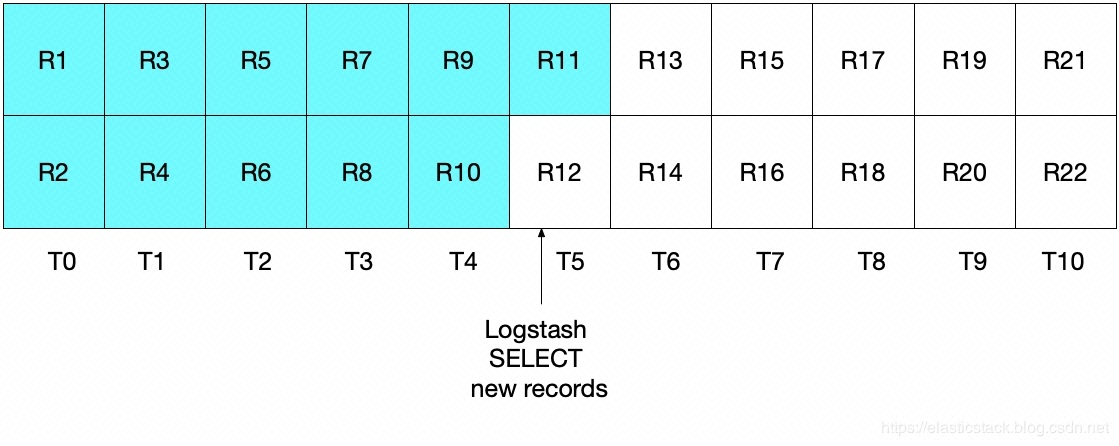
After the second iteration is completed, all the documents with a timestamp later than or equal to T5 are extracted, as shown in the following figure.
Note that R11 (in the purple box) will be sent to Elasticsearch again.
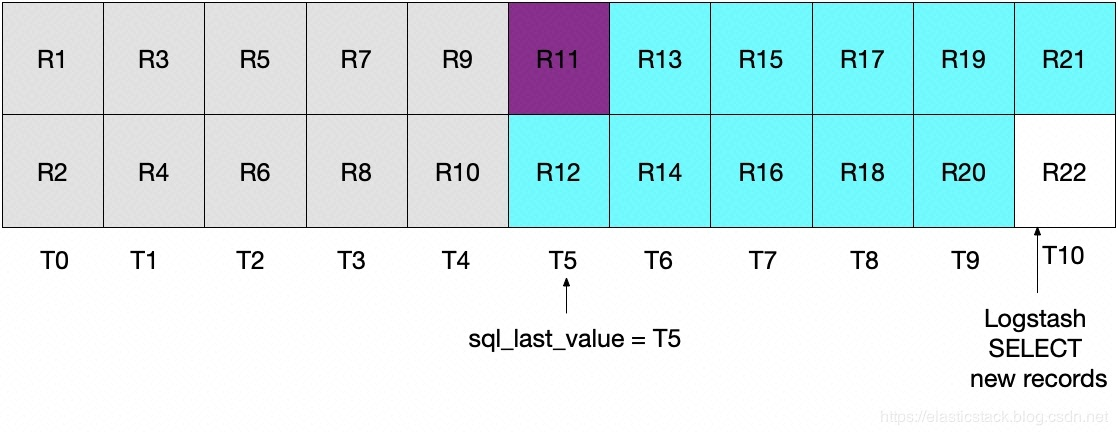
The previous two methods are not ideal. In the first method, data is lost. In the second method, redundant data is read from the RDS instance and sent to Elasticsearch.
We need to find a better method. The following statement is used to send each document to Elasticsearch only once:
(UNIX_TIMESTAMP(update_time) > :sql_last_value AND update_time < NOW())The current Logstash polling loop will be performed at T5. But the following condition must be met:
update_time < NOW()Therefore, only documents with a timestamp before T5 are read from the RDS instance. We have extracted all the documents of T4 but have not read any documents of T5. Therefore, sql_last_value will be set to T4 for the next iteration of the Logstash polling loop.
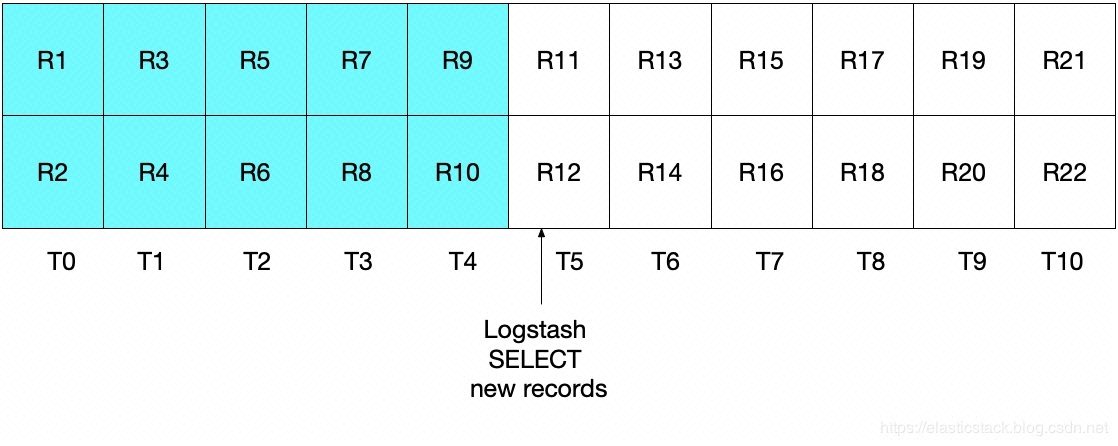
The following figure shows what will happen in the next iteration of the Logstash polling loop. Due to the UNIX_TIMESTAMP(update_time) > :sql_last_value statement, where sql_last_value is set to T4, document extraction starts from T5. In addition, only documents meeting the update_time < NOW() condition are extracted. Therefore, only documents with a timestamp of T9 or earlier are extracted. This means that all documents in T9 are extracted and sql_last_value is set to T9 for the next iteration. Therefore, this method eliminates the risk of retrieving only a subset of MySQL documents at any specified time interval.
Once the JDBC input plan triggers reading records from an RDS instance and writing the records to Elasticsearch, run the following query statement to view the documents in Elasticsearch:
GET student/_searchOutput similar to the following is displayed:
{
  "took" : 2,
  "timed_out" : false,
  "_shards" : {
    "total" : 5,
    "successful" : 5,
    "skipped" : 0,
    "failed" : 0
  },
  "hits" : {
    "total" : 5,
    "max_score" : 1.0,
    "hits" : [
      {
        "_index" : "student",
        "_type" : "doc",
        "_id" : "20205002",
        "_score" : 1.0,
        "_source" : {
          "update_time" : "2020-05-19T08:43:19.000Z",
          "stuage" : 25,
          "@timestamp" : "2020-05-19T09:08:02.173Z",
          "stuname" : "张雨",
          "studept" : "大个子",
          "create_time" : "2020-05-19T08:43:19.000Z",
          "stusex" : "男"
        }
      },
      {
        "_index" : "student",
        "_type" : "doc",
        "_id" : "20205005",
        "_score" : 1.0,
        "_source" : {
          "stuage" : 28,
          "stuname" : "大禹",
          "create_time" : "2020-05-19T12:12:22.000Z",
          "stusex" : "男",
          "update_time" : "2020-05-19T12:12:22.000Z",
          "studept" : "咖啡",
          "@timestamp" : "2020-05-19T12:13:00.160Z"
        }
      },
      {
        "_index" : "student",
        "_type" : "doc",
        "_id" : "20205001",
        "_score" : 1.0,
        "_source" : {
          "update_time" : "2020-05-19T08:42:39.000Z",
          "stuage" : 27,
          "@timestamp" : "2020-05-19T09:08:02.140Z",
          "stuname" : "赵弘景",
          "studept" : "健身",
          "create_time" : "2020-05-19T08:42:39.000Z",
          "stusex" : "男"
        }
      },
      {
        "_index" : "student",
        "_type" : "doc",
        "_id" : "20205004",
        "_score" : 1.0,
        "_source" : {
          "update_time" : "2020-05-19T08:44:54.000Z",
          "stuage" : 23,
          "@timestamp" : "2020-05-19T09:08:02.191Z",
          "stuname" : "潘多",
          "studept" : "跳舞",
          "create_time" : "2020-05-19T08:44:54.000Z",
          "stusex" : "女"
        }
      },
      {
        "_index" : "student",
        "_type" : "doc",
        "_id" : "20205003",
        "_score" : 1.0,
        "_source" : {
          "update_time" : "2020-05-19T08:44:11.000Z",
          "stuage" : 26,
          "@timestamp" : "2020-05-19T09:08:02.175Z",
          "stuname" : "黄磊",
          "studept" : "烹饪",
          "create_time" : "2020-05-19T08:44:11.000Z",
          "stusex" : "男"
        }
      }
    ]
  }
}
Then, run the following command to update the record with an id value of 20205003:
update `student` set `stuDept`='好男人,烹饪大厨' where `id`='20205003';JDBC will correctly update the record. Run the following command to view an Elasticsearch document:
GET student/_doc/20205003A document similar to the following is returned:
{
  "_index" : "student",
  "_type" : "_doc",
  "_id" : "20205003",
  "_version" : 3,
  "_seq_no" : 2,
  "_primary_term" : 1,
  "found" : true,
  "_source" : {
    "update_time" : "2020-05-19T12:27:42.000Z",
    "stuage" : 26,
    "@timestamp" : "2020-05-19T12:28:00.125Z",
    "stuname" : "黄磊",
    "studept" : "好男人,烹饪大厨",
    "create_time" : "2020-05-19T08:44:11.000Z",
    "stusex" : "男"
  }
}
Note: Now _version is set to 3, update_time is different from create_time, and the stuname field has been correctly updated to the new value. In this example, the @timestamp field is not very useful, but it is added by Logstash by default.
Run the following command to complete update or insertion in the RDS instance. Also, verify whether the correct information is contained in Elasticsearch.
insert `student`(`id`,`stuName`,`stuSex`,`stuAge`,`stuDept`) values('20205008','悦来','女',28,'跳跳');Statement: This article is an authorized revision of the article "How to Use Logstash and JDBC to Ensure Data Synchronization Between Elasticsearch and Relational Databases" based on the Alibaba Cloud service environment.
Source: (Page in Chinese) https://elasticstack.blog.csdn.net/
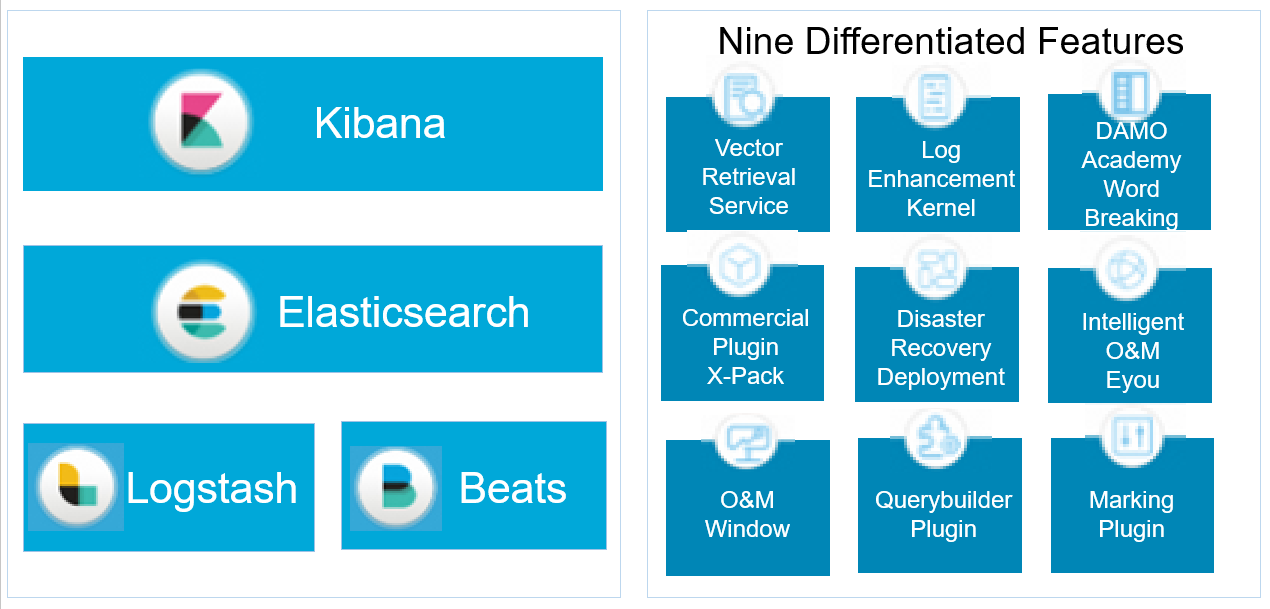
The Alibaba Cloud Elastic Stack is completely compatible with open-source Elasticsearch and has nine unique capabilities.
For more information about discounts, visit the Alibaba Cloud Elasticsearch official website.
Efficiently Monitor Nginx Web Servers Using Alibaba Cloud Elasticsearch
How to Migrate Data from an Amazon ES Domain to an Alibaba Cloud Elasticsearch Cluster

2,598 posts | 769 followers
FollowAlibaba Clouder - January 7, 2021
Data Geek - May 10, 2024
Data Geek - May 30, 2024
Alibaba Cloud Community - October 29, 2024
Alibaba Cloud MaxCompute - September 18, 2018
Alibaba Clouder - January 29, 2021

2,598 posts | 769 followers
Follow ApsaraDB for HBase
ApsaraDB for HBase is a NoSQL database engine that is highly optimized and 100% compatible with the community edition of HBase.
Learn More Big Data Consulting for Data Technology Solution
Alibaba Cloud provides big data consulting services to help enterprises leverage advanced data technology.
Learn More Big Data Consulting Services for Retail Solution
Alibaba Cloud experts provide retailers with a lightweight and customized big data consulting service to help you assess your big data maturity and plan your big data journey.
Learn More Tair
Tair
Tair is a Redis-compatible in-memory database service that provides a variety of data structures and enterprise-level capabilities.
Learn MoreMore Posts by Alibaba Clouder
Start building with 50+ products and up to 12 months usage for Elastic Compute Service
Get Started for Free Get Started for Free