By Alex Muchiri.
Previously, we looked at how you can install Botpress on an Alibaba Cloud ECS instance. We also created an FAQ bot and integrated it to Facebook messenger to answer commonly asked questions automatically. Click Creating a FAQ ChatBot That's Integrated with Facebook Messenger to read the previous article if you hadn't.
In this article, the last one of this series, we will explore some of the advanced concepts in Botpress and see how you can use them in real applications.
The converse API is an open standards API made to allow for integration of your bot running on Botpress with other apps, websites or messaging platforms. It is implemented for asynchronous responses to answers to user statements. You can access the resources for your bot in the resource below:
POST URL/api/v1/bots/{botId}/converse/{userId} The botId is always generated while creating a new bot on the platform, while the userId is a unique string identifying each user. The request body must always contain the type and text flags as shown below:
{
  "type": "text",
  "text": "Hello there?"
}
The converse API also supports a debug mode by including additional variables in the URL:
POST URL/api/v1/bots/{botId}/converse/{userId}/secured?include=nlu,state,suggestions,decisionThe converse API cannot, however, be restricted, throttled or disabled and can only receive messages from users and not the other way around. See sample response to the user post above in the below code:
{
  "responses": [
    {
      "type": "typing",
      "value": true
    },
    {
      "type": "text",
      "markdown": true,
      "text": "What is your name please?"
    }
  ],
  "nlu": {
    "language": "en",
    "entities": [],
    "intent": {
      "name": "hello",
      "confidence": 1
    },
    "intents": [
      {
        "name": "hello",
        "confidence": 1
      }
    ]
  },
  "state": {}
}The NLU (natural language understanding), or more simply the understanding module, processes incoming messages to classify intents, identify language, extract entities and tag slots. Intents are identified from user messages and ranked based on confidence level. Note that each intent has to be added manually and the corresponding utterances saved as well. The event.nlu.intent.name variable allows the bot to detect and reply to intents within flows, actions and hooks, see the JSON example below:
{
  "type": "text",
  "channel": "messenger",
  "direction": "incoming",
  "payload": {
    "type": "text",
    "text": "good morning"
  },
  "target": "welcome bot",
  "botId": "welcome-bot",
  "threadId": "1",
  "id": some id,
  "preview": "good morning",
  "flags": {},
  "nlu": {
    "language": "en", // language identification (from supported languages)
    "intent": { // most probable intents
      "name": "hello",
      "confidence": 1
    },
    "intents": [ identified intents, sorted by confidence
      {
        "name": "hello",
        "confidence": 1,
        "provider": "native"
      },
    ],
    "entities": [],
    "slots": {}
  }
}
Now you can use transitions to trigger an action associated with an intent using flow transitions.
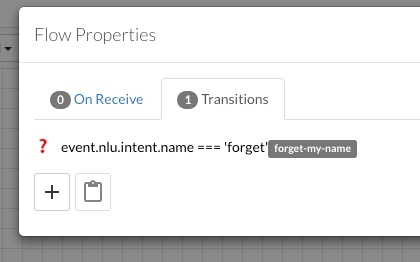
The entity property is a component of the NLU that helps to extract known entities from user input using both system and custom entities. The event.nlu.entities variable in hooks, flow transitions and actions enables the extraction of entities.
System entities are extracted using either of two methods:
The duckling extraction uses a Facebook Duckling implementation in external Botpress servers to extract entities such as time, email, phone number. However, this may raise some privacy concerns regarding the storage and usage of data obtained by the Botpress developers in this way. As such, it is possible to disable the feature by setting the ducklingEnabled flag to false in the config. Alternatively, you could build your own duckling engine from the source to change the ducklingURL located in data/global/config/nlu.json file. Check this link to learn how to set up your own Duckling server.
{
  type: 'quantity',
  meta: {
    confidence: 1,
    provider: 'native',
    source: '8 kg', //user input to extract entity was extracted
    start: 22, // index of the first character from the user input
    end: 26, // index of the last character from the user input
  },
  data: {
    value: 5,
    unit: 'kilogram',
    extras: {}
  }
}
Placeholder extraction is an experimental method under development for the any entity type, which serves as a placeholder. It is recommended to use custom entities since the any type requires a lot of training data to work efficiently. Consider the example below:
James went to the garage this morning.
We could extract from the above the following: James, garage and morning. However, this would also classify them as any entities.
The NLU does both pattern and list extraction based on the defined patterns. Patterns could be used to identify product codes and serial numbers. See example below for pattern extraction:

Here's the extraction model schema:
{ name: 'MODELS',
  type: 'pattern',
  meta:
   { confidence: 1,
     provider: 'native',
     source: 'Vitz-2012',
     start: 22,
     end: 35,
     raw: {} },
  data: {
    extras: {},
    value: 'Vitz-2012',
    unit: 'string'
    }
}
The emphasis is to create a related pattern entity type for the 'MODELS' type.
List extraction requires creating an entity such as Train Stations and then creating occurrences and corresponding synonyms.
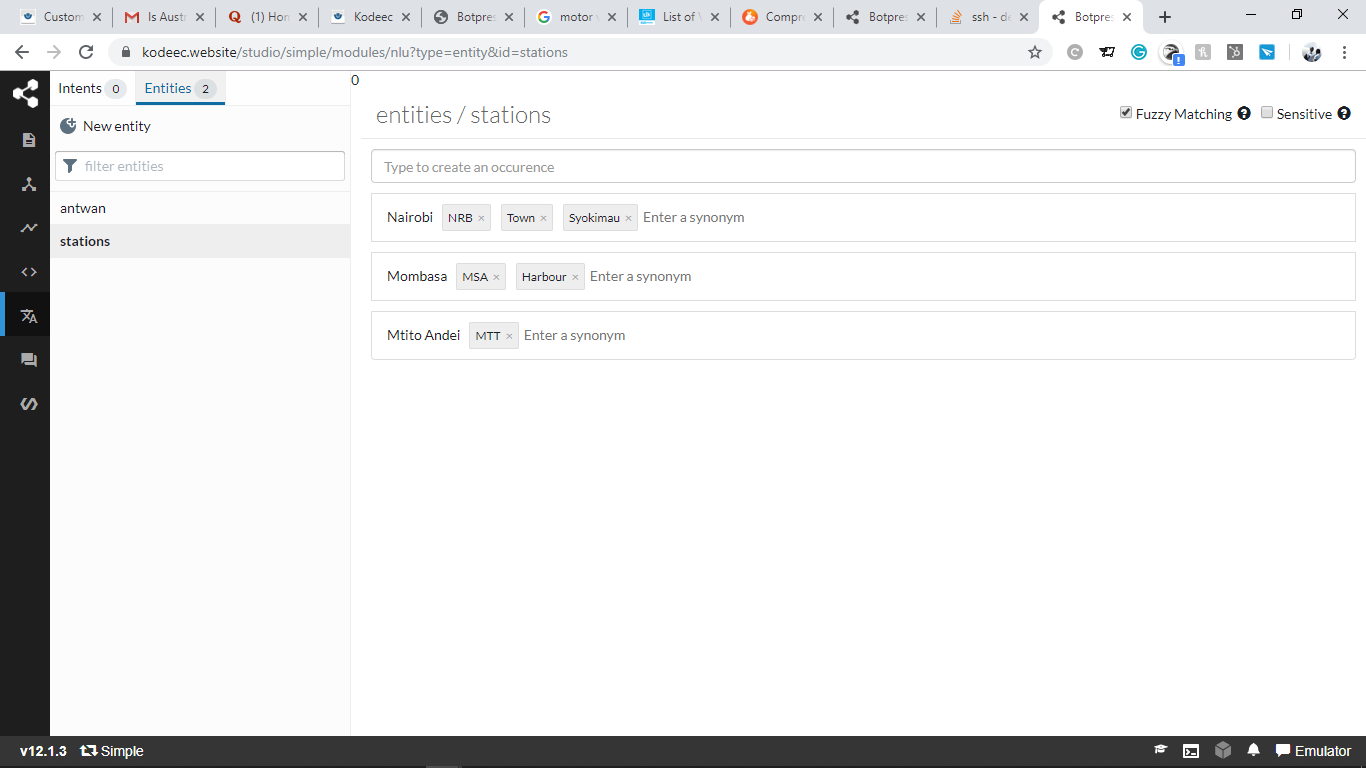
The extraction will go like this:

Here's the JSON format:
;[
  {
    name: 'Stations',
    type: 'list',
    meta: {
      confidence: 1,
      provider: 'native',
      source: 'Nairobi',
      start: 10,
      end: 30,
      raw: {}
    },
    data: {
      extras: {},
      value: 'Nairobi',
      unit: 'string'
    }
  },
  {
    name: 'Stations',
    type: 'list',
    meta: {
      confidence: 1,
      provider: 'native',
      source: 'MSA',
      start: 38,
      end: 41,
      raw: {}
    },
    data: {
      extras: {},
      value: 'Mombasa',
      unit: 'string'
    }
  }
]
The final major concept in NLU that we will explore is slots as it is very crucial for entity extractions to fulfil an intent. When slots are derives, they are stored in the event.nlu.slots map and can be accessed from anywhere in the flow. The way it works is that Botpress tags user input and once identified as related to some intent, an extraction even will map it to event.nlu.slots. Slots are created in the intent section of the Botpress server. In the example below, we have a travelling intent setup, and we need to extract the station from and the destination:
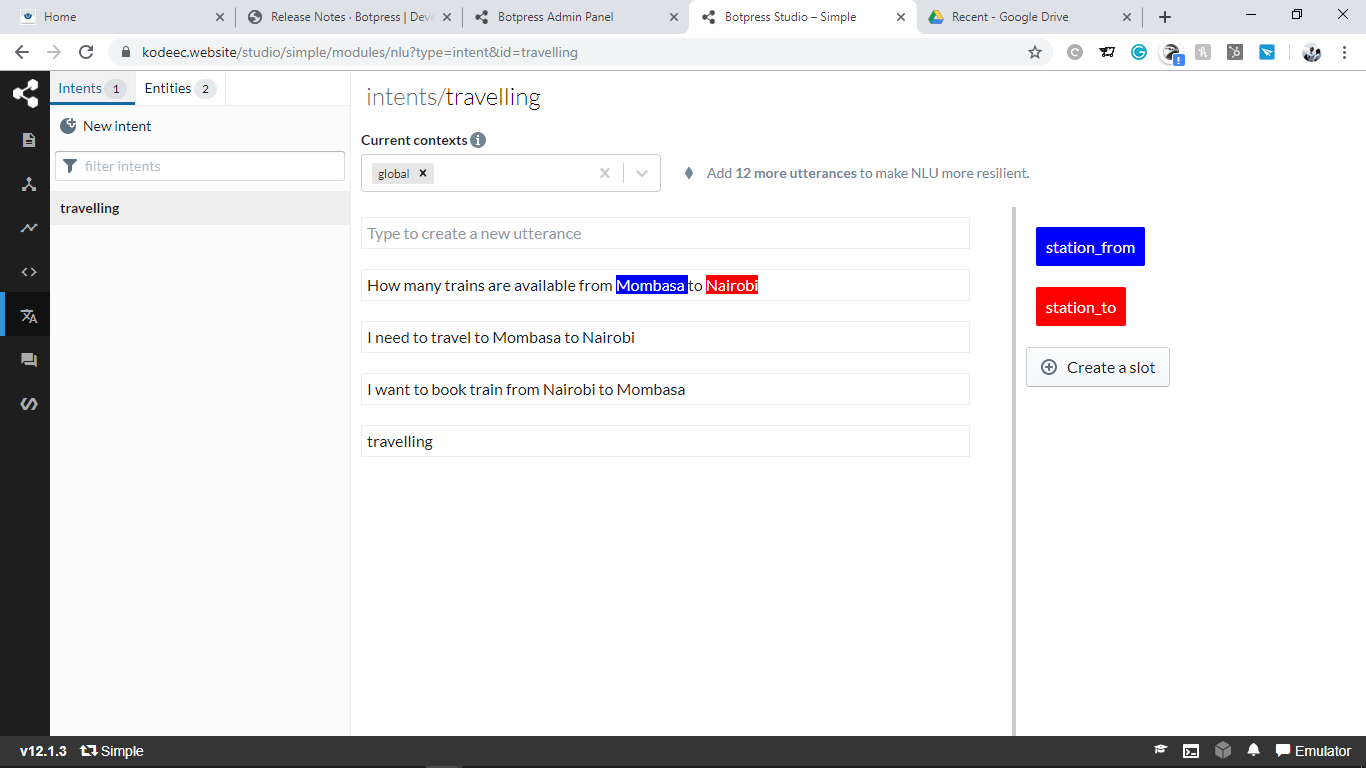
Create new slots using the provided buttons on the left. Consider the statement below:
I need to travel to Mombasa from Nairobi
Highlight the first station and select the respective station from your slots then press enter. Repeat for the other station. You could have as many slots as possible for each intent, but you would rather keep it simple and neat. The slot filling process is automatic and even newer versions have a feature to set the number of retries to fill in the slots that the engine can do.
By default, the converse API and all access channels require a HTTPS connection to improve security. In addition, Botpress is hosted in your own servers, which would obviously improve security of data and privacy. Another exciting security feature is the handling of sensitive information. Botpress has a database to persist user interactions including messages, and this could be problematic if sensitive information such as credit card information, passwords and some responses remain unencrypted. You can mark entities as sensitive so that the contained data is not persisted in the database. However, the event.nlu.entities variable will still contain the extracted value. The chat window or dashboard will only show ***** symbols instead of the true value.
At the time of this tutorial, the latest version of Botpress is version 12.14, which comes with auto-migration for database and configurations. As such, all migrations are automatic and you will not need to do any manual interventions. However, previous versions still require a bit of work and you would have to refer that from official documentation.
Botpress enables users to connect to their backend systems using the API call skill. The skill has three sections: body, headers and memory.
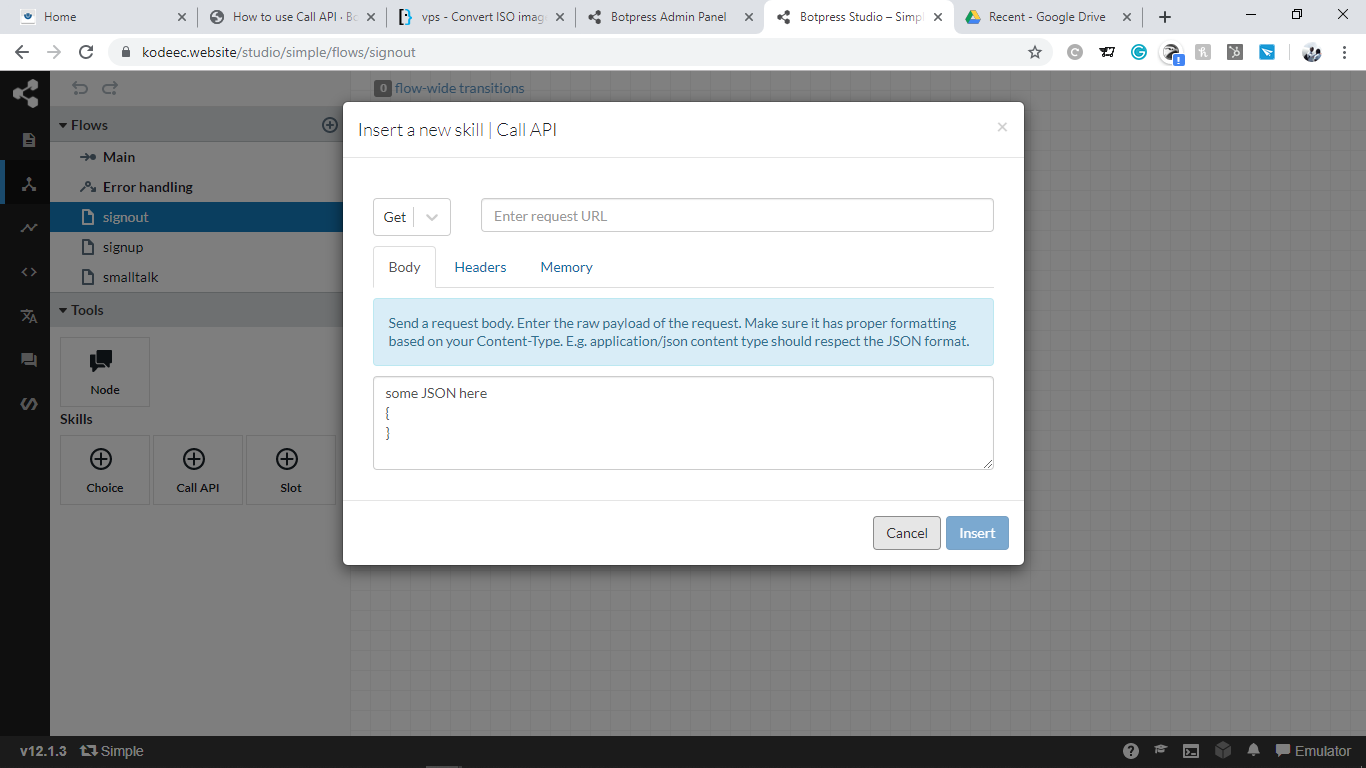
The body caries the payload that you wish to call your API with, such as train booking details. The headers carry authorization tokens, the content type and other custom headers that would be necessary to call your API.
By default, API responses are saved in the {{temp.response}} variable, but tis could be stored differently. You can also call APIs in custom actions to get some data to execute some action. The engine already has axios http client as a dependency. To create a custom action, create a new .js file /data/global/actions/niceApi.js. Copy the template below into your file:
const axios = require('axios')

/**
 * @title Call my nice API
 * @category Nice
 * @author My Nice company, Inc.
 */
const niceApi = async () => {
  // This calls our API
  const {data} = await axios.get('https://api.nice.com/botpress/)

  // Save the response data to a session variable that is accessible within the flow
  session.response = data
}

// Return the stored value using the lie below:
return niceApi()
The API call skill is very popular since it allows communication with external systems. However, for a more intimate connection with other systems, the engine has JWT enabled, but this requires a bit of a complex setup which we shall not dive into in this tutorial. See official documentaion for JWT method of connecting backend systems.
We have already looked at how to create nodes in previous tutorials. Flows contain nodes and skills and are used to manage large and complex bots to make it easy to manage and work with them.
A flow contains a startNode defined in its respective *.flow.json file. Each bot must have a main flow. You could transition from a node in one flow to a sub flow. Usually, user input is processed sequentially from node to node until the end of the flow is reached. You should find flows within a bot stored in data/bots/bot-id/flows/. Consider the JSON example below:
{
  "version": "0.0.1",
  "catchAll": {},
  "startNode": "entry",
  "nodes": [
    {
      "id": "df052970ef",
      "name": "entry",
      "next": [
        {
          "condition": "true",
          "node": "topic-choices"
        }
      ],
      "onEnter": [
        "say #!builtin_text-lbs0Re",
        "builtin/removeContext {\"contexts\":\"monkeys,giraffes\"}"
      ],
      "onReceive": null
    },
    {
      "id": "e4887b15ba",
      "type": "skill-call",
      "skill": "choice",
      "name": "topic-choices",
      "flow": "skills/choice-62d44d.flow.json",
      "next": [
        {
          "condition": "temp['skill-choice-ret'] == \"context\"",
          "node": "contexts.flow.json"
        },
        {
          "condition": "temp['skill-choice-ret'] == \"memory\"",
          "node": "memory.flow.json"
        },
        {
          "caption": "On failure",
          "condition": "true",
          "node": "catch"
        }
      ],
      "onEnter": null,
      "onReceive": null
    },
    {
      "id": "114b7e7782",
      "name": "catch",
      "next": [
        {
          "condition": "true",
          "node": "topic-choices"
        }
      ],
      "onEnter": [
        "say #!builtin_text-SKQxXN"
      ],
      "onReceive": null
    },
    {
      "id": "41e1699b34",
      "name": "node-17b6",
      "next": [],
      "onEnter": [],
      "onReceive": null,
      "type": "standard"
    }
  ]
}In this article, we looked at some of the advanced concepts in Botpress, specifically the converse API, NLU, upgrades, security, integration with backend systems, nodes and flows.
This series was designed to enable you to get started with the Botpress open source chatbot development engine as quickly as possible. It is a very powerful engine with good visuals and of course it is free to use. Unlike other bot engines such as Google's Dialogue Flow, IBM Watson or Microsoft's LUIS, you can set up Botpress on an Alibaba Cloud instance and avoid paying monthly fees for AI bots.
Do you have an Alibaba Cloud account? Sign up for an account and try over 40 products for free. This offer is worth up to $1300. Get Started with Alibaba Cloud to learn more.
The views expressed herein are for reference only and don't necessarily represent the official views of Alibaba Cloud.
Creating a FAQ ChatBot That's Integrated with Facebook Messenger

2,593 posts | 792 followers
FollowAlibaba Clouder - May 20, 2020
Alibaba Clouder - May 20, 2020
Alibaba Clouder - May 20, 2020
Alibaba Cloud Community - September 13, 2021
Alibaba Clouder - March 16, 2021
Alibaba Clouder - April 10, 2018

2,593 posts | 792 followers
Follow Simple Log Service
An all-in-one service for log-type data
Learn More Web App Service
Web App Service allows you to deploy, scale, adjust, and monitor applications in an easy, efficient, secure, and flexible manner.
Learn More WAF(Web Application Firewall)
A cloud firewall service utilizing big data capabilities to protect against web-based attacks
Learn More ECS(Elastic Compute Service)
Elastic and secure virtual cloud servers to cater all your cloud hosting needs.
Learn MoreMore Posts by Alibaba Clouder