Web Application Firewall (WAF)提供控制台升級工具,支援將 WAF 2.0 執行個體自助升級至 WAF 3.0。本文介紹升級先決條件、升級後的變更內容及升級操作步驟。
自助升級工具入口分批灰階開放。
如果您的Web Application Firewall控制台左側導覽列底部已顯示WAF3.0升級入口按鈕,表示您可以直接進行自助升級。
如果沒有WAF3.0升級入口按鈕,且急需將執行個體升級到WAF 3.0,請聯絡您的商務經理,提交升級申請,通過後再進行自助升級。
前提條件
存在透明接入(ALB類型)的執行個體暫不支援直接升級。若存在,需要關閉引流、刪除網域名稱接入配置後,再進行自助升級。具體操作,請參見常見問題。
阿里雲每日0點至3點進行雲產品資產同步等操作,建議您在該時段不要進行透明接入的升級。
執行個體版本包括訂用帳戶進階版、企業版、旗艦版,混合雲WAF的獨享版。
執行個體未使用大屏服務、未開啟定製功能。
執行個體在15天內不會到期。
升級操作需擁有WAF完整許可權(AliyunYundunWAFFullAccess)。
帳號未欠費。
升級前須知
對業務影響
商務持續性:升級過程平滑無閃斷,不會對正常業務造成影響。升級後,WAF 2.0提供的CNAME地址、已配置的回源地址保持不變,您可以在CNAME接入列表查看相關資訊。
升級時間長度:升級時間長度約15分鐘。其中“一鍵全量升級”方式因包含全面的系統預檢查,其耗時通常長於“手工分批升級”方式。
升級後的變化
升級流程介紹
接入對象升級說明:
升級透明接入的網域名稱時,WAF會將網域名稱綁定的雲產品(七層SLB類型、四層SLB類型、ECS類型)執行個體引流連接埠的流量升級到對應雲產品接入中,同時將執行個體添加為防護對象,將網域名稱添加為自訂防護對象。
升級混合雲接入的流量時,WAF預設將流量升級到混合雲反向 Proxy模式中,並產生一個防護對象。
流量灰階功能介紹:
選擇手工分批升級時,支援對網域名稱開啟流量灰階功能。流量灰階可以先將部分流量導向WAF 3.0,根據實際業務需求,選擇切入到新版本流量的比例,直到將全部流量切入到WAF 3.0。
流量灰階比例支援檔位為1%、5%、10%、20%、30%、50%、70%、90%、100%,不支援自訂比例。僅允許增加灰階比例,如10%增加至20%,不允許減少灰階比例。
資訊泄露防護(DLP)功能暫不支援灰階,當遷移任務開啟時,資訊泄露防護的命中記錄將被記錄在WAF 3.0中。
操作步驟
登入Web Application Firewall控制台,在頂部功能表列,選擇WAF執行個體的資源群組和地區(中國內地、非中國內地)。在左側導覽列底部,單擊WAF3.0升級入口。
如果您的執行個體滿足升級要求,在升級須知面板,閱讀並勾選升級須知後,單擊我已了解升級須知,開始升級,進入升级工具頁面,準備進行升級。
如果您的執行個體不滿足升級要求,WAF將彈出錯誤提示框。您可以根據提示內容,執行對應操作。
步驟一:流量綁定(僅限透明接入模式)
如果您存在透明接入的網域名稱,則會彈出流量綁定頁面,需要將網域名稱綁定到對應雲產品(ECS、CLB(TCP)、CLB(HTTP/HTTPS))。如果您不清楚網域名稱對應的雲產品類型,可以按照以下步驟確認:
使用網路診斷分析,選擇網路診斷分析,輸入欄位名,在DNS服務商解析結果處進行查看並複製公網IP地址。
分別進入ECS控制台-執行個體與傳統型負載平衡CLB控制台。選擇地區與資源群組,尋找上一步複製的IP地址對應的執行個體。
如果是ECS執行個體,選擇ECS。
如果是監聽協議為TCP的CLB執行個體,選擇CLB(TCP)。
如果是監聽協議為HTTP或HTTPS的CLB執行個體,選擇CLB(HTTP/HTTPS)。
選擇完成後,單擊繼續升級。

步驟二:升級預校正
升級預校正工具用於檢測當前執行個體是否滿足升級條件。首次校正完成後,您可在升級工具頁面查看最近的校正時間與結果。若校正未通過,請根據頁面提示的原因進行修複,修複完成後返回此頁面重新校正。
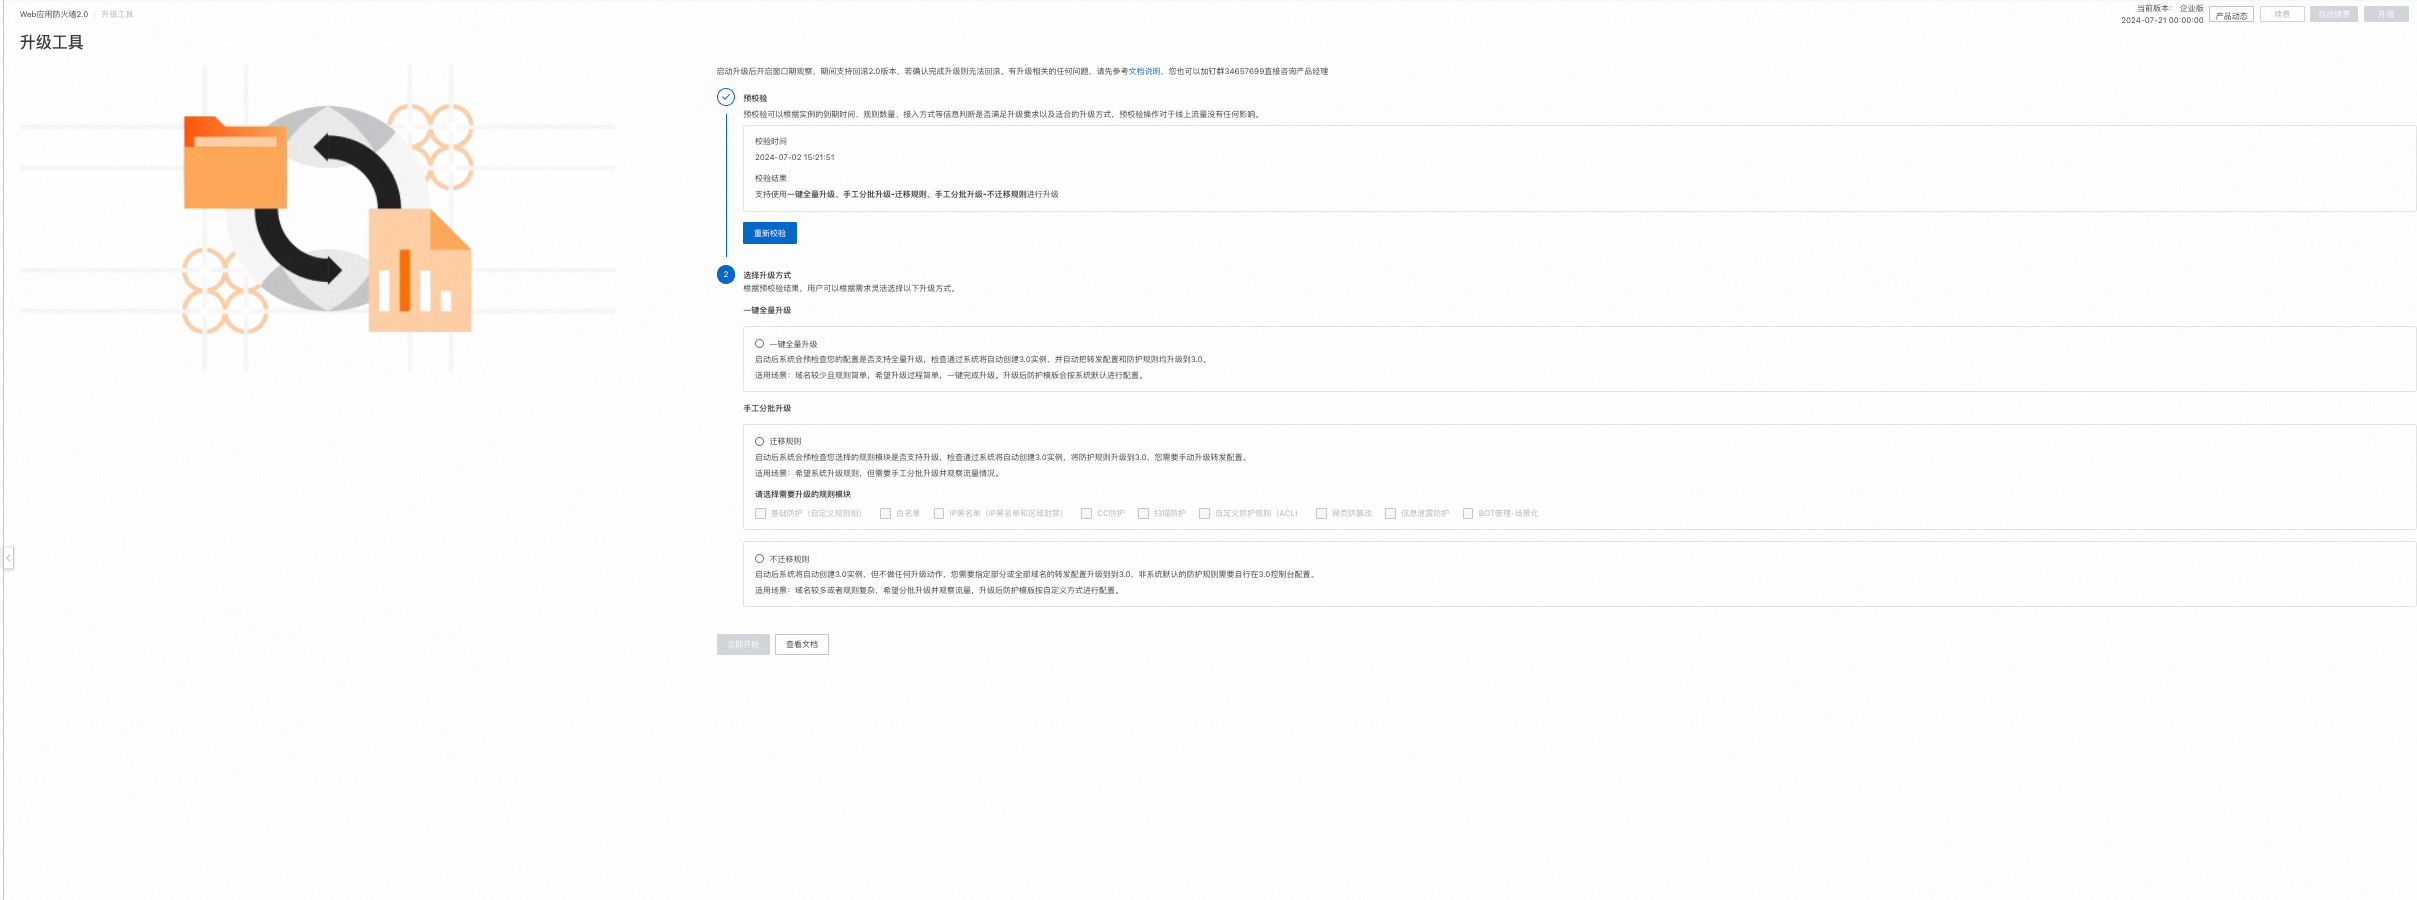
步驟三:選擇升級方式
升級工具提供了三種升級方式,您可以根據需求進行選擇:
遷移方式 | 一鍵全量升級 | 手工分批升級:遷移規則 | 手工分批升級:不遷移規則 |
適用情境 |
|
|
|
升級模式 | 系統會預檢查是否支援全量升級,檢查通過後自動建立3.0執行個體,並自動把轉寄配置和防護規則升級至3.0。 | 系統會預檢查您選擇的防護模組是否支援升級,檢查通過後自動建立3.0執行個體,將防護規則升級至3.0,轉寄配置需手動升級。 | 系統將自動建立3.0執行個體,不執行任何升級動作。您需手動升級轉寄配置,非預設防護規則需在3.0控制台中重新設定。 |
在升級工具頁面,選擇一鍵全量升級、手工分批遷移-遷移規則或手工分批遷移-不遷移規則後,單擊立即開始。
重要選擇手工分批遷移-遷移規則後,您需選擇要升級的防護規則,支援多選。您只能在當前頁面選擇要升級的防護規則,請根據業務情況仔細評估後再開始遷移。
在彈出的對話方塊單擊確定,執行個體將開始自動升級,自動升級預計需要15分鐘,請您保持當前頁面的開啟狀態,不要重新整理頁面。
說明如果升級不成功,執行個體將自動復原到WAF 2.0。您可以在復原完成對話方塊,查看升級失敗原因。

WAF自動升級結束後,在WAF 3.0版本实例创建成功對話方塊,單擊確認進入升級視窗期。
步驟四:在升級視窗期內完成遷移
升級視窗期為允許進行升級操作的整個周期,共計15天。您可以在升級工具頁面,查看升級視窗期剩餘時間長度。
根據升級方式執行操作:
一鍵全量升級
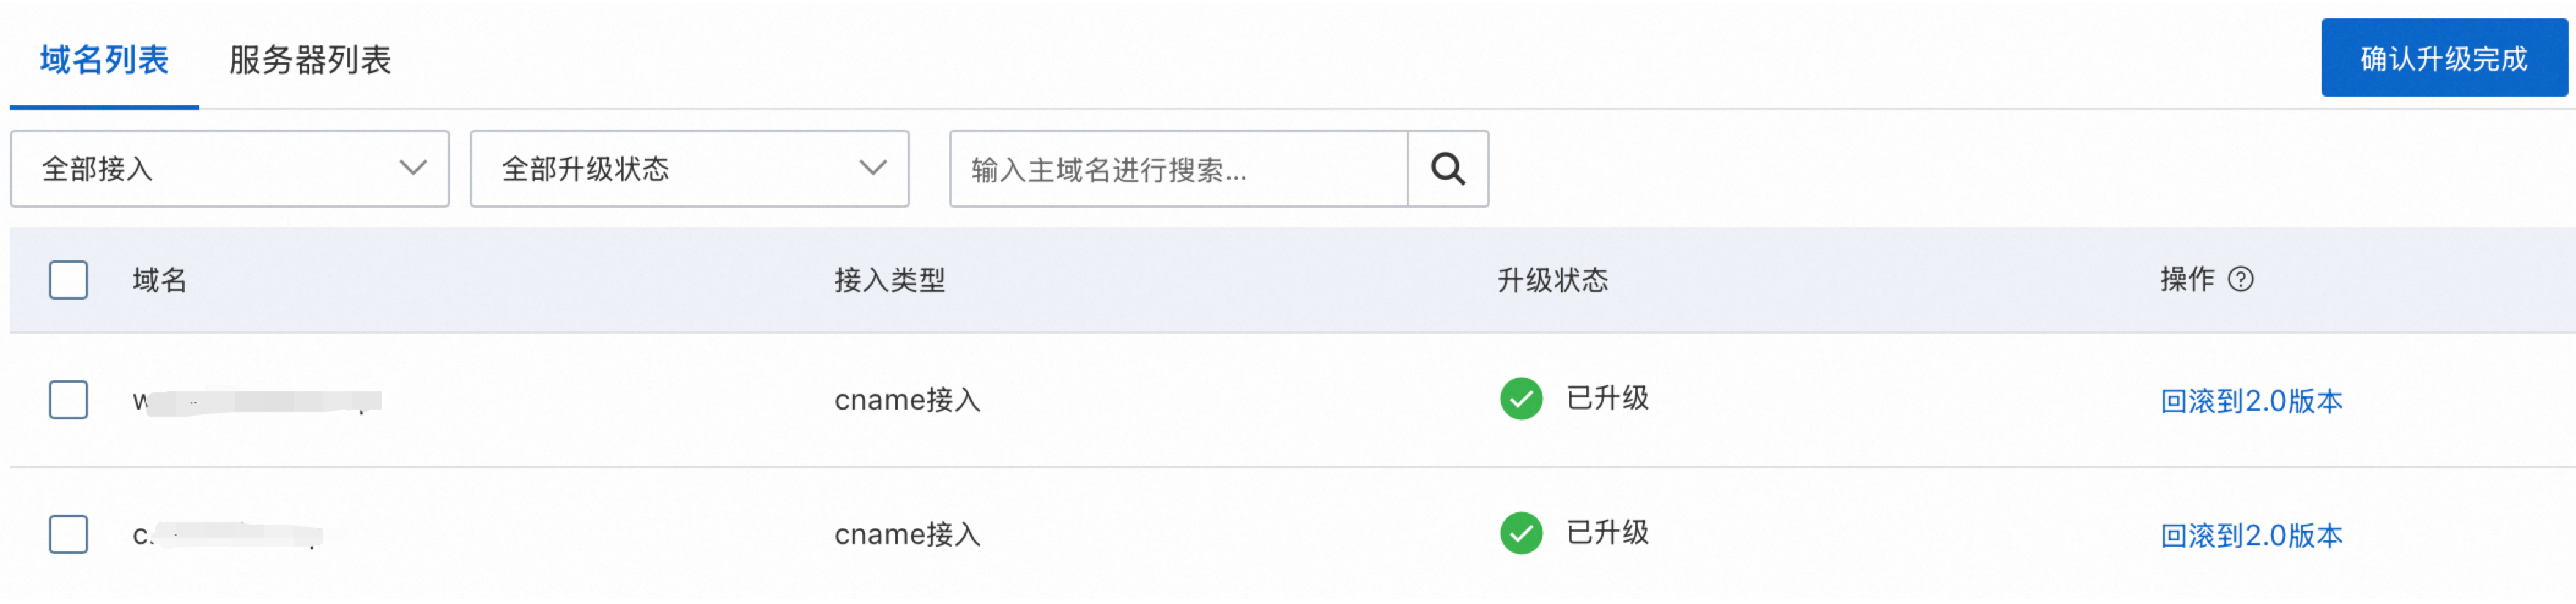
若您在上一步選擇一鍵全量升級,此時在升級工具頁面,所有網域名稱與伺服器的升級狀態會顯示為已升級,表示所有接入WAF的網域名稱與雲產品執行個體相關配置已自動升級到WAF 3.0。
檢查各接入對象對應的業務側流量是否正常。包括但不限於查看日誌中狀態代碼200的佔比是否有明顯波動、QPS是否有明顯突增突降等。若您已開啟WAF3.0Log Service,可以參考日誌查詢進行檢查。
單擊頁面左下角切到3.0版本,進行如下檢查:
在左側導覽列,單擊接入管理,檢查資產接入狀態。
在左側導覽列,選擇,檢查防護模板及其生效對象是否符合業務需求。
若確定正常,前往升級工具,單擊確認升級完成。WAF 2.0執行個體會被釋放,需在WAF 3.0控制台進行安全防護。
說明若發現業務不正常,前往升級工具,在接入對象的操作列單擊復原到2.0版本,使網域名稱/伺服器復原至2.0。
復原至2.0後,後續也可在升級工具頁面,單擊目標操作列的升級到3.0版本。此時,系統將只升級該對象的轉寄配置。您需要手動為該對象關聯相應的防護原則範本。
極端情況下若復原後業務仍異常,請單擊頁面右上方放棄升級,使所有配置回到遷移開始前的狀態。
手工分批升級:遷移規則
若您在上一步選擇手工分批遷移-遷移規則,此時在升級工具頁面,所有網域名稱與伺服器的升級狀態會顯示為未升級,需要繼續進行手動升級。
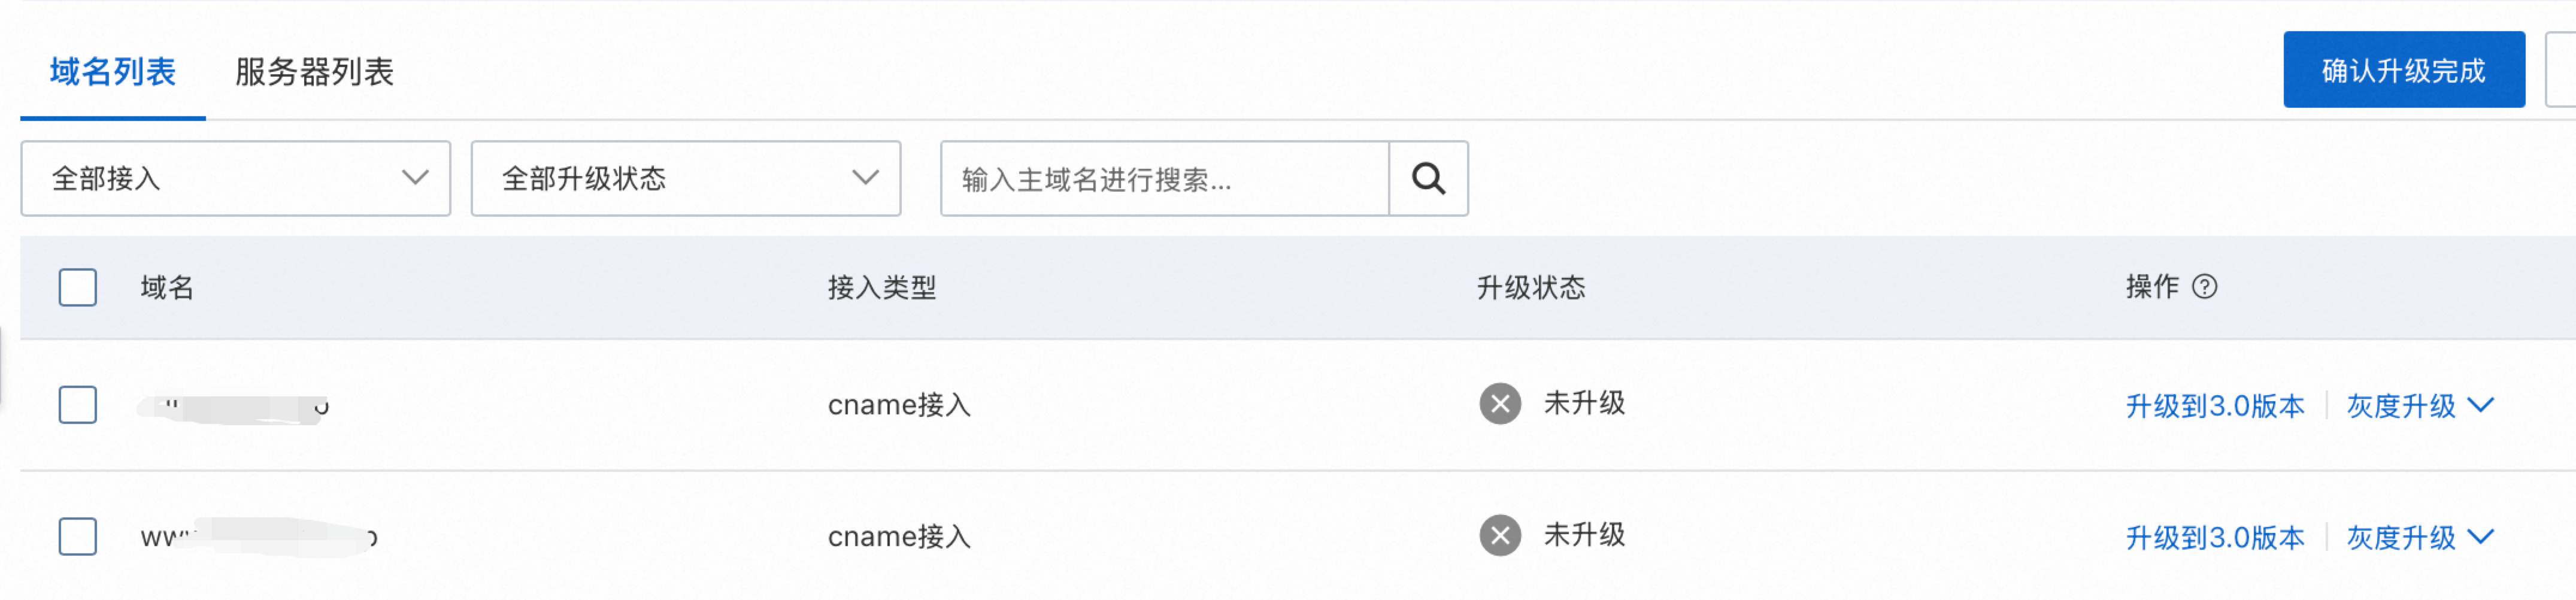
選擇一個或多個網域名稱/雲產品執行個體手動進行升級,直至所有網域名稱與雲產品執行個體顯示已升級,支援以下兩種升級方式:
直接升級:在操作列單擊升級到3.0版本,在彈出的提示框單擊確定。
灰階升級:在操作列單擊灰階升級,並選擇切入到新版本流量的比例,逐步將流量切入到WAF 3.0。當灰階升級進度達到100%時,升級狀態顯示為已升級。
檢查各接入對象對應的業務側流量是否正常。包括但不限於查看日誌中狀態代碼200的佔比是否有明顯波動、QPS是否有明顯突增突降等。若您已開啟WAF3.0Log Service,可以參考日誌查詢進行檢查。
說明若發現業務不正常,前往升級工具,在接入對象的操作列單擊復原到2.0版本,使網域名稱/伺服器復原至2.0。
復原至2.0後,後續也可在升級工具頁面,單擊目標操作列的升級到3.0版本。此時,系統將只升級該對象的轉寄配置。您需要手動為該對象關聯相應的防護原則範本。
極端情況下若復原後業務仍異常,請單擊頁面右上方放棄升級,使所有配置回到遷移開始前的狀態。
若所有網域名稱與雲產品執行個體均已升級完成,且業務側流量與防護配置均符合預期,前往升級工具,單擊確認升級完成。WAF 2.0執行個體會被釋放,需在WAF 3.0控制台進行安全防護。
手工分批升級:不遷移規則
若您在上一步選擇手工分批遷移-不遷移規則,此時在升級工具頁面,所有網域名稱與伺服器的升級狀態會顯示為未升級,需要繼續進行手動升級。
選擇一個或多個網域名稱/雲產品執行個體手動進行升級,直至所有網域名稱與雲產品執行個體顯示已升級,支援以下兩種升級方式:
直接升級:在操作列單擊升級到3.0版本,在彈出的提示框單擊確定。
灰階升級:在操作列單擊灰階升級,並選擇切入到新版本流量的比例,逐步將流量切入到WAF 3.0。當灰階升級進度達到100%時,升級狀態顯示為已升級。
檢查各接入對象對應的業務側流量是否正常。包括但不限於查看日誌中狀態代碼200的佔比是否有明顯波動、QPS是否有明顯突增突降等。若您已開啟WAF3.0Log Service,可以參考日誌查詢進行檢查。
說明若發現業務不正常,前往升級工具,在接入對象的操作列單擊復原到2.0版本,使網域名稱/伺服器復原至2.0。
復原至2.0後,後續也可在升級工具頁面,單擊目標操作列的升級到3.0版本。此時,系統將只升級該對象的轉寄配置。您需要手動為該對象關聯相應的防護原則範本。
極端情況下若復原後業務仍異常,請單擊頁面右上方放棄升級,使所有配置回到遷移開始前的狀態。
單擊頁面左下角切到3.0版本,參考WAF 2.0執行個體的防護配置,建立WAF 3.0防護模板及防護規則,並配置對應的生效對象。具體操作,請參見防護配置概述。
若所有網域名稱與雲產品執行個體均已升級完成,且業務側流量與防護配置均符合預期,前往升級工具,單擊確認升級完成。WAF 2.0執行個體會被釋放,需在WAF 3.0控制台進行安全防護。
升級完成後請及時進行確認。如果您在升級視窗期15天到期後仍未單擊確認升級完成,執行個體及其配置會復原到WAF 2.0,自動建立的WAF 3.0執行個體會被釋放,視窗期內的防護配置也會被刪除。如果仍需升級,需要重新開始。
後續操作(配置日誌、警示等)
完成升級後,若您曾在WAF 2.0配置了如下服務,則需要在WAF 3.0進行額外操作:
配置Log Service
您需要重新設定Log Service的如下資訊:
配置日誌欄位和儲存類型、防護對象的採集狀態、日誌儲存時間長度、日誌容量。具體操作,請參見日誌管理概述。
開啟或關閉Log Service。具體操作,請參見開啟或關閉Log Service。
配置CloudMonitor與警示
WAF 3.0啟用新的事件和指標監控項,需要重新設定。具體操作,請參見配置CloudMonitor通知。
配置RAM許可權
針對OpenAPI介面層級的許可權管理需要重新設定。更多資訊,請參見授權資訊。
配置Terraform
Terraform需要重新設定。更多資訊,請參見Terraform Registry(網域名稱)、Terraform Registry(執行個體)。
配置OpenAPI
WAF 3.0啟用新的OpenAPI。更多資訊,請參見API概覽。
配置資源群組
資源群組暫不支援升級,需要重新設定。具體操作,請參見通過CNAME接入為網站開啟WAF防護。
商品code變更引發的操作
完成升級後,WAF對應的商品code會發生變化。如果您的執行個體因此需要進行商務變更,請聯絡您的商務經理。
常見問題
有透明接入引流的執行個體能不能升級?
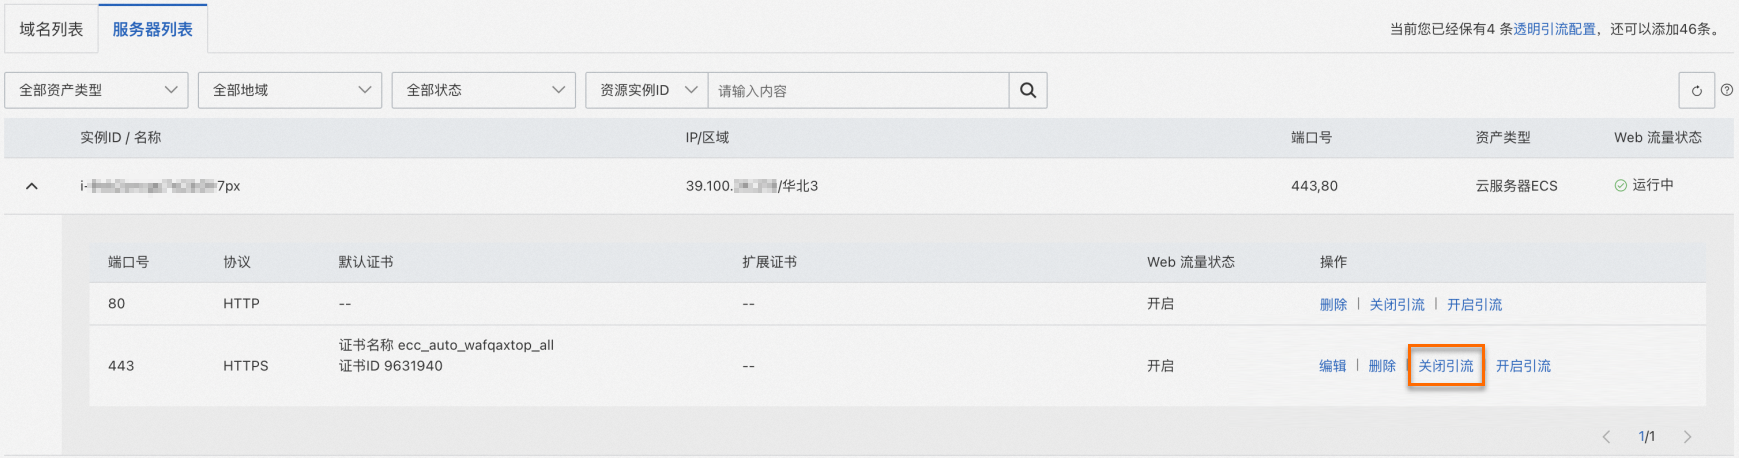
可以。WAF支援自助將透明接入(七層SLB類型、四層SLB類型、ECS類型)的流量升級到WAF 3.0。透明接入(ALB類型)的流量暫不支援自助升級。您可以先關閉ALB類型的引流、刪除網域名稱接入配置後,再進行升級。具體操作可參考如下步驟:
訪問網站接入頁面,在伺服器列表頁簽,單擊執行個體連接埠操作列的關閉引流。
在網域名稱列表頁簽,單擊網域名稱操作列的刪除。

升級WAF執行個體。具體操作,請參見升級操作。
將ALB類型的流量重新接入WAF 3.0。具體操作,請參見雲產品接入。
獨享版執行個體能不能升級?
可以,詳情請諮詢您的商務經理,或通過工單提交諮詢。
升級過程中,會不會產生費用?
不會。升級完成後,訂用帳戶執行個體會在下一次續約時產生費用。
WAF 2.0企業版能不能升級成WAF 3.0進階版,WAF 2.0進階版能不能升級成WAF 3.0企業版?
不能。訂用帳戶執行個體僅支援同版本升級,WAF 2.0進階版只能升級為WAF 3.0進階版。如果您希望使用企業版,您可以在升級完成後,將進階版升級為企業版。具體操作,請參見升級。
升級視窗內,能不能在WAF 2.0上新添加一個網域名稱,再繼續進行升級?
不能。升級視窗期內,網站接入會被置灰,不支援新添加網域名稱、刪除或修改已接入網域名稱的所有轉寄配置。如果您在升級視窗期內,需要在WAF 2.0上新添加一個網域名稱,您需要先放棄升級,再添加網域名稱。完成後,重新進行升級。
放棄升級後,系統會刪除WAF 3.0執行個體及其配置,並退出升級流程。