The data restoration feature minimizes the losses that are caused by unintentional operations. You can use a temporary RDS instance to restore the data of a primary ApsaraDB RDS for SQL Server instance. This topic describes how to restore the data of a primary RDS instance by using a temporary RDS instance. After you create a temporary RDS instance for the primary RDS instance, the primary RDS instance still runs as normal. The temporary RDS instance serves only as an intermediary for data restoration. After data is restored to the temporary RDS instance, verify that the restored data is correct. Then, migrate the restored data to the primary RDS instance. This minimizes the impact of data restoration on your workloads.
For more information about how to select a data restoration solution, see Methods to restore an ApsaraDB RDS for SQL Server instance.
Prerequisites
Your primary RDS instance must meet the following requirements:
The RDS instance runs SQL Server 2008 R2.
The RDS instance runs RDS High-availability Edition.
The RDS instance uses local disks.
NoteYou can go to the Basic Information page of your RDS instance to view the preceding information.
The primary RDS instance has data backup files. If you want to restore data to a point in time, log backup files are required. For more information, see Backup description.
Usage notes
The temporary RDS instance inherits the account and password settings of the primary RDS instance.
The temporary RDS instance uses the classic network type.
Only one temporary RDS instance can exist. If you want to create a temporary RDS instance, you must delete the existing temporary RDS instance.
A temporary RDS instance is free of charge. After a temporary RDS instance is created, it remains valid within 48 hours. After 48 hours, the system automatically deletes the temporary RDS instance.
You cannot create, modify, or delete databases or accounts on a temporary RDS instance.
Procedure
- Go to the Instances page. In the top navigation bar, select the region in which the RDS instance resides. Then, find the RDS instance and click the ID of the instance.
In the left-side navigation pane, click Backup and Restoration.
On the Backup and Restoration page, click the Temporary Instance tab.
Select the period that is the closest to the point in time to which you want to restore data. The system restores data based on the last backup before the point in time.
Select Time: The system displays the points in time at which valid backup sets on the Data Backup tab are generated.
Other Times: You can select another point in time at which a valid backup set is generated.
Select a creation type.
Click Create Temporary Instance. Then, click OK.
Click Create Temporary Instance of Higher Version. In the dialog box that appears, configure the Zone, Upgrade To, VPC, and vSwitch parameters, and click OK.
NoteThe time that is required to create a temporary RDS instance varies based on factors such as the data volume. You can view the task progress on the Tasks page.
The instance type and storage type of a temporary RDS instance of a later version use the default configurations. The temporary RDS instance is retained for seven days and is automatically released seven days later.
Only one temporary RDS instance can exist. If you want to roll back to another temporary RDS instance, you must delete the current temporary RDS instance first.
After the temporary RDS instance is created, go to the Instances page and click the ID of the primary RDS instance.
In the upper-right corner of the page that appears, click Database Migration to go to the Data Synchronization page of the new Data Transmission Service (DTS) console.
- In the upper-left corner of the page, select the region in which the data migration instance resides.
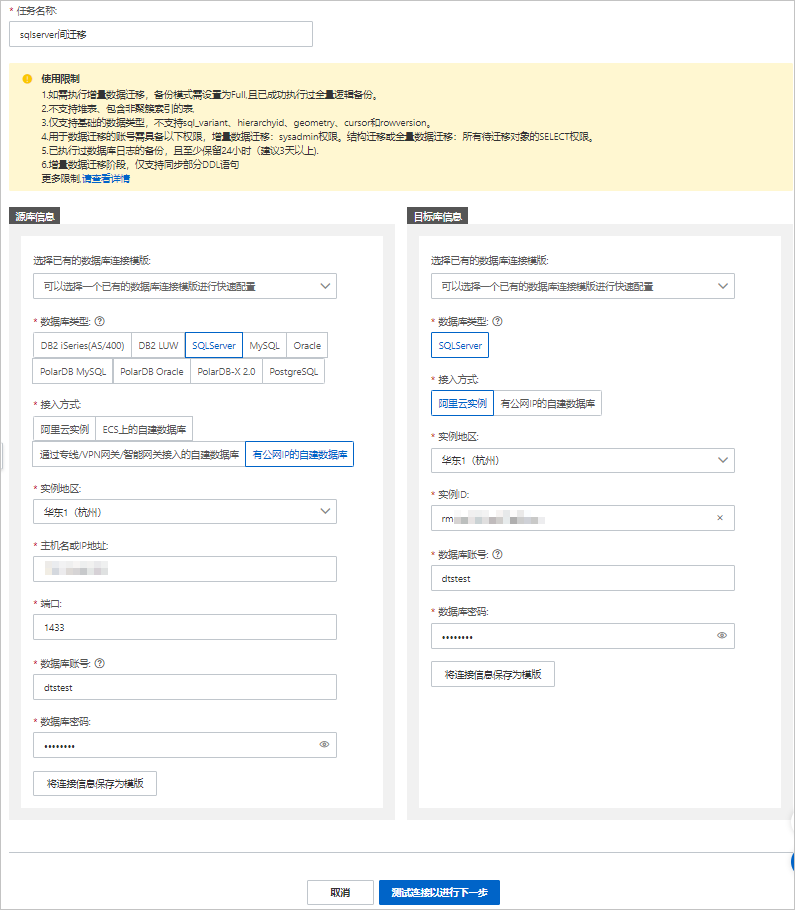
Click Create Task. On the Create Task wizard page, configure the source and destination databases.
Warning After you configure the source and destination databases, we recommend that you read the limits displayed at the top of the page. Otherwise, the task may fail or data inconsistency may occur.Category
Parameter
Description
N/A
Task Name
The task name that DTS automatically generates. We recommend that you specify a descriptive name that makes it easy to identify the task. You do not need to specify a unique task name.
Source Database
Database Type
Select SQL Server.
Access Method
Select Public IP Address.
NoteIf you select a self-managed database, you must make preparations. For more information, see Preparation overview.
Instance Region
Select the region in which the self-managed SQL Server database resides.
Hostname or IP address
Enter the endpoint of the self-managed SQL Server database. In this example, enter the public IP address.
Port Number
Enter the port number of the self-managed SQL Server database. The default port number is 1433.
Database Account
Enter the account that is used to log on to the self-managed SQL Server database.
Database Password
The password of the database account.
Destination Database
Database Type
Select SQL Server.
Access Method
Select Alibaba Cloud Instance.
Instance Region
Select the region in which the destination RDS instance resides.
Instance ID
Select the ID of the destination RDS instance.
Database Account
Enter the database account of the destination RDS instance.
Database Password
The password of the database account.
- In the lower part of the page, click Test Connectivity and Proceed. If the source or destination database is an Alibaba Cloud database instance, such as an ApsaraDB RDS for MySQL or ApsaraDB for MongoDB instance, DTS automatically adds the CIDR blocks of DTS servers to the IP address whitelist of the instance. If the source or destination database is a self-managed database hosted on an Elastic Compute Service (ECS) instance, DTS automatically adds the CIDR blocks of DTS servers to the security group rules of the ECS instance, and you must make sure that the ECS instance can access the database. If the source or destination database is a self-managed database that is deployed in a data center or provided by a third-party cloud service provider, you must manually add the CIDR blocks of DTS servers to the IP address whitelist of the database to allow DTS to access the database. For more information, see the "CIDR blocks of DTS servers" section of the Add the CIDR blocks of DTS servers to the security settings of on-premises databases topic.Warning If the CIDR blocks of DTS servers are automatically or manually added to the IP address whitelist of the database instance or ECS security group rules, security risks may arise. Therefore, before you use DTS to migrate data, you must understand and acknowledge the potential risks and take preventive measures, including but not limited to the following measures: enhance the security of your account and password, limit the ports that are exposed, authenticate API calls, regularly check the IP address whitelist or ECS security group rules and forbid unauthorized CIDR blocks, and connect the database to DTS by using Express Connect, VPN Gateway, or Smart Access Gateway.
Configure task objects and perform advanced configurations. For more information, see Step 5.
- In the lower part of the page, click Next: Save Task Settings and Precheck.
You can move the pointer over Next: Save Task Settings and Precheck and click Preview OpenAPI parameters to view the parameters to be specified when you call the relevant API operation to configure the DTS task.
Note- Before you can start the data migration task, DTS performs a precheck. You can start the data migration task only after the task passes the precheck.
- If the task fails to pass the precheck, click View Details next to each failed item. After you troubleshoot the issues based on the causes, run a precheck again.
- If an alert is triggered for an item during the precheck:
- If an alert item cannot be ignored, click View Details next to the failed item and troubleshoot the issues. Then, run a precheck again.
- If an alert item can be ignored, click Confirm Alert Details. In the View Details dialog box, click Ignore. In the message that appears, click OK. Then, click Precheck Again to run a precheck again. If you ignore the alert item, data inconsistency may occur, and your business may be exposed to potential risks.
- Wait until the Success Rate value becomes 100%. Then, click Next: Purchase Instance.
- On the Purchase Instance page, specify the Instance Class parameter for the data migration instance. The following table describes the parameter.
Section Parameter Description New Instance Class Resource Group The resource group to which the data migration instance belongs. Default value: default resource group. For more information, see What is Resource Management?. Instance Class DTS provides various instance classes that vary in the migration speed. You can select an instance class based on your business scenario. For more information, see Specifications of data migration instances.
- Read and select the check box to agree to Data Transmission Service (Pay-as-you-go) Service Terms.
- Click Buy and Start to start the data migration task. You can view the progress of the task in the task list.
Related operations
Operation | Description |
Creates a temporary instance. |