在將RDS MySQL一鍵升級至PolarDB MySQL版的過程中,將為您建立目標PolarDB叢集並進行資料同步。升級後的PolarDB叢集將包含源RDS執行個體的帳號資訊、資料庫、IP白名單以及必要的參數配置。
整個升級過程中將包含以下步驟:
一鍵升級分為物理遷移(物理複製)和邏輯遷移(DTS資料同步)兩種方式,具體區分如下。更多資訊,請參見物理遷移和邏輯遷移對比。
物理遷移(物理複製):RDS MySQL 5.6和5.7高可用版且儲存類型為本地SSD盤的執行個體,遷移至相同版本的PolarDB MySQL版叢集。
邏輯遷移(DTS資料同步):除上述屬於物理遷移(物理複製)方式外,其他形態的RDS MySQL執行個體遷移至相同或不同版本的PolarDB MySQL版叢集。
詳細步驟說明,請參見各操作步驟。
前置檢查:
白名單檢查(可選):若源RDS主執行個體與唯讀執行個體的白名單配置不一致,為確保唯讀執行個體的白名單能夠自動同步至目標PolarDB叢集,需先將唯讀執行個體的白名單合并至主執行個體的白名單配置中。
僅限邏輯遷移:
步驟一:從RDS遷移:在PolarDB購買頁面,選擇建立方式為從RDS遷移,並指定源RDS版本及執行個體,以建立一個目標PolarDB叢集。
步驟二:地址補齊(可選):一鍵升級支援帶地址切換,您可保留源RDS執行個體的串連地址,應用程式無需修改任何串連配置即可切換至目標PolarDB叢集。僅當源RDS執行個體和目標PolarDB叢集同時存在的串連地址,才支援相互切換。
步驟三:遷移切換:交換源RDS執行個體和目標PolarDB叢集的讀寫狀態(即將源RDS執行個體修改為唯讀,將目標PolarDB叢集修改為可讀可寫),同時會更換複製方向(即將目標PolarDB叢集的新增資料同步到源RDS執行個體)。
步驟四:源執行個體DTS任務切換(可選):若源執行個體存在關聯的DTS鏈路(非一鍵遷移DTS鏈路),您可使用此功能修改(替換)DTS同步或遷移任務的源或目標庫執行個體,平滑切換關聯業務。
步驟五:完成遷移:若業務資料移轉已完成,並且後續不再需要使用資料同步時,您可以完成整個升級過程。
退訂或釋放RDS執行個體(可選):若業務已在PolarDB叢集上穩定運行且不再需要源RDS執行個體時,可以退訂或釋放源RDS執行個體。
遷移切換完成後,如果您探索資料存在異常或其他問題,可以進行遷移復原(可選)操作,以便迅速恢複到升級前的狀態。之後,您還可以繼續選擇取消遷移(可選)操作,恢複到切換之前的狀態。
前置檢查
檢查是否已建立PolarDB服務關聯角色(僅限邏輯遷移)
若您已完成遷移評估並且無相關異常,可跳過該前置檢查。
在使用邏輯遷移(DTS資料同步)方式進行一鍵升級前,請先檢查是否已建立PolarDB服務關聯角色,以及是否已授予DTS訪問雲資源的許可權。
使用阿里雲帳號(主帳號)前往RAM控制台的身份管理>角色列表。
檢查角色列表中,是否已存在名為AliyunServiceRoleForPolarDB的服務關聯角色,如下:

若存在,請跳過當前檢查步驟。
若不存在,則繼續執行以下步驟。
單擊建立角色,在開啟的建立角色頁面中,單擊右上方的建立服務關聯角色。

在開啟的建立服務關聯角色頁面中,選擇信任的雲端服務為AliyunServiceRoleForPolarDB,並單擊建立服務關聯角色以完成建立。

以下為您展示如何查看授權結果以及快速授權的方式。更多資訊,請參見授予DTS訪問雲資源的許可權。
查看授權結果
使用阿里雲帳號(主帳號)前往RAM控制台的身份管理>角色列表。
檢查角色列表中,是否已存在名為AliyunDTSDefaultRole的角色,如下:

若不存在,請前往快速授權。
若存在,則繼續執行以下步驟檢查當前角色許可權。
單擊角色名稱,查看AliyunDTSDefaultRole的詳細資料。
當角色AliyunDTSDefaultRole同時滿足如下條件時,表示授權成功。
許可權管理中包含系統策略AliyunDTSRolePolicy。

信任策略中包含
dts.aliyuncs.com。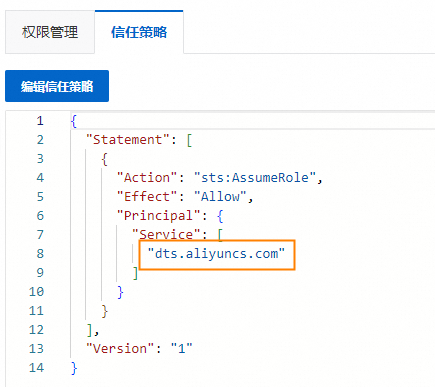
當角色AliyunDTSDefaultRole不滿足上述條件時,表示授權失敗,需要重新授權。您可以刪除角色AliyunDTSDefaultRole,重新授權。
快速授權
使用阿里雲帳號(主帳號)訪問AliyunDTSDefaultRole快捷授權頁面,在存取控制快速授權頁面中,單擊確認授權。
說明出現雲資源訪問授權成功!時,表示已完成授權。
更多授權方式,請參見授予DTS訪問雲資源的許可權。
刪除源RDS執行個體中多餘系統帳號(僅限邏輯遷移)
若您已完成遷移評估並且無相關異常,可跳過該前置檢查。
為了相容RDS MySQL和PolarDB兩者的系統帳號體系,避免升級後目標PolarDB的系統帳號被覆蓋,源RDS執行個體中不允許同時存在root和aliyun_root帳號。因此,在進行升級前,請先刪除源RDS執行個體中多餘的系統帳號。
RDS MySQL各個版本的正確系統帳號名如下:
RDS MySQL版本 | 正確的系統帳號名 |
RDS MySQL 5.6 | root |
RDS MySQL 5.7 | aliyun_root |
RDS MySQL 8.0 | aliyun_root |
在上述版本中,除相應的正確系統帳號外,其他系統帳號均需被刪除。例如,RDS MySQL 5.7執行個體的正確系統帳號為aliyun_root。若您在控制台中手動建立了root帳號,則需將其刪除。在刪除之前,請確保您的業務中未使用root帳號。
系統帳號可能是您手動建立的,也可能是系統建立並因版本升級而遺留的。在某些情況下,該帳號可能不會在控制台中顯示。
樣本
以清理RDS MySQL 5.6執行個體中多餘系統帳號為例,具體刪除步驟如下:
使用高許可權帳號串連執行個體。
找到所有的root和aliyun_root系統帳號。
SELECT * FROM mysql.user WHERE `user` IN ('root', 'aliyun_root');刪除多餘的系統帳號。RDS MySQL 5.6正確的系統帳號是root,因此需要刪除aliyun_root帳號。
DELETE FROM mysql.user WHERE `user` = 'aliyun_root' LIMIT n;
白名單檢查(可選)
如果源RDS主執行個體和唯讀執行個體的白名單配置不一致,為了保證唯讀節點的白名單自動同步到目標PolarDB叢集,請提前將唯讀節點的白名單合入到主節點的白名單配置中。
步驟一:從RDS遷移
本操作將建立一個與源RDS執行個體資料相同的PolarDB叢集,源RDS執行個體的增量資料會即時同步到該PolarDB叢集。
登入PolarDB控制台,單擊创建新集群,進入PolarDB購買頁。
選擇計費類型為訂用帳戶、隨用隨付或Serverless。
訂用帳戶:在建立叢集時支付計算節點的費用,而儲存空間會根據實際資料量按小時計費,並從賬戶中按小時扣除。
隨用隨付:無需預先支付費用,計算節點和儲存空間(根據實際資料量)均按小時計費,並從賬戶中按小時扣除。
Serverless:無需預先支付費用,計算節點、儲存空間、資料庫代理等資源在叢集使用過程中基於實際需求動態彈性擴縮,並根據擴縮的實際用量來計費。
設定如下參數。
說明下表格中未詳細介紹的參數,請參考購買叢集相關章節。
參數
說明
建立方式
選擇從RDS遷移。
說明在正式遷移切換前PolarDB的讀寫狀態為唯讀,且預設開啟Binlog。
地區
選擇源RDS MySQL執行個體所在地區。
說明建立的PolarDB叢集也在此地區。
源RDS引擎
源RDS執行個體的引擎類型,固定為MySQL,不可變更。
源RDS版本
源RDS執行個體的版本。您可以選擇5.6、5.7或8.0。
源RDS執行個體
選擇源RDS執行個體,不包括唯讀執行個體。
相容性
目標PolarDB叢集的資料庫引擎版本。您可以選擇與源RDS執行個體一致的版本,也可以選擇跨版本。
節點規格
按需選擇,建議不低於源RDS執行個體規格。關於PolarDB節點規格,詳情請參見企業版計算節點規格。
儲存引擎
支援InnoDB和InnoDB & 高壓縮引擎兩種引擎類型。
說明InnoDB & 高壓縮引擎:InnoDB和X-Engine混合部署引擎。選擇該選項後,可以設定高壓縮引擎的比例。更多資訊,請參見高壓縮引擎(X-Engine)。
在右上方檢查叢集配置資訊,設定購買時間長度(針對訂用帳戶叢集)、購買數量和是否自動續約。
閱讀並勾選服務合約。單擊立即購買。
在支付頁面,確認未支付訂單資訊和支付方式,單擊訂購。
說明支付成功後,需要等待10~15分鐘建立叢集,之後您就可以在叢集列表中看到新建立的叢集。
當叢集中的節點狀態為建立中時,整個叢集可能仍未建立完成,此時叢集不可用。只有當叢集狀態為運行中時,叢集才可以正常使用。
請確認已選中正確的地區,否則無法看到您建立的叢集。
叢集建立成功後,登入PolarDB控制台,單擊叢集ID進入叢集基本信息頁。
在基本信息頁的RDS迁移功能中,確認目標PolarDB叢集的复制延迟小於60秒即可進行步驟三:遷移切換操作。
 說明
說明已存在DTS雙向同步的執行個體無法進行一鍵遷移/升級,可能會出現資料不一致問題;
叢集建立後開始從RDS執行個體同步資料,您需要在30天內進行步驟五:完成遷移操作,超過30天將自動關閉遷移功能。
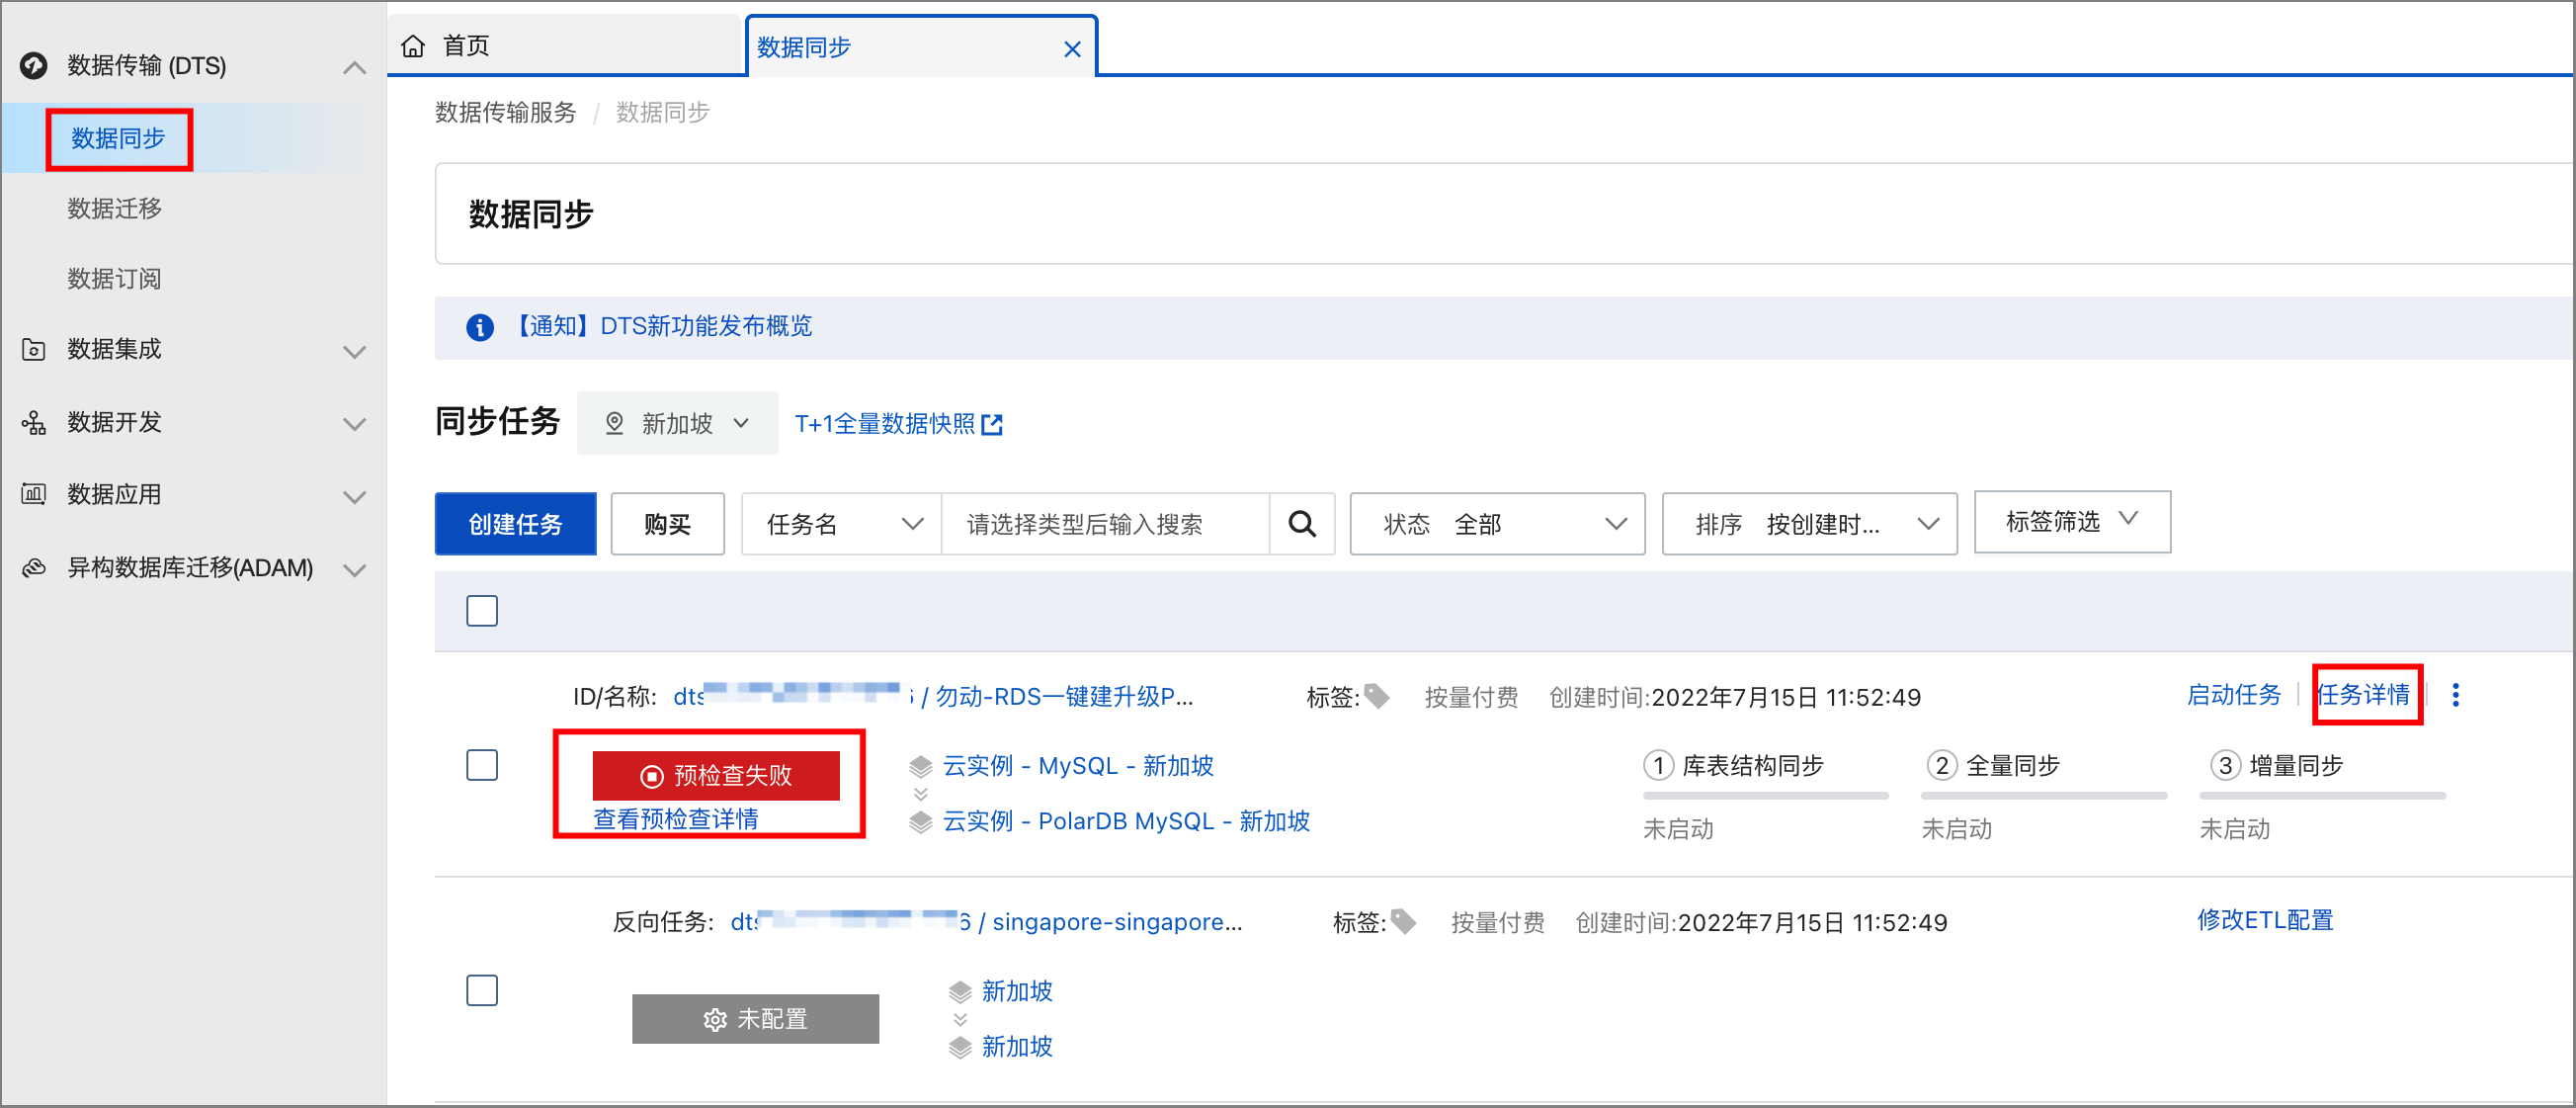
若為邏輯遷移(DTS資料同步)方式,在PolarDB叢集建立完成後,若RDS遷移狀態變為預檢查失敗,請根據錯誤資訊中的提示進行處理。

例如,如果源RDS中建立了觸發器,則預檢查會失敗並報錯“RDS執行個體存在觸發器”。請先刪除源RDS的觸發器,再點擊繼續遷移,或者點擊放棄遷移後手動去DTS控制台頁面建立遷移任務。具體可參見源庫存在觸發器時如何配置同步或遷移作業。
您可以在此步驟選擇放棄遷移,相關影響請參見常見問題。
步驟二:地址補齊(可選)
PolarDB一鍵遷移支援帶地址切換,您可保留資料庫原串連地址,無需應用程式修改任何串連配置即可切換至PolarDB。需要注意,僅當源RDS和目標PolarDB叢集同時存在的串連地址才支援相互切換,預設情況下目標端僅建立私網主地址和私網叢集地址,如果源端包含2個以上的串連地址,您需在切換前在目標端建立好對應的串連地址,否則不會切換。關於如何為PolarDB叢集和RDS執行個體建立串連地址,請參見管理串連地址和設定串連地址。
在目標端叢集變成運行中後,才可進行地址補齊操作。此外您還可以根據業務需要,進行地址屬性配置、執行個體參數配置、唯讀節點補齊等操作。
使用帶地址切換交換私網地址前,請確保源RDS執行個體和目標端PolarDB叢集屬於同一個VPC,否則切換後原有服務將無法串連。
步驟三:遷移切換
當目標PolarDB叢集的复制延迟小於60秒時,即可進行遷移切換操作。
進入PolarDB控制台。
找到目的地組群,單擊叢集的ID。
在基本信息頁面的RDS遷移功能中,單擊遷移切換。
 說明
說明切換過程一般小於5分鐘。
本操作將交換源RDS執行個體和目標PolarDB叢集的讀寫狀態(即將源RDS執行個體修改為唯讀,將PolarDB叢集修改為可讀可寫),同時會更換複製方向(即將PolarDB叢集的新增資料同步到RDS執行個體)。
在切換業務到新資料庫對話方塊中,選擇帶地址切換(應用程式不用改串連配置)或不帶地址切換(應用程式需要改為新的PolarDB串連配置)。
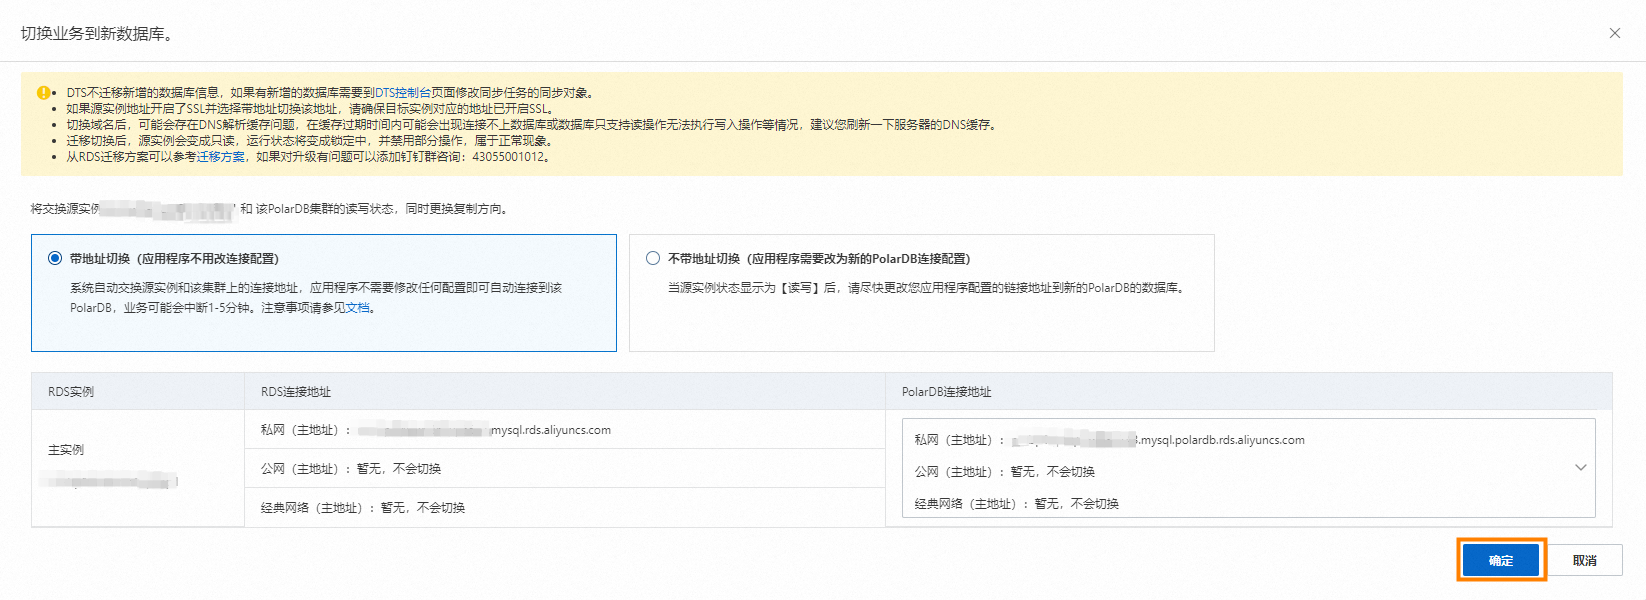
若您選擇帶地址切換(應用程式不用改串連配置),操作步驟如下:
選中帶地址切換(應用程式不用改串連配置)。系統會自動交換源RDS執行個體和目標PolarDB上的串連地址,您無需在應用程式端修改任何配置即可自動連接到目標PolarDB叢集。
重要選擇帶地址切換(應用程式不用改串連配置)前,請務必閱讀帶地址切換注意事項。
單擊確定。
若您選擇不帶地址切換(應用程式需要改為新的PolarDB串連配置),操作步驟如下:
勾選不帶地址切換(應用程式需要改為新的PolarDB串連配置)。
單擊確定。
重新整理頁面,當目標PolarDB讀寫狀態顯示為讀寫後,儘快修改應用中的資料庫連接地址。
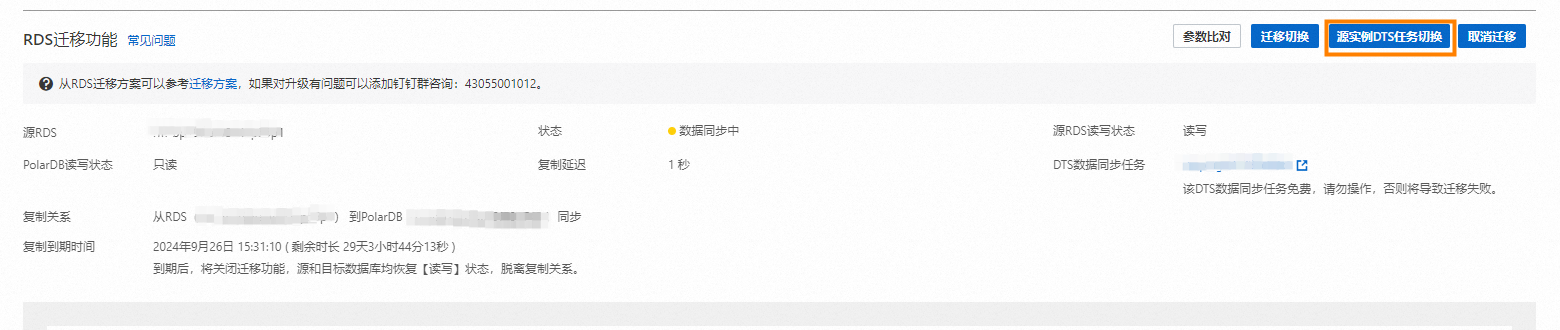
步驟四:源執行個體DTS任務切換(可選)
若源執行個體RDS不存在相關聯的DTS任務連結(非一鍵遷移DTS鏈路),不會在當前頁面展示該功能按鈕,請忽略當前步驟。
若源執行個體存在關聯的DTS鏈路(非一鍵遷移DTS鏈路),您可使用此功能修改(替換)DTS同步或遷移任務的源或目標庫執行個體,平滑切換關聯業務,實現原理和注意事項請參見修改DTS任務的源或目標庫執行個體。
在庫表結構遷移和全量遷移階段,請勿執行庫或表結構變更的DDL操作,否則資料移轉任務會失敗。
進入PolarDB控制台。
找到目的地組群,單擊叢集的ID。
在基本信息頁面的RDS遷移功能中,單擊源執行個體DTS任務切換。
在切換業務DTS資料庫對話方塊中,選擇源執行個體DTS任務(正向切換)或目標執行個體DTS任務(切換復原)。
重要切換前,請先檢查源執行個體和目標執行個體同步資料的DTS狀態,詳細DTS狀態查詢,請參見DTS狀態查詢。

若您選擇源執行個體DTS任務(正向切換),操作步驟如下:
請選擇您需要遷移切換資料庫執行個體的DTS任務。
單擊提交正向切換。
若您選擇目標執行個體DTS任務(切換復原),操作步驟如下:
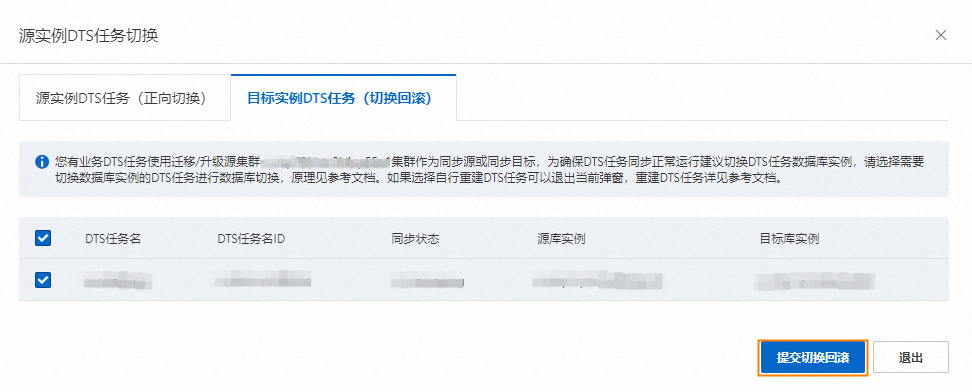
請選擇您需要遷移切換資料庫執行個體的DTS任務。
單擊提交切換復原。
源執行個體DTS任務(正向切換)適用於遷移切換(步驟三)後,將源執行個體關聯的DTS鏈路(非一鍵遷移DTS鏈路)切換到目標執行個體。此操作是在遷移切換(步驟三)後,完成遷移(步驟五)前進行的。
目標執行個體DTS任務(切換復原)適用於遷移復原後將目標執行個體關聯的DTS鏈路(非一鍵遷移DTS鏈路)切換回源執行個體。此操作是在遷移復原(可選)後,取消遷移(可選)之前進行的。
步驟五:完成遷移
在完成步驟一:從RDS遷移後,您需要在30天內進行完成遷移操作。
請確保在進行完成遷移操作前,資料移轉已完成,並且後續不再使用資料同步。物理遷移方式下,會中斷源RDS到PolarDB叢集的資料複製;邏輯遷移方式下,將會刪除資料同步任務。
由於本操作將中斷PolarDB叢集和RDS執行個體間的資料同步,不再提供取消遷移(可選)功能,建議您使用一段時間PolarDB叢集,確認正常後再執行本操作。
登入PolarDB控制台。
找到目的地組群,單擊叢集的ID。
在基本信息頁面的RDS迁移功能中,單擊完成迁移,在彈出的對話方塊中單擊确定。
 說明
說明單擊确定後,系統將在約2分鐘內中斷同步關係,期間遷移狀態將顯示為关闭同步,請耐心等待遷移完成。
您可以在完成遷移對話方塊內選擇是否關閉PolarDB叢集的Binlog。關閉Binlog會帶來少量的寫入效能提升,但關閉Binlog後PolarDB叢集會自動重啟使新配置生效。
如果不再需要源RDS執行個體,可以手動退訂或釋放。詳情請參見退訂或釋放RDS執行個體(可選)。
若您需要為源RDS執行個體進行續約或變更配置等操作,請先單擊完成遷移。
退訂或釋放RDS執行個體(可選)
當資料從RDS遷移到PolarDB後,若業務已在PolarDB上穩定運行且不再需要源RDS時,可以退訂或釋放源RDS執行個體。
對於訂用帳戶的RDS執行個體,您可以進行退訂。詳情請參見退訂訂用帳戶主執行個體。
對於隨用隨付的RDS執行個體,請及時手動釋放執行個體,以避免浪費閑置的RDS資源。具體可參見釋放或退訂執行個體。
查看資料同步任務詳情(僅限邏輯遷移)(可選)
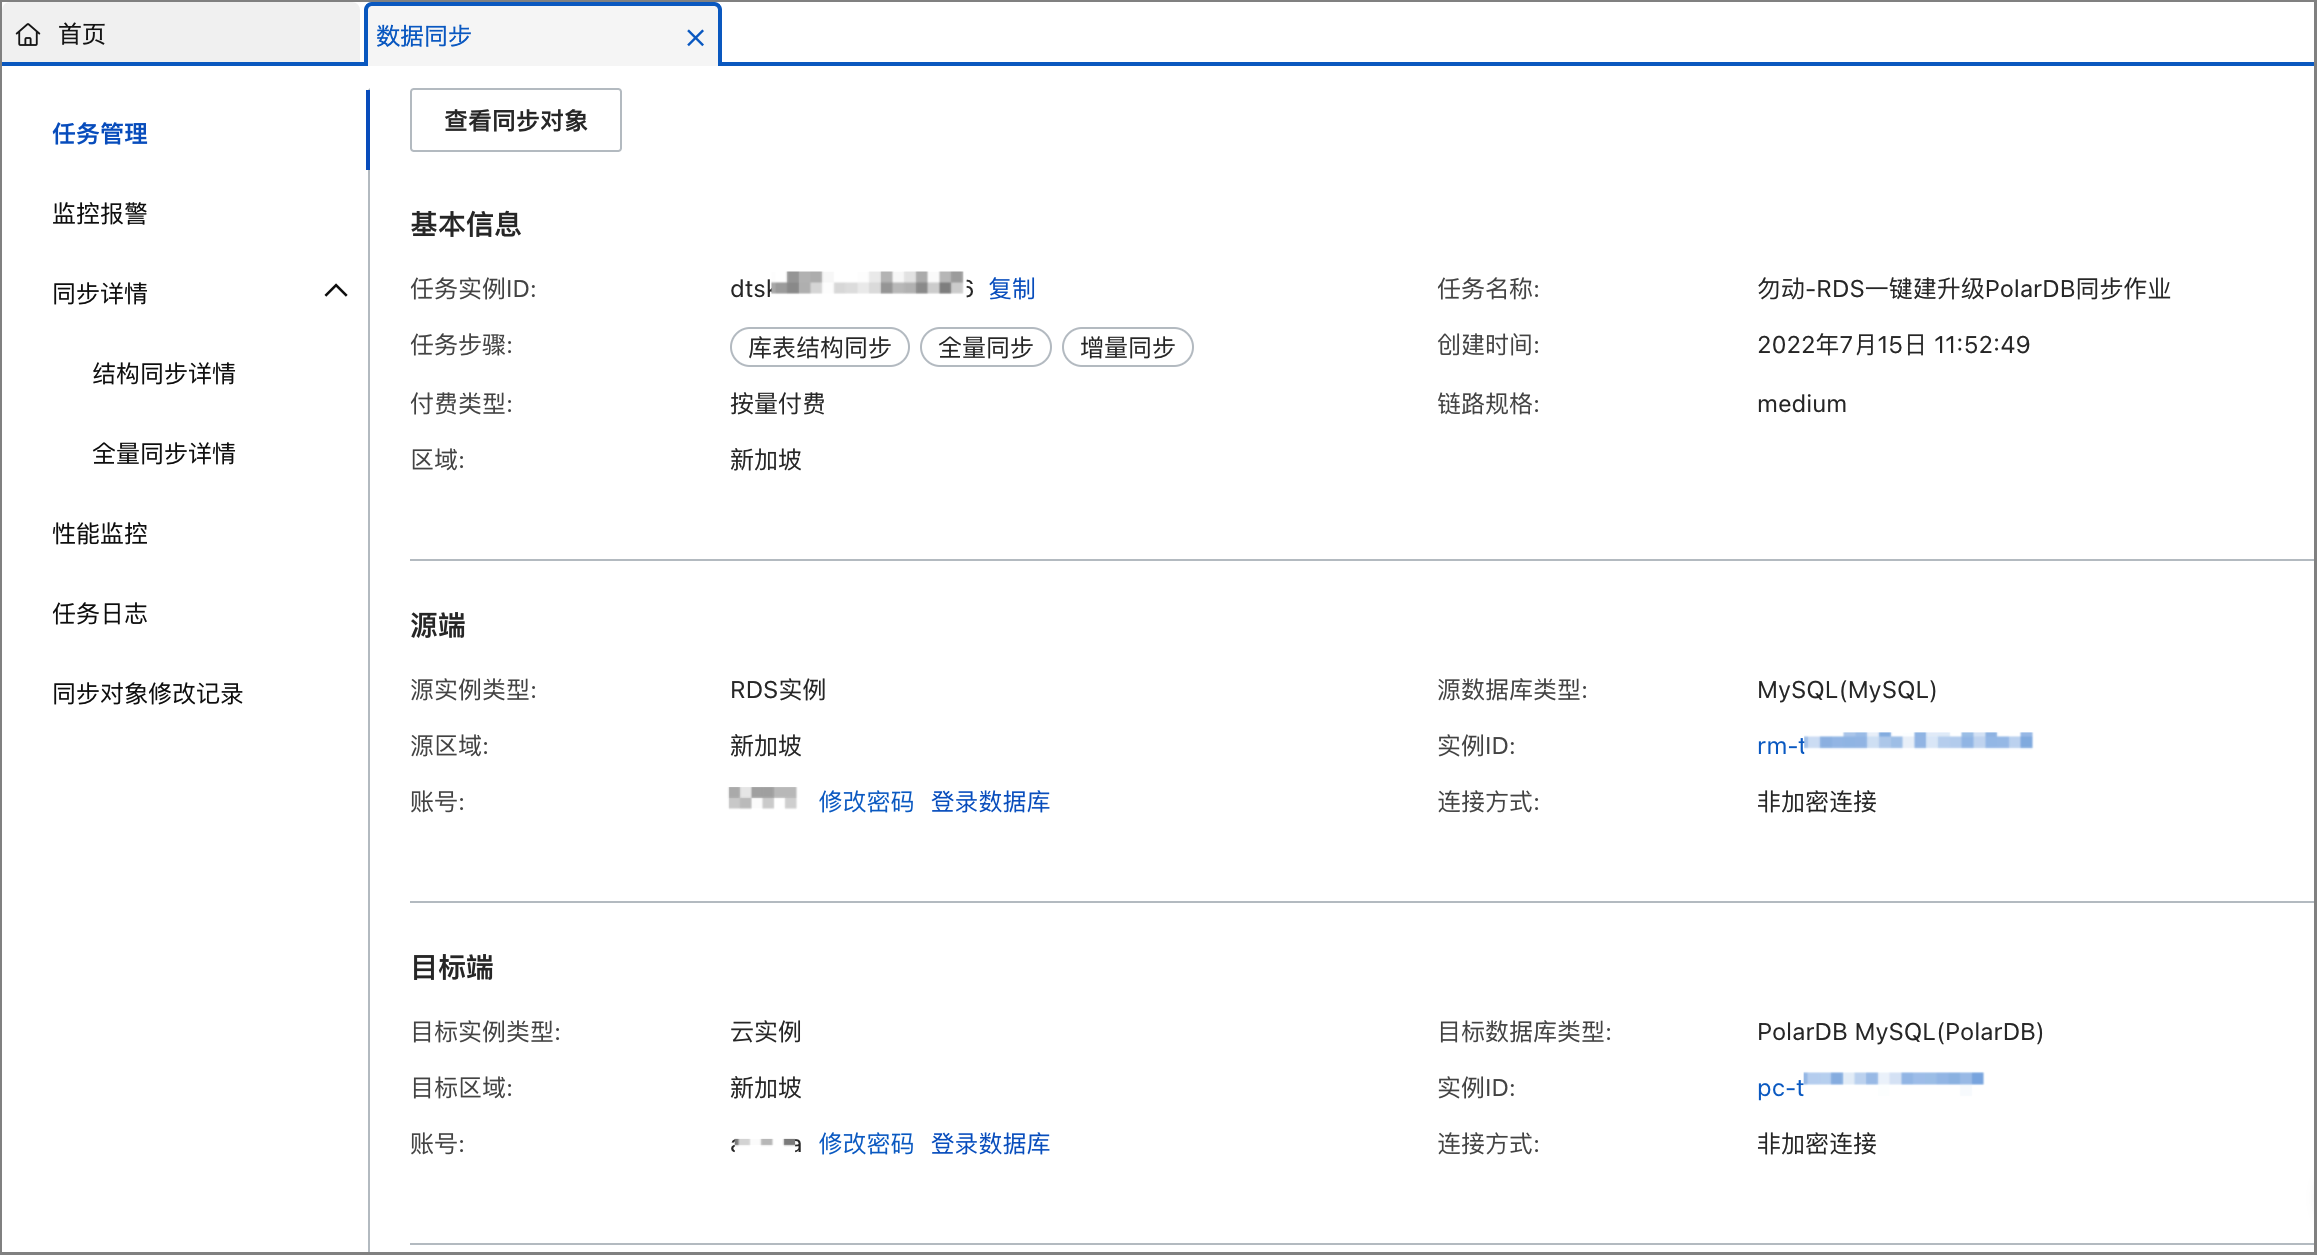
在使用邏輯遷移(DTS資料同步)方式進行一鍵升級的過程中,若遇到遷移報錯(如預檢查失敗)或者其他異常狀態(如複寫延遲異常高)時,您可以前往對應的DTS資料同步任務的詳情頁,查看資料同步任務的具體資訊。
進入PolarDB控制台。
找到目的地組群,單擊叢集ID。
在基本信息頁面的RDS迁移功能中,單擊DTS数据同步任务的任務名稱,進入DTS控制台資料同步列表。

找到對應的資料同步任務,您可查看預檢查失敗詳情、查看同步任務詳情、查看同步任務日誌等。
遷移過程中,若需求調整同步任務的同步對象(如源RDS端有新增庫時,需要將新增庫也納入同步對象),您可單擊修改同步對象重新設定。
