All Products
Search
Document Center

Cloud Backup:Back up files from a File Storage NAS file system

更新時間:Oct 31, 2024

To prevent data loss or damage, we recommend that you use Cloud Backup to back up all directories and files in your File Storage NAS (NAS) file system. Cloud Backup allows you to configure flexible backup policies to back up data to the cloud. You can view and restore data at any time. This topic describes how to use Cloud Backup to back up files from a NAS file system.

Prerequisites

Background information

  • Unless otherwise specified, NAS in this topic refers to File Storage NAS.

  • Cloud Backup allows you to back up Network File System (NFS) and Server Message Block (SMB) file shares regardless of whether NAS file systems are mounted. Cloud Backup uses an efficient backup mechanism that scans files in NAS file systems. This eliminates the need to create snapshots for NAS file systems.

  • NAS backup does not support the access control list (ACL) feature of SMB file systems. If the ACL feature is enabled for your SMB file system, Cloud Backup cannot back up the ACL configurations. For more information, see Overview of the SMB ACL feature.

  • If you do not have the required permissions to back up an SMB file system by using Cloud Backup, the backup operation fails. In this case, we recommend that you back up the SMB file system by using a Cloud Backup client for Elastic Compute Service (ECS) file backup. For more information, see Grant the Cloud Backup client the permissions to read data from an SMB file system in NAS and Back up SMB file systems by using backup clients for ECS.

  • You can also back up NAS file systems by using a Cloud Backup client for ECS file backup. For more information, see Overview (Back up NFS NAS file systems using ECS file backup).

Usage notes

  • The first time you create a backup plan or associate a backup plan with a backup policy, Cloud Backup automatically creates a service-linked role named AliyunServiceRoleForHbrNasBackup to obtain the permissions to access related resources. In the dialog box that appears, assign the role as prompted. For more information, see Service-linked roles for Cloud Backup.

  • In NAS backup and restoration, the maximum length of a file name is 248 bytes. If the length of a file name exceeds 248 bytes, the file fails to be backed up or restored and the backup or restore job is partially completed.

  • When you restore NAS files, you cannot restore socket files or hard links.

Create a backup plan to periodically back up NAS files

Note
  • We recommend that you include no more than 50 million files in each NAS backup job and no more than 8 million files and subdirectories in each directory.

  • After you create a backup plan, the first backup job performs a full backup and subsequent backup jobs perform incremental backups.

To back up files in a NAS file system to a backup vault in the same region as the file system, perform the following steps:

  1. Log on to the Cloud Backup console.

  2. In the left-side navigation pane, choose Backup > NAS Backup.

  3. In the top navigation bar, select a region.

  4. On the Alibaba NAS tab, click Create Backup Plan.

  5. In the Create Backup Plan panel, configure the parameters and click OK.

    Note
    • The first time you use Cloud Backup, you can apply for a 30-day free trial of backup plans. The free trial period starts from the day when a backup plan is created. Free backup plans do not support backup policies. You can use backup policies to create backup plans only in paid mode.

    • You cannot modify the source path and backup cycle of a free-trial backup plan. Each free-trial backup plan uses a separate backup vault. You cannot change the backup vault after you change a free-trial backup plan to a paid backup plan. If you plan to back up all your data to the same backup vault in the future, do not use a free-trial backup plan.

    1. Configure the basic parameters described in the following table.

      Parameter

      Description

      File System

      Select the NAS file system that you want to back up.

      Pay After Trial Ends

      Specify whether to pay for the backup plan after the free trial ends.

    2. Click Switch to Paid Plan to configure the advanced parameters. The following table describes the advanced parameters.

      Important
      • If the region that you select supports backup policies, you can set a backup plan only by associating it with a backup policy. Cloud Backup periodically backs up NAS files based on the backup policy.

      • To view the regions that support backup policies, click Policy Center in the left-side navigation pane of the Cloud Backup console. For more information about how to create a backup policy, see Create a backup policy.

      Parameter

      Description

      Source Paths

      Enter a file path, for example, /nas/folder.

      Backup Rule

      Configure the rule based on which files are backed up. Only files that match the specified rule are backed up.

      • Include All Files: All files are backed up.

      • Include Files or Exclude Files: If you select Include Files, enter the paths to the files that you want to back up. If you select Exclude Files, enter the paths to the files that you do not want to back up.

      Backup Policy

      Select a proper backup policy from the drop-down list.

      Cloud Backup automatically backs up data sources based on the backup policy that you configure. Backup policies help you flexibly manage data sources. A backup policy includes the following settings: backup vault encryption method, backup interval, retention period, cross-region replication policy, automatic archiving of backup data, and virus detection for backup points.

      If the default backup policy does not meet your requirements, you can click Manage Policy to go to the Policy Center page to create or modify a backup policy.

      For more information about the parameters in a backup policy, see Manage backup policies.

      After a backup plan is created, the backup plan is in the Running state. Cloud Backup runs NAS backup jobs based on the specified start time, end time, and backup interval.

      Note

      You can view the progress of each backup job on the Backup Jobs tab. After a backup job is completed, you can restore the backup data of the source NAS file system to the same or a different NAS file system.

Backup is successful

When the backup execution time is reached, Cloud Backup runs a backup job. If the status of the backup job is Completed, the backup job is completed on the current day.image.png

On the Backup Plans tab, find the NAS file system that is backed up and click Backup History in the Actions column. You can view each backup record in the Backup History section. Later, you can restore files based on these historical backups. For more information, see Create a restore job for a single NAS file system in the same region.

image

Browse and download backup files

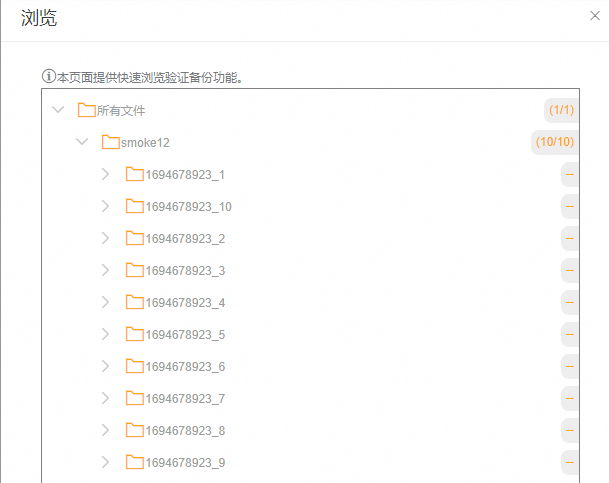
  • Browse backup files

    You can use the Browse feature to view files that have been backed up. If virus detection has been performed on a backup point, Cloud Backup marks the files that are infected with viruses.

    1. On the Backup Plans tab, find the NAS file system and click Backup History in the Actions column.

    2. In the Backup History section, find the backup point that you want to view and click Browse.

    image

  • Download backup files

    You cannot directly download backup files. However, you can restore files to a specified temporary directory in your NAS file system and then download files from the NAS file system. You are not charged for data restoration.

Virus detection

To prevent virus-infected files from being restored to the production environment, Cloud Backup provides the Backup Point Virus Detection feature. The feature allows you to select a clean and safe backup point for future data restoration. You can click Virus Detection to check for viruses. For more information, see Backup point virus detection.

Troubleshooting

If the Status of the backup plan or backup job is abnormal, you can resolve the issue based on the following instructions.

  • Status of the backup job: Failed (The path cannot be accessed.)

    The path specified by Source Paths in the backup plan does not exist. Change the source path in the backup plan and make sure that the network path exists. On the Backup Plans tab, find the file system and choose More > Modify Plan in the Actions column.image.png

  • Status of the backup job: Failed (The specified file system does not exist.)

    The NAS file system is deleted.

    • If the NAS file system is deleted as expected, ignore the backup job status. To prevent additional backup storage fees, we recommend that you perform the following operation to delete the related storage vault: Click Storage Vaults in the left-side navigation pane, and find and delete the storage vault.

    • If the NAS file system is deleted unexpectedly, perform the following operation to restore the NAS file system: Create a NAS file system in the corresponding region and use the NAS file system as the restoration destination to restore NAS files. For more information, see Create a restore job for a single NAS file system in the same region.image.png

  • Status of the backup plan: Suspended

    The backup plan has been suspended. After the backup plan is suspended, Cloud Backup does not back up files from the NAS file system. We recommend that you resume the backup plan at your earliest opportunity.

Create a restore job for a single NAS file system in the same region

To restore a NAS file system within the same region, perform the following steps:

  1. On the Restore Jobs tab, click Create Restore Job.

  2. In the Create Restore Job panel, perform the following steps.

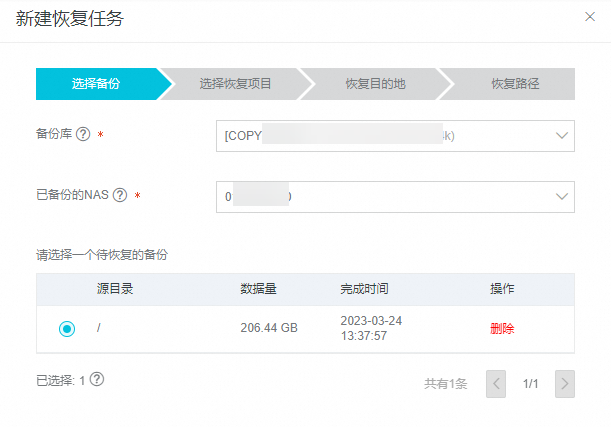
    1. Select the backup that you want to restore, and click Next.

      Parameter

      Description

      Source Vault

      Select the backup vault that stores the backup data of the source NAS file system.

      Source File System

      Select a NAS file system that has been backed up by using Cloud Backup.

      Backup

      Select the backup that you want to restore.

    2. In the Select Restore Items step, configure the Restore Items parameter and click Next.

      Parameter

      Description

      Restore Items

      Select the files or directories that you want to restore. Valid values:

      • Include All Files: Cloud Backup restores all backup files from the source NAS file system.

      • Include Files: Select the files or folders that you want to restore. You can also click Enter Paths to specify the files that you want to restore.

      • Exclude Files: Select the files or folders that you do not want to restore. You can also click Enter Paths to specify the files that you do not want to restore.

      Enter one path in each line and make sure that each path starts with the lowest-level directory in the source path. For example, to restore the file.txt file and the abc folder in the /test/data directory, enter the following paths:

      /data/file.txt
      /data/abc
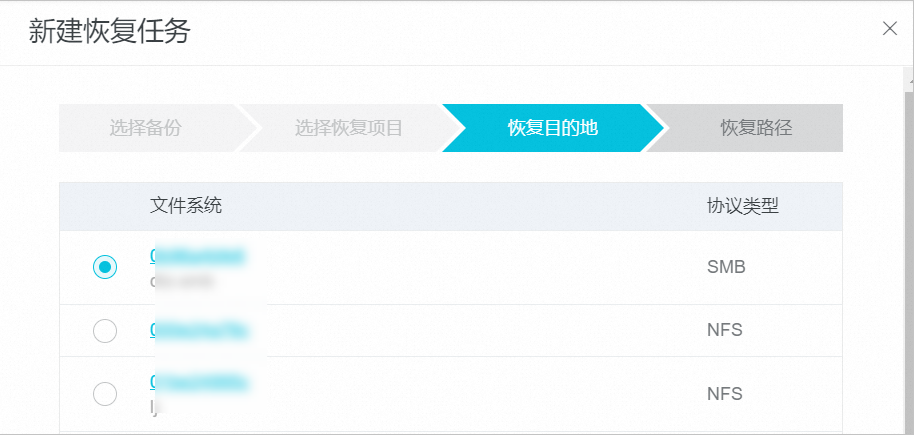
    3. In the Restore Destination step, select a File System in the specified region and click Next.

    4. In the Destination Path step, specify the recovery path and click Create.

      Parameter

      Description

      Restore Path Type

      Select the type of the recovery path.

      • Specify Path: Specify a new path and restore the file system to the path.

      • Origin Path: Restore the file system to the original path.

      Destination Path

      This parameter is required only if you set the Restore Path Type parameter to Specify Path. This parameter specifies the path to which the file system is restored. For example, you can restore the file system to /nas/abc.

      File Conflict Policy

      • Skip This File

      • Overwrite The File

      • Keep Latest File

      Virus Detection During Restoration

      If you turn on this switch, Cloud Backup performs virus detection on all files to be restored before data restoration. The console provides the detailed information about this feature. For more information, see Backup point virus detection.

      When Recovery Items Contain Detected Viruses

      • Do not restore the virus-infected files (You can find secure versions on the Virus Detection tab.)

      • I am aware of the risks and still want to restore all the selected items

    After the restore job is created, you can view the progress of the restore job in the Status column on the Restore Jobs tab.

Create a remote mirror vault for the backup vault (cross-region backup)

A backup vault is a repository in which Cloud Backup stores backup data in the cloud. To implement disaster recovery, you can create a remote mirror vault for a backup vault and back up data from the backup vault to the mirror vault.

To back up data to a mirror vault, perform the following steps:

  1. Log on to the Cloud Backup console.

  2. In the left-side navigation panel, click Overview. On the Overview page, select a region, for example, China (Hangzhou). Find the backup vault for which you want to create a mirror vault and click Cross-Region Backup in the upper-right corner of the backup vault section.

    image

  3. In the Create Mirror Vault panel, configure the parameters and then click Create. The following table describes the parameters.

    Note
    • You can create only one mirror vault for each backup vault.

    • You can back up data to a remote mirror vault and restore backup data from the mirror vault. However, you cannot create backup plans for the mirror vault. The historical backup data stored in the source backup vault is synchronized to a mirror vault 90 minutes after the mirror vault is created.

    • When a mirror vault is created, the mirror vault contains all the backup data that is stored in the source backup vault.

    image.png

    Parameter

    Description

    Region

    Select a region for the mirror vault.

    Vault Name

    Enter a name for the mirror vault.

    Description

    Enter a description for the mirror vault.

    After you create a mirror vault, you can view the progress of data synchronization. After the data is synchronized, you can restore the data in a NAS file system from the mirror vault.

    image

Restore data from a remote mirror vault

A backup vault is a repository in which Cloud Backup stores backup data in the cloud. To implement disaster recovery, you can restore data from a remote mirror vault to a NAS file system. Perform the following steps:

  1. In the top navigation bar, select the region where the mirror vault resides. In the left-side navigation pane, choose Backup > NAS Backup. On the NAS Backup page, click Alibaba NAS.

  2. Click the Restore Jobs tab. Then, click Create Restore Job.

  3. In the Select Backup step of the Create Restore Job panel, configure the parameters.

    You must select the mirror vault from the Source Vault drop-down list. The name of a mirror vault is prefixed by [COPY]. When you configure other parameters, you can follow the requirements for the parameters that you configured for the Backup Vault in the Create a restore job for a single NAS file system in the same region step.COPY

What to do next

In the upper-left corner of the Backup Plans tab, click Manage Mounts. In the Manage Mounts panel, you can perform the following operations:

  • View all the file systems for which you have created backup plans in the selected region: You can click a file system to view the information of the NAS file system. The information includes the protocol type and the number of mount targets.

  • Remove Mount Target: After you create a backup plan for a NAS file system, Cloud Backup automatically creates a mount target for the file system. You cannot directly delete the mount target in the NAS console because it is created by using an internal service of Alibaba Cloud. If you want to delete a mount target, find the file system in the Manage Mounts panel and click Remove Mount Target in the Actions column. After the mount target is deleted, the backup jobs that are running fail. Before you delete the mount target, make sure that all backup plans are deleted and no backup jobs or restore jobs of the file system are running.

After a backup plan is created, Cloud Backup backs up files in the source NAS file system from the specified start time at the specified interval. You can perform the following operations in the Actions column on the Backup Plans tab.

Operation

Description

Backup History

Views all the backup records of the file system or the backup records in the last three months.

More > Run Now

Immediately runs a backup plan.

More > Suspend Plan

Suspends a running backup plan. To resume a suspended backup plan, choose More > Resume Plan.

More > Modify Plan

Modifies a backup plan.

More > Delete Plan

Deletes a running backup plan. After you delete the backup plan, Cloud Backup no longer runs backup jobs for the backup plan but retains the backup data.

More > Alert Settings

Configures the method used to send alert notifications.

  • Disabled: The Cloud Backup client does not send alert notifications.

  • Same as Backup Vault: The Cloud Backup client sends alert notifications by using the same method configured for the backup vault.

  • Notify Alibaba Cloud Account: The Cloud Backup client sends alert notifications to the owner of the Alibaba Cloud account by using emails, internal messages, and text messages.

  • Custom: If you select this option, you must select one or more alert contacts or alert contact groups. If an alert is triggered, the Cloud Backup client sends alert notifications to the selected alert contacts or alert contact groups. For more information, see Manage alert contacts.

References