為避免因恢複受病毒感染的資料導致生產環境被病毒汙染的風險,Cloud Backup服務提供备份点病毒检测功能。本文介紹Cloud Backup的備份點病毒檢測功能,包括功能介紹、支援範圍和使用限制、工作原理、操作流程、費用以及注意事項等。
功能介紹
雲備份是對您生產環境中資料的定期備份,如果您生產環境中的資料被病毒汙染,備份庫中相應的資料也將攜帶病毒。當您需要恢複備份庫的資料到生產環境時,如果用於恢複的檔案已感染了病毒,恢複後將對生產環境產生二次汙染,對災難恢複的時效性造成極大的影響,給業務帶來更大的損失。 Cloud Backup提供備份點病毒檢測功能,來協助您選取乾淨安全的備份點進行資料恢複。通過該功能,您可以進行:
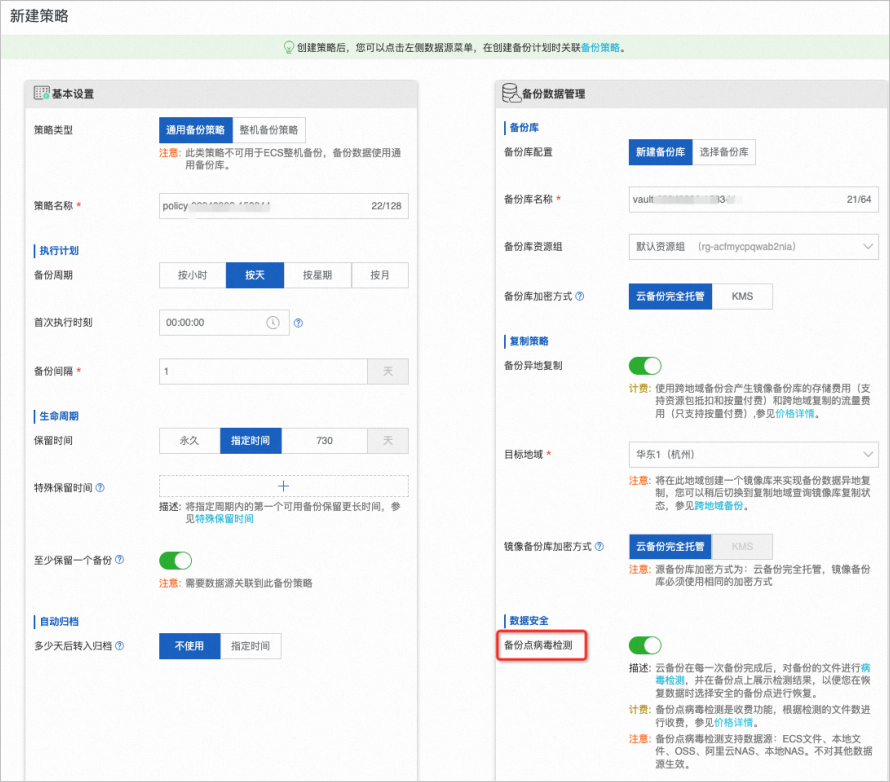
基於備份策略的自動檢測:在設定備份策略時,開啟备份点病毒检测功能,雲備份將在每次定時備份後自動完成備份資料病毒檢測。通過此方式,您可以瞭解每個備份點中的備份檔案風險情況,在需要資料恢複時可以高效地選取安全的檔案進行恢複。
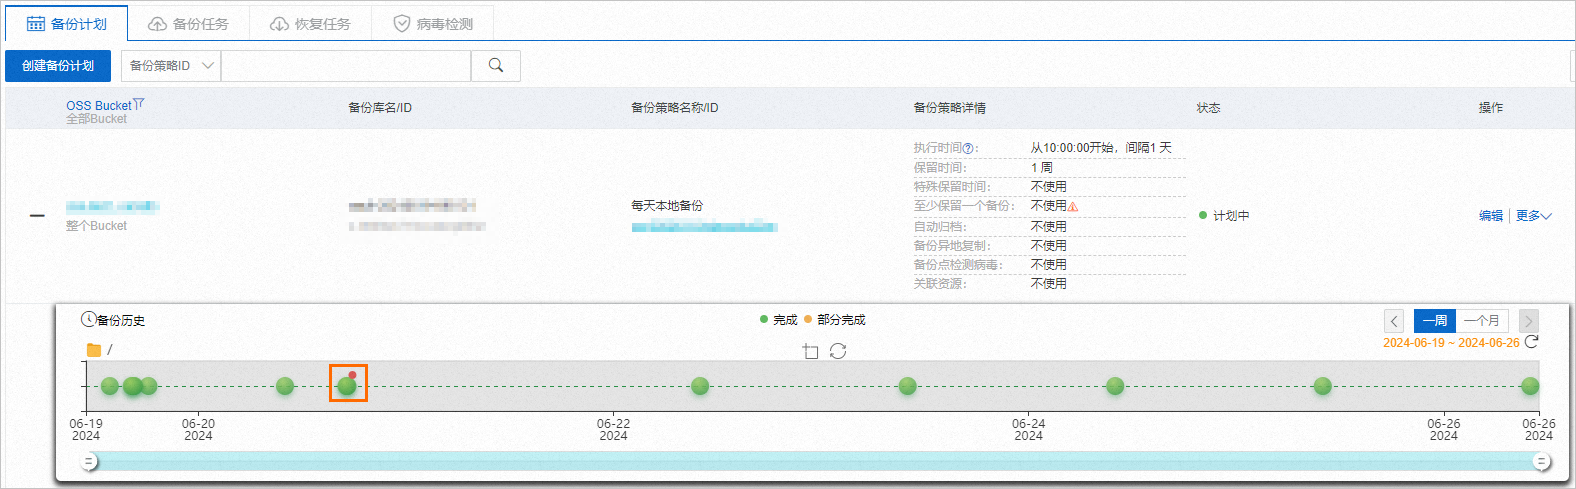
按需手動檢測:您可以根據具體的業務需求,在備份歷史中選取一個特定的備份點進行病毒檢測,或在病毒檢測頁面建立備份點病毒檢測任務,或使用恢複時進行病毒檢測功能。
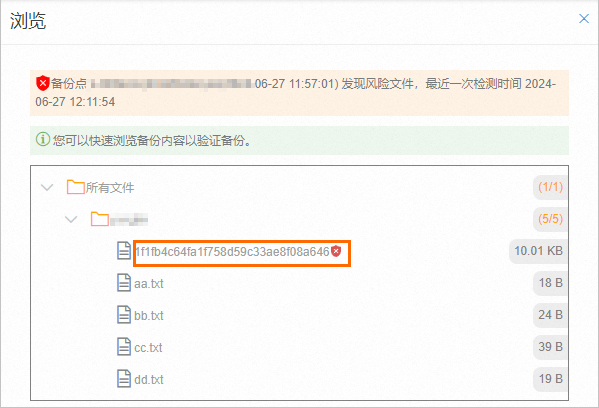
在檢測後如果雲備份發現備份點存在病毒檔案,將會對該備份點進行風險標記。在瀏覽備份點時,您可以看到備份點中的備份檔案的具體風險情況。
支援範圍和使用限制
备份点病毒检测功能支援的資料來源包括ECS檔案備份(新版)、本地檔案備份(新版)、OSS備份、阿里雲NAS備份和本地NAS備份。
备份点病毒检测功能僅能夠檢測單個不超過100 MB大小的備份檔案。當單個備份檔案大小大於100 MB時,將跳過檢測,您可以通過下載“無法檢測的檔案清單”進行查看具體備份檔案資訊。
支援地區:請參考地區支援的功能特性。
支援檢測病毒類型
Cloud Backup的备份点病毒检测功能支援對以下病毒類型(virus_type)進行檢測。
virus_type | 病毒名稱 |
Backdoor | 反彈Shell後門 |
DDoS | DDoS木馬 |
Downloader | 下載器木馬 |
Engtest | 引擎測試程式 |
Hacktool | 駭客工具 |
Trojan | 高危程式 |
Malbaseware | 被汙染的基礎軟體 |
MalScript | 惡意指令碼 |
Malware | 惡意程式 |
Miner | 挖礦程式 |
Proxytool | 代理工具 |
RansomWare | 勒索病毒 |
RiskWare | 風險軟體 |
Rootkit | Rootkit |
Stealer | 竊密工具 |
Scanner | 掃描器 |
Suspicious | 可疑程式 |
Virus | 感染型病毒 |
WebShell | 網站後門 |
Worm | 蠕蟲 |
AdWare | 廣告軟體 |
Patcher | 破解程式 |
Gametool | 私服工具 |
注意事項
備份庫中歸檔層備份復原點不支援备份点病毒检测。
在複製庫備份情境中,對複製目標備份庫中的備份點不支援基於備份策略的自動檢測,但支援按需手動檢測。如果備份點中的檔案在源端進行了病毒檢測,則相應的檢測結果會展示在目標端的同一備份點及檔案上,您無需進行二次檢測。如果您需要瞭解按需進行病毒檢測的更多資訊,請參見備份資料按需手動檢測。
備份策略中開啟备份点病毒检测後,對第一個備份點會進行全量病毒檢測,對後續的備份點進行增量備份的病毒檢測。
備份點病毒檢測任務一旦開始執行,無法中途取消。
工作原理
病毒檢測功能和備份服務無縫整合,您不需要部署任何服務或用戶端即可完成備份資料病毒檢測。
基於備份策略的自動檢測
在備份策略中開啟备份点病毒检测功能後,備份服務後台將會在每次定時備份完成後自動對備份點進行病毒檢測,病毒檢測所需時間取決於檢測的檔案數。

病毒檢測遵循以下邏輯:
首次檢測:對備份鏈路中的第一個備份點進行全量病毒檢測。
後續檢測:對比上一個備份點,僅對新增或變化的檔案進行增量病毒檢測。
如上圖樣本:
對備份點1,檢測10000個檔案(全量)。
對備份點2,僅檢測基於備份點1新增的2000個檔案和變化的1000個檔案(共3000個增量檔案)。
對備份點3,僅檢測基於備份點2變化的2000個檔案(增量)。
按需手動檢測

按需手動檢測的具體方式包括:
在备份历史中,選擇一個備份點進行手動病毒檢測。
在备份历史中,選擇某個備份點建立恢複任務,同時開啟恢复时进行病毒检测功能進行病毒檢測。
在恢复任务頁面,選擇一個備份庫或者複製目標備份庫的某個備份點建立恢複任務,同時開啟恢复时进行病毒检测功能進行病毒檢測。
在病毒检测頁面,選擇一個備份庫或者複製目標備份庫的某個備份點進行手動病毒檢測。
在病毒检测頁面,如果一個備份庫或者複製目標備份庫的某個備份點被病毒感染後,可以通過使用查找安全版本恢复,選擇其他的備份點進行病毒檢測以選擇安全版本進行恢複。
按需手動檢測特性:
每一個備份點的檢測相互獨立,不會繼承同一個備份鏈路中其他備份點的檢測結果,可能會出現不同備份點被檢測多次的結果。
對同一個備份點進行多次按需手動檢測時,同一個檔案只會被檢測一次,並且多次檢測結果會自動進行合并。
如上圖樣本:
針對備份點1:
/A目錄下包含10000個檔案,/A/B目錄下包含4000個檔案。
第一次僅檢測/A/B目錄,檢測4000個檔案。
第二次檢測/A目錄時,自動跳過已檢測的/A/B目錄,僅檢測剩餘的10000-4000=6000個檔案。
針對備份點2:如果對全部檔案進行按需病毒檢測,則會對9000+1000+2000=12000個檔案進行病毒檢測。
針對備份點3:如果對全部檔案進行按需病毒檢測,則會對1000+2000=3000個檔案進行病毒檢測。
操作入口
這裡以ECS檔案的操作為例,對备份点病毒检测功能的操作入口進行說明。
基於備份策略的自動檢測
關於如何建立備份策略,請參見策略中心。
按需手動檢測

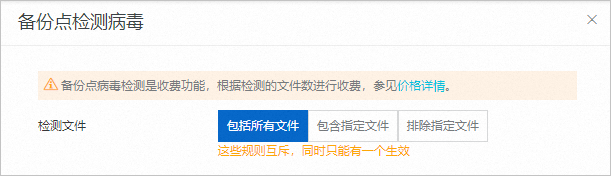
單擊病毒检测,您可選擇對包括所有文件、包含指定文件或排除指定文件進行病毒檢測。這些規則互斥,同時只能有一個生效。

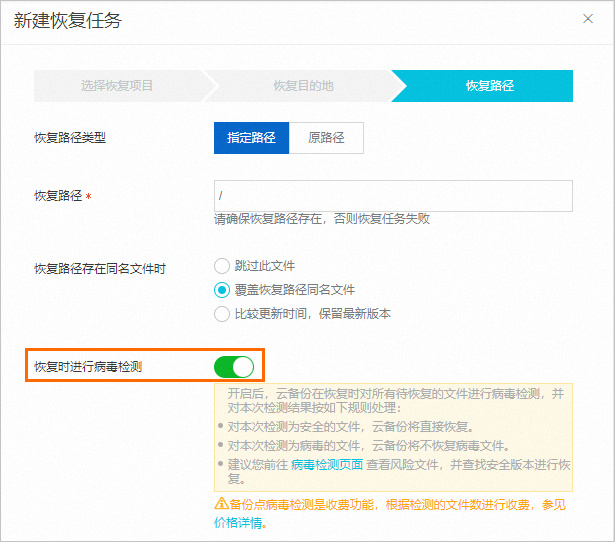
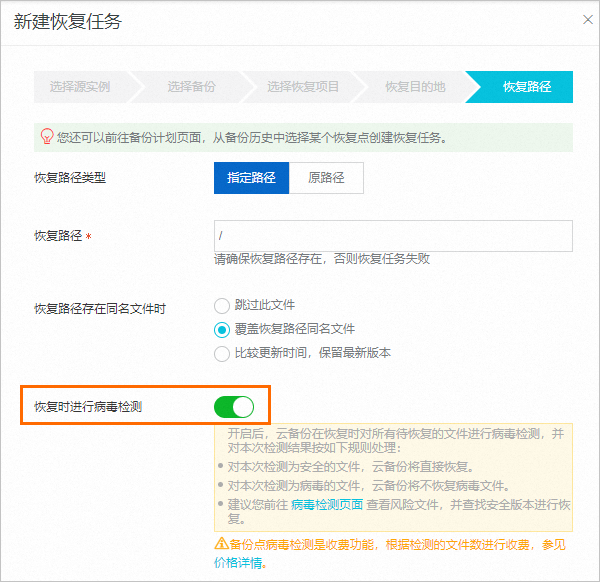
開啟恢复时进行病毒检测功能後,雲備份在恢複時會對所有待恢複的檔案進行病毒檢測,即邊檢測邊恢複。
說明對本次檢測為安全的檔案,雲備份將直接恢複。
對本次檢測為病毒的檔案,雲備份將不恢複病毒檔案。
建議您前往病毒检测頁面查看風險檔案,並尋找安全版本進行恢複。


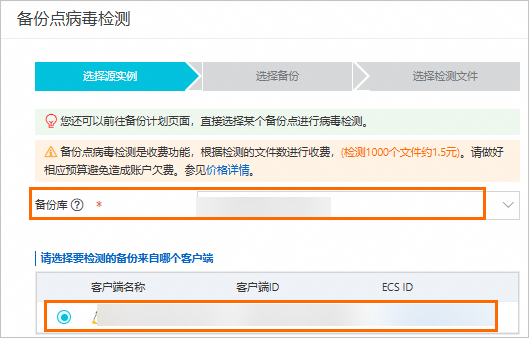
在选择源实例頁簽,選擇要檢測的備份庫,選擇要檢測的備份來自哪個用戶端。然後單擊下一步。
在选择备份頁簽,選擇要檢測的備份點。然後單擊下一步。

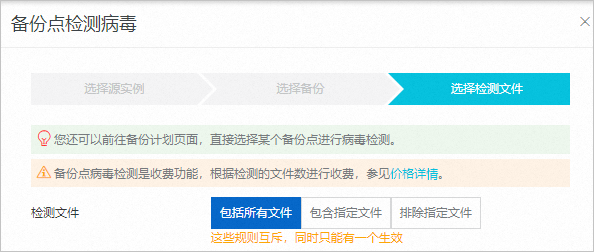
在选择检测文件頁簽,您可選擇對包括所有文件、包含指定文件或排除指定文件進行病毒檢測。這些規則互斥,同時只能有一個生效。最後完成确定。
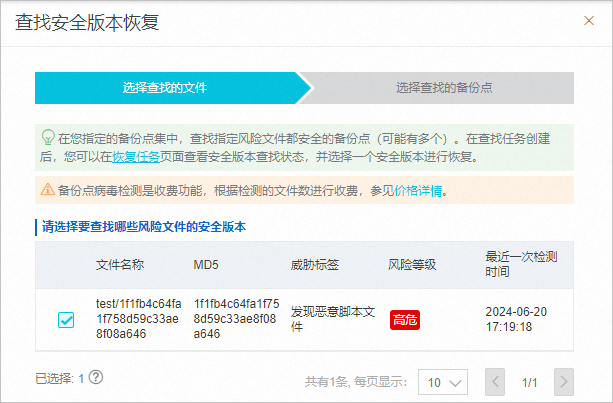
尋找安全版本恢複
在病毒检测頁簽,單擊目標ECS操作列的查找安全版本恢复。

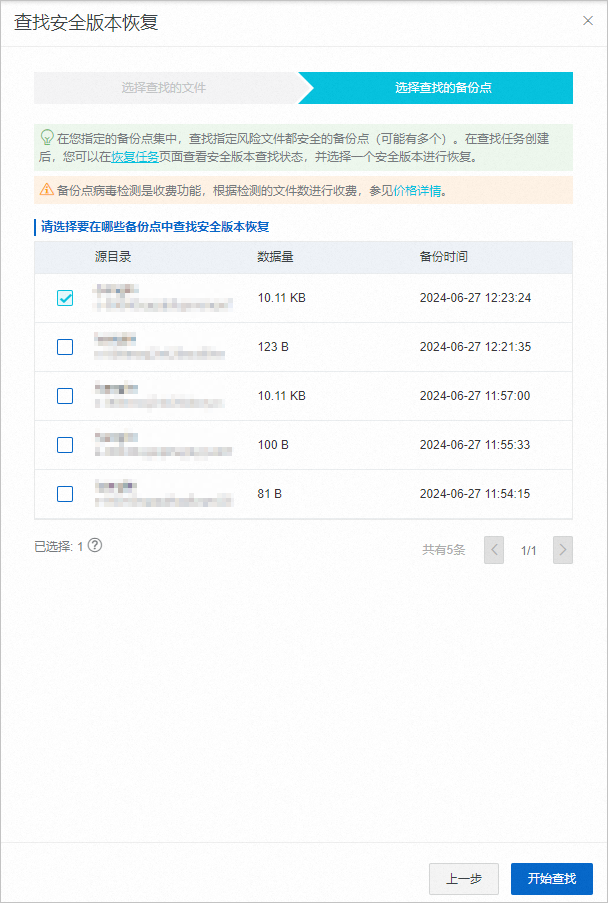
在选择查找的文件頁簽,選擇需要尋找其安全版本的風險檔案,然後單擊下一步。
在选择查找的备份点頁簽,選擇用於尋找安全版本進行恢複的備份點(即未被病毒感染的原檔案的備份點),然後單擊确定。
恢複任務建立後,您可以在恢复任务頁簽的状态欄查看安全版本狀態。
狀態為无安全版本,更換合適的備份點查詢安全版本。

狀態為有安全版本,您可以單擊目標ECS操作列的 ⋮ > 恢复安全版本。具體操作,請參見恢複安全版本。

恢複安全版本
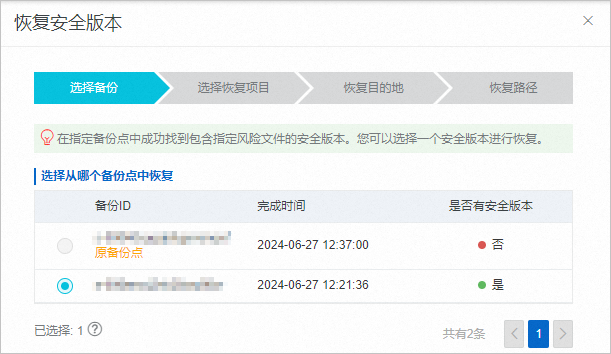
單擊目標ECS操作列的 ⋮ > 恢复安全版本。
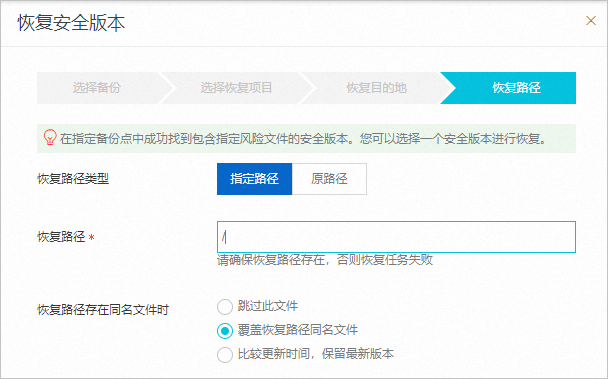
在选择备份頁簽,您可以選擇一個有安全版本的備份點進行恢複。然後單擊下一步。
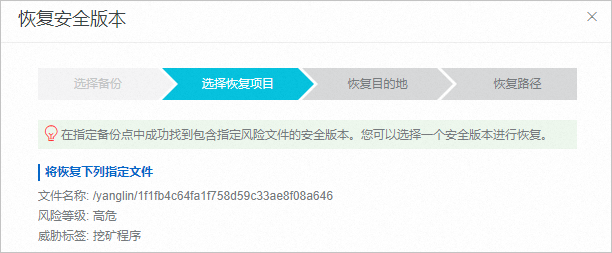
在选择恢复项目頁簽,然後單擊下一步。
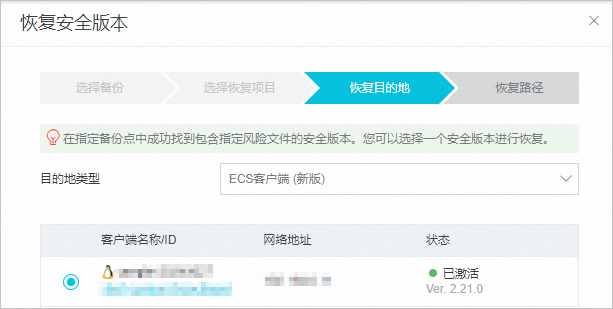
在恢复目的地頁簽,選擇要恢複的目的地,然後單擊下一步。
在恢复路径頁簽,您可以指定路徑進行恢複,或在原路徑恢複,然後單擊开始恢复。
在恢复任务頁簽,您可查看任務的恢複狀態。當狀態為完成時,表示恢複成功。

備份點的病毒檢測狀態說明
如果雲備份服務在病毒檢測過程中發現某個備份點包含病毒檔案,該備份點將被標記為風險狀態。您在瀏覽備份點時,可查看具體的風險檔案資訊。
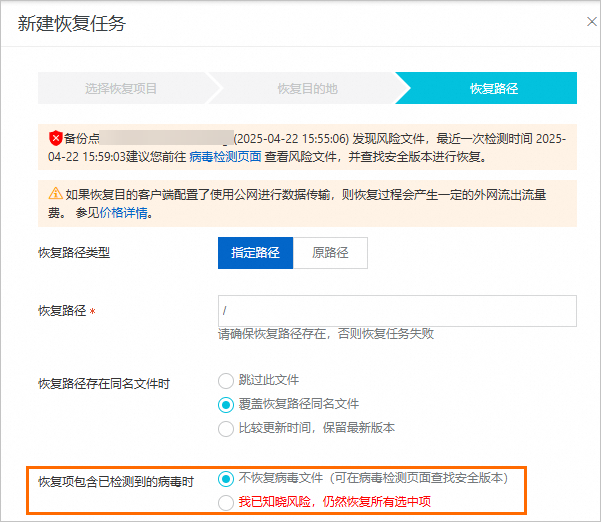
如果對已包含病毒檔案的備份點進行恢複,您可選擇:
不恢复病毒文件(可在病毒检测页面查找安全版本)
我已知晓风险,仍然恢复所有选中项
建議您前往病毒检测頁面查看風險檔案,並尋找安全版本進行恢複。具體操作,請參見尋找安全版本恢複。
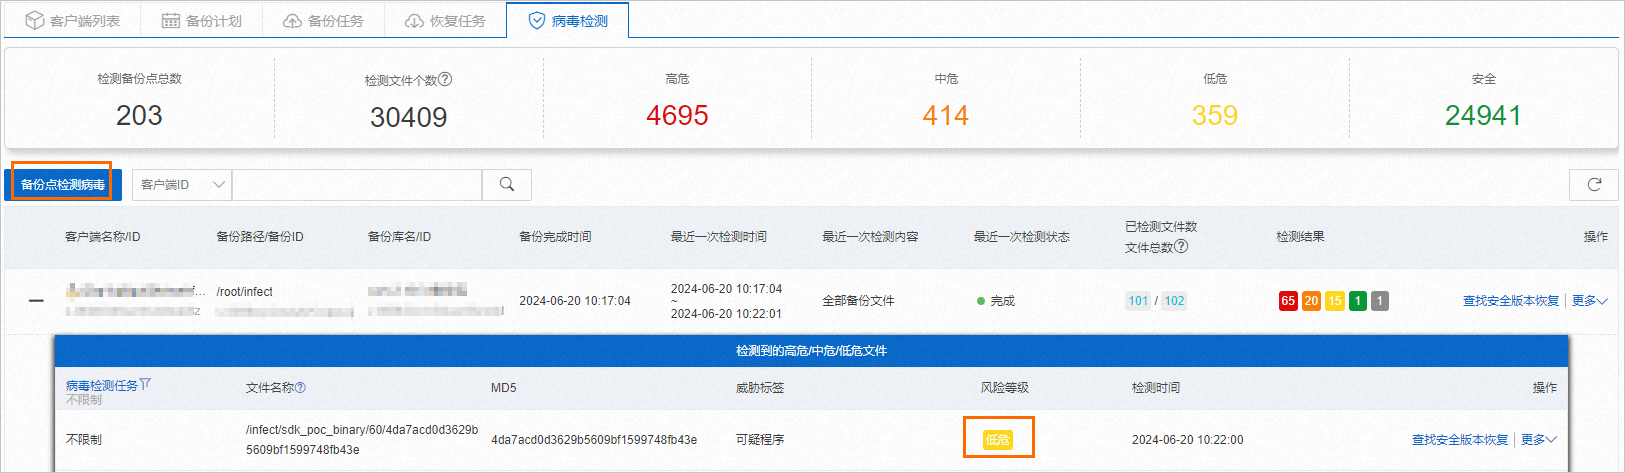
檢測結果

在病毒检测頁面,您可以看到所有進行過病毒檢測的備份點的統計結果,其中包括:
检测备份点总数:代表歷史合計檢測過的備份點數目。
检测文件总数:代表所有檔案累計被檢測的次數,是病毒檢測計費的依據。
高危:代表歷史合計檢測出來的高危檔案或者objects數目。
中危:代表歷史合計檢測出來的中危檔案或者objects數目。
低危:代表歷史合計檢測出來的低危檔案或者objects數目。
安全:代表歷史合計檢測出來的安全檔案或者objects數目。

另外,針對每一個備份點,您不僅可以看到該備份點所有歷史檢測結果統計,還可以看到具體的風險檔案詳情。
已檢測檔案數:代表該備份點歷史合計已經完成檢測過的檔案或者objects數目。
檔案總數:代表該備份點歷史合計計劃檢測的檔案或者objects數目。
检测结果:檢測結果是對已檢測檔案的具體分類統計,具體包括:
高危:代表該備份點歷史合計已經檢測出來的高危檔案或者objects數目。
中危:代表該備份點歷史合計已經檢測出來的中危檔案或者objects數目。
低危:代表該備份點歷史合計已經檢測出來的低危檔案或者objects數目。
安全:代表該備份點歷史合計已經檢測出來的安全檔案或者objects數目。
無法檢測的檔案數:由於檔案大小限制等導致無法被檢測的檔案數目,該條目代表該備份點歷史合計無法的檔案或者objects數目。
相關操作
在病毒检测頁面,您可以單擊操作列的 ⋮ ,進行如下相關操作。
操作 | 說明 |
下载病毒文件列表 | 您可以將檢測到的病毒檔案結果匯出為檔案在本地進行查看,匯出檔案中包含病毒檔案路徑、MD5雜湊值、風險等級及病毒名稱等資訊。 |
下载无法检测文件列表 | 當單個備份檔案大小大於100 MB時,將跳過檢測。您可以下載無法檢測的檔案清單查看具體備份檔案資訊。 |
强制恢复当前版本 | 強制恢複風險檔案可能會對恢複目標造成風險,請謹慎操作。 |
費用
病毒檢測為收費功能,检测文件总数為病毒檢測的計費依據。無論是基於備份策略的自動檢測,還是按需發起的手動檢測,均按成功檢測的檔案數量進行收費,未成功檢測的檔案不收費。
基於備份策略的自動檢測僅針對新增或發生變化的檔案執行增量病毒檢測。而按需手動檢測針對每個備份點的檢測相互獨立,互不影響。检测文件总数為自動檢測與手動檢測歷史累計檢測檔案數的總和。關於計費規則的詳細說明,請參見工作原理部分。更多計費資訊,請參見價格詳情。
