To use the browser monitoring feature of Application Real-Time Monitoring Service (ARMS) to monitor web applications, you must install the ARMS agent by using Alibaba Cloud Content Delivery Network (CDN) or node package manager (npm). This topic describes how to install the ARMS browser monitoring agent on web applications by using CDN.
Install the browser monitoring agent
Log on to the ARMS console.
In the left-side navigation pane, choose . In the top navigation bar, select a region.
On the Browser Monitoring page, click Create Application Site in the upper-right corner.
In the Frontend, Mobile, and Client Applications section of the Integration Center panel, click Web & H5.

In the Create an application step of the Integrate Web & H5 panel, enter a custom application name.
In the Configuration items for the SDK extension step of the Integrate Web & H5 panel, select the required option. The code of the BI agent to be pasted to the page is then generated based on the selected options.
Disable Automatic API Reporting: If you select this option, you must manually call the
__bl.api()method to report the API success rate.Enable Automatic SPA Resolution: If you select this option, ARMS monitors the
hashchangeevent of the page and automatically reports page views (PVs). This option is suitable for single-page applications (SPAs).Enable FMP Collection: If you select this option, ARMS collects the data related to First Meaningful Paint (FMP).
Enable Page Resource Reporting: If you select this option, the static resources loaded on the page are reported when the onload event is triggered.
Associated with Application Monitoring: If you select this option, API requests are in end-to-end association with Application Monitoring.
Enable User Behavior Backtracking: If you select this option, you can view user behavior trace in JS Error Diagnosis.
Enable Console Tracking: If you select this option, user behavior is traced in the console. The behavior can be
error,warn,log, orinfo.ImportantThis feature affects the path of the Console panel.
Install the ARMS agent by using one of the following methods:
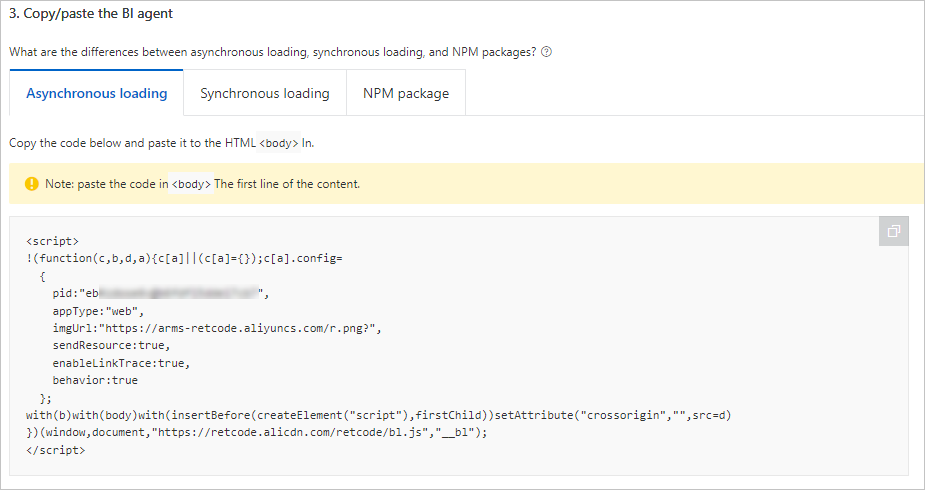
Asynchronous loading: Copy the provided code, paste it to the first line of the
<body>element of the HTML page, and then restart the application.
HTML example
<!DOCTYPE html>
<html>
  <head>
    <meta charset="utf-8" />
    <meta http-equiv="x-ua-compatible" content="ie=edge,chrome=1" />
    <meta name="viewport" content="width=device-width" />
    <title>ARMS</title>
  </head>
  <body>
    <script>
      !(function (c, b, d, a) {
        c[a] || (c[a] = {})
        c[a].config = {
          pid: 'xxx',
          appType: 'web',
          imgUrl: 'https://arms-retcode.aliyuncs.com/r.png?',
          sendResource: true,
          enableLinkTrace: true,
          behavior: true,
          useFmp: true,
          enableSPA: true,
        }
        with (b) with (body) with (insertBefore(createElement('script'), firstChild)) setAttribute('crossorigin', '', (src = d))
      })(window, document, 'https://retcode.alicdn.com/retcode/bl.js', '__bl')
    </script>
    <div id="app"></div>
  </body>
</html>
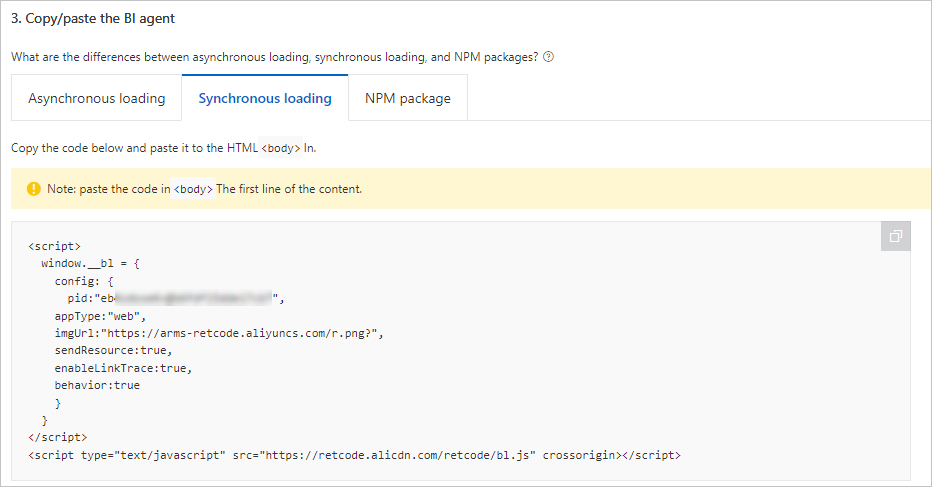
Synchronous loading: Copy the provided code, paste it to the first line of the
<body>element of the HTML page, and then restart the application.
npm package:
Run the following command to install the npm package:
npm install alife-logger --saveCopy and run the following command from the console to initialize the npm package:
const BrowserLogger = require('alife-logger');
const __bl = BrowserLogger.singleton({pid:"b590lhguqs@8cc3f63543d****",appType:"web",imgUrl:"https://arms-retcode.aliyuncs.com/r.png?",sendResource:true,behavior:true,enableLinkTrace:true,enableConsole:true});
Differences between asynchronous loading and synchronous loading
Asynchronous loading: It is also known as non-blocking loading. In asynchronous loading, the browser continues to process subsequent pages regardless of whether JavaScript loading is completed. We recommend that you use this method if you require high page performance.
ImportantIf you use asynchronous loading, ARMS cannot capture JavaScript errors or resource loading errors before the monitoring SDK completes the initialization.
Synchronous loading: It is also known as blocking loading. In synchronous loading, the browser does not continue to process subsequent pages until the JavaScript loading is completed. We recommend that you use synchronous loading if you need to capture JavaScript errors and resource loading errors during the whole process.
Custom UID
When the ARMS browser monitoring agent is installed by using synchronous or asynchronous loading, the web SDK automatically generates a user ID (UID) to collect information such as the number of unique visitors (UVs). The UID can be used to identify a user but does not have business attributes. If you want to customize a UID, add the following content to config in the code:
uid: "xxx" // The UID is used to identify a user. You can specify the UID based on your business requirements. Example:
<script>
!(function(c,b,d,a){c[a]||(c[a]={});c[a].config={pid:"xxx",appType:undefined,imgUrl:"https://arms-retcode.aliyuncs.com/r.png?", uid: "xxxx"};
with(b)with(body)with(insertBefore(createElement("script"),firstChild))setAttribute("crossorigin","",src=d)
})(window,document,"https://retcode.alicdn.com/retcode/bl.js","__bl");
</script>If you modify options in the SDK Extension Configuration section, the code changes. Copy and paste the code again.
Common SDK parameters
The browser monitoring feature of ARMS allows you to set a variety of SDK parameters to meet additional requirements. The following table describes the common parameters suitable for the scenarios described in this topic.
|
|
|
|
|
pid | String | The unique ID of the project. It is automatically generated by ARMS when it creates a site. | Yes | None |
uid | String | The ID of the user. The value is an identifier of the user and can be used to search for the user. You can specify a custom value. If you do not specify this parameter, the SDK is automatically generated and updated every six months. | No | Automatically generated by the SDK |
tag | String | The input tag. Each log carries a tag. | No | None |
release | String | The version of the application. We recommend that you configure this parameter to view the report information of different versions. | No |
|
environment | String | The environment field. Valid values: prod, gray, pre, daily, and local.
| No |
|
sample | Integer | The log sampling configuration. The value is an integer from 1 to 100. The performance logs and success API logs are sampled at the | No |
|
behavior | Boolean | Specifies whether to record the user behavior that reports errors for easy troubleshooting. | No |
|
enableSPA | Boolean | Listen to hashchange events on the page and report the PV again. This is applicable to single-page application scenarios. | No |
|
enableLinkTrace | Boolean | For more information about back-to-back Tracing Analysis, see Use the front-to-back tracing feature to diagnose API errors. | No |
|
The browser monitoring feature of ARMS also provides more SDK parameters to further meet your requirements. For more information, see SDK reference.