このトピックでは、Azure Active Directory (AD) とElastic Desktop Service (Enterprise Edition) 間でシングルサインオン (SSO) を構成する方法について説明します。 SSOを構成した後、エンドユーザーがクラウドコンピューターにアクセスすると、Azure ADユーザーのログオン資格情報が認証されます。 これにより、安全で統一されたログオンの管理に役立ちます。
背景
シングルサインオン (SSO) は、シングルサインオンで複数の信頼できるアプリケーションシステムに効率的にアクセスできる安全な通信テクノロジーです。 SSOは、IDフェデレーションに基づいてログオンを実装します。
SSOシナリオでは、次の用語がよく使用されます。
IDプロバイダー (IdP): 外部IDプロバイダーのメタデータを含むエンティティ。 IdPはID管理サービスを提供し、ユーザー名やパスワードなどのユーザーID情報を収集して保存し、ユーザーログオン時にユーザーIDを検証します。
一般的なIdPs:
オンプレミスIdP: Microsoft Active Directoryフェデレーションサービス (AD FS) やShibbolethなどのオンプレミスアーキテクチャを使用します。
クラウドIdP:
Azure AD、Googleワークスペース、Okta、およびOneLogin。
サービスプロバイダー (SP): IdPのID管理機能を使用して、IdPとの信頼関係に基づいて特定のサービスをユーザーに提供するアプリケーション。 OpenID Connect (OIDC) など、SAML (Security Assertion Markup Language) プロトコルに準拠していない特定のIDシステムでは、SPはIdPの依存関係者です。
SAML 2.0: 企業のユーザーID認証の標準プロトコルです。 これは、SPとIdP間の通信の技術的実装の1つです。 SAMLは、企業がSSOを実装するために使用する事実上の標準です。
手順
Azure ADを使用してユーザーを管理する場合は、Azure ADと同じユーザー名を持つ便利なユーザーを構成して、Elastic Desktop Service (Enterprise Edition) のSSOを実装できます。 次に、Elastic Desktop Service (Enterprise Edition) はサービスプロバイダー (SP) として機能し、Azure ADはIDプロバイダー (IdP) として機能します。 どちらも、Security Assertion Markup Language (SAML) プロトコルに基づいてメタデータファイルを交換してSSOを実装します。 SSOを構成すると、エンドユーザーはAzure ADで同じログオン資格情報を使用してクラウドコンピューターにアクセスできます。
手順1: ユーザー名がAzure ADユーザーのユーザー名と同じである便利なユーザーを作成し
Elastic Desktop Service (Enterprise Edition) を使用するAzure ADユーザーの場合は、Elastic Desktop Service (Enterprise Edition) コンソールのAzure ADユーザーと同じユーザー名の便利なユーザーを作成する必要があります。
Elastic Desktop Service (Enterprise Edition) コンソールの [ユーザー作成] パネルで、[手動入力] タブまたは [バッチ入力] タブを選択すると、複数のユーザーに関する情報を同時に入力またはインポートして便利なユーザーを作成できます。 少数のユーザーを作成する場合は、[手動入力] タブでユーザーに関する情報を手動で入力できます。 多数のユーザーを作成する場合は、[バッチ入力] タブで特定の形式を満たすファイルを使用して、ユーザーに関する情報をインポートできます。
ファイルに情報を入力するときは、作成するコンビニエンスユーザーのユーザー名がAzure ADユーザーのユーザー名と同じであることを確認してください。 ユーザー名は大文字と小文字を区別しません。
ユーザー情報をインポートする前に、次のセクションを参照してElastic Desktop Serviceユーザーを有効な形式で作成するために使用されるcsvファイル。
ダウンロードa. Azure ADのAzure ADユーザーに関する情報を含むcsvファイル。
Azure ADコンソールにログインします。
左側のナビゲーションウィンドウで、ユーザーをクリックします。
すべてのユーザー (プレビュー)ページで、ユーザーの資格情報が有効かどうかを確認します。
Azure ADユーザーのユーザー名は、コンビニエンスユーザーを作成するためのフォーマット要件に従う必要があります。 Azure ADユーザーのユーザー名の形式が無効な場合、Azure ADユーザーに対応するコンビニエンスユーザーを作成することはできません。
コンビニエンスユーザーを作成するときは、次のフォーマット要件を満たす必要があります。
ユーザー名は3 ~ 24文字である必要があります。
ユーザー名には、英小文字、数字、およびハイフン (-) 、アンダースコア (_) 、ピリオド (.) などの特殊文字を使用できます。
ユーザー名は小文字で始まる必要があります。
上部のナビゲーションバーで、一括操作を選択し、ユーザーのダウンロードを選択します。

画面の指示に従って、Azure ADユーザーに関する情報をダウンロードします。 ダウンロードされた情報は、.csvファイルに含まれます。

Excelを使用してを開きます。csvファイルを入力し、インポートするユーザーに関する情報を入力または変更します。 ファイル内の情報が、コンビニエンスユーザーを作成するためのフォーマット要件を満たしていることを確認してください。 次に、ファイルをに保存します。csv形式。
説明ユーザー情報を変更するときは、次のフォーマット要件に注意してください。
フォーマット:
ユーザーがアクティブ化するコンビニエンスユーザー: 最初の列はユーザー名、2番目の列は電子メールアドレス、3番目の列は電話です。 3番目の列はオプションです。
管理者が有効にするコンビニエンスユーザー: 最初の列はユーザー名、2番目の列は電子メール、3番目の列は電話、4番目の列はパスワードです。 2番目と3番目の列はオプションです。
で。Azure ADコンソールからダウンロードしたcsvファイルの場合、userPrincipalName列は
Username @ Domain name形式です。 作成するコンビニエンスユーザーのユーザー名として、@ の前のユーザー名を使用できます。 userPrincipalName列に指定された値がユーザーの実際の電子メールアドレスである場合、userPrincipalName列を電子メール列として使用できます。 実際のメールアドレスがuserPrincipalName列で指定したメールアドレスと異なる場合は、実際のメールアドレスを指定します。
あなたが準備した後。csvファイルで、Elastic Desktop Service (Enterprise Edition) コンソールの [バッチ入力] タブをクリックして、便利なユーザーを一括作成します。 詳細は、「コンビニエンスアカウントの作成」をご参照ください。
Azure ADユーザーに対応するコンビニエンスユーザーを作成したら、できるだけ早い機会にコンビニエンスユーザーにクラウドコンピューターを割り当てます。 詳細については、「コンビニエンスアカウントの管理」をご参照ください。
手順2: アプリケーションを作成し、アプリケーションをAzure ADユーザーに割り当てる
Azure AD側では、Elastic Desktop Service (Enterprise Edition) に対応するアプリケーションを作成し、Elastic Desktop Service (Enterprise Edition) を使用するAzure ADユーザーに対してアプリケーションを承認する必要があります。 アプリケーションを作成して割り当てるには、次の手順を実行します。
Azure ADコンソールの左側のナビゲーションウィンドウで、エンタープライズアプリケーションをクリックします。
すべてのアプリケーションページで新しいアプリケーションをクリックします。
上部のナビゲーションバーで、独自のアプリケーションを作成するをクリックします。
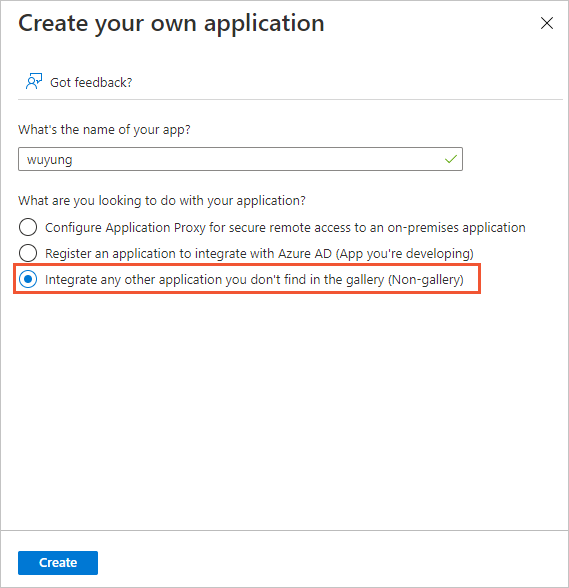
表示されるダイアログボックスで、作成するアプリケーションの名前を入力し、ギャラリーにない他のアプリケーションを統合する (非ギャラリー)を選択し、作成をクリックします。
ページを更新し、作成したアプリケーションの名前をクリックします。
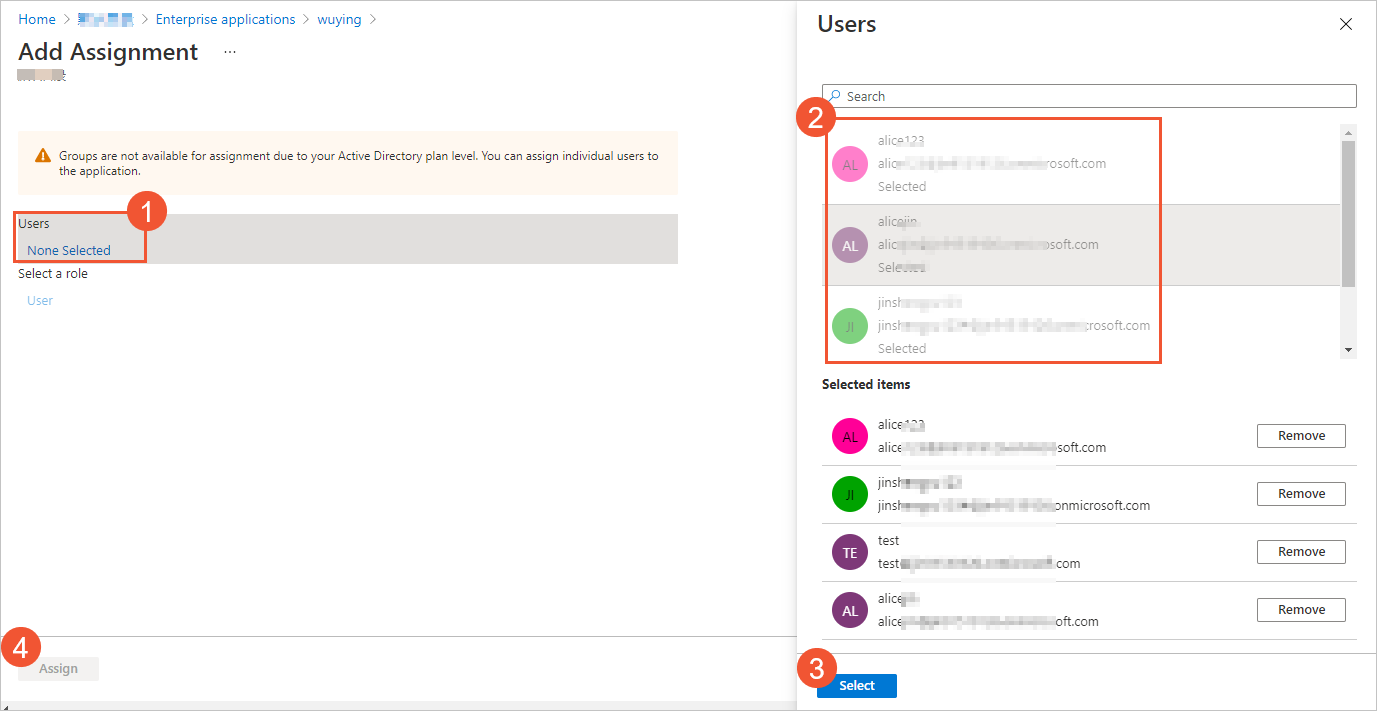
左側のナビゲーションウィンドウで、ユーザーとグループをクリックし、ユーザー /グループの追加をクリックします。
割り当ての追加ページで、ユーザーを選択し、割り当てをクリックします。
手順3: Elastic Desktop Service (Enterprise Edition) をAzure ADで信頼できるSAML SPとして構成する
Elastic Desktop Service (Enterprise Edition) を信頼できるSAML SPとして構成するには、そのメタデータファイルをAzure ADにアップロードする必要があります。 メタデータファイルをアップロードするには、次の手順を実行します。
でメタデータファイルを取得します。Elastic Desktop Service (Enterprise Edition)コンソールにアクセスします。
EDS Enterpriseコンソールにログインします。
左側のナビゲーションウィンドウで、 を選択します。
[Officeネットワーク (旧ワークスペース)] で、SSOを有効にするオフィスネットワークを見つけ、オフィスネットワークIDをクリックします。
オフィスネットワークの詳細ページの左側のナビゲーションウィンドウで、[その他] タブをクリックします。
[その他] タブで、[アプリケーションメタデータ] の右側にある [アプリケーションメタデータファイルのダウンロード] をクリックします。
ダウンロードしたメタデータファイルは、ローカルコンピューターのDownloadフォルダーに自動的に保存されます。
Azure ADのElastic Desktop Service (Enterprise Edition) に対応するアプリケーションのSSOを構成します。
Azure ADコンソールで、手順2で作成したアプリケーションを起動します。
左側のナビゲーションウィンドウで、シングルサインオンを選択し、SAMLを選択します。
メタデータファイルのアップロードをクリックします。
Elastic Desktop Service (Enterprise Edition) のメタデータファイルを選択し、[の追加] をクリックします。
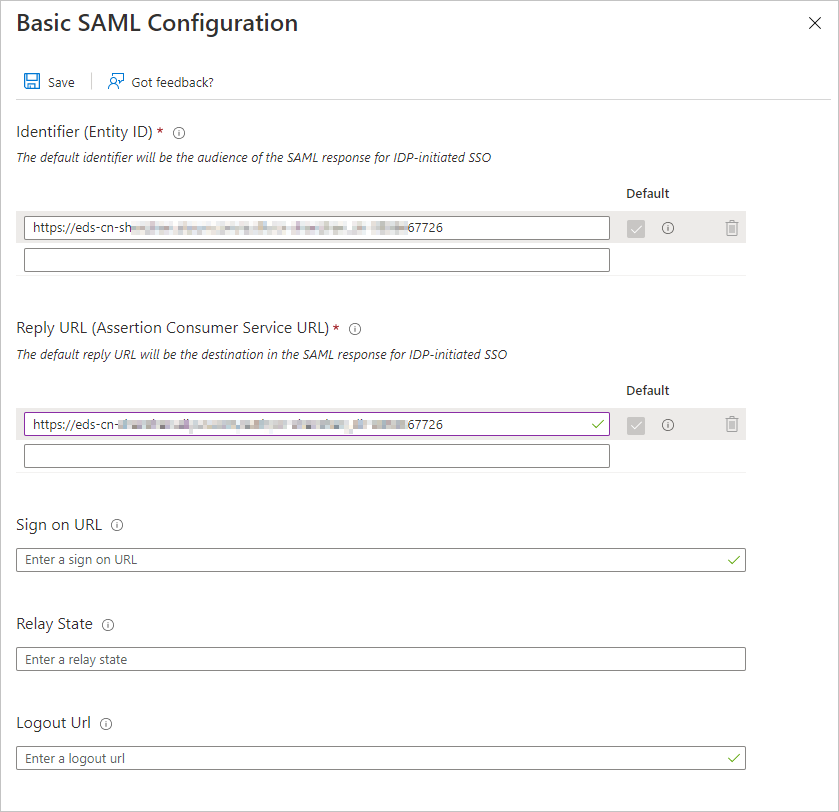
では、基本的なSAML設定パネルで、IdentifierフィールドとReply URLフィールドの値が有効かどうかを確認し、保存をクリックします。
説明ローカルコンピューターに保存されているメタデータファイルを開き、IdentifierとReply URLパラメーターの値が有効かどうかを確認します。
識別子 (Entity ID): メタデータファイルの
md:EntityDescriptorタグのentityID値。
返信URL (Assertion Consumer Service URL): メタデータファイルの
md:AssertionConsumerServiceタグのLocation値。
重要メタデータファイルをアップロードすると、IdentifierフィールドとReply URLフィールドが自動的に入力されます。 IdentifierおよびReply URLパラメーターが自動的に入力されない場合は、値を指定します。
手順4: Azure ADを信頼できるSAML IdPとして構成するElastic Desktop Service (Enterprise Edition)
Azure ADメタデータファイルをElastic Desktop Service (Enterprise Edition) にアップロードして、Azure ADを信頼できるSAML IdPとして構成できます。 メタデータファイルをアップロードするには、次の手順を実行します。
Azure AD IdPメタデータファイルを取得します。
Azure ADコンソールで、手順2で作成したアプリケーションを起動します。
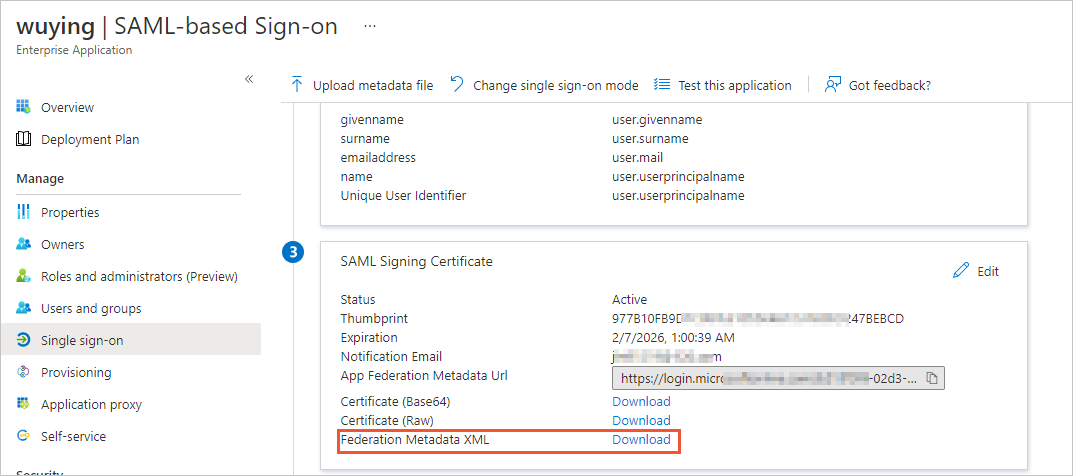
左側のナビゲーションウィンドウで、シングルサインオンをクリックします。
[SAML署名証明書] セクションで、フェデレーションメタデータXMLの右側にある [ダウンロード] をクリックします。
ダウンロードしたメタデータファイルは、ローカルコンピューターのDownloadフォルダーに自動的に保存されます。
では、Elastic Desktop Serviceコンソールで、Azure ADメタデータファイルをアップロードします。
EDS Enterpriseコンソールにログインします。
左側のナビゲーションウィンドウで、 を選択します。
[Officeネットワーク (旧ワークスペース)] ページで、SSOを有効にするオフィスネットワークを見つけ、オフィスネットワークIDをクリックします。
オフィスネットワークの詳細ページの左側のナビゲーションウィンドウで、[その他] タブをクリックします。
[その他] タブで、SSO機能を有効にし、IdPメタデータファイルをアップロードします。
SSO: オフィスネットワークのSSO機能を有効または無効にします。
デフォルトでは、SSO機能は無効になっています。 SSO機能が無効になっている場合、SSO設定は有効になりません。
IdPメタデータ: [ファイルのアップロード] をクリックして、IdPメタデータファイルをアップロードします。
IdP Metadataパラメーターのステータスが完了の場合、Azure ADは信頼できるSAML IdPとして構成されます。
次に何をすべきか
SSO設定が完了すると、エンドユーザーはAzure ADユーザーのログオン資格情報を使用してクラウドコンピューターにアクセスします。 次のセクションでは、Azure ADユーザーがクラウドコンピューターに接続するためのSSOを実装する方法について説明します。 次のセクションでは、Alibaba Cloud WorkspaceのWindowsクライアントが使用されます。
Windowsクライアントを起動します。
Pro Edition (旧Enterprise Edition) ログインページで、SSOを有効にしたオフィスネットワークのIDを入力します。
Azure ADログオンページで、コンビニエンスユーザーに対応するAzure ADユーザーに関する情報を入力します。 Azure ADシステムは、ユーザーの資格情報を認証します。
認証が成功した場合、クライアントにログオンできます。 ユーザーに割り当てられたクラウドコンピューターはカードとして表示されます。 接続するクラウドコンピューターのカードの上にポインターを移動し、[クラウドコンピューターの接続] をクリックします。
よくある質問
Azure ADログオンページで問題が発生した場合は、プロンプトに従って問題のトラブルシューティングを行います。
たとえば、Elastic Desktop Service (Enterprise Edition) に対応するアプリケーションがユーザーに割り当てられていないことを示す次のエラーが発生した場合は、手順2を参照してください。
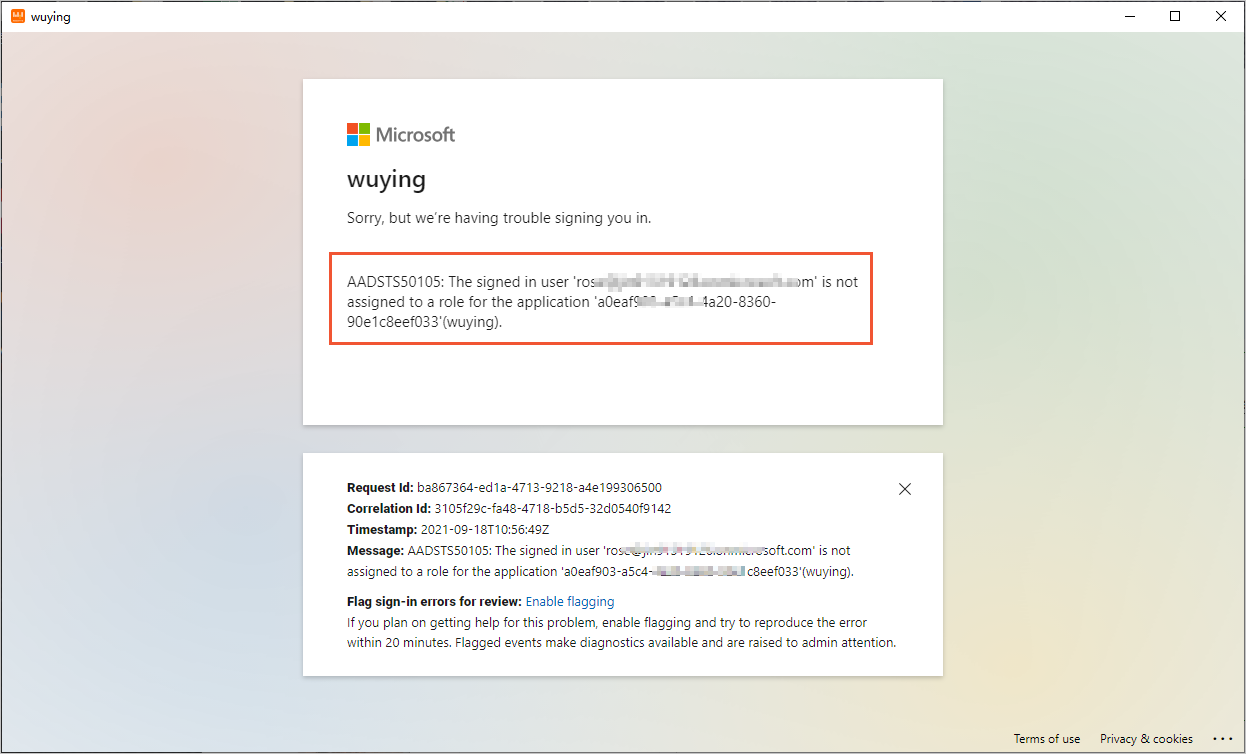
クライアントで認証の失敗についてプロンプトが表示された場合は、管理者に連絡してSSO設定が有効かどうかを確認してください。
クライアントの内部エラーについてプロンプトが表示された場合は、管理者に連絡して、Azure ADユーザーに対応するコンビニエンスユーザーが正しく構成されているかどうかを確認します。