Platform for AI (PAI) サービス (Deep Learning Containers (DLC) や Data Science Workshop (DSW) など) では、ossfs 2.0 クライアントまたは Alibaba Cloud EMR が提供する JindoFuse コンポーネントを使用して、Object Storage Service (OSS) データソースをコンテナー内の指定されたパスにマウントできます。また、OSS Connector for AI/ML および OSS software development kit (SDK) を使用して OSS データを読み取ることもできます。シナリオに基づいて OSS データを読み取る方法を選択できます。
背景情報
人工知能 (AI) 開発では、通常、ソースデータは Object Storage Service (OSS) に保存され、モデル開発とトレーニングのためにトレーニング環境にダウンロードされます。ただし、この方法にはいくつかの欠点があります。
データセットのダウンロード時間が長いため、GPU がアイドル状態になります。
トレーニングタスクごとにデータを再ダウンロードする必要があります。
ランダムなデータサンプリングでは、完全なデータセットを各トレーニングノードにダウンロードする必要があります。
これらの問題を解決するには、OSS からデータを読み取るための次の提案を検討してください。
OSS データ読み取り方法 | 説明 | 推奨シナリオ |
JindoFuse コンポーネントを使用して、OSS データセットをコンテナー内の指定されたパスにマウントできます。これにより、データを直接読み書きできます。 |
| |
ossfs 2.0 は、Object Storage Service (OSS) をローカルファイルシステムとしてマウントすることで、パフォーマンス専有型のアクセスを実現するように設計されたクライアントです。優れたシーケンシャル読み取りおよび書き込み機能を提供し、OSS の広帯域幅を最大限に活用します。 | ossfs 2.0 は、AI トレーニング、推論、ビッグデータ処理、自動運転など、高いストレージアクセスパフォーマンスを必要とするシナリオに最適です。これらの計算集約型のワークロードは、主にシーケンシャルおよびランダム読み取り、シーケンシャル書き込み (追加のみ) を含み、完全な POSIX セマンティクスに依存しません。 | |
PAI は OSS Connector for AI/ML を統合しており、PyTorch コード内で OSS ファイルを直接ストリーミングして読み取ることができます。この方法は、シンプルで効率的なデータ読み取りを提供し、次の利点があります。
| この方法では、マウントせずに OSS データを読み書きできます。PyTorch でトレーニングしていて、数百万の小さなファイルを読み取る必要があり、高いスループット要件がある場合に推奨されます。OSS Connector for AI/ML は、これらのシナリオでデータセットの読み取りを大幅に高速化できます。 | |
OSS2 を使用して OSS からデータをストリーミングできます。OSS2 は柔軟で効率的なソリューションであり、データリクエストのレイテンシーを大幅に削減し、トレーニング効率を向上させることができます。 | この方法は、マウントせずに OSS データに一時的にアクセスする必要がある場合や、ビジネスロジックに基づいてデータアクセスをプログラムで制御する場合に適しています。このような場合、OSS Python SDK または OSS Python API を使用できます。 |
JindoFuse
DLC と DSW は、JindoFuse コンポーネントを使用して OSS データセットまたは OSS パスをコンテナー内の指定されたパスにマウントすることをサポートしています。これにより、トレーニング中に OSS に保存されているデータを直接読み書きできます。
マウント方法
DLC での OSS のマウント
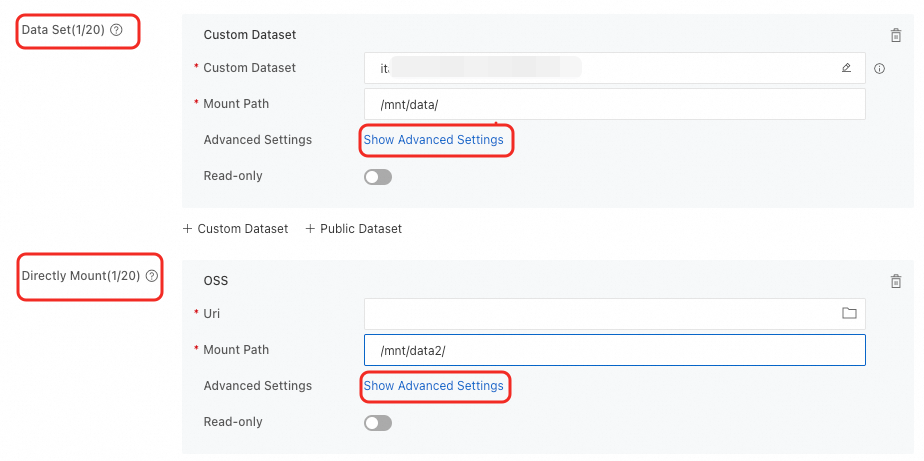
DLC ジョブを作成するときに OSS データセットをマウントできます。2 つのマウントタイプがサポートされています。詳細については、「トレーニングジョブの作成」をご参照ください。

マウントタイプ | 説明 |
データセット | タイプが [Object Storage Service (OSS)] のデータセットを選択し、[マウントパス] を設定します。パブリックデータセットを使用する場合、読み取り専用マウントモードのみがサポートされます。 |
直接マウント | OSS バケットストレージパスを直接マウントします。 ローカルキャッシュが有効になっている Lingjun リソースのクォータを使用する場合、[キャッシュの使用] スイッチをオンにしてキャッシュ機能を有効にできます。 |
DSW での OSS のマウント
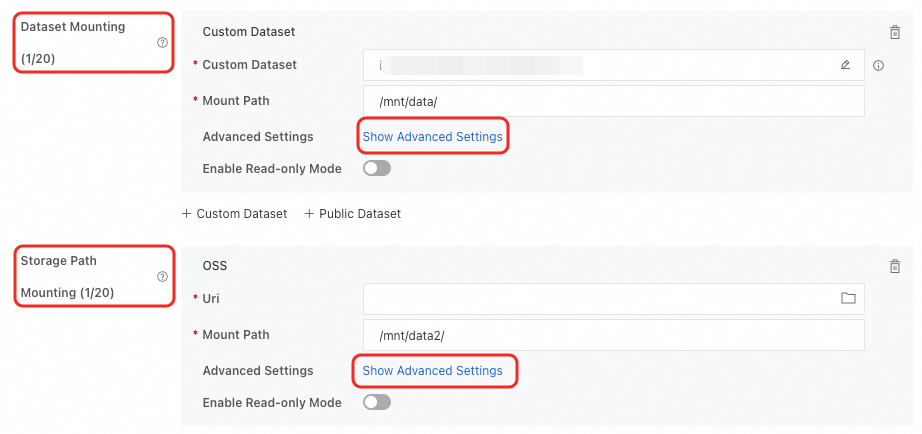
DSW インスタンスを作成するときに OSS データセットをマウントできます。2 つのマウントタイプがサポートされています。詳細については、「DSW インスタンスの作成」をご参照ください。

マウントタイプ | 説明 |
データセットのマウント | タイプが [Object Storage Service (OSS)] のデータセットを選択し、[マウントパス] を設定します。パブリックデータセットを使用する場合、読み取り専用マウントモードのみがサポートされます。 |
ストレージパスのマウント | OSS バケットストレージパスを直接マウントします。 |
デフォルト構成の制限
[詳細設定] パラメーターが空の場合、デフォルトの構成が使用されます。デフォルトの構成には、次の制限があります。
OSS ファイルをすばやく読み取るために、OSS のマウント時にディレクトリやファイルリストなどのメタデータがキャッシュされます。
分散タスクでは、複数のノードが同じディレクトリを作成して存在するかどうかを確認する必要がある場合、メタデータキャッシュにより各ノードが作成を試みます。1 つのノードのみがディレクトリを正常に作成でき、他のノードはエラーを報告します。
デフォルトでは、OSS Multipart API を使用してファイルを作成します。ファイルの書き込み中は、オブジェクトは OSS に表示されません。すべての書き込み操作が完了した後にのみ、OSS ページでオブジェクトを表示できます。
ファイルの同時書き込みおよび読み取り操作はサポートされていません。
ファイルへのランダム書き込み操作はサポートされていません。
一般的な JindoFuse 構成
シナリオに基づいて、詳細設定で JindoFuse パラメーターをカスタマイズすることもできます。
このトピックでは、特定のシナリオで JindoFuse を構成する方法についての提案を提供します。これらは、すべてのシナリオに最適な構成ではありません。より柔軟な構成については、「JindoFuse ユーザーガイド」をご参照ください。
クイック読み取り/書き込み: 迅速な読み取りと書き込みを保証します。ただし、同時読み取りまたは書き込み中にデータ不整合が発生する可能性があります。このモードのマウントパスにトレーニングデータとモデルをマウントできます。このモードのマウントパスを作業ディレクトリとして使用しないことをお勧めします。
{ "fs.oss.download.thread.concurrency": "CPU コア数の 2 倍", "fs.oss.upload.thread.concurrency": "CPU コア数の 2 倍", "fs.jindo.args": "-oattr_timeout=3 -oentry_timeout=0 -onegative_timeout=0 -oauto_cache -ono_symlink" }増分読み取り/書き込み: 増分書き込み中のデータ整合性を保証します。元のデータが上書きされると、データ不整合が発生する可能性があります。読み取り速度はわずかに遅くなります。このモードを使用して、トレーニングデータのモデル重みファイルを保存できます。
{ "fs.oss.upload.thread.concurrency": "CPU コア数の 2 倍", "fs.jindo.args": "-oattr_timeout=3 -oentry_timeout=0 -onegative_timeout=0 -oauto_cache -ono_symlink" }一貫性のある読み取り/書き込み: 同時読み取りまたは書き込み中のデータ整合性を保証し、高いデータ整合性を必要とし、迅速な読み取りを必要としないシナリオに適しています。このモードを使用して、プロジェクトのコードを保存できます。
{ "fs.jindo.args": "-oattr_timeout=0 -oentry_timeout=0 -onegative_timeout=0 -oauto_cache -ono_symlink" }読み取り専用: 読み取りのみを許可します。このモードを使用して、パブリックデータセットをマウントできます。
{
  "fs.oss.download.thread.concurrency": "CPU コア数の 2 倍",
  "fs.jindo.args": "-oro -oattr_timeout=7200 -oentry_timeout=7200 -onegative_timeout=7200 -okernel_cache -ono_symlink"
}
さらに、一般的な構成操作には次のものがあります。
異なる JindoFuse バージョンの選択:
{ "fs.jindo.fuse.pod.image.tag": "6.7.0" }メタデータキャッシュの無効化: 分散タスクを実行し、複数のノードが同時に同じディレクトリに書き込もうとすると、キャッシュが原因で一部のノードでの書き込み操作が失敗する可能性があります。この問題は、JindoFuse コマンドラインパラメーターを変更し、
-oattr_timeout=0-oentry_timeout=0-onegative_timeout=0を追加することで解決できます。{ "fs.jindo.args": "-oattr_timeout=0-oentry_timeout=0-onegative_timeout=0" }データのアップロードまたはダウンロード用のスレッド数の調整: 次のパラメーターを構成して、スレッド数を調整できます。
{
  "fs.oss.upload.thread.concurrency": "32",
  "fs.oss.download.thread.concurrency": "32",
  "fs.oss.read.readahead.buffer.count": "64",
  "fs.oss.read.readahead.buffer.size": "4194304"
}
AppendObject メソッドを使用した OSS ファイルのマウント: ローカルで作成したすべてのファイルは、OSS AppendObject API を呼び出すことによってオブジェクト (ファイル) として作成されます。AppendObject メソッドを使用して作成されたオブジェクトの最終サイズは 5 GB を超えることはできません。AppendObject の制限の詳細については、「AppendObject」をご参照ください。以下は構成例です。
{
  "fs.jindo.args": "-oattr_timeout=0 -oentry_timeout=0 -onegative_timeout=0",
  "fs.oss.append.enable": "true",
  "fs.oss.flush.interval.millisecond": "1000",
  "fs.oss.read.readahead.buffer.size": "4194304",
  "fs.oss.write.buffer.size": "262144"
}
OSS-HDFS のマウント: OSS-HDFS を有効にするには、「OSS-HDFS サービスとは」をご参照ください。分散トレーニングシナリオでは、次のパラメーターを追加することをお勧めします。
{ "fs.jindo.args": "-oattr_timeout=0 -oentry_timeout=0 -onegative_timeout=0 -ono_symlink -ono_xattr -ono_flock -odirect_io", "fs.oss.flush.interval.millisecond": "10000", "fs.oss.randomwrite.sync.interval.millisecond": "10000" }メモリリソースの構成:
fs.jindo.fuse.pod.mem.limitパラメーターを構成することで、メモリリソースを調整できます。以下は構成例です。{ "fs.jindo.fuse.pod.mem.limit": "10Gi" }
ossfs 2.0
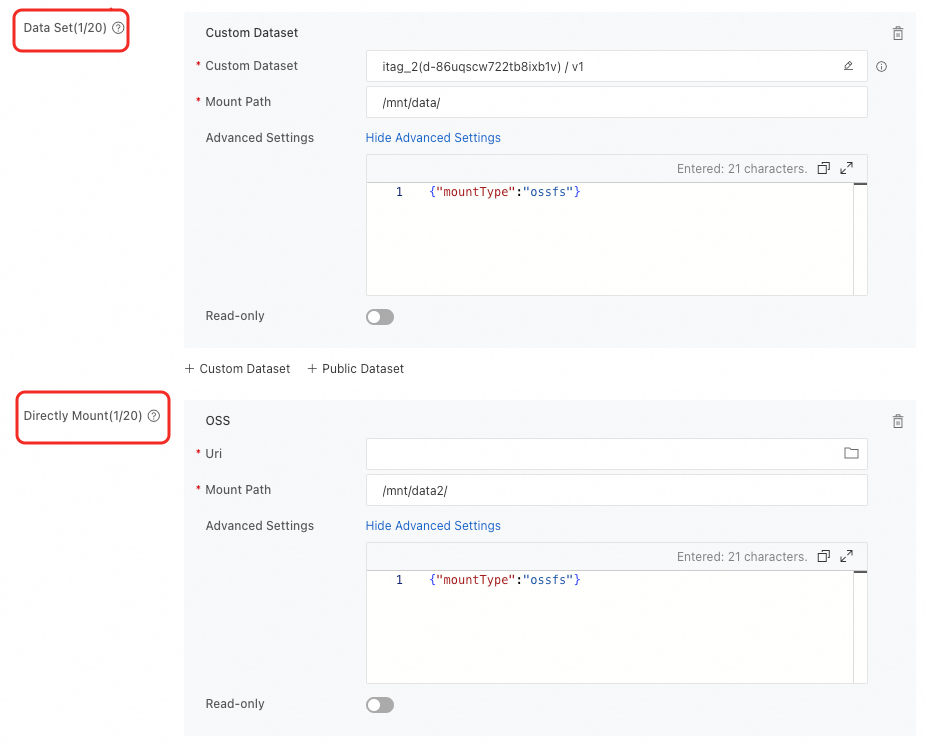
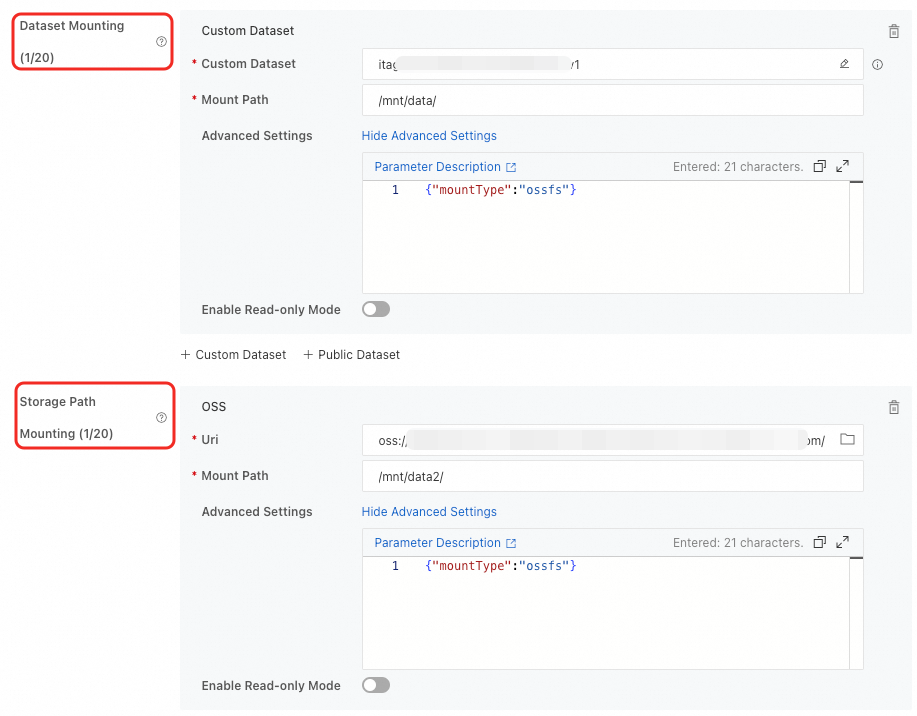
OSS データソースをマウントする際、[詳細設定] で {"mountType":"ossfs"} を設定して ossfs マウント方法を使用できます。
マウント方法
DLC での OSS のマウント
DLC ジョブを作成するときに OSS データセットをマウントできます。2 つのマウントタイプがサポートされています。構成方法の詳細については、「トレーニングジョブの作成」をご参照ください。

マウントタイプ | 説明 |
データセット | タイプが [Object Storage Service (OSS)] のデータセットを選択し、[マウントパス] を設定します。パブリックデータセットを使用する場合、読み取り専用マウントモードのみがサポートされます。 |
直接マウント | OSS バケットストレージパスを直接マウントします。 ローカルキャッシュが有効になっている Lingjun リソースのクォータを使用する場合、[キャッシュの使用] スイッチをオンにしてキャッシュ機能を有効にできます。 |
DSW での OSS のマウント
DSW インスタンスを作成するときに OSS データセットをマウントできます。2 つのマウントタイプがサポートされています。構成方法の詳細については、「DSW インスタンスの作成」をご参照ください。

マウントタイプ | 説明 |
データセットのマウント | タイプが [Object Storage Service (OSS)] のデータセットを選択し、[マウントパス] を設定します。パブリックデータセットを使用する場合、読み取り専用マウントモードのみがサポートされます。 |
ストレージパスのマウント | OSS バケットストレージパスを直接マウントします。 |
一般的な ossfs 構成
[詳細設定] では、fs.ossfs.args を使用して詳細パラメーターを設定できます。複数のパラメーターはカンマ , で区切ります。詳細パラメーターの詳細については、「ossfs 2.0」をご参照ください。次の例では、一般的なシナリオについて説明します。
タスク中にデータソースが変更されない: 読み取るファイルがプロセス中に変更されない場合は、キャッシュ時間を長く設定してメタデータリクエストの数を減らすことができます。典型的なシナリオは、既存のファイルのバッチを読み取り、処理後に新しいファイルのバッチを生成することです。
{ "mountType":"ossfs", "fs.ossfs.args": "-oattr_timeout=7200" }高速読み取り/書き込み: メタデータキャッシュ時間を短くして、キャッシュ効率とデータの適時性のバランスをとることができます。
{ "mountType":"ossfs", "fs.ossfs.args": "-oattr_timeout=3, -onegative_timeout=0" }分散タスクの一貫性のある読み取り/書き込み: デフォルトでは、ossfs はメタデータキャッシュに基づいてファイルデータを更新します。次の構成を使用して、複数のノード間で同期されたビューを実現できます。
{
    "mountType":"ossfs",
    "fs.ossfs.args": "-onegative_timeout=0, -oclose_to_open"
}
DLC/DSW シナリオで開いているファイルが多すぎることによる OOM: DLC または DSW シナリオでは、タスクの同時実行性が高いと、多数のファイルが同時に開かれ、メモリ不足 (OOM) の問題が発生する可能性があります。次の構成を使用して、メモリの圧迫を軽減できます。
{
    "mountType":"ossfs",
    "fs.ossfs.args": "-oreaddirplus=false, -oinode_cache_eviction_threshold=300000"
}
OSS Connector for AI/ML
OSS Connector for AI/ML は、Alibaba Cloud OSS チームが AI および機械学習シナリオ向けに開発したクライアントライブラリです。大規模な PyTorch トレーニングに便利なデータ読み込みエクスペリエンスを提供し、データ転送の時間と複雑さを大幅に削減し、モデルトレーニングを高速化します。これにより、不要な操作やデータ読み込みのボトルネックを防ぐことで効率が向上します。ユーザーエクスペリエンスを最適化し、データアクセスを高速化するために、PAI は OSS Connector for AI/ML を統合しています。この統合により、PyTorch コードを使用してストリーミングモードで OSS オブジェクトを効率的に読み取ることができます。
制限事項
公式イメージ: OSS Connector for AI/ML モジュールは、DLC ジョブまたは DSW インスタンスの PyTorch 2.0 以降のイメージでのみ使用できます。
カスタムイメージ: PyTorch 2.0 以降のバージョンのみがサポートされています。この要件を満たすカスタムイメージを使用している場合は、次のコマンドを実行して OSS Connector for AI/ML モジュールをインストールできます。
pip install -i http://yum.tbsite.net/aliyun-pypi/simple/ --extra-index-url http://yum.tbsite.net/pypi/simple/ --trusted-host=yum.tbsite.net osstorchconnectorPython バージョン: Python 3.8 から 3.12 のみがサポートされています。
準備
認証情報ファイルを設定します。
認証情報は、次のいずれかの方法で設定できます。
Deep Learning Containers (DLC) ジョブの OSS へのパスワードなしのアクセス用に認証情報ファイルを設定できます。詳細については、「DLC RAM ロールの設定」をご参照ください。認証情報ファイルを設定すると、DLC ジョブは Security Token Service (STS) から一時的なアクセス認証情報を取得できます。これにより、認証情報を明示的に設定することなく、OSS やその他のクラウドリソースに安全にアクセスでき、キー漏洩のリスクを軽減できます。
コードプロジェクトで認証情報ファイルを設定して、認証情報を管理します。以下は構成例です。
説明AccessKey 情報をプレーンテキストで設定すると、セキュリティリスクが生じます。RAM ロールを使用して、DLC インスタンス内で認証情報を自動的に設定することをお勧めします。詳細については、「DLC RAM ロールの設定」をご参照ください。
OSS Connector for AI/ML インターフェイスを使用する場合、認証情報ファイルのパスを指定して、OSS データリクエストの認証情報を自動的に取得できます。
{
  "AccessKeyId": "<Access-key-id>",
  "AccessKeySecret": "<Access-key-secret>",
  "SecurityToken": "<Security-Token>",
  "Expiration": "2024-08-20T00:00:00Z"
}
次の表に、設定項目を示します。
設定項目
必須
説明
値の例
AccessKeyId
はい
Alibaba Cloud アカウントまたは RAM ユーザーの AccessKey ID と AccessKey シークレット。
説明STS から取得した一時的なアクセス認証情報を使用して OSS にアクセスする場合は、これを一時的な認証情報の AccessKey ID と AccessKey シークレットに設定します。
NTS****
AccessKeySecret
はい
7NR2****
SecurityToken
いいえ
一時的なアクセストークン。STS から取得した一時的なアクセス認証情報を使用して OSS にアクセスする場合は、このパラメーターを設定する必要があります。
STS.6MC2****
Expiration
いいえ
認証情報の有効期限。Expiration が空の場合、認証情報は期限切れになりません。認証情報が期限切れになると、OSS Connector は認証情報を再読み込みします。
2024-08-20T00:00:00Z
config.json ファイルを設定します。以下は構成例です。
コードプロジェクトで config.json ファイルを設定して、同時実行プロセス数やプリフェッチ設定などのコアパラメーターを管理できます。ログファイルの保存場所を定義することもできます。OSS Connector for AI/ML インターフェイスを使用する場合、config.json ファイルのパスを指定できます。システムは、読み取りの同時実行処理とプリフェッチ値を自動的に取得し、OSS データリクエストの関連ログを指定されたログファイルに出力します。
{
    "logLevel": 1,
    "logPath": "/var/log/oss-connector/connector.log",
    "auditPath": "/var/log/oss-connector/audit.log",
    "datasetConfig": {
        "prefetchConcurrency": 24,
        "prefetchWorker": 2
    },
    "checkpointConfig": {
        "prefetchConcurrency": 24,
        "prefetchWorker": 4,
        "uploadConcurrency": 64
    }
}
次の表に、設定項目を示します。
設定項目
必須
説明
値の例
logLevel
はい
ログレコードレベル。デフォルトは INFO です。有効値:
0: デバッグ
1: INFO
2: WARN
3: ERROR
1
logPath
はい
コネクタのログパス。デフォルトのパスは
/var/log/oss-connector/connector.logです。/var/log/oss-connector/connector.log
auditPath
はい
コネクタ I/O の監査ログ。レイテンシーが 100 ms を超える読み取りおよび書き込みリクエストを記録します。デフォルトのパスは
/var/log/oss-connector/audit.logです。/var/log/oss-connector/audit.log
DatasetConfig
prefetchConcurrency
はい
データセットを使用して OSS からデータをプリフェッチするときの同時タスクの数。デフォルト値は 24 です。
24
prefetchWorker
はい
データセットを使用して OSS からデータをプリフェッチするために使用できる vCPU の数。デフォルト値は 4 です。
2
checkpointConfig
prefetchConcurrency
はい
チェックポイント読み取りを使用して OSS からデータをプリフェッチするときの同時タスクの数。デフォルト値は 24 です。
24
prefetchWorker
はい
チェックポイント読み取りを使用して OSS からデータをプリフェッチするために使用できる vCPU の数。デフォルト値は 4 です。
4
uploadConcurrency
はい
チェックポイント書き込みを使用してデータをアップロードするときの同時タスクの数。デフォルト値は 64 です。
64
使用方法
OSS Connector for AI/ML は、OssMapDataset と OssIterableDataset の 2 つのデータセットアクセスインターフェイスを提供します。これらは、それぞれ PyTorch の Dataset および IterableDataset インターフェイスの拡張です。OssIterableDataset はプリフェッチに最適化されており、トレーニング効率が向上します。対照的に、OssMapDataset のデータ読み取り順序は DataLoader によって決定され、シャッフル操作をサポートします。したがって、次の提案に基づいてデータセットアクセスインターフェイスを選択できます。
メモリが限られているか、データ量が多い場合、シーケンシャル読み取りのみが必要で、大幅な並列処理が不要な場合は、OssIterableDataset を使用してデータセットを構築します。
逆に、十分なメモリがあり、データ量が少なく、ランダム操作と並列処理が必要な場合は、OssMapDataset を使用してデータセットを構築します。
OSS Connector for AI/ML は、モデルのロードと保存のための OssCheckpoint インターフェイスも提供します。現在、OssCheckpoint 機能は、一般的な計算リソース環境でのみ使用できます。
次の内容では、これら 3 つのインターフェイスの使用方法について説明します。
OssMapDataset
次の 3 つのデータセットアクセスモードをサポートしています。
OSS パスプレフィックスに基づいてフォルダーにアクセスする
この方法は、インデックスファイルを設定せずにフォルダー名を指定するだけで済むため、よりシンプルで直感的で、保守と拡張が容易です。OSS フォルダー構造が次のようになっている場合は、この方法を使用してデータセットにアクセスできます。
dataset_folder/
    ├── class1/
    │   ├── image1.JPEG
    │   └── ...
    ├── class2/
    │   ├── image2.JPEG
    │   └── ...
この方法を使用する場合、OSS パスプレフィックスを指定し、ファイルストリームの解析方法をカスタマイズする必要があります。以下は、画像ファイルを解析および変換する方法です。
def read_and_transform(data):
    normalize = transforms.Normalize(mean=[0.485, 0.456, 0.406],
                                     std=[0.229, 0.224, 0.225])
    transform = transforms.Compose([
        transforms.RandomResizedCrop(224),
        transforms.RandomHorizontalFlip(),
        transforms.ToTensor(),
        normalize,
    ])

    try:
        img = accimage.Image((data.read()))
        val = transform(img)
        label = data.label # ファイル名
    except Exception as e:
        print("read failed", e)
        return None, 0
    return val, label
dataset = OssMapDataset.from_prefix("{oss_data_folder_uri}", endpoint="{oss_endpoint}", transform=read_and_transform, cred_path=cred_path, config_path=config_path)
manifest_file に基づいてファイルにアクセスする
この方法は、複数の OSS バケットからのデータアクセスをサポートし、より柔軟なデータ管理アプローチを提供します。OSS フォルダー構造が次のようであり、ファイル名とラベルの関係を管理する manifest_file がある場合は、この方法を使用してデータセットにアクセスできます。
dataset_folder/
    ├── class1/
    │   ├── image1.JPEG
    │   └── ...
    ├── class2/
    │   ├── image2.JPEG
    │   └── ...
    └── .manifest
manifest_file のフォーマットは次のとおりです。
{'data': {'source': 'oss://examplebucket.oss-cn-wulanchabu.aliyuncs.com/dataset_folder/class1/image1.JPEG'}}
{'data': {'source': ''}}
この方法を使用する場合、manifest_file の解析方法をカスタマイズする必要があります。以下は使用例です。
def transform_oss_path(input_path):
    pattern = r'oss://(.*?)\.(.*?)/(.*)'
    match = re.match(pattern, input_path)
    if match:
        return f'oss://{match.group(1)}/{match.group(3)}'
    else:
        return input_path


def manifest_parser(reader: io.IOBase) -> Iterable[Tuple[str, str, int]]:
    lines = reader.read().decode("utf-8").strip().split("\n")
    data_list = []
    for i, line in enumerate(lines):
        data = json.loads(line)
        yield transform_oss_path(data["data"]["source"]), ""
dataset = OssMapDataset.from_manifest_file("{manifest_file_path}", manifest_parser, "", endpoint=endpoint, transform=read_and_trans, cred_path=cred_path, config_path=config_path)
OSS URI のリストに基づいてファイルにアクセスする
インデックスファイルを設定せずに、OSS URI を指定するだけで OSS ファイルにアクセスできます。以下は使用例です。
uris =["oss://examplebucket.oss-cn-wulanchabu.aliyuncs.com/dataset_folder/class1/image1.JPEG", "oss://examplebucket.oss-cn-wulanchabu.aliyuncs.com/dataset_folder/class2/image2.JPEG"]
dataset = OssMapDataset.from_objects(uris, endpoint=endpoint, transform=read_and_trans, cred_path=cred_path, config_path=config_path)
OssIterableDataset
OssIterableDataset は、OssMapDataset と同じ 3 つのデータセットアクセス方法をサポートしています。次の例は、これら 3 つの方法の使用方法を示しています。
OSS パスプレフィックスに基づいてフォルダーにアクセスする
dataset = OssIterableDataset.from_prefix("{oss_data_folder_uri}", endpoint="{oss_endpoint}", transform=read_and_transform, cred_path=cred_path, config_path=config_path)manifest_file に基づいてファイルにアクセスする
dataset = OssIterableDataset.from_manifest_file("{manifest_file_path}", manifest_parser, "", endpoint=endpoint, transform=read_and_trans, cred_path=cred_path, config_path=config_path)OSS URI のリストに基づいてファイルにアクセスする
dataset = OssIterableDataset.from_objects(uris, endpoint=endpoint, transform=read_and_trans, cred_path=cred_path, config_path=config_path)
OssCheckpoint
現在、OssCheckpoint 機能は、一般的な計算リソース環境でのみ使用できます。OSS Connector for AI/ML は、OssCheckpoint を介して OSS モデルファイルへのアクセスと OSS へのモデルファイルの保存をサポートしています。次の例は、インターフェイスの使用方法を示しています。
checkpoint = OssCheckpoint(endpoint="{oss_endpoint}", cred_path=cred_path, config_path=config_path)

checkpoint_read_uri = "{checkpoint_path}"
checkpoint_write_uri = "{checkpoint_path}"
with checkpoint.reader(checkpoint_read_uri) as reader:
    state_dict = torch.load(reader)
    model.load_state_dict(state_dict)
with checkpoint.writer(checkpoint_write_uri) as writer:
    torch.save(model.state_dict(), writer)
コード例
以下は、OSS Connector for AI/ML のサンプルコードです。このサンプルコードを使用して OSS データにアクセスできます。
from osstorchconnector import OssMapDataset, OssCheckpoint
import torchvision.transforms as transforms
import accimage
import torchvision.models as models
import torch

cred_path = "/mnt/.alibabacloud/credentials"  # DLC ジョブと DSW インスタンスのロール情報を設定した後のデフォルトの認証情報パス。
config_path = "config.json"
checkpoint = OssCheckpoint(endpoint="{oss_endpoint}", cred_path=cred_path, config_path=config_path)
model = models.__dict__["resnet18"]()

epochs = 100  # エポックを指定します
checkpoint_read_uri = "{checkpoint_path}"
checkpoint_write_uri = "{checkpoint_path}"
with checkpoint.reader(checkpoint_read_uri) as reader:
    state_dict = torch.load(reader)
    model.load_state_dict(state_dict)


def read_and_transform(data):
    normalize = transforms.Normalize(mean=[0.485, 0.456, 0.406],
                                     std=[0.229, 0.224, 0.225])
    transform = transforms.Compose([
        transforms.RandomResizedCrop(224),
        transforms.RandomHorizontalFlip(),
        transforms.ToTensor(),
        normalize,
    ])

    try:
        img = accimage.Image((data.read()))
        value = transform(img)
    except Exception as e:
        print("read failed", e)
        return None, 0
    return value, 0
dataset = OssMapDataset.from_prefix("{oss_data_folder_uri}", endpoint="{oss_endpoint}", transform=read_and_transform, cred_path=cred_path, config_path=config_path)
data_loader = torch.utils.data.DataLoader(
    dataset, batch_size="{batch_size}",num_workers="{num_workers"}, pin_memory=True)

for epoch in range(args.epochs):
    for step, (images, target) in enumerate(data_loader):
        # バッチ処理
        # モデルトレーニング
    # モデルの保存
    with checkpoint.writer(checkpoint_write_uri) as writer:
        torch.save(model.state_dict(), writer)
上記のコードの主要なステップは次のとおりです。
OssMapDataset を使用して、指定された OSS URI からデータセットを構築します。このデータセットは、標準の PyTorch Dataloader 使用パラダイムに従います。
このデータセットを使用して、標準の Torch Dataloader を構築します。次に、dataloader を反復処理して各バッチを処理し、モデルをトレーニングし、結果を保存することで、標準のトレーニングプロセスを実行します。
このプロセスでは、データセットをコンテナー環境にマウントしたり、データを事前にローカルに保存したりする必要がないため、オンデマンドのデータ読み込みが可能になります。
OSS SDK
OSS Python SDK
OSS Python SDK を使用して、OSS のデータを読み書きできます。手順は次のとおりです。
OSS SDK for Python をインストールします。詳細については、「インストール (Python SDK V1)」をご参照ください。
OSS SDK for Python のアクセス認証情報を設定します。詳細については、「Python SDK 1.0 を使用してアクセス認証情報を設定する」をご参照ください。
OSS データを読み書きします。
# -*- coding: utf-8 -*-
import oss2
from oss2.credentials import EnvironmentVariableCredentialsProvider

# 環境変数から取得した RAM ユーザーの AccessKey ペアを使用してアクセス認証情報を設定します。
auth = oss2.ProviderAuth(EnvironmentVariableCredentialsProvider())
bucket = oss2.Bucket(auth, '<Endpoint>', '<your_bucket_name>')
# ファイル全体を読み取ります。
result = bucket.get_object('<your_file_path/your_file>')
print(result.read())
# 範囲でデータを読み取ります。
result = bucket.get_object('<your_file_path/your_file>', byte_range=(0, 99))
# OSS にデータを書き込みます。
bucket.put_object('<your_file_path/your_file>', '<your_object_content>')
# 追加可能なファイルに追加します。
result = bucket.append_object('<your_file_path/your_file>', 0, '<your_object_content>')
result = bucket.append_object('<your_file_path/your_file>', result.next_position, '<your_object_content>')
必要に応じて、次の設定項目を変更します。
設定項目
説明
<Endpoint>
バケットが存在するリージョンのエンドポイント。たとえば、バケットが中国 (杭州) リージョンにある場合、このパラメーターを https://oss-cn-hangzhou.aliyuncs.com に設定します。エンドポイントの取得方法の詳細については、「リージョンとエンドポイント」をご参照ください。
<your_bucket_name>
バケット名を入力します。
<your_file_path/your_file>
読み書きするファイルのパス。バケット名を除いたオブジェクトの完全なパスを入力します (例:
testfolder/exampleobject.txt)。<your_object_content>
追加するコンテンツ。必要に応じて変更してください。
OSS Python API
OSS Python API を使用すると、トレーニングデータとモデルを OSS に簡単に保存できます。開始する前に、OSS Python SDK をインストールし、アクセス認証情報を正しく設定していることを確認してください。詳細については、「インストール (Python SDK V1)」および「アクセス認証情報の設定 (Python SDK V1)」をご参照ください。
トレーニングデータのロード
データを OSS バケットに保存し、データパスと対応するラベルを同じバケット内のインデックスファイルに配置できます。DataSet をカスタマイズすることで、PyTorch の
DataLoaderAPI を使用して、複数のプロセスを使用してデータを並行して読み取ることができます。次のコードは例を示しています。import io import oss2 from oss2.credentials import EnvironmentVariableCredentialsProvider import PIL import torch class OSSDataset(torch.utils.data.dataset.Dataset): def __init__(self, endpoint, bucket, auth, index_file): self._bucket = oss2.Bucket(auth, endpoint, bucket) self._indices = self._bucket.get_object(index_file).read().split(',') def __len__(self): return len(self._indices) def __getitem__(self, index): img_path, label = self._indices(index).strip().split(':') img_str = self._bucket.get_object(img_path) img_buf = io.BytesIO() img_buf.write(img_str.read()) img_buf.seek(0) img = Image.open(img_buf).convert('RGB') img_buf.close() return img, label # 環境変数からアクセス認証情報を取得します。このコードサンプルを実行する前に、OSS_ACCESS_KEY_ID および OSS_ACCESS_KEY_SECRET 環境変数が設定されていることを確認してください。 auth = oss2.ProviderAuth(EnvironmentVariableCredentialsProvider()) dataset = OSSDataset(endpoint, bucket, auth, index_file) data_loader = torch.utils.data.DataLoader( dataset, batch_size=batch_size, num_workers=num_loaders, pin_memory=True)主要な設定項目は次のとおりです。
主要な設定
説明
endpoint
バケットが存在するリージョンのエンドポイント。たとえば、バケットが中国 (杭州) リージョンにある場合、このパラメーターを https://oss-cn-hangzhou.aliyuncs.com に設定します。エンドポイントの取得方法の詳細については、「リージョンとエンドポイント」をご参照ください。
bucket
バケット名を入力します。
index_file
インデックスファイルのパス。
説明この例では、インデックスファイル内の各サンプルはカンマ (,) で区切られ、サンプルパスとラベルはコロン (:) で区切られます。
モデルの保存またはロード
OSS Python API を使用して、PyTorch モデルを保存またはロードできます。PyTorch モデルの保存またはロード方法の詳細については、「PyTorch」をご参照ください。以下に例を示します。
モデルの保存
from io import BytesIO
import torch
import oss2
from oss2.credentials import EnvironmentVariableCredentialsProvider

auth = oss2.ProviderAuth(EnvironmentVariableCredentialsProvider())
# バケット名
bucket_name = "<your_bucket_name>"
bucket = oss2.Bucket(auth, endpoint, bucket_name)
buffer = BytesIO()
torch.save(model.state_dict(), buffer)
bucket.put_object("<your_model_path>", buffer.getvalue())
各項目は次のとおりです。
endpoint は、バケットが配置されているリージョンのエンドポイントです。たとえば、中国 (杭州) の場合は、https://oss-cn-hangzhou.aliyuncs.com と入力します。
<your_bucket_name> は OSS バケットの名前です。名前は oss:// で始めることはできません。
<your_model_path> はモデルパスです。必要に応じてこのパスを変更してください。
モデルのロード
from io import BytesIO
import torch
import oss2
from oss2.credentials import EnvironmentVariableCredentialsProvider

auth = oss2.ProviderAuth(EnvironmentVariableCredentialsProvider())
bucket_name = "<your_bucket_name>"
bucket = oss2.Bucket(auth, endpoint, bucket_name)
buffer = BytesIO(bucket.get_object("<your_model_path>").read())
model.load_state_dict(torch.load(buffer))
各項目は次のとおりです。
endpoint は、バケットが配置されているリージョンのエンドポイントです。たとえば、中国 (杭州) の場合は、https://oss-cn-hangzhou.aliyuncs.com と入力します。
<your_bucket_name> は OSS バケットの名前です。名前は oss:// で始めることはできません。
<your_model_path> はモデルパスです。必要に応じてこのパスを変更してください。