MaxCompute はオープンコンピューティングプラットフォームです。OpenSearch にインポートするデータが MaxCompute によって生成される場合、MaxCompute プロジェクトをアプリケーションに接続できます。アプリケーションで再インデックスがトリガーされると、OpenSearch は MaxCompute プロジェクトのテーブルから自動的に全データを取得します。MaxCompute プロジェクトから増分データを取得するには、OpenSearch の API または SDK を使用する必要があります。
Alibaba Cloud アカウントの AccessKey ペアを設定する
OpenSearch のアプリケーションに MaxCompute プロジェクトを接続すると、OpenSearch システムは Alibaba Cloud アカウントの AccessKey ペアを使用して MaxCompute プロジェクトにアクセスし、MaxCompute プロジェクトのテーブルからデータをダウンロードします。MaxCompute プロジェクトを接続する前に、Alibaba Cloud アカウントの AccessKey ペアを設定していることを確認してください。
OpenSearch コンソールにログインするために使用する Alibaba Cloud アカウント内に MaxCompute プロジェクトが作成されていることを確認してください。
Alibaba Cloud アカウントの AccessKey ペアを使用して、Alibaba Cloud アカウント内に作成された MaxCompute プロジェクトのテーブルにアクセスできます。
セキュリティリスクを軽減するために、RAM ユーザーの AccessKey ペアを使用することもできます。RAM ユーザーを作成し、RAM ユーザーに権限を付与するには、次の手順を実行します。
Alibaba Cloud アカウントで RAM ユーザーを作成します。詳細については、RAM ユーザーの作成を参照してください。
MaxCompute コンソールにログインし、RAM ユーザーのメンバーを追加します。
要件に基づいて、追加されたメンバーにロールを割り当てます。
DataStudio ページで
list users;コマンドを実行して、追加されたメンバーのアカウントを表示します。

アカウント名をコピーし、次のコマンドを実行してアカウントに権限を付与します。xxx はコピーされたアカウント名を示します。
-- 1. MaxCompute プロジェクトに対する LIST 権限を付与します。
grant CreateInstance,List on project zy_ts_test to user xxx;

-- 2. MaxCompute テーブルに対する SELECT、DESCRIBE、および DOWNLOAD 権限を付与します。
GRANT select,describe,download ON TABLE people_info TO USER xxx;

-- 3. (オプション) MaxCompute テーブルに対するラベルベースの権限を付与します。
set label 2 to USER  xxx;

-- 特定のユーザーの権限と、ユーザーに割り当てられているロールに関する情報を照会します。
show grants for xxx;
RAM ユーザーを作成し、RAM ユーザーに権限を付与したら、OpenSearch コンソールで MaxCompute プロジェクトを設定できます。
MaxCompute データソースを設定する
[アプリケーションの設定] ページで、[アプリケーションスキーマ作成方法] セクションの [データソースを使用] をクリックします。

表示される [データソースの選択] パネルで、データソースとして [MaxCompute] を選択します。
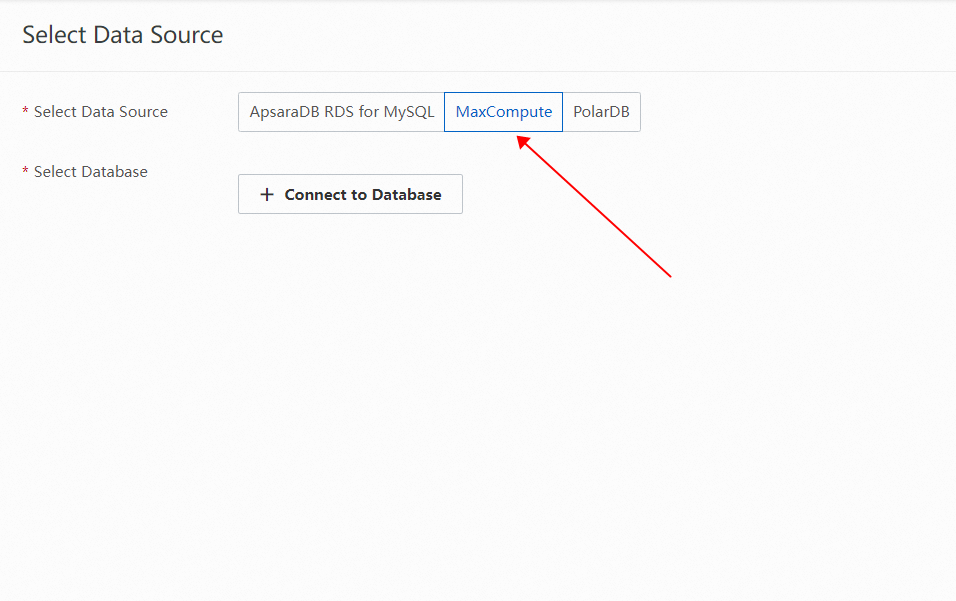
[データベースに接続] をクリックし、[プロジェクト名]、[AccessKey ID]、[AccessKey Secret] パラメーターを設定します。
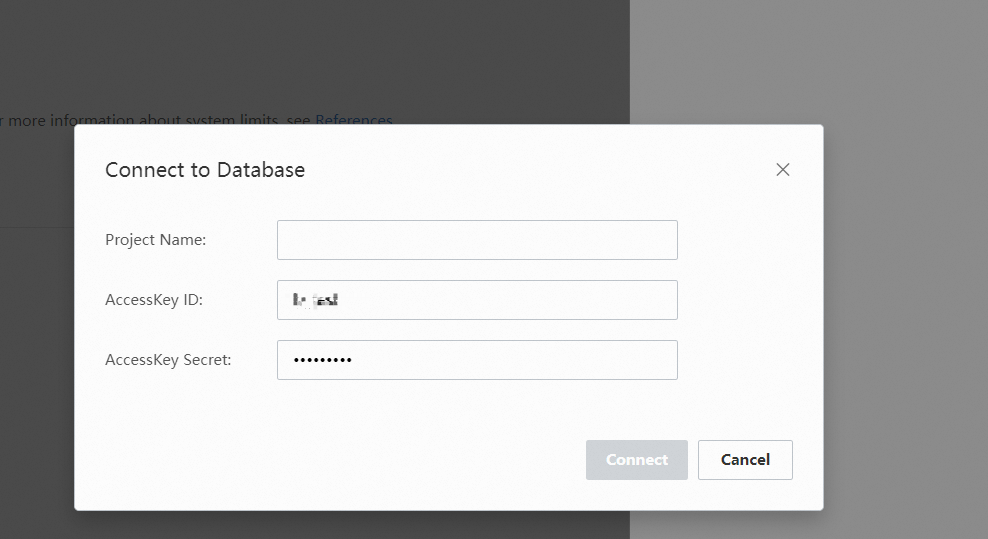
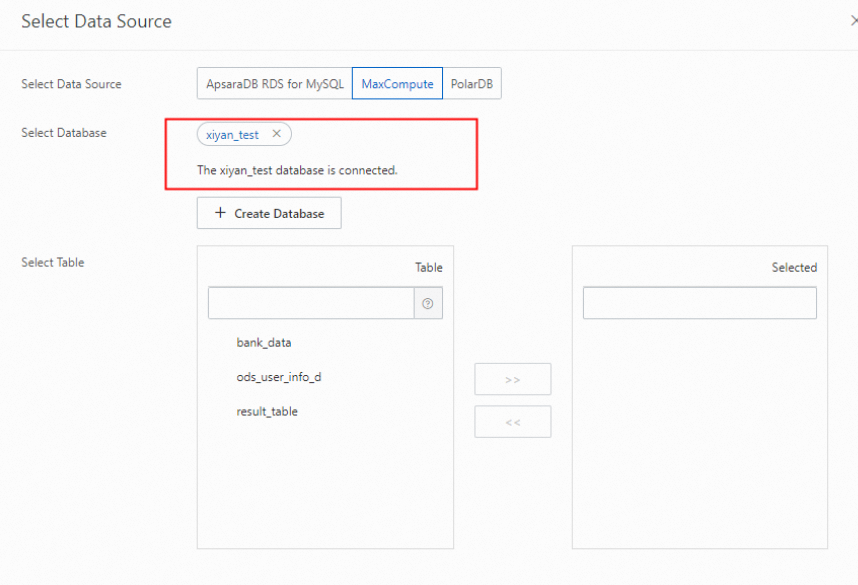
[接続] をクリックします。次に、1 つ以上のテーブルを選択します。
システムは対応するフィールドを自動的にマッピングします。ビジネス要件に基づいてフィールドを微調整できます。[次へ] をクリックします。

アプリケーションスキーマを設定する場合は、プライマリテーブルと一意のプライマリキーフィールドを各テーブルに作成する必要があります。
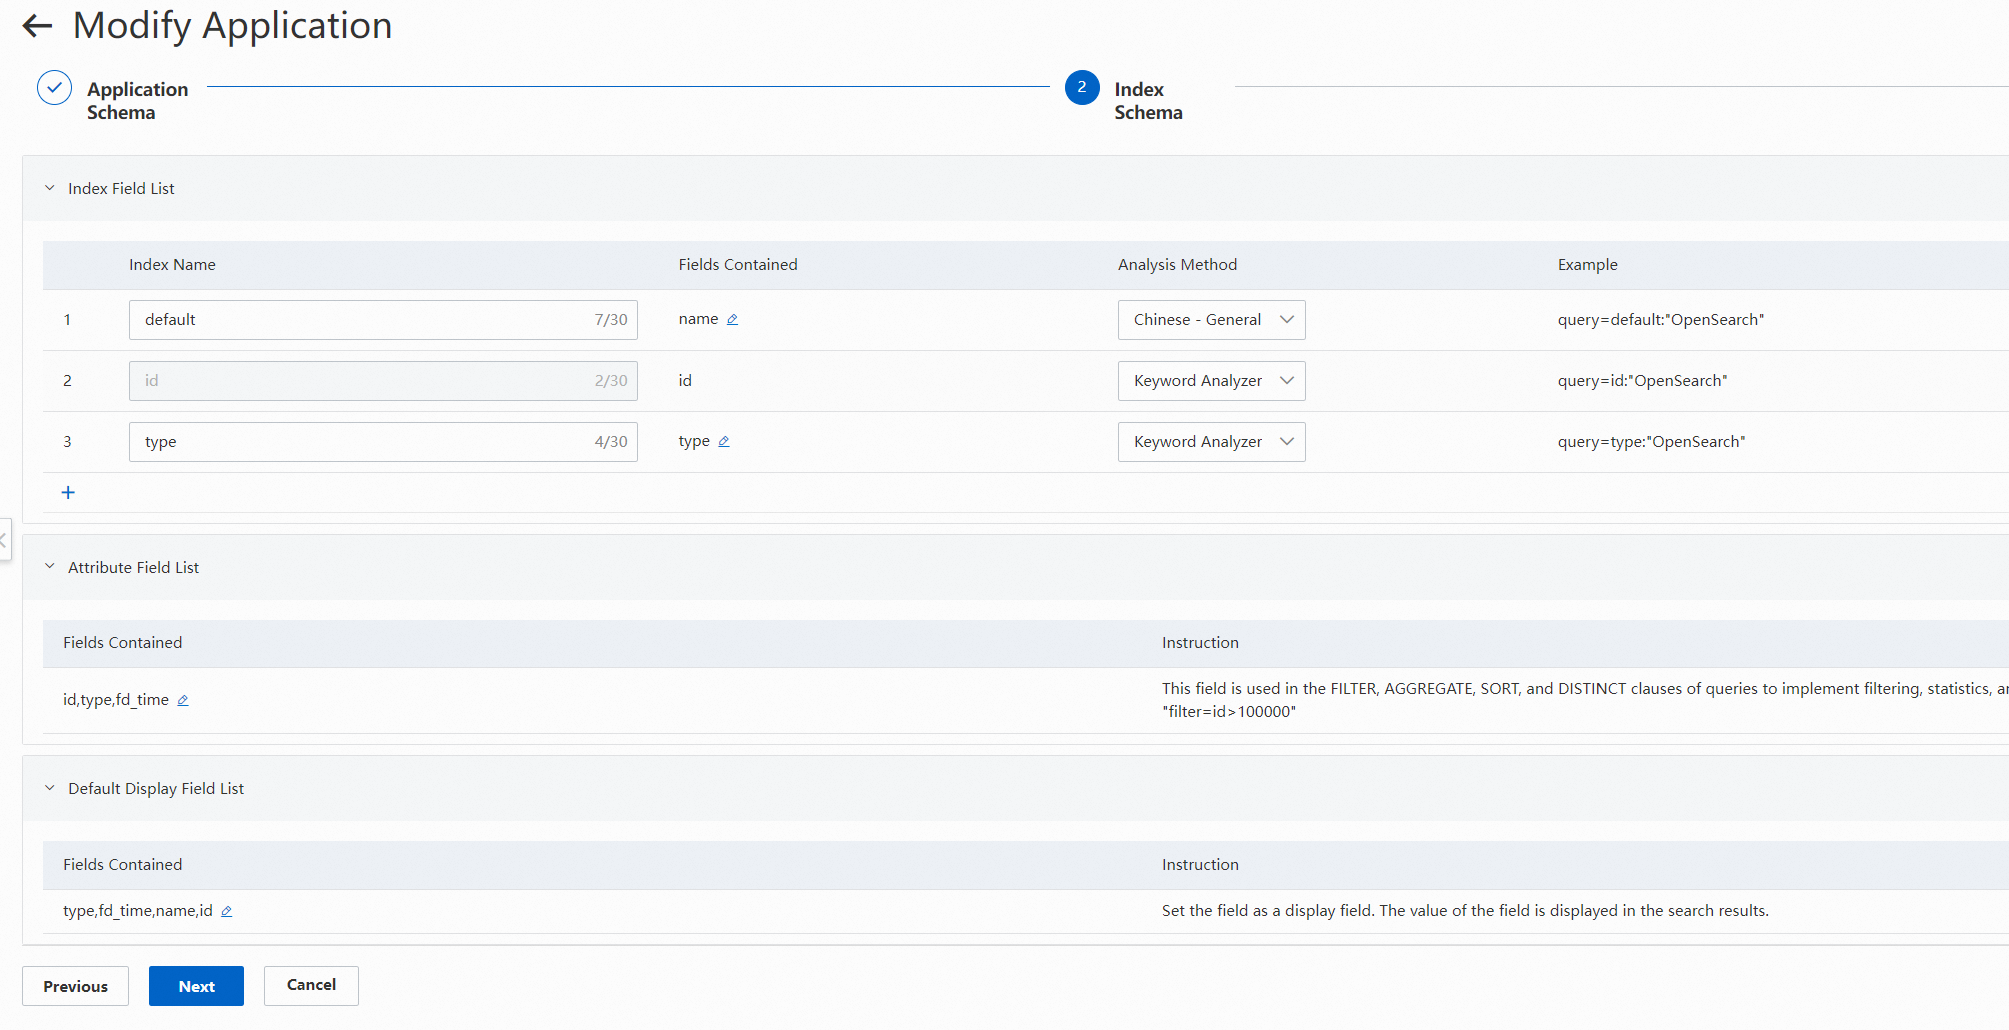
インデックススキーマを設定します。検索要件に基づいて適切なアナライザーを選択できます。詳細については、インデックススキーマを参照してください。次に、[次へ] をクリックします。
データソースを設定します。この手順では、フィールドマッピング、パーティション情報、およびデータ同期の同時実行制御を設定できます。
5.1 フィールドマッピングの設定: [アクション] 列の [編集] をクリックします。OpenSearch は、MaxCompute データ用に複数の データソースプラグイン を提供しています。プラグインを使用する必要がある場合は、フィールドマッピングを設定する際に、[コンテンツ変換] 列のプラス記号 (+) をクリックします。これにより、ソースフィールドは OpenSearch に同期される前に変換されます。構成エラーや接続障害などのエラーが原因でプラグインが機能しない場合は、ソースフィールドはコンテンツ変換なしで宛先フィールドに同期されます。
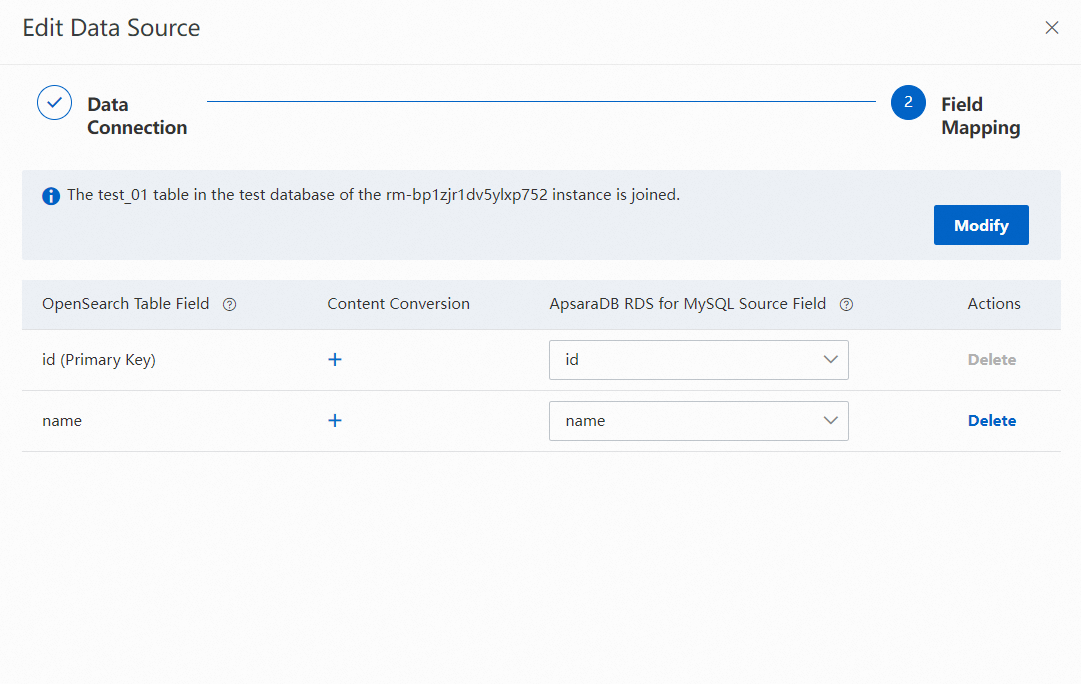
プラグインを設定します。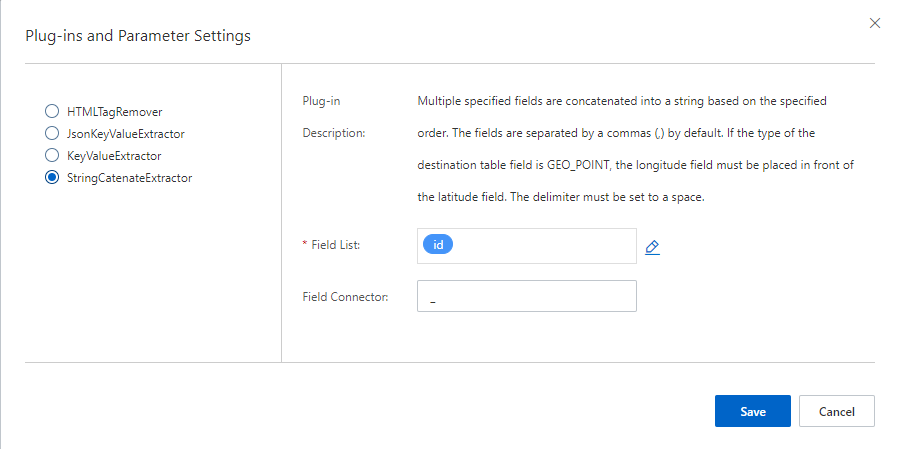
システムは、MaxCompute テーブルの DATETIME 型のデータをミリ秒に自動的に変換します。対応する OpenSearch フィールドの型を INT に設定する必要があります。
BIGINT、DOUBLE、BOOLEAN、DATETIME、STRING、DECIMAL の MaxCompute データ型がサポートされています。
5.2 パーティションを選択する:OpenSearch は正規表現をサポートしており、MaxCompute データの特性に基づいてインポートするデータのパーティションを選択できます。たとえば、次の図の正規表現は、前日のデータをインポートするように指定しています。[アプリケーションの詳細] ページで [再インデックス] をクリックして、スケジュールされた再インデックスタスクを作成できます。このようにして、増分パーティションデータを毎日インポートできます。
正規表現:等号 (=)、カンマ (,)、セミコロン (;)、二重縦棒 (||) はシステムの予約文字です。たとえば、ds=%Y%m%d || -1 days は、前日の指定されたパーティションの全データを自動的にインポートするように指定します。

ds はパーティションフィールドの名前を指定します。等号 (=) の両側にスペースなどの見えない文字は使用できません。
次のセクションでは、MaxCompute のパーティション条件を設定する方法について説明します。
1:セミコロン (;) で区切ることで、複数のパーティションフィルタールールを指定できます。たとえば、pt=1;pt=2 は、パーティションフィルタールール pt=1 または pt=2 を満たすすべてのパーティションに一致します。
2:カンマ (,) で区切ることで、パーティションフィルタールールに複数のパーティションフィールドを設定できます。たとえば、pt1=1,pt2=2,pt3=3 は、すべてのパーティション条件 pt1=1、pt2=2、pt3=3 を満たすすべてのパーティションに一致します。%Y%m%d || -1 days などの関数は複数のパーティションフィールドをサポートしていませんが、単一のパーティションフィールドをサポートしています。

例:前の図に示すように、MaxCompute テーブルの pt パーティションには ds 子パーティションが含まれています。
複数のパーティションを指定する:pt=1;pt=2 は、pt=1 および pt=2 パーティションのすべてのデータの同期を指定します。
複数のパーティションフィールドを設定する:pt=1,ds=1 は、pt=1 パーティションの ds=1 子パーティションのデータの同期を指定します。
pt=1,ds=%Y%m%d || -1 days または pt=1;pt=%Y%m%d || -1 days はサポートされていません。
3:パーティションフィールドの値はアスタリスク (*) にすることができます。これは、パーティションフィールドの値が任意の値になることを示します。この場合、このフィールドはフィルタールールではオプションです。
4:パーティションフィールドの値には正規表現を含めることができます。たとえば、pt=[0-9]* は、pt 値が数値であるすべてのパーティションに一致します。
5:パーティションフィールドの値は時間照合をサポートしています。フィルタールールは次の形式です。pt=フォーマットされた時間を含むパーティションフィールド値 || 時間間隔式。たとえば、ds=%Y%m%d || -1 days は、パーティションフィールドが ds で、フォーマットされた時間が 20150510 で、前日のデータが必要であることを示します。
5.1 フォーマットされた時間パラメーターは、標準の時間形式パラメーターにすることができます。
5.2 時間間隔式は、次の形式にすることができます。+/- n week|weeks|day|days|hour|hours|minute|minutes|second|seconds|microsecond|microseconds。プラス記号 (+) は、スケジュールされた再インデックスタスクが作成されてから N 週間、N 日、N 時間、N 分、N 秒、または N ミリ秒後を示します。マイナス記号 (-) は、スケジュールされた再インデックスタスクが作成される N 週間、N 日、N 時間、N 分、N 秒、または N ミリ秒前を示します。
5.3 デフォルトでは、システムはすべてのフィルタールールで +0 days 条件を使用して時間パラメーターを変換します。したがって、フィルタリングに使用されるフィールド値には、次の文字列を通常の文字列パラメーターとして含めることはできません。たとえば、水曜日に作成されたタスクの場合、pt=%abc は、pt 値が %abc ではなく Wedbc であるパーティションに一致します。
次のリストは、正規表現に含めることができるすべてのパラメーターを示しています。
%d: 月の日付。
%H: 24 時間制の時間。有効な値: [0, 23]。
%m: 年の月。有効な値: [01, 12]。
%M: 分。有効な値: [00, 59]。
%S: 秒。有効な値: [00, 61]。
%y: 2 桁で表される年。
%Y: 4 桁で表される年。
5.3. データ同期の同時実行制御を設定する:
[DONE ファイルを使用] を選択すると、DONE ファイルをアップロードして、OpenSearch が全データをプルするタイミングを制御できます。これにより、データの整合性が確保されます。OpenSearch が MaxCompute から全データをプルする前に、OpenSearch は当日の DONE ファイルが存在するかどうかを確認します。ファイルが存在しない場合、OpenSearch は DONE ファイルが表示されるまで待機します。デフォルトのタイムアウト期間は 1 時間です。
MaxCompute の公式 Web サイトから MaxCompute クライアント (odpscmd) をダウンロードする必要があります。パッケージのファイル名は odps_clt_release_64.tar.gz です。
必要な MaxCompute プロジェクトに対する CreateResource 権限が必要です。
MaxCompute クライアントをインストールしたら、MaxCompute クライアントで次のコマンドを実行します。DONE ファイルの名前は $prefix_%Y-%m-%d 形式です。$prefix:デフォルトでは、DONE ファイルの名前のプレフィックスはテーブル名です。%Y-%m-%d はスケジュールされた再インデックスタスクの日付を指定します。スケジュールされた再インデックスタスクの最小間隔は 1 日です。
odpscmd -u accessid -p accesskey --project=<prj_name>-e "add file <done file>;"MaxCompute クライアントでの odpscmd の使用方法の詳細については、MaxCompute クライアント (odpscmd) を参照してください。
DONE ファイルの内容は JSON 形式です。DONE ファイルには、現在の全データのミリ秒単位のタイムスタンプのみを含める必要があります。システムは過去 3 日間の増分データのみを保持します。したがって、タイムスタンプで指定された時点は、過去 3 日以内である必要があります。
DONE ファイルのタイムスタンプは、プルする増分データの時点を示します。タイムスタンプを指定しない場合、スケジュールされた再インデックスタスクの開始時刻からの増分データが追加されます。OpenSearch は過去 3 日間の増分データのみを保持します。したがって、時点は過去 3 日以内である必要があります。
たとえば、全データが当日の 09:00 に生成され、MaxCompute が 10:00 に全データを処理し、OpenSearch のスケジュールされた再インデックスタスクが 10:30 に開始されるとします。MaxCompute が全データを処理した後、当日の 09:00 以降の増分データが追加されます。データの整合性を確保するために、DONE ファイルに当日の 09:00 に対応するタイムスタンプをミリ秒単位で指定する必要があります。そうしないと、スケジュールされた再インデックスタスクのデフォルトの開始時刻である 10:30 以降の増分データが追加されます。09:00 から 10:30 までの増分データは失われます。注意して進めてください。増分データが生成されない場合は、タイムスタンプを指定する必要はありません。
次のサンプルコードは、高度なアプリケーションの DONE ファイルの内容の例を示しています。DONE ファイルのタイムスタンプは、増分データを追加するために使用されます。同様の方法を使用して、標準アプリケーションの DONE ファイルにタイムスタンプを指定できます。
{
"timestamp":"1234567890000"
}
DONE ファイルとデータ時間の優先順位:
MaxCompute データソースのデータ時間は必須であり、DONE ファイルよりも優先されます。
アプリケーションのバージョンを 1 つだけ作成する場合は、データ時間のみを指定する必要があります。この場合、DONE ファイルのみを使用することはできません。
スケジュールされた再インデックスタスクを使用する必要がある場合は、データ時間と DONE ファイルの両方を指定する必要があります。最初のバージョンでは、データ時間が DONE ファイルよりも優先されます。後続のバージョンでは、DONE ファイルがデータ時間よりも優先されます。
使用上の注意
MaxCompute データソースは完全同期のみをサポートし、増分同期はサポートしていません。