データディザスタリカバリは、MySQL データベースの地理的冗長性、長期アーカイブ、単一テーブルリストアなどの機能を提供します。このトピックでは、データディザスタリカバリを使用して ApsaraDB RDS for MySQL インスタンスを自動的にバックアップし、インスタンスのデータをリストアする方法について説明します。
バックアップスケジュールの作成
詳細については、「バックアップスケジュールの作成」をご参照ください。
バックアップスケジュールを購入する際は、データソースタイプパラメータを MySQL に、バックアップメソッドパラメータを 論理バックアップ に設定します。
データディザスタリカバリが MySQL データベースをバックアップおよびリストアする際の粒度については、「サポートされているデータベースの種類と機能」をご参照ください。
論理バックアップに加えて、データディザスタリカバリでは、物理バックアップを使用して、自己管理 MySQL データベースの完全データ、増分データ、バイナリログをバックアップすることもできます。詳細については、「サードパーティクラウドまたは自己管理 MySQL データベースでホストされている MySQL データベースを物理的にバックアップまたはリストアする」および「論理バックアップ、物理バックアップ、スナップショット」をご参照ください。
バックアップスケジュールの構成
DMS コンソール V5.0 にログインします。
上部のナビゲーションバーで、 を選択します。
説明DMS コンソールをシンプルモードで使用している場合は、DMS コンソールの左上隅にある
 アイコンにポインタを移動し、 を選択します。
バックアップスケジュール ページで、構成するバックアップスケジュールを見つけ、バックアッププランの設定 を 操作 列でクリックします。

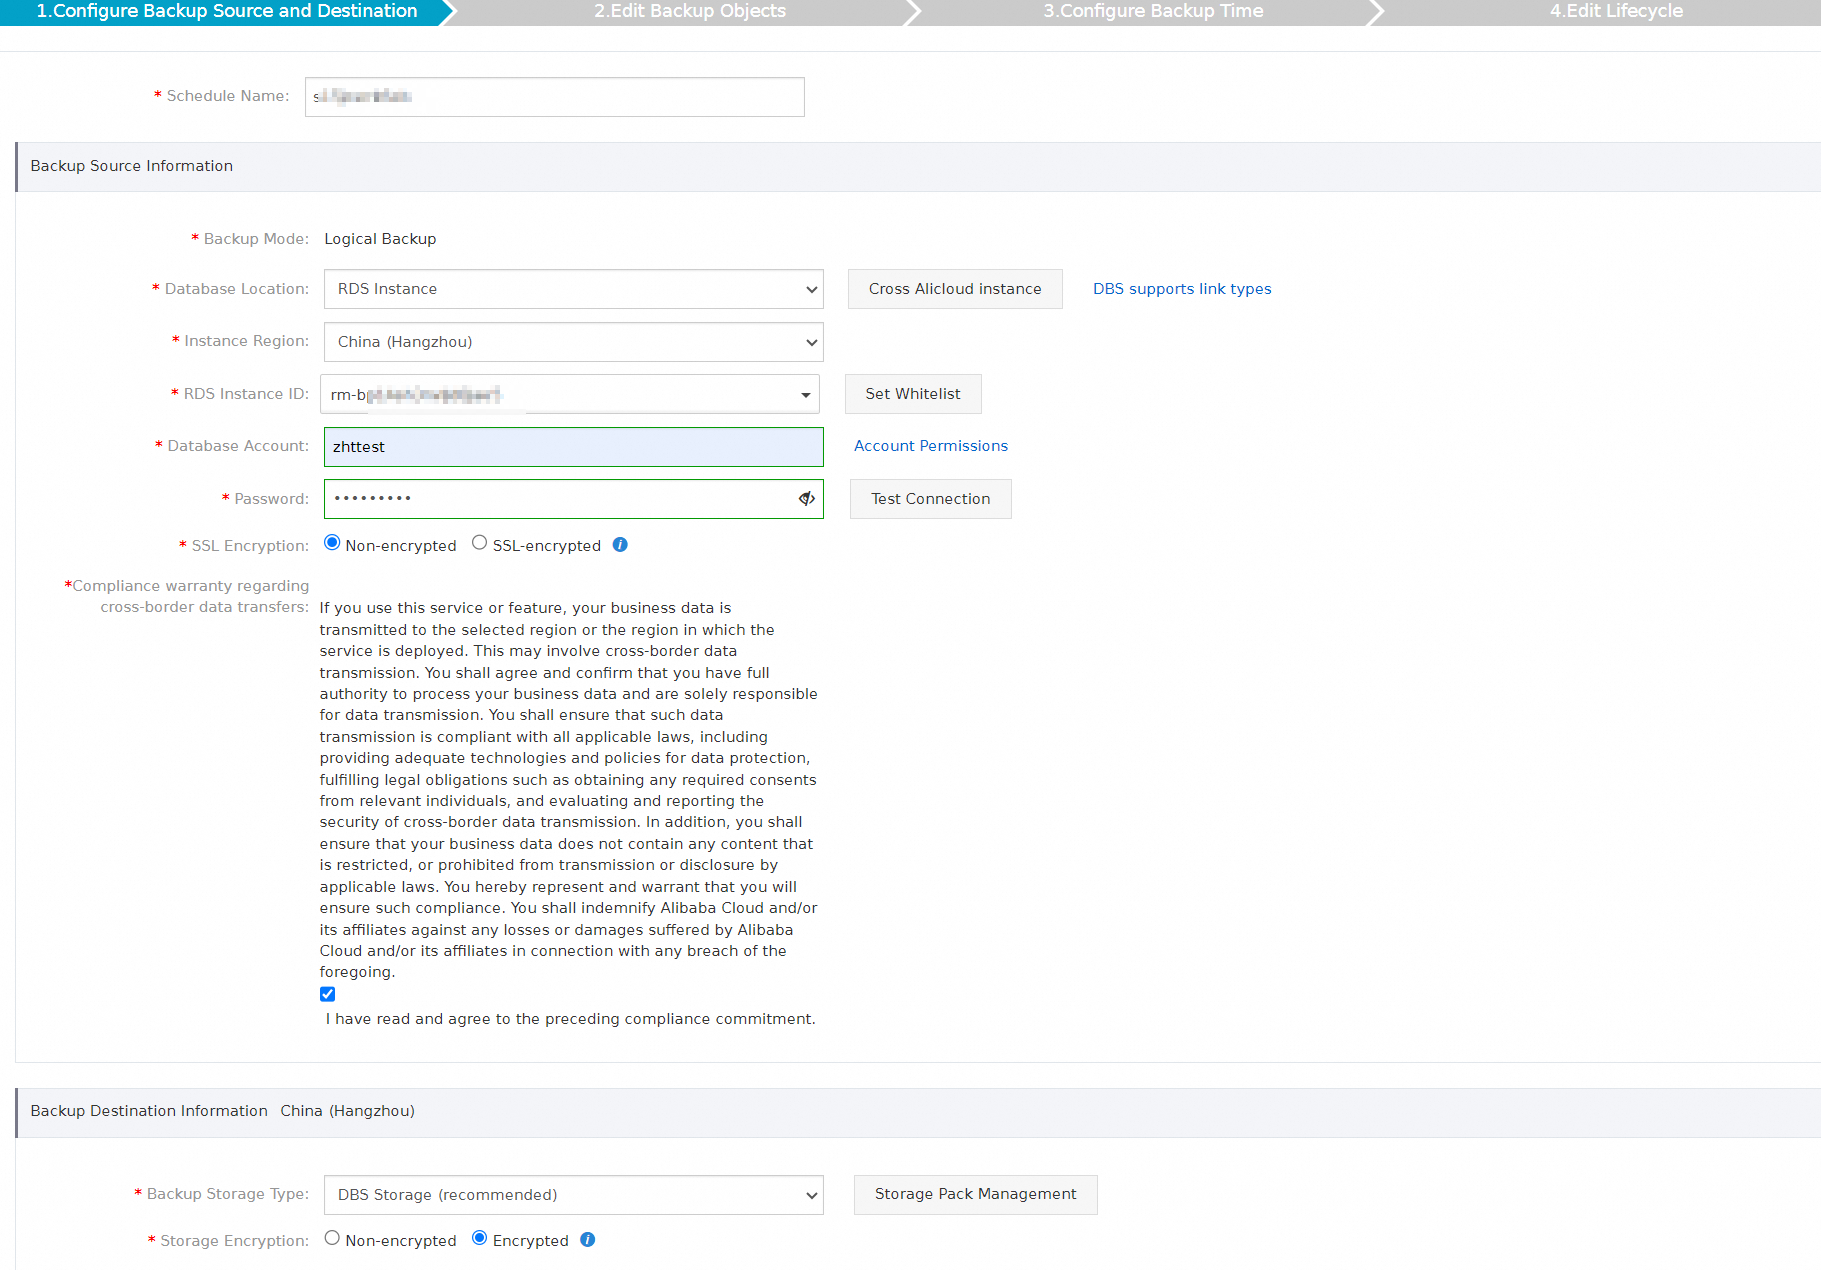
バックアップソースと対象の設定 ステップで、バックアップソースと宛先を構成し、ページの右下隅にある [次へ] をクリックします。

表 1. パラメーター
セクション
パラメーター
説明
該当なし
[スケジュール名]
バックアップスケジュールの名前です。DBS は自動的にバックアップスケジュール名を生成します。識別しやすい説明的な名前を入力することをお勧めします。バックアップスケジュール名は一意である必要はありません。
バックアップソース情報
[バックアップモード]
データのバックアップに使用するメソッドです。デフォルトでは、バックアップスケジュールを購入したときに選択したバックアップメソッドが使用されます。この例では、論理バックアップ が使用されます。
[データベースの場所]
RDS インスタンス
[インスタンスリージョン]
ソースデータベースインスタンスが存在するリージョンです。
説明[データベースの場所] パラメーターを RDS インスタンス、PolarDB、ECS 上の自作データベース、または インターネット IP アドレスなし : Port の自作データベース (データベースゲートウェイ DG を介したアクセス) に設定した場合にのみ、このパラメーターが表示されます。
[RDS インスタンス ID]
バックアップする ApsaraDB RDS インスタンスの ID です。
[データベースアカウント]
バックアップするデータベースへの接続に使用するアカウントのユーザー名です。アカウントには、データベースをバックアップするための権限が必要です。詳細については、「アカウント権限」をご参照ください。
説明ApsaraDB RDS データベースの場合、バックアップには読み取り専用の権限が必要であり、バックアップとリストアには読み取りと書き込みの権限が必要です。
[パスワード]
バックアップするデータベースへの接続に使用するアカウントのパスワードです。
データベースアカウントのユーザー名とパスワードを入力した後、パスワードの横にある 接続テスト をクリックして、データベース情報が有効かどうかを確認します。指定したパラメーターが有効な場合は、「テストに合格しました」メッセージが表示されます。「テストに失敗しました」メッセージが表示された場合は、「テストに失敗しました」の横にある [確認] をクリックします。確認結果に基づいて、ソースデータベースに関する情報を変更します。
[SSL 暗号化]
バックアップデータの転送に使用する接続方法です。有効な値:
暗号化されていない接続。
SSL セキュア接続: SSL は、転送中のデータのセキュリティと整合性を向上させるために、トランスポート層でネットワーク接続を暗号化します。ただし、SSL を使用すると、ネットワーク接続の応答時間が長くなります。
説明SSL セキュア接続 を選択する場合は、バックアップスケジュールを設定する前に、ApsaraDB RDS インスタンスで SSL 暗号化を有効にする必要があります。詳細については、「クラウド証明書を使用して SSL 暗号化を有効にする」トピックの 手順 1: RDS インスタンスの SSL 暗号化機能を有効にする セクションをご参照ください。
[国境を越えたデータ転送に関するコンプライアンス保証]
チェックボックスを選択して、コンプライアンスのコミットメントを読み、同意します。
バックアップ対象情報
[バックアップストレージタイプ]
バックアップデータの保存に使用するストレージのタイプです。有効な値:
[DBS ストレージ (推奨)]: バックアップデータは、Object Storage Service (OSS) バケットを作成する必要なく、データディザスタリカバリに保存されます。データディザスタリカバリに保存されているデータの量に基づいて課金されます。課金方法の詳細については、「料金」をご参照ください。
ユーザー OSS: 事前に OSS コンソールでバケットを作成する必要があります。詳細については、「バケットの作成」をご参照ください。
説明この例では、[DBS ストレージ (推奨)] が選択されています。[ユーザー向け OSS] を選択した場合は、[OSS バケット名] パラメーターを設定する必要があります。標準ストレージタイプのみがサポートされています。
バックアップするデータの量が多い場合は、サブスクリプションストレージプランを購入して料金を相殺することをお勧めします。ストレージプランは、従量課金よりも費用対効果が高くなります。
[ストレージの暗号化]
保存されたデータの暗号化に使用するメソッドです。有効な値:
内蔵暗号化ストレージ (推奨): 保存されたデータの暗号化に AES-256 が使用されます。
OSS では、サーバ側暗号化機能が使用されます。サーバ側暗号化が有効になっているバケットにオブジェクトをアップロードすると、OSS はオブジェクトを暗号化して保存します。暗号化されたオブジェクトを OSS からダウンロードすると、OSS はオブジェクトを復号化し、復号化されたオブジェクトを返します。
非暗号化ストレージ: バックアップデータは暗号化されません。
バックアップ対象の設定 手順で、[利用可能] セクションにあるバックアップ対象のデータベースまたはテーブルを見つけます。右向き矢印をクリックして、選択したデータベースまたはテーブルを 選択したデータベースオブジェクト セクションに追加します。次に、[次へ] をクリックします。
説明データディザスタリカバリを使用すると、単一のテーブル、単一のデータベース、または複数のデータベースをバックアップできます。 [利用可能] セクションの左下隅にある [すべて選択] をクリックすると、すべてのデータベースを選択できます。サポートされているバックアップオブジェクトは、データベースの種類によって異なります。詳細については、「サポートされているデータベースの種類と機能」をご参照ください。
デフォルトでは、バックアップスケジュールが作成された後に作成されたデータベースをバックアップスケジュールを使用してバックアップすることはできません。このようなデータベースをバックアップするには、バックアップスケジュールの [タスクの設定] ページで、データベースをバックアップスケジュールに追加します。詳細については、「バックアップオブジェクトの変更」をご参照ください。
バックアップ時間の設定 ステップで、次の表に示すパラメーターを設定し、[次へ] をクリックします。
パラメーター
説明
フルバックアップ頻度
バックアップスケジュールの頻度。有効な値: 定期的なバックアップ および 単一バックアップ。
説明定期的なバックアップ を選択した場合は、完全データバックアップの頻度 パラメーターと 開始時刻 パラメーターを設定する必要があります。
完全データバックアップの頻度
データディザスタリカバリがバックアップスケジュールを実行する曜日。1 つ以上の曜日を選択できます。少なくとも 1 つの曜日を選択してください。
開始時刻
バックアップの開始時刻。オフピーク時の時刻を指定することをお勧めします。例: 01:00。
説明次のバックアップの開始時刻に前の完全データバックアップが完了していない場合、データディザスタリカバリは次のバックアップをスキップします。
増分バックアップ
増分バックアップを有効にするかどうかを指定します。
説明増分バックアップを有効にする前に、バックアップするデータベースでバイナリロギング機能が有効になっていることを確認してください。 デフォルトでは、ApsaraDB RDS for MySQL データベースではバイナリロギング機能が有効になっています。自己管理データベースを使用する場合は、バイナリロギング機能を手動で有効にする必要があります。
このパラメーターは、フルバックアップ頻度 パラメーターを 定期的なバックアップ に設定した場合にのみ表示されます。
完全データバックアップの最大同時スレッド数
完全バックアップに使用できる同時スレッドの最大数。このパラメーターを設定して、バックアップ速度を調整できます。たとえば、バックアップスレッドの数を減らして、データベースへの影響を最小限に抑えることができます。
バックアップネットワーク速度制限
ネットワーク帯域幅の制限。単位: MB/s。ビジネス要件に基づいて制限を設定できます。デフォルト値 0 は、ネットワーク帯域幅が無制限であることを示します。
ライフサイクルの設定 ステップの [完全データ バックアップ ライフサイクルの設定] セクションで、完全バックアップ データのライフサイクルを設定します。
ステップ 6 で [増分バックアップ] パラメーターを [有効] に設定した場合は、増分バックアップ データのライフサイクルを設定する必要があります。バックアップ データのライフサイクルルールについて詳しくは、「バックアップセットのライフサイクルルールを管理するにはどうすればよいですか。」をご参照ください。
上記の設定が完了したら、ページの右下隅にある 事前チェックして開始する をクリックします。
[事前チェック合格] メッセージが表示されたら、今すぐ起動する をクリックします。
説明バックアップスケジュールの [状態] が [実行中] に変わると、バックアップスケジュールが有効になります。
バックアップスケジュールの開始時に例外またはエラーが発生した場合は、できるだけ早く例外またはエラーのトラブルシューティングを行ってください。詳細については、「DBS で異常なバックアップスケジュールのエラーを修正する方法」をご参照ください。上記のトピックで提供されているソリューションを使用しても問題が解決しない場合は、DBS DingTalk グループ(ID: 35585947)のテクニカルサポートに連絡してください。
データの復元
- DMS コンソール V5.0 にログオンします。
上部のナビゲーションバーで、 を選択します。
説明DMS コンソールをシンプルモードで使用している場合は、DMS コンソールの左上隅にある
 アイコンにポインタを移動し、 を選択します。
[バックアップスケジュール] ページで、管理するバックアップスケジュールを見つけ、[アクション] 列の [管理] をクリックします。アクション
バックアップタスクの設定 ページで、右上隅にある データベースの復元 をクリックします。
復元タスクの作成ウィザードの 復元時点の設定 ステップで、次の表に示すパラメータを設定し、[次へ] をクリックします。
説明この例では、バックアップデータは新しいデータベースインスタンスに復元されます。 [ターゲットデータベースインスタンスタイプ] パラメータを 既存のインスタンスを使用する に設定する場合は、さらにパラメータを設定する必要があります。 詳細については、「論理バックアップを使用して ApsaraDB RDS for MySQL インスタンスまたは自己管理 MySQL データベースをバックアップする」トピックの表 1 をご参照ください。
セクション
パラメータ
説明
該当なし
復元タスク名
タスクの名前。 データディザスタリカバリは、タスク名を自動的に生成します。 タスクを識別しやすい名前を指定することをお勧めします。 タスク名は一意である必要はありません。
復元時点
[復元可能な時間範囲]
最初の完全バックアップセットが作成された時点から、最新の完全バックアップセットが作成された時点までの時間範囲。 ソースデータベースは、この時間範囲内の任意の時点に復元できます。
[復元先]
ソースデータベースを復元する時点。この時点は、[復元可能な時間範囲] パラメーターで指定された時間範囲内である必要があります。
説明増分バックアップ機能が有効になっている場合、データディザスタリカバリでは、最初の完全バックアップの完了から最後の増分バックアップの完了までの任意の時点にデータを復元できます。
増分バックアップ機能が無効になっている場合、データディザスタリカバリでは、完全バックアップが完了した時点にデータを復元できます。
[ターゲットデータベースの設定]
[ターゲットデータベースインスタンスタイプ]
データを復元するデータベースインスタンスタイプ。 有効値: [新規 (推奨)] および 既存のインスタンスを使用する。
説明既存のインスタンスを使用する を選択した場合は、復元操作を実行するときにターゲットデータベースが使用可能であることを確認してください。
[データベースの場所]
[ターゲットデータベースインスタンスタイプ] が [新規 (推奨)] に設定されている場合は、[RDS インスタンス] を選択します。
[ターゲット データベース インスタンス タイプ] が 既存のインスタンスを使用する に設定されている場合は、次のオプションのいずれかを選択できます。
インターネット IP アドレスなし : Port の自作データベース (データベースゲートウェイ DG を介したアクセス)
インターネット IP アドレス : Port の自作データベースがあります
ECS 上の自作データベース
RDS インスタンス
専用線、VPN ゲートウェイ、インテリジェントゲートウェイを介して接続されたユーザー自作データベース
PolarDB
[インスタンスリージョン]
新しいデータベースインスタンスが存在するリージョン。
ターゲットデータベースインスタンスが存在するリージョンを選択します。
説明
[VPC]
新しいデータベースインスタンスがデプロイされる仮想プライベートクラウド (VPC)。
説明VPC の作成方法については、「VPC の作成と管理」をご参照ください。
[DB インスタンスクラス]
新しいデータベースインスタンスタイプ。 コンソールに表示される使用可能なインスタンスタイプからインスタンスタイプを選択します。
説明ソースデータベースインスタンスと同じインスタンスタイプ、またはより高い仕様のインスタンスタイプを選択することをお勧めします。
[ストレージ容量 (GB)]
新しいデータベースインスタンスのストレージ容量。 コンソールに表示される使用可能なストレージ容量サイズからサイズを選択します。
説明データベースインスタンスにバックアップデータを復元するのに十分な容量があることを確認するために、ソースデータベースインスタンスのサイズの少なくとも 1.3 倍、または DBS 完全バックアップセットのサイズの 5 ~ 6 倍のストレージ容量サイズを選択することをお勧めします。 データディザスタリカバリがバックアップを実行するときに、データは圧縮されます。
[データベースタイプ]
データベースタイプ。 デフォルト値: MySQL。
説明このパラメータは、[データベースの場所] パラメータを インターネット IP アドレス : Port の自作データベースがあります、PolarDB、ECS 上の自作データベース、専用線、VPN ゲートウェイ、インテリジェントゲートウェイを介して接続されたユーザー自作データベース、または インターネット IP アドレスなし : Port の自作データベース (データベースゲートウェイ DG を介したアクセス) に設定した場合にのみ表示されます。
[ゲートウェイインスタンス ID]
database gateway の ID。
説明このパラメータは、[データベースの場所] パラメータを [パブリックネットワーク IP なし: ポートの自己構築データベース (database Gateway 経由でアクセス)] に設定した場合にのみ表示されます。
[polardb インスタンス ID]
データを復元する PolarDB クラスタの ID。
[RDS インスタンス ID]
データを復元する ApsaraDB RDS インスタンスの ID。
[ECS インスタンス ID]
ターゲットデータベースがデプロイされている Elastic Compute Service (ECS) インスタンスの ID。
説明このパラメータは、[データベースの場所] パラメータを [ECS ホスト型データベース] に設定した場合にのみ表示されます。
[アドレス]
データを復元するデータベースインスタンスに接続するために使用されるエンドポイント。
説明インスタンスがデプロイされているサーバーでファイアウォール設定などのネットワークセキュリティ設定が指定されている場合は、ホワイトリストを追加する方法 をクリックしてデータディザスタリカバリの CIDR ブロックを取得し、サーバーのホワイトリストに CIDR ブロックを追加します。 これにより、データディザスタリカバリはサーバーにアクセスできます。
このパラメータは、[データベースの場所] パラメータを インターネット IP アドレスなし : Port の自作データベース (データベースゲートウェイ DG を介したアクセス)、専用線、VPN ゲートウェイ、インテリジェントゲートウェイを介して接続されたユーザー自作データベース、または インターネット IP アドレス : Port の自作データベースがあります に設定した場合にのみ表示されます。
[ポート番号]
ターゲットデータベースに接続するために使用されるポート番号。
説明このパラメータは、[データベースの場所] パラメータを [apsaradb For Mongodb] に設定した場合には表示されません。
[データベースアカウント]
データベースに接続するために使用されるアカウントのユーザー名。 アカウントには、データベースをバックアップするための権限が必要です。 詳細については、「アカウント権限」をご参照ください。
説明ApsaraDB RDS データベースの場合、バックアップには読み取り専用権限が必要であり、バックアップと復元には読み取りと書き込みの権限が必要です。
[パスワード]
データベースに接続するために使用されるアカウントのパスワード。
説明データベースアカウントのユーザー名とパスワードを入力した後、パスワードの横にある 接続テスト をクリックして、データベース情報が有効かどうかを確認します。 指定されたパラメータが有効な場合は、「テストに合格しました」メッセージが表示されます。 「テストに失敗しました」メッセージが表示された場合は、「テストに失敗しました」の横にある [確認] をクリックします。 確認結果に基づいて、ソースデータベースに関する情報を変更します。
[SSL 暗号化]
バックアップデータを送信するために使用される接続方法。 有効値:
暗号化されていない接続。
SSL セキュア接続: SSL は、転送中のデータのセキュリティと整合性を向上させるために、トランスポート層でネットワーク接続を暗号化します。 ただし、SSL はネットワーク接続の応答時間を増加させます。
説明SSL セキュア接続 を選択する場合は、バックアップスケジュールを設定する前に、ApsaraDB RDS インスタンスの SSL 暗号化を有効にする必要があります。 詳細については、「クラウド証明書を使用して SSL 暗号化を有効にする」トピックの ステップ 1: RDS インスタンスの SSL 暗号化機能を有効にする セクションをご参照ください。
[ピア VPC]
ターゲットデータベースが存在する仮想プライベートクラウド (VPC)。
説明このパラメータは、[データベースの場所] パラメータを [express Connect DB/VPN Gateway/インテリジェントゲートウェイ] に設定した場合にのみ表示されます。
[国境を越えたデータ転送に関するコンプライアンス保証]
チェックボックスを選択して、コンプライアンスに関する声明を読んで同意します。
復元オブジェクトの設定 ステップで、次の表に示すパラメータを設定し、事前チェックして開始する をクリックします。
パラメータ
説明
[競合の処理]
デフォルトでは、[同じ名前のオブジェクトの名前を変更する] が [競合の処理] パラメーターに選択されています。たとえば、復元する
job_infoテーブルがターゲットデータベース内のテーブルと同じ名前の場合、システムは復元されたテーブルの名前をjob_info_dbs_<Restore タスク ID>_<タイムスタンプ>の形式で変更します。[復元するオブジェクト]
[使用可能] セクションで復元するデータベースまたはテーブルを選択し、右向き矢印をクリックして [選択済み] セクションに追加します。
説明データディザスタリカバリでは、個々のデータベースまたはテーブルを復元できます。 これにより、復元されるデータ量が削減され、目標復旧時間 (RTO) が短縮されます。 サポートされている復元の粒度については、「サポートされているデータベースタイプと機能」をご参照ください。
事前チェックに合格しました メッセージが 事前チェック ダイアログボックスに表示されたら、今すぐ起動する をクリックします。
データベースの復元進捗状況を表示するには、左側のナビゲーションウィンドウで 復元タスク をクリックします。
説明データベースの復元に必要な時間は、バックアップスケジュールの仕様とデータベースのサイズによって異なります。 仕様が高いほど、復元速度は速くなります。 詳細については、「論理バックアップと物理バックアップのパフォーマンステスト」をご参照ください。
データベースを新しい ApsaraDB RDS インスタンスに復元する場合、インスタンスの作成には約 5 ~ 10 分かかります。 データベースが復元された後、ApsaraDB RDS コンソール で新しい ApsaraDB RDS インスタンスを表示できます。 または、次の操作を実行して、新しい ApsaraDB RDS インスタンスを表示します。 [復元タスク] ページで、復元タスクの ID をクリックします。 表示されるページで、[基本情報] セクションの ApsaraDB RDS インスタンスの ID をクリックします。 ApsaraDB RDS コンソールにリダイレクトされます。
次の手順
CreateBackupPlan 操作を呼び出してバックアップスケジュールを作成できます。また、CreateAndStartBackupPlan 操作を呼び出して、バックアップスケジュールを作成、構成、および開始することもできます。詳細については、「CreateBackupPlan」または「CreateAndStartBackupPlan」をご参照ください。
バックアップソース、バックアップオブジェクト、またはバックアップポリシーパラメーター (バックアップスケジュール の バックアップ時間やバックアップセットの保持時間など) を変更する方法の詳細については、「バックアップスケジュールの管理」をご参照ください。
バックアップスケジュールによって後から発生する可能性のある料金の詳細については、「課金の FAQ」をご参照ください。
不要なバックアップスケジュールを一時停止して、コストを削減できます。詳細については、「バックアップスケジュールを一時停止または開始する」をご参照ください。