- おすすめの商品
-
 Elastic Compute Service (ECS)
高性能の仮想サーバー
-
Simple Application Server (SAS)
-
Elastic GPU Service
-
Elastic Desktop Service (EDS)
-
Object Storage Service (OSS)
-
Cloud Enterprise Network (CEN)
-
Web Application Firewall (WAF)
-
Domain Names
-
パリ 2024 オリンピック競技大会 New
Alibaba Cloud は、AI を活用したクラウドサービスでパリ 2024 年オリンピック競技大会をサポート
-
スタッド・ローラン・ギャロス - よみがえる栄光 New
Cloud Bao は、謎を解き明かし、過去を現在によみがえらせる魔法の旅にご案内します
-
コンコルド広場 - 障壁を破る New
Cloud Bao は、動きの完成に苦戦している不思議なブレイクダンサーに遭遇します
-
ヴェール・シュル・マルヌ・ノーティカル・スタジアム - 持続可能なスポー New
Cloud Bao は、野心的な持続可能性の目標と、二酸化炭素排出量の削減において AI テクノロジーが果たす役割を発見します
-
国際放送センター - 数十億の人々を魅了する画像、サウンド、データ New
Cloud Bao は、パリを舞台にした今回の難しい謎解きの最後の手がかりを解き明かしています
-
Trust Center
Alibaba Cloudは、安定した、信頼性が高く、安全で、準拠したクラウドコンピューティング製品とサービスを顧客に提供することを約束します
-
セキュリティ &プライバシーコンプライアンス
Alibaba Cloud のコンプライアンスプログラムには、データ保護への取り組みだけでなく、
世界中の包括的な認証および認定レポートが含まれています。 -
クラウドコンプライアンスリソース
お客様が Alibaba Cloud に安全で規制に準拠したクラウド環境をデプロイするのに役立つリソース
-
セキュリティコンプライアンスに関する FAQ
データセキュリティとプライバシーに関するよくある質問
-
プロダクトと機能のアップデート情報 New
最新のプロダクトニュースと機能リリース
-
Cloud Forward
PolarDB は、クラウドネイティブのリレーショナルデータベースです。従来のエンタープライズデータベースのパフォーマンスと可用性と、オープンソースデータベースの柔軟性と費用対効果を兼ね備えています。
-
プレスルーム
最新ニュースとメディアリリース
-
Alibaba Cloud電子ジャーナル New
2024 年 Alibaba Cloud お客様事例:成功を共にした 1 年
-
アナリストレポート (業界分析)
業界のトップアナリスト企業による Alibaba Cloud の評価
-
お知らせ
-
Asia Accelerator Hot
Alibaba Cloud でアジアでの成功を加速
-
情報セキュリティとコンプライアンス
ワンストップのコンプライアンスコンサルティングサービス
-
中国ビジネス - MLPS 2.0 コンプライアンス New
MLPS 2.0 のワンストップコンプライアンスソリューション
-
中国ビジネス - ネットワーク
ビジネスの中国進出を支援
-
中国ビジネス - グローバルアプリケーションの高速化 New
ネットワーク経由でインターネット向けアプリケーションの高速化と保護
-
中国ビジネス - セキュリティ
中国で展開するビジネスの保護
-
中国ビジネス - データセキュリティ New
堅牢なデータセキュリティフレームワーク全体でデータ資産を保護する
-
ICP サポート Hot
ICP ライセンス申請のサポート
-
中国ビジネス - オムニチャネルデータミッドエンド New
ビッグデータの構築、管理、活用をワンストップで実現するオムニチャネルソリューション
-
中国ビジネス - 組織データミッドエンド New
組織内のビッグデータの構築,管理,活用のためのワンストップソリューション
-
中国ビジネス - ビジネスミッドエンド New
調達と販売を同じエンタープライズレベルのオムニチャネルデジタルプラットフォームで実現
-
中国ビジネス - 会話型チャットボットのための人工知能サービス New
オムニチャネルを介してAIを活用した人間のような会話型多言語チャットボットを構築
-
中国ビジネス - オンライン教育
オンライン教育プラットフォームを迅速に構築
-
中国ビジネス - ドメイン登録
ドメイン名の登録、分析、保護サービスを提供します

- クラウドサーバー
-
Elastic Compute Service (ECS) Hot
高性能の仮想サーバー
-
CloudBox
ローカルにデプロイされたフルマネージドの Alibaba Cloud インフラストラクチャとサービス。
-
Compute Nest
サービスプロバイダーおよび顧客向けのアプリケーション管理サービス
-
Dedicated Host Hot
クラウド上のお客様専用ホスト
-
ECS Bare Metal Instance
柔軟性の高いベアメタルコンピューティングサービス
-
Elastic GPU Service Featured
強力な並列コンピューティング機能
-
Simple Application Server (SAS) Hot
迅速な導入のためのオールインワンサービス
-
Auto Scaling
Auto Scaling は、ビジネスサイクルに合わせてコンピューティングリソースを自動的に調整します
- Alibaba Cloud ワークスペース
-
Cloud Phone Beta
O&M と運用が容易で、安定したセキュアなクラウド仮想電話
-
Elastic Desktop Service (EDS) Featured
安全かつ効率的で使いやすいクラウドベースのデスクトップサービス
- HPC
-
Batch Compute
大規模バッチ処理
-
Elastic High Performance Computing (E-HPC)
高性能のパブリックコンピューティングサービス
-
Super Computing Cluster(SCC)
RDMA ネットワーク上の並列コンピューティング
- コンテナサービス
-
Container Service for Kubernetes (ACK) Hot
認証取得済みの Kubernetes プラットフォーム
-
Container Compute Service (ACS) New
Kubernetes のコンテナー仕様に準拠したコンテナーコンピューティングリソースを提供するクラウドコンピューティングサービス
-
Container Registry (ACR)
安全なイメージホスティングプラットフォーム
-
Service Mesh (ASM)
マイクロサービスのトラフィックを複数クラスターを対象に統合管理
-
Distributed Cloud Container Platform for Kubernetes
さまざまなインフラストラクチャリソースに基づいて実行される Kubernetes クラスターをユーザーが管理するためのコントロールプレーンを提供
-
Serverless Kubernetes Service (ASK)
高い弾力性と信頼性を備えたエンタープライズ向けのサーバーレス Kubernetes サービス
-
Elastic Container Instance (ECI)
サーバーレスコンテナインスタンスサービス
- エッセンシャルストレージサービス
-
Elastic Block Storage (EBS)
高性能で信頼性が高く、低遅延のブロックストレージサービス
-
Object Storage Service (OSS) Hot
安全性、高い費用対効果、高い信頼性を備えたオブジェクトストレージサービス
-
File Storage NAS Hot
ECS、HPC、コンテナのためのファイルストレージ
-
Cloud Parallel File Storage (CPFS)
フルマネージド型のスケーラブルな並列ファイルシステム
-
Tablestore
NoSQL データベースにデータを保存
-
Storage Capacity Unit (SCU)
柔軟なストレージサービスを利用し、ストレージの予算を計画的に最適化
- クラウドネットワーク
-
Server Load Balancer (SLB) Hot
リソース間でトラフィックを分散
-
Elastic IP Address (EIP) Hot
独立したパブリック IP リソース
-
Cloud Data Transfer (CDT)
インターネットデータ転送とクロスリージョンデータ転送の統一課金
-
Data Transfer Plan
インターネットトラフィック利用量のパッケージ
-
Virtual Private Cloud (VPC)
プライベートクラウドネットワークを作成
-
NAT Gateway
パブリックインターネットゲートウェイ
-
Network Intelligence Service (NIS) Beta
ネットワーク状態の可視化とインテリジェントな診断機能を備えたセルフサービスネットワーク O&M サービス
-
PrivateLink
Alibaba Cloud 上のサービスへの安全で使いやすいプライベート接続
-
Alibaba Cloud DNS PrivateZone
プライベートドメインネーム管理サービス
- クロスリージョンネットワーク
-
Cloud Enterprise Network (CEN) Featured
エンタープライズレベルのグローバルネットワークを構築
-
Global Accelerator (GA)
グローバルでインターネットアプリケーションを高速化し、ユーザーエクスペリエンスを向上
-
Transit Router (TR)
トランジットルーターがデプロイされているリージョンのコアルーター。
-
Global Traffic Manager (GTM)
IP アドレス全体でのグローバルアクセラレーション、スケジューリングおよびディザスタリカバリ
- クラウドセキュリティ
-
Anti-DDoS Hot
ボリューム型 DDoS 攻撃から保護
-
Bastionhost
システムの O&M および運用監査のプラットフォーム
-
Cloud Firewall
ネットワークセキュリティの最前線
-
Secure Access Service Edge (SASE) New
ゼロトラストネットワークアクセス、オフィスデータ保護、および端末管理を統合したオフィスセキュリティ管理プラットフォーム。
-
Security Center Hot
包括的クラウドネイティブアプリケーション保護プラットフォーム (CNAPP) 機能
-
Web Application Firewall (WAF) Hot
Web アプリケーションのセキュリティ保護
- データセキュリティ
-
Certificate Management Service (Original SSL Certificate) Hot
SSL 証明書の適用、購入、および管理
-
Cloud Hardware Security Module (HSM)
クラウドにホストされたハードウェアセキュリティモジュール (HSM) をクラウドユーザーに提供
-
Sensitive Data Discovery & Protection (SDDP)
機密データを保護するセキュリティサービス
-
Key Management Service (KMS)
暗号化キーの生成と管理
- ID セキュリティ
-
Identity as a Service (IDaaS)
アカウント、認証、承認、申請、および監査機能
-
Resource Access Management (RAM)
リソースアクセスの承認と管理
- マイクロサービスツールとプラットフォーム
-
Application High Availability Service (AHAS)
アプリケーションの高可用性を保証
-
Enterprise Distributed Application Service (EDAS)
アプリのデプロイとマイクロサービスソリューション
-
Microservices Engine (MSE)
主流のオープンソースマイクロサービスエコシステムに対応したワンストッププラットフォーム
-
Service Mesh (ASM)
マイクロサービスのトラフィックを複数クラスターを対象に統合管理
- メッセージキュー
-
ApsaraMQ for Confluent
エンタープライズクラスのフルマネージド型リアルタイムデータストリーミングプラットフォーム
-
ApsaraMQ for Kafka
Apache Kafka を利用した、フルマネージド型ですぐに使えるメッセージキューサービス
-
ApsaraMQ for MQTT
IoT とモバイルデバイス向けのメッセージサービス
-
ApsaraMQ for RabbitMQ Hot
すぐに使えるフルマネージド型の RabbitMQ サービス
-
ApsaraMQ for RocketMQ
分散型メッセージキューサービス
-
Message Service (MNS)
アプリケーション間でメッセージを送信
- クラウドネイティブの可観測性
-
Application Real-Time Monitoring Service (ARMS) Hot
ビジネスモニタリング機能を構築
-
Managed Service for Grafana
Managed Service for Grafana は、フルマネージド型の可観測性プラットフォームです。
-
Managed Service for OpenTelemetry
アプリケーションのデバッグと分析を容易に
-
Managed Service for Prometheus
オープンソースのPrometheusエコシステムと互換性のある、オールインワンのメトリック監視プラットフォームを提供します。
- リレーショナルデータベース
-
PolarDB Hot
Oracle 構文との高い互換性を備えた、Super MySQL および PostgreSQL
-
ApsaraDB RDS
クラウドマネージド MySQL、PostgreSQL、SQL Server、およびMariaDB
- NoSQL データベース
-
Tair (Redis® OSS-Compatible) Hot
Redis® OSS 互換のキャッシュおよびキーバリュー型データベース
-
Lindorm
クラウドネイティブのマルチモデルデータベース
-
ApsaraDB for MongoDB
ドキュメント指向データベースサービス
-
ApsaraDB for HBase
高度に最適化された NoSQL データベースで、Apache HBase とは100%の互換性
-
Time Series Database for InfluxDB®️
低コストで可用性が高くスケーラブルなオンライン時系列データベース
- データコンピューティングと分析
-
Elasticsearch Hot
検索と分析用に設計され、費用対効果はオープンソース版の 2 倍、最新のエンタープライズ機能を備えた AI 検索と AI アシスタント。
-
Hologres
PostgreSQL 互換のリアルタイム分析
-
MaxCompute Hot
大規模なデータウェアハウジング
-
Realtime Compute for Apache Flink
リアルタイムデータ処理のためのプラットフォーム
- データ開発とサービス
-
DataHub Beta
ストリーミングデータのパブリッシュとサブスクライブの機能を提供する
-
Data Integration
リアルタイムおよびオフラインのデータ同期
-
Dataphin
フルパスのデータ生成と管理
-
DataWorks
フル装備のデータウェアハウスを半額のコストで
-
Optimization Solver
複雑な最適化の問題を効率的に解決して意思決定を容易にする
- ビッグデータの適用と視覚化
-
DataV
知見に富むビッグデータの可視化
-
Quick BI
ビッグデータの分析と可視化
-
Alibaba Cloud Model Studio New
Qwen などの一般的なモデルに基づいて、ビジネスを理解するインテリジェントなアプリケーションを構築するためのワンストップ生成 AI プラットフォーム
-
Platform for AI (PAI)
エンドツーエンドの機械学習プラットフォーム
-
DashVector
ローコード API と高い費用対効果を備えた高性能ベクトル検索サービス
-
AIRec
お客様のアプリケーションのためのパーソナライズされた高品質レコメンデーションサービス
-
Machine Translation
オーダーメイドで要件に対応する機械翻訳
-
PAI-Lingjunインテリジェントコンピューティングサービス
基礎モデルのトレーニングなど、高性能コンピューティングタスクのための包括的なAIコンピューティングプラットフォーム
-
Chatbot Beta
スマートな対話のためのチャットボットプラットフォーム
-
Image Search
視覚情報を使う高精度の検索ソリューション
-
Offline Visual Intelligence Software Packages
画像のセグメンテーション、ビデオのセグメンテーション、文字認識など、ビジュアル制作用のオフライン SDK です。
-
Intelligent Speech Interaction
音声認識および合成のプラットフォーム
-
OpenSearch
インテリジェントな検索サービスを開発するためのワンストッププラットフォーム
- メディアサービス
-
Intelligent Media Services(IMS) New
マルチメディアオーディオとビデオのワンストップクラウドに設定されたインテリジェントサービス
-
ApsaraVideo Live
オーディオとビデオのライブストリーミングプラットフォーム
-
Real-Time Streaming
超低遅延と高い同時実行性を備えたライブストリーミングサービス
-
ApsaraVideo Real-time Communication
超低遅延の対話型 HD ライブオーディオビデオプラットフォームをすばやく構築。
-
ApsaraVideo VOD Hot
オールインワンの VOD ソリューション
-
ApsaraVideo Media Processing (MPS)
マルチメディアトランスコードのクラウドサービス
- エンタープライズクラウドサービス
-
CloudQuotation
見積もりデータへ超低遅延の安定したプレミアムアクセスを提供。
-
Energy Expert
企業とプロダクトが排出する二酸化炭素量の測定と分析を支援します
-
Robotic Process Automation (RPA)
ビジネスプロセスの自動化で企業運営の効率を改善
-
SOFAStack™
クラウドネイティブ分散アーキテクチャに基づいた、金融グレードのワンストップ高可用性アプリケーション R&D および O&M プラットフォーム
-
ZOLOZ Real ID
eKYC のデジタルおよびリモートオンラインソリューション
-
ZOLOZ SMART AML
包括的でインテリジェントな検出、ビッグデータ主導のマネーロンダリング対策 (AML) ソリューション
- エンタープライズファウンデーションサービス
-
GoChina ICP Filing Assistant
ICP 登録をするための要件を企業がナビゲートすることを支援する
- エンタープライズコラボレーション
-
Alibaba Mail
パブリッククラウド上の電子メールサービス
-
DingTalk Enterprise New
企業専用のデジタルプラットフォームを作成
-
YiDA Beta
エンタープライズアプリケーションを開発するためのローコード SaaS
-
Direct Mail
シンプルで効率的な電子メールサービス
- API & SDK
-
Cloud Shell Beta
CLI でクラウドリソースを管理
-
OpenAPI Explorer
API の呼び出しとリクエストをさらに活用
-
OpenAPI Portal Beta
オールインワンプラットフォームには、API ドキュメント、デバッグツール、SDK、およびサンプルコードが用意されています。
-
Resource Orchestration Service (ROS)
コンピューティングリソースの運用と管理 (O&M) を簡素化する
-
SDK Center
Ailbaba Cloud SDK カタログ
- 運用管理とモニタリング
-
Application Real-Time Monitoring Service (ARMS) Hot
ビジネスモニタリング機能を構築
-
CloudMonitor
リアルタイムのクラウドモニタリングサービス
-
CloudOps Orchestration Service
O&M タスクの管理と実行のための自動化された運用保守サービス
-
Intelligent Advisor
クラウドリソースのリスク検査サービス
-
Managed Service for OpenTelemetry
アプリケーションのデバッグと分析を容易に
-
Simple Log Service (SLS) Hot
ログ型データのためのオールインワンサービス
- クラウド管理
-
ActionTrail
セキュリティとコンプライアンスを維持
-
Cloud Architect Design Tools (CADT)
コードを記述せずに Web グラフィカルインターフェイスでクラウドアーキテクチャを構築する
-
Cloud Config Beta
設定のトレースとコンプライアンス監査
-
Cloud Governance Center (CGC) Beta
Alibaba Cloud のマルチアカウント環境をワンストップモードで設定して管理
-
Quota Center
Alibaba Cloud サービスのクォータを一元的に表示および管理する
-
Resource Access Management (RAM)
リソースアクセスの承認と管理
-
Resource Management
ディレクトリ、フォルダー、アカウント、グループを階層的に使用して、すべてのリソースを整理および管理します。
コスト最適化ソリューション
Elasticity Assurance
Elasticity Assurance は、日々の要件に柔軟に対応するためのリソースを保証します。プリエンプティブルインスタンス
プリエンプティブルインスタンスは、従量課金インスタンスと比較して有利な価格で提供されるオンデマンドインスタンスです。プリエンプティブルインスタンスのスポット価格は、需要と供給の変化に応じて変動します。ECS リザーブドインスタンス
高い柔軟性を提供する Elastic Computing Services の費用対効果の高い購入オプションSavings Plans
Savings Plans は、従量課金インスタンスの料金を最大 76% 節約できる新しい料金モデルです。関连ソリューション
クラウドネイティブ AI スイート
AI プラットフォームの構築を加速し、より効率的で迅速な配信を実現SecOps
きめ細かいセキュリティ制御を実装DevOps
迅速かつ安全にDevOpsのメリットを最大化エンドツーエンドのクラウドネイティブアプリケーション管理
CloudOps、DevOps、SecOps、AIOps、FinOps を効率的、安全、かつ透過的に管理できます関连ソリューション
バックアップとアーカイブ
データバックアップ、データアーカイブ、ディザスタリカバリメディアアーカイブ
安全なメディアアーカイブAlibaba Cloud ドライブ
写真やファイルをオンラインで保存、共有、管理Data Lake Storage
耐久性、拡張性、経済性に優れたストレージでデータレイクを構築関连ソリューション
Bring Your Own IP Addresses (BYOIP)
ご自身の IP アドレスを使用してクラウドに移行しますグローバルネットワーク
多国籍企業向けのエンドツーエンドのソフトウェアデファインドネットワークグローバルアプリケーションの高速化
ネットワーク経由でインターネット向けアプリケーションの高速化と保護グローバルなインターネット接続
インターネットデータセンター (IDC) のインターネットゲートウェイをクラウドに移行関连ソリューション
データセキュリティ
堅牢なデータセキュリティフレームワーク全体でデータ資産を保護する無料のセキュリティ緊急対応
最大 30 日間無料の保護サービスとセキュリティ相談サービスMLPS 2.0 コンプライアンス
MLPS 2.0 のワンストップコンプライアンスソリューション関连ソリューション
クラウドネイティブ AI スイート
AI プラットフォームの構築を加速し、より効率的で迅速な配信を実現SecOps
きめ細かいセキュリティ制御を実装DevOps
迅速かつ安全にDevOpsのメリットを最大化エンドツーエンドのクラウドネイティブアプリケーション管理
CloudOps、DevOps、SecOps、AIOps、FinOps を効率的、安全、かつ透過的に管理できます関连ソリューション
FinTech用クラウドデータベースソリューション
FinTech に特化したクラウドネイティブデータベースソリューションを活用ゲーム用クラウドデータベースソリューション
成熟しカスタマイズされたアーキテクチャですべてのデータの問題を解決するOracle データベースの移行
Oracle データベースをクラウドネイティブデータベースにスムーズに移行するクラウド移行
データを Alibaba Cloud へ安全に移行関连ソリューション
ビッグデータおよび AI のデモギャラリー
Alibaba Cloud のビッグデータおよび AI の技術がどのようにデータインテリジェンスへの道のりを容易にするのか、デモを試して実際に体験してみてください。AI コンピテンシーセンター
エクスペリエンスセンターでは、お客様が Alibaba Cloud の AI プロダクトを使用し、ビジネスデータを探索するために役立つ幅広いユースケースとプロダクトドキュメントを揃えています。Alibaba Cloud のデータレイク
あらゆるサイズとタイプのデータをリアルタイムで保存、管理、分析Alibaba Cloud AIとデータインテリジェンス
Alibaba Cloud の AI とデータインテリジェンス機能、新しいオファー、最新プロダクトのすべてをご紹介します。関连ソリューション
デジタルクレジット貸付
ビッグデータと AI が信用と詐欺のリスクを軽減企業のデータ技術を支えるビッグデータコンサルティングサービス
企業のデータの近代化とデジタルの未来に向けた計画を支援します会話型 AI サービス
オムニチャネルを介してAIを活用した人間のような会話型多言語チャットボットを構築EasyDispatch でフィールドサービスを管理
AIによるリアルタイムの意思決定支援でフィールドサービスディスパッチを強化関连ソリューション
オンライン教育
オンライン教育プラットフォームを迅速に構築Narrowband HD トランスコード
帯域幅コストを最大 30% 削減スポーツやイベントのリアルタイムライブストリーミング
スポーツやイベントをインターネット上でスムーズに世界中の視聴者に同時配信eコマース・ライブストリーミング
フル機能のライブショッピングプラットフォームを迅速、かつ容易に構築関连ソリューション
オンライン教育
オンライン教育プラットフォームを迅速に構築ICP サポート
ICP ライセンス申請のサポートデジタルマーケティング
データを活用してマーケティング活動をパワーアップ関连ソリューション
サプライチェーンプランニングのためのAlibaba DChain
俊敏性、インテリジェント性、コスト効率に優れたサプライ チェーンの構築と管理クラウドバッジ
イベント運営のための革新的なデジタル証明書サービスデジタルストア向けのクラウド POS ソリューション
すべての操作を 1 つのクラウド POS システムに一元化関连ソリューション
クラウド移行
データを Alibaba Cloud へ安全に移行エンタープライズ IT ガバナンス
Alibaba Cloud で効率的かつ制御可能なクラウド環境を構築するログ管理をベースとしたAIOps
インテリジェントなログ管理ソリューションによるAIOps環境へのログインバックアップとアーカイブ
データバックアップ、データアーカイブ、ディザスタリカバリ
- 金融サービス
-
金融サービス Hot
Alibaba Cloudでイノベーションを加速させる
-
FinTech on Cloud
クラウド上のビジネスで、顧客満足度を向上
-
資本市場と証券
グローバルな資本市場において、安全で正確、かつデジタル化された顧客体験を提供
-
FinTech用クラウドデータベースソリューション
FinTech に特化したクラウドネイティブデータベースソリューションを活用
-
デジタルクレジット貸付
ビッグデータと AI が信用と詐欺のリスクを軽減
-
Forex
高速で安全なグローバル Forex プラットフォームを構築します
- ニューリテール
-
リテール Hot
リテール新時代に向けたデジタルトランスフォーメーションを実現
-
E コマース Hot
E コマースプラットフォームの構築、運営、最適化を支援
-
eコマース・ライブストリーミング Hot
フル機能のライブショッピングプラットフォームを迅速、かつ容易に構築
-
オムニチャネルデータミッドエンド
ビッグデータの構築、管理、活用をワンストップで実現するオムニチャネルソリューション
-
会話型 AI サービス
オムニチャネルを介してAIを活用した人間のような会話型多言語チャットボットを構築
- サプライチェーン
-
スマート物流
自動化、デジタル化された、インテリジェントなスマート物流ソリューションでコストとユーザーエクスペリエンスのバランスを実現
-
AI サプライチェーン
俊敏性、インテリジェント性、コスト効率に優れたサプライ チェーンの構築と管理
- ゲーム
-
ゲーム Hot
グローバルで高可用性を維持しながら、ゲームのすばやい成長を促進
-
ゲーム用クラウドデータベースソリューション Hot
成熟しカスタマイズされたアーキテクチャですべてのデータの問題を解決する
- メディア
-
メディア
デジタル化されたメディアジャーニーで、今日のメディア市場向けにコンテンツを準備
-
Narrowband HD トランスコード
帯域幅コストを最大 30% 削減
-
eコマース・ライブストリーミング Hot
フル機能のライブショッピングプラットフォームを迅速、かつ容易に構築
-
スポーツやイベントのリアルタイムライブストリーミング Hot
スポーツやイベントをインターネット上でスムーズに世界中の視聴者に同時配信
-
リモートレンダリング
Alibaba Cloud の E-HPC を使用してオンプレミスのレンダーファームをクラウドに接続します。
-
パーソナライズされたコンテンツの推奨
顧客が最適なコンテンツを見つけるためのディスカバリーサービスを構築します
-
メディアアーカイブ
安全なメディアアーカイブ
- 通信
-
通信事業者向けクラウドソリューション
統一されたデータ駆動型プラットフォームを通じた一貫したフルライフサイクルの顧客サービスの提供
-
通信事業者向けスーパーアプリ
DingTalkをベースにした通信とデジタルライフスタイルのオールインワンプラットフォームの構築
-
Alibaba Cloud ドライブ
写真やファイルをオンラインで保存、共有、管理
-
通信事業者向け顧客エンゲージメントイネーブラー
シームレスなオムニチャネルカスタマーエクスペリエンスを実現
- ISV
-
中小企業向けの ISV ソリューション
中小企業をターゲットとした独立系ソフトウェアベンダーの信頼性の高いITサービス
-
クラウド移行向けの ISV ソリューション
新しいクラウドビジネスへの最短の道を切り開く
-
AlibabaCloud上のAruba EdgeConnect Enterprise
WAN 接続、リアルタイムの最適化、WAN コストの削減を可能にする先進の SD-WAN プラットフォーム
-
AlibabaCloud上のIBM Qradar SOAR
自動化とプロセス標準化で迅速にインシデント対応
-
AlibabaCloud上のIBM Qradar SIEM
重要なサイバーセキュリティの脅威に対する一元化された可視性とインテリジェントなセキュリティ分析 を提供
-
AlibabaCloudでのIBMマネージドファイル転送ソリューション
大容量、高信頼性、高セキュリティの企業向けファイル転送
- 教育
-
オンライン教育
オンライン教育プラットフォームを迅速に構築
-
遠隔教育のための加速化されたグローバルネットワーキングソリューション
教育システムと遠隔地の学生との間に、高速で安定したグローバルネットワーク接続を構築する
- ヘルスケアとライフサイエンス
-
CT 画像分析
CT 画像分析の時間を短縮
-
エラスティックハイパフォーマンスコンピューティング
治療薬およびワクチンの研究開発を加速します
-
ゲノム配列解析
ウイルスのスクリーニングと検出の効率を向上します
-
感染予測
感染予測を実行します
- スポーツ
-
スポーツ
インテリジェントテクノロジーでスポーツ業界をデジタル化
-
Sports Live+
コスト削減が可能なAIによるスポーツライブ配信サービス
-
ライブメディアゲートウェイ
専門的な放送トランスコードおよび信号分配管理サービス
-
ライブメディアコンテンツプロバイダー
クラウドベースでの音声・映像コンテンツの取り込み、編集、配信サービス
-
会場シミュレーション
バーチャルな会場で重要な運営タスクをシミュレート
-
クラウドバッジ
イベント運営のための革新的なデジタル証明書サービス
-
スマートイベントガイドブック
インテリジェントでインタラクティブなイベントガイドブック
-
現場向けライブビデオ伝送Cloud Gateway
クラウドベースのバックパックユニットからバンドルされたライブストリームを簡単に管理
- 広告とマーケティング
-
デジタルマーケティング
データを活用してマーケティング活動をパワーアップ
- AI
-
Alibaba Cloud生成AIソリューション Hot
生成 AI でイノベーションを加速し、新たなビジネスの成功を生み出す
-
Tongyi Qianwen (Qwen) Hot
Alibaba Cloud が提供する最高性能の基盤モデル
-
AI Doc New
AI の力を活用し、文書から容易に知識を引き出す
-
Smart Studio New
1 つのワークスペースで多様なコンテンツ作成を可能にする、生成 AI を搭載したオールインワンプラットフォーム
-
自動音声認識 New
AI 搭載の音声テキスト変換サービスで洞察を得る
-
Alibaba Cloud AIとデータインテリジェンス
Alibaba Cloud の AI とデータインテリジェンス機能、新しいオファー、最新プロダクトのすべてをご紹介します。
-
AI コンピテンシーセンター
エクスペリエンスセンターでは、お客様が Alibaba Cloud の AI プロダクトを使用し、ビジネスデータを探索するために役立つ幅広いユースケースとプロダクトドキュメントを揃えています。
-
AI アクセラレーション
Alibaba Cloud GPUテクノロジーにより、AI主導のビジネスおよびAIモデルのトレーニングと推論を加速化
-
メタバース
メタバースは次世代のインターネットです
-
パーソナライズされたコンテンツ推奨機能
顧客に最適なコンテンツを見つけるための発見サービスを構築します
-
会話型 AI サービス
オムニチャネルを介してAIを活用した人間のような会話型多言語チャットボットを構築
- ネットワーク
-
グローバルなインターネット接続
インターネットデータセンター (IDC) のインターネットゲートウェイをクラウドに移行
-
グローバルネットワーク Hot
多国籍企業向けのエンドツーエンドのソフトウェアデファインドネットワーク
-
グローバルアプリケーションの高速化 Hot
ネットワーク経由でインターネット向けアプリケーションの高速化と保護
- クラウド移行
-
クラウド移行
データを Alibaba Cloud へ安全に移行
-
Landing Zone
Alibaba Cloud での効率的で費用効果の高い運用を実現するための安全でスケーラブルな環境を設定
-
データベース移行
フルマネージドクラウドデータベースに移行
-
Oracle データベースの移行
Oracle データベースをクラウドネイティブデータベースにスムーズに移行する
-
Bring Your Own IP Addresses (BYOIP)
ご自身の IP アドレスを使用してクラウドに移行します
- セキュリティとコンプライアンス
-
Cloud Security Hot
Alibaba Cloud の強力なセキュリティツールセットで、ビジネスセキュリティ、アプリケーションセキュリティ、データセキュリティ、インフラストラクチャセキュリティ、アカウントセキュリティを保護
-
データベースセキュリティ
クラウド上でのデータ資産の保護、バックアップ、復元
-
MLPS 2.0 コンプライアンス Hot
MLPS 2.0 のワンストップコンプライアンスソリューション
-
Alibaba Cloud InCountry Service (ACIS)
中国で適用される規則や規制を遵守しながら、ビジネスを迅速かつ効率的に拡大
- クラウドネイティブ
-
エンドツーエンドのクラウドネイティブアプリケーション管理
CloudOps、DevOps、SecOps、AIOps、FinOps を効率的、安全、かつ透過的に管理できます
-
CloudOps
クラウドネイティブ環境を構築し、クラスターを高効率で管理
-
DevOps
迅速かつ安全にDevOpsのメリットを最大化
-
SecOps
きめ細かいセキュリティ制御を実装
-
コンテナ管理をベースとしたAIOps
O&M の効率とシステム全体のセキュリティを向上
-
FinOps
クラウドの利用状況をリアルタイムに分析し、コスト削減を実現
- データと分析
-
Alibaba Cloud のデータレイク
あらゆるサイズとタイプのデータをリアルタイムで保存、管理、分析
-
ログ管理をベースとしたAIOps
インテリジェントなログ管理ソリューションによるAIOps環境へのログイン
-
企業のデータ技術を支えるビッグデータコンサルティングサービス
企業のデータの近代化とデジタルの未来に向けた計画を支援します
-
小売業向けビッグデータコンサルティングサービス
小売業者のデジタル・ジャーニーの迅速な計画を支援
- Web3
-
Alibaba Cloud for Web3
Web3 のイノベーションを加速し、新しいビジネスの成長を促進
-
Cloudverse ソリューション
ビジネスにおける Web3 への入り口として高度にカスタマイズ可能なメタバース空間を構築するためのワンストップソリューション
- エンタープライズサービスとアプリケーション
-
Alibaba Cloud 上の Salesforce Hot
世界に誇るCRMプラットフォームを中国へ
-
Alibaba Cloud ドライブ
写真やファイルをオンラインで保存、共有、管理
-
Red Hat OpenShift on Alibaba Cloud
可用性、信頼性、伸縮性に優れたアプリケーションの構築、デプロイ、管理
-
DevOps
迅速かつ安全にDevOpsのメリットを最大化
-
ビジネスミッドエンド
調達と販売を同じエンタープライズレベルのオムニチャネルデジタルプラットフォームで実現
-
組織データミッドエンド
組織内のビッグデータの構築,管理,活用のためのワンストップソリューション
-
SAP
Alibaba Cloud でエンタープライズアプリケーションとサービスを強化
-
Alibaba Cloud InCountry Service (ACIS)
中国で適用される規則や規制を遵守しながら、ビジネスを迅速かつ効率的に拡大
-
Web とアプリのデプロイ Hot
迅速かつ費用対効果の高い方法で Web サイトとアプリケーションを構築できます。
-
ビデオストリーミングの高速化 Hot
包括的なマルチメディアプラットフォームでコンテンツ処理を管理し、グローバルなリアルタイムストリーミングネットワークのメリットを活用します。
-
高頻度取引 (HFT) Hot
クオンツ取引のための、ネットワークとコンピューティングのレイテンシを極限まで低く抑えたソリューションです。
-
セキュリティとコンプライアンス New
クラウドでシステムとビジネスをグローバルに保護します。
-
カスタマーエンゲージエント New
複数の通信チャネルを使用してエンドユーザーに連絡できます。
-
データと分析 New
データバリューチェーンを管理し、データの利用を通じてビジネスの再発明を可能にします。
-
生成 AI New
生成 AI でイノベーションを加速し、新しいビジネスの成功を生み出します。
-
Alibaba Cloud に移行 New
迅速、円滑、かつ安全な移行プロセスで Alibaba Cloud に移行できます。
-
Workspace on Cloud New
安全、オープン、かつ手頃な価格のクラウドコンピューターでワークスペースを強化します。
- 中国への参入
-
情報セキュリティとコンプライアンス
ワンストップのコンプライアンスコンサルティングサービス
-
MLPS 2.0
コンプライアンス HotMLPS 2.0 のワンストップコンプライアンスソリューション
-
ネットワーク
ビジネスの中国進出を支援
-
セキュリティ
中国で展開するビジネスの保護
-
データセキュリティ
堅牢なデータセキュリティフレームワーク全体でデータ資産を保護する
-
ICP 登録サポート Hot
ICP ライセンス申請のサポート
-
ドメイン登録
ドメイン名の登録、分析、保護サービスを提供します
-
Alibaba Cloud 上の Salesforce Hot
世界に誇るCRMプラットフォームを中国へ
- デジタルトランスフォーメーションで成功を加速
-
ビジネスミッドエンド
調達と販売を同じエンタープライズレベルのオムニチャネルデジタルプラットフォームで実現
-
オムニチャネルデータミッドエンド
ビッグデータの構築、管理、活用をワンストップで実現するオムニチャネルソリューション
-
組織データミッドエンド
組織内のビッグデータの構築,管理,活用のためのワンストップソリューション
-
会話型 AI サービス
オムニチャネルを介してAIを活用した人間のような会話型多言語チャットボットを構築
-
グローバルアプリケーションの高速化
ネットワーク経由でインターネット向けアプリケーションの高速化と保護
-
オンライン教育
オンライン教育プラットフォームを迅速に構築
注目のリソース
Webinar
デジタルトランスフォーメーションをリードするクラウドネイティブ注目のリソース
ベストプラクティス
Alibaba Cloud への E コマース Web サイトの移行コンプライアンス
-
Alibaba Cloud Academy
技術およびビジネスのトレーニングプログラム
-
ドキュメント
プロダクトガイドと FAQ
-
ホワイトペーパー
最新のトレンド、テクノロジー、クラウドに関するインサイトを掘り下げた調査
-
Alibaba Cloud プロジェクトハブ
Alibaba Cloud 製品で構築された、開発者の最新プロジェクトを知る。
-
Alibaba Cloud電子ジャーナル
Alibaba Cloud eマガジン第 5 号: ビジネスをスピードアップ
-
ビデオセンター
このビデオを通して当社の魅力をぜひご覧いただければと思います
-
Cloud TechNovate
Alibaba Cloud の最新テクノロジー、製品、ソリューション、そして期間限定オファーについてご紹介します

- コンサルティング & デザイン
-
デジタルトランスフォーメーションサービス
企業がデジタルプラットフォーム機能とデジタルシステムを構築するのに役立ちます
-
Alibaba Cloud Landing Zone
クラウドベースの IT アーキテクチャ設計とガバナンスソリューションを提供
-
セキュリティコンプライアンスサービス
セキュリティコンプライアンスの相談と実施のための専門サービスを提供します
-
ICP 登録コンサルティングサービス
ICP 登録の規則、ICP 登録のプロセス、文書の作成、ICP 登録の提出に関するワンストップの助言を提供し、お客様が ICP 登録を完了できるように支援します。
-
顧客成功サービス
Alibaba Cloud へのビジネスの移行に伴って、ビジネス要件の信頼できる分析と全体的なプロジェクトガイダンスを提供します
-
-
日本語
-
概要
-
料金
-
製品
-
全ての製品(100+)
-
おすすめの商品
-
コンピューティング
-
コンテナ
-
ストレージ
-
ネットワークと CDN
-
セキュリティ
-
ミドルウェア
-
データベース
-
分析コンピューティング
-
AI と機械学習
-
メディアサービス
-
エンタープライズサービスとクラウドコミュニケーション
-
ドメイン名と Web サイト
-
エンドユーザーコンピューティング
-
IoT
-
Serverless
-
開発者ツール
-
移行と O&M 管理
-
Apsara Stack
-
-
ソリューション
-
マーケットプレイス
-
開発者
-
パートナー
-
ドキュメント
-
サービス
- 電話 (+1-833-732-2135)
-
お問い合わせ
-
ModelStudio
-
コンソール
0.0.201


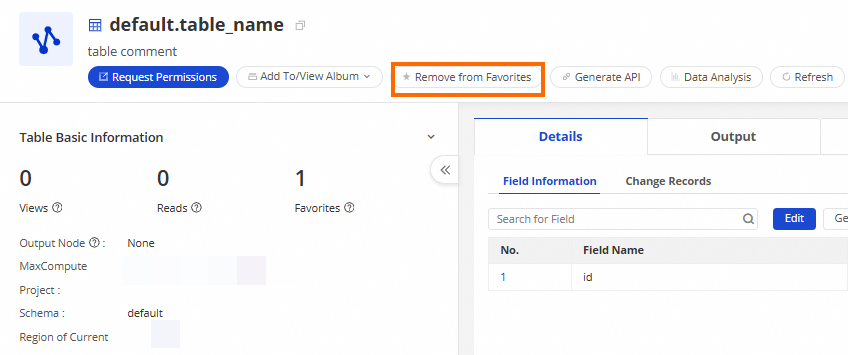

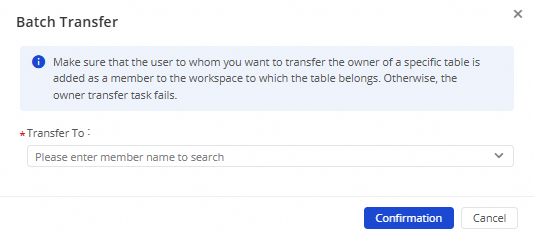
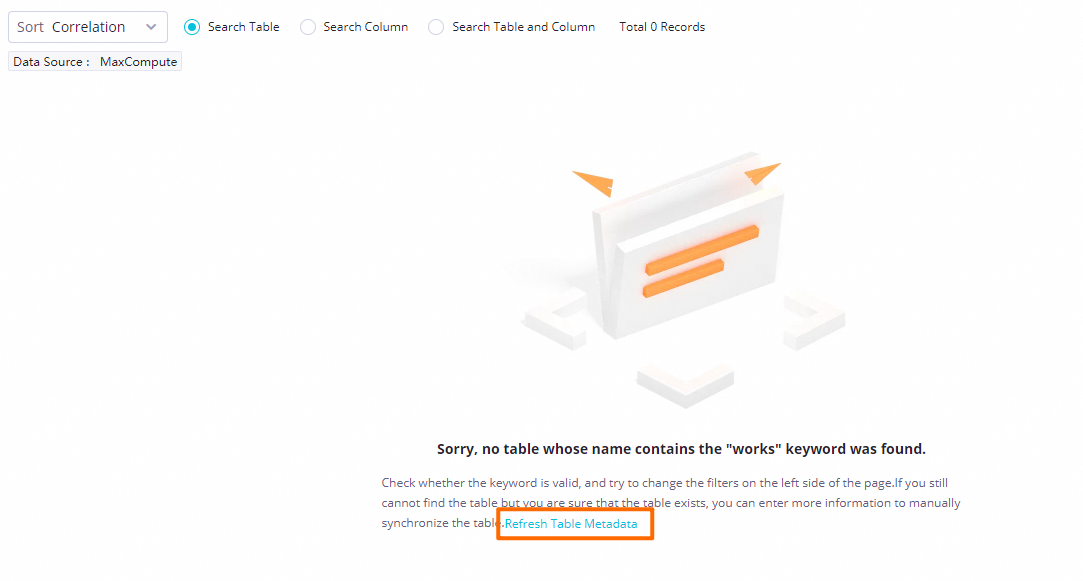
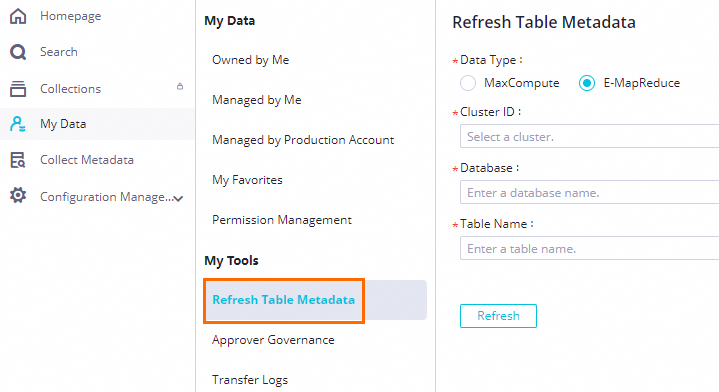
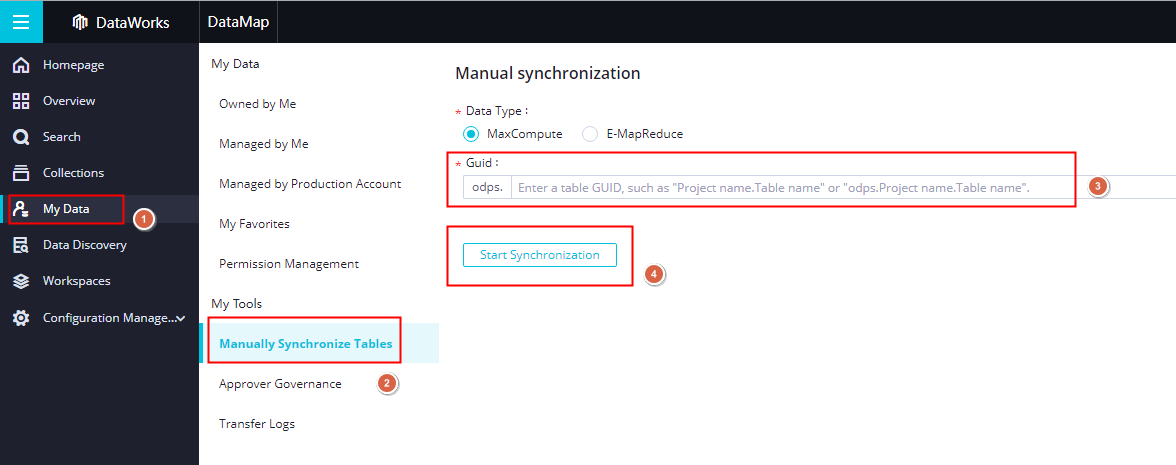 形式でテーブル名を指定し、 をクリックする必要があります。