This topic describes how to connect a strongSwan device to an Elastic Compute Service (ECS) instance on Alibaba Cloud.
strongSwan is an open-source and IPsec-based VPN solution that is easy to configure and can be deployed in mainstream Linux distributions. You can use strongSwan to establish IPsec-VPN connections with Alibaba Cloud.
In this example, a VPN gateway in dual-tunnel mode is used to establish IPsec-VPN connections. If your VPN gateway supports only the single-tunnel mode, see the Configure a strongSwan device to use a single tunnel section of this topic.
Scenarios
The following scenario is an example. You can configure strongSwan on an on-premises gateway to establish dual-tunnel IPsec-VPN connections to Alibaba Cloud.

Subnetting
Data center side
Private CIDR block: 172.16.0.0/16
strongSwan device
NIC eth0: 172.16.20.80; NAT-mapped Internet egress 1: 120.XX.XX.202
(Optional) NIC eth1: 172.16.21.248; NAT-mapped Internet egress 47.XX.XX.127
NoteFor more information about scenarios where NAT is not used, see How do I configure a strongSwan device whose NIC is assigned a public IP address?
This topic provides configuration examples for a single-egress strongSwan device and a dual-egress strongSwan device. You can use either device to establish IPsec-VPN connections to Alibaba Cloud.
Alibaba Cloud side
VPC CIDR block: 192.168.0.0/16
vSwitch 1 CIDR block: 192.168.10.0/24
vSwitch 2 CIDR block: 192.168.10.0/24
vSwitch 3 CIDR block: 192.168.40.0/24
vSwitch 4 CIDR block: 192.168.50.0/24
vSwitch 5 CIDR block: 192.168.55.0/24
VPN gateway
IPsec Address 1: 47.XX.XX.151
IPsec Address 2: 47.XX.XX.87
NoteAfter you create a VPN gateway, the system automatically assigns two IPsec addresses to the VPN gateway.
BGP IP address
In addition to static routing, this topic also describes how to configure a strongSwan device to establish an IPsec-VPN connection that uses BGP dynamic routing. If you do not want to use BGP dynamic routing, skip this section. The following table describes the CIDR blocks for BGP dynamic routing.
Resource | Tunnel | BGP tunnel CIDR block | BGP IP address | BGP local ASN |
VPN gateway | Tunnel 1 | 169.254.10.0/30 Note In a VPN gateway, the CIDR block of each tunnel must be unique. | 169.254.10.1 | 65535 |
Tunnel 2 | 169.254.20.0/30 | 169.254.20.1 | ||
strongSwan device | Tunnel 1 | 169.254.10.0/30 | 169.254.10.2 | 65530 |
Tunnel 2 | 169.254.20.0/30 | 169.254.20.2 |
VPN configurations
The two tunnels use the same configurations. The VPN configurations on Alibaba Cloud and the strongSwan device must be the same for each tunnel.
Pre-shared key: ChangeMe***
IKE configurations
IKE version: ikev2
Negotiation mode: main
Encryption algorithm: aes
Authentication algorithm: sha1
DH group: group2
SA lifetime (seconds): 86400
IPsec configurations:
Encryption algorithm: aes
Authentication algorithm: sha1
DH group: group2
SA lifetime (seconds): 86400
Preparations on Alibaba Cloud
Complete the configuration on Alibaba Cloud based on the number of Internet egresses and routing method.
Two egresses and BGP dynamic routing
Refer to Connect a VPC to a data center in dual-tunnel mode and enable BGP dynamic routing and complete the Create a VPN gateway, Create a customer gateway, Create an IPsec-VPN connection, and Enable BGP automatic route advertisement steps.
The strongSwan device has two Internet egress IP addresses. Therefore, you must create two customer gateways.
When you create IPsec-VPN connections, select Tunnel 1 for Egress 1 and Tunnel 2 for Egress 2. Destination Routing Mode is selected in this example.
Two egresses and static routing
Refer to Connect a VPC to a data center in dual-tunnel mode and complete the Create a VPN gateway, Create a customer gateway, Create an IPsec-VPN connection, and Configure VPN gateway routing steps.
The strongSwan device has two Internet egress IP addresses. Therefore, you must create two customer gateways.
When you create IPsec-VPN connections, select Tunnel 1 for Egress 1 and Tunnel 2 for Egress 2. Destination Routing Mode is selected in this example.
One egress and BGP dynamic routing
Refer to Connect a VPC to a data center in dual-tunnel mode and enable BGP dynamic routing and complete the Create a VPN gateway, Create a customer gateway, Create an IPsec-VPN connection, and Enable BGP automatic route advertisement steps.
The strongSwan device has only one Internet egress IP address. Therefore, you need only to create one customer gateway.
When you create IPsec-VPN connections, select the two tunnels for the same customer gateway. Destination Routing Mode is selected in this example.
One egress and static routing
Refer to Connect a VPC to a data center in dual-tunnel mode and complete the Create a VPN gateway, Create a customer gateway, Create an IPsec-VPN connection, and Configure VPN gateway routing steps.
The strongSwan device has only one Internet egress IP address. Therefore, you need only to create one customer gateway.
When you create IPsec-VPN connections, configure protected data flows. Select the two tunnels for the same customer gateway.
For the local CIDR block, enter the CIDR block of the VPC, which is 192.168.0.0/16.
For the peer CIDR block, enter the CIDR block of the data center, which is 172.16.0.0/16.
In scenarios where IPsec-VPN connections are associated with transit routers, this method is not recommended. We recommend that you use BGP dynamic routing.
Configure the strongSwan device
In the following example, a strongSwan device that runs CentOS Stream 9 64-bit is used. For more information about other operating systems, see strongSwan documentation.
1. Configure an Allow firewall policy
Configure an Allow policy for ESP (IP protocol 50) on UDP port 500 and UDP port 4500.
iptables -I INPUT -p 50 -j ACCEPT
iptables -I INPUT -p udp --dport 500 -j ACCEPT
iptables -I INPUT -p udp --dport 4500 -j ACCEPT2. Enable traffic forwarding
echo 1 > /proc/sys/net/ipv4/ip_forwardThe preceding command is a temporary command. After you restart the strongSwan device, you must run the command again. If you want to enable traffic forwarding for the strongSwan device permanently, perform the following steps.
3. Install strongSwan
dnf install epel-release -y
dnf install strongswan-5.9.10 -y4. Configure the tunnels
Two egresses - static routing and BGP dynamic routing
Dual-egress is based on XFRM interfaces. To use XFRM interfaces, the strongSwan version must be 5.8.0 or later, the Linux kernel version must be 4.19 or later, the iproute2 version must be 5.1.0 or later, and the kernel must support the XFRM module. If lsmod | grep xfrm is not displayed, XFRM interfaces are not supported. For more information, see XFRM Interfaces on Linux.
Configure routes so that access from IPsec Address 1 goes through eth0 and access from IPsec Address 2 goes through eth1.
ip route add 47.XX.XX.151 via 172.16.20.253 dev eth0  #172.16.20.253 is the private gateway address of eth0.
ip route add 47.XX.XX.87 via 172.16.21.253 dev eth1   #172.16.20.253 is the private gateway address of eth1.
Make sure the following two IPsec addresses can be pinged.
ping 47.XX.XX.151
ping 47.XX.XX.87
Create two virtual network interfaces for establishing IPsec-VPN tunnels.
ip link add ipsec0 type xfrm dev eth0 if_id 42 # Create an XFRM virtual network interface for Tunnel 1, with the interface ID 42 and the public interface eth0 as the underlying interface. ip link add ipsec1 type xfrm dev eth1 if_id 43 # Create an XFRM virtual network interface for Tunnel 2, with the interface ID 43 and the public interface eth1 as the underlying interface. ip link set ipsec0 up # Start the XFRM virtual network interface for Tunnel 1. ip link set ipsec1 up # Start the XFRM virtual network interface for Tunnel 2.ImportantThe preceding configuration for creating virtual network interfaces is a temporary configuration. After you restart the strongSwan device, you must add the configuration again and run the
sudo systemctl restart strongswan;swanctl --load-allcommand. The command requires root permissions. If you want to configure a script that runs on system startup to automatically create virtual network interfaces after the strongSwan device is restarted, perform the following steps.Modify the strongSwan configuration file.
Back up the original strongSwan configuration file.
mv /etc/strongswan/swanctl/swanctl.conf /etc/strongswan/swanctl/swanctl.conf.bakCreate a strongSwan configuration file.
vi /etc/strongswan/swanctl/swanctl.confAdd and save the following configurations based on the example.
ImportantIf you plan to use static routing, enable the
updown = /root/connect_1.shandupdown = /root/connect_2.shcommands in the configuration file.connections { vco1 { # The VPN configurations of IPsec-VPN Tunnel 1. version = 2 # The IKE version, which must be the same as that configured for Tunnel 1 on Alibaba Cloud. A value of 2 indicates IKEv2. local_addrs = 172.16.20.80 # The IP address of the first local NIC. remote_addrs = 47.XX.XX.151 # Set the remote address of Tunnel 1 to the VPN gateway address of Tunnel 1 on Alibaba Cloud, which is IPsec Address 1. dpd_delay = 10 rekey_time = 84600 # The SA lifetime of Tunnel 1, which must be the same as that specified in the IKE configurations of Tunnel 1 on Alibaba Cloud. over_time = 1800 proposals = aes-sha1-modp1024 # The encryption algorithm, authentication algorithm, and DH group of Tunnel 1, which must be the same as those specified in the IKE configurations of Tunnel 1 on Alibaba Cloud. A value of group2 indicates modp1024. encap = yes local { auth = psk # Set the authentication algorithm of the data center to PSK. id = 120.XX.XX.202 # The public IP address of the first local egress. This value must be the same as RemoteId of Tunnel 1. } remote { auth = psk # Set the authentication algorithm of the VPC to PSK. id = 47.XX.XX.151 # IPsec Address 1 on the Alibaba Cloud side. This value must be the same as LocalId of Tunnel 1. } children { vco_child1 { local_ts = 0.0.0.0/0 # Specify that the CIDR block of the protected data flows for the destination-based route mode on Alibaba Cloud is 0.0.0.0/0. remote_ts = 0.0.0.0/0 # Specify that the CIDR block of the protected data flows for the destination-based route mode on Alibaba Cloud is 0.0.0.0/0. mode = tunnel rekey_time = 85500 life_time = 86400 # The SA lifetime of Tunnel 1, which must be the same as that specified in the IPsec configurations of Tunnel 1 on Alibaba Cloud. dpd_action = restart start_action = start close_action = start esp_proposals = aes-sha1-modp1024 # The encryption algorithm, authentication algorithm, and DH group of Tunnel 1, which must be the same as those specified in the IPsec configurations of Tunnel 1 on Alibaba Cloud. A value of group2 indicates modp1024. if_id_out = 42 # Specify that the XFRM virtual network interface of Tunnel 1 is used as the egress port and ingress port of Tunnel 1. if_id_in = 42 #updown = /root/connect_1.sh # Execute the /root/connect_1.sh script to configure routing based on the UP/DOWN status of Tunnel 1. This parameter is required only when static routing is used. } } } vco2 { # The VPN configurations of IPsec-VPN Tunnel 2. version = 2 # The IKE version, which must be the same as that configured for Tunnel 2 on Alibaba Cloud. A value of 2 indicates IKEv2. local_addrs = 172.16.21.248 # The IP address of the second local NIC. remote_addrs = 47.XX.XX.127 # Set the remote address of Tunnel 2 to the VPN gateway address of Tunnel 2 on Alibaba Cloud, which is IPsec address 2. dpd_delay = 10 rekey_time = 84600 # The SA lifecycle of Tunnel 2, which must be the same as that specified in the IKE configurations of Tunnel 2 on Alibaba Cloud. over_time = 1800 # proposals = aes-sha1-modp1024 # The encryption algorithm, authentication algorithm, and DH group of Tunnel 2, which must be the same as those specified in the IKE configurations of Tunnel 2 on Alibaba Cloud. A value of group2 indicates modp1024. encap = yes local { auth = psk # Set the authentication algorithm of the data center to PSK. id = 47.XX.XX.87 # The public IP address of the second local egress. This value must be the same as RemoteId of Tunnel 2. } remote { auth = psk # Set the authentication algorithm of the VPC to PSK. id = 47.XX.XX.127 # IPsec Address 2 on the Alibaba Cloud side. This value must be the same as LocalId of Tunnel 2. } children { vco_child2 { local_ts = 0.0.0.0/0 # Specify that the CIDR block of the protected data flows for the destination-based route mode on Alibaba Cloud is 0.0.0.0/0. remote_ts = 0.0.0.0/0 # Specify that the CIDR block of the protected data flows for the destination-based route mode on Alibaba Cloud is 0.0.0.0/0. mode = tunnel rekey_time = 85500 life_time = 86400 # The SA lifetime of Tunnel 2, which must be the same as that specified in the IPsec configurations of Tunnel 1 on Alibaba Cloud. dpd_action = restart start_action = start close_action = start esp_proposals = aes-sha1-modp1024 # The encryption algorithm, authentication algorithm, and DH group of Tunnel 2, which must be the same as those specified in the IPsec configurations of Tunnel 2 on Alibaba Cloud. A value of group2 indicates modp1024. if_id_out = 43 # Specify that the XFRM virtual network interface of Tunnel 2 is used as the egress port and ingress port of Tunnel 2. if_id_in = 43 #updown = /root/connect_2.sh # Execute the /root/connect_2.sh script to configure routing based on the UP/DOWN status of Tunnel 2. This parameter is required only when static routing is used. } } } } secrets { ike-vco1 { secret = ChangeMe*** # The PSK of Tunnel 1, which must be the same as that configured for Tunnel 1 on Alibaba Cloud. } ike-vco2 { secret = ChangeMe*** # The PSK of Tunnel 2, which must be the same as that configured for Tunnel 2 on Alibaba Cloud. } }
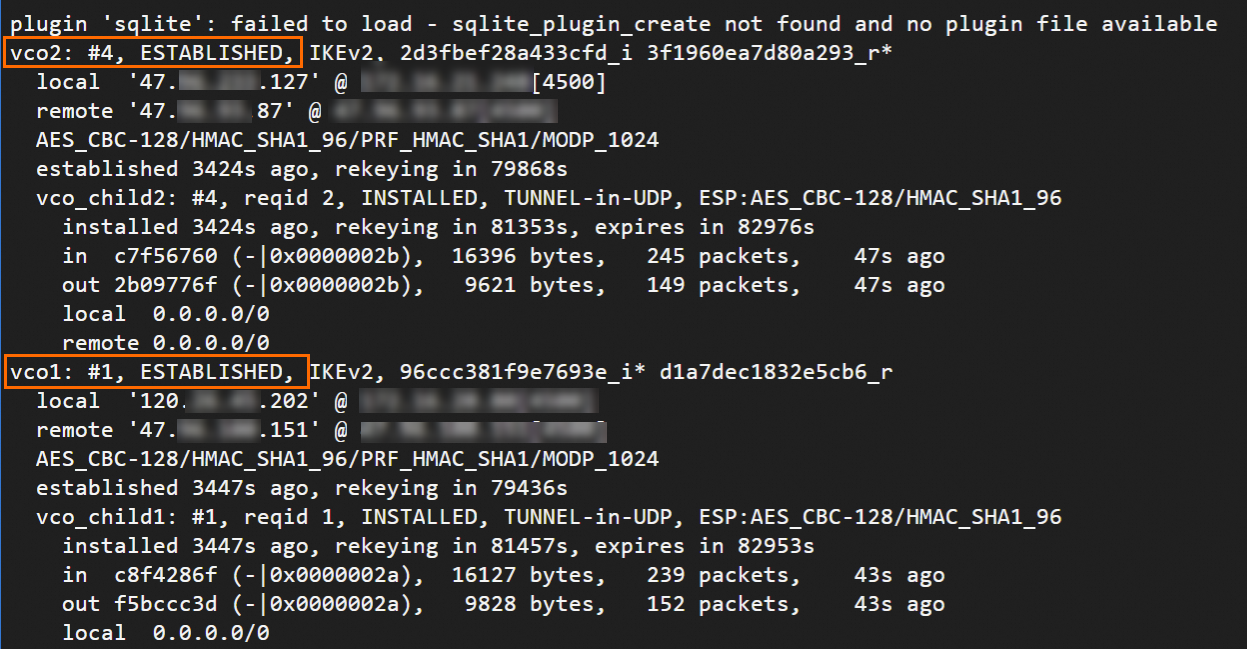
Restart the strongSwan process and view the tunnel status.
sudo systemctl restart strongswan
swanctl --load-all
watch swanctl --list-sas
In the following figure, the strongSwan device and VPN gateway are connected through an IPsec-VPN connection. You still need to configure routing so that they can communicate.
Configure routes.
Choose a routing method on demand.
BGP dynamic routing
NoteAfter the strongSwan device restarts, re-add the BGP configuration.
Run the following command to configure BGP IP addresses.
ip address add 169.254.10.2/30 dev ipsec0
ip address add 169.254.20.2/30 dev ipsec1
Install frr.
yum install -y frrRun the
vi /etc/frr/daemonscommand to enable BGP dynamic routing.Press
ito enter the edit mode. Change the value of the bgpd parameter toyesto enable BGP dynamic routing. PressEscto exit and enter:wqto save the change.Run the frr feature.
systemctl enable frr
systemctl restart frr
Add the BGP configuration.
Run the following command to access the configuration interface.
vtyshRun the following command to enter the configuration mode.
config terminalAdd the BGP configuration.
Run the following command to replace the following addresses with the actual ones.
Replace “169.254.10.1” and “169.254.20.1” with the actual tunnel BGP IP addresses on the Alibaba Cloud side.
Replace “65535” with the actual BGP ASN of the VPN gateway.
Replace “172.16.20.0/24” and “172.16.21.0/24” with the actual CIDR blocks of the data center.
route-map allow-all permit 1
exit

router bgp 65530
 bgp router-id 169.254.10.2
 neighbor 169.254.10.1 remote-as 65535
 neighbor 169.254.10.1 timers 10 30
 neighbor 169.254.20.1 remote-as 65535
 neighbor 169.254.20.1 timers 10 30

 address-family ipv4 unicast
  network 172.16.20.0/24
  network 172.16.21.0/24
  neighbor 169.254.10.1 soft-reconfiguration inbound
  neighbor 169.254.10.1 route-map allow-all in
  neighbor 169.254.10.1 route-map allow-all out
  neighbor 169.254.20.1 soft-reconfiguration inbound
  neighbor 169.254.20.1 route-map allow-all in
  neighbor 169.254.20.1 route-map allow-all out
  maximum-paths 32
 exit-address-family
exit
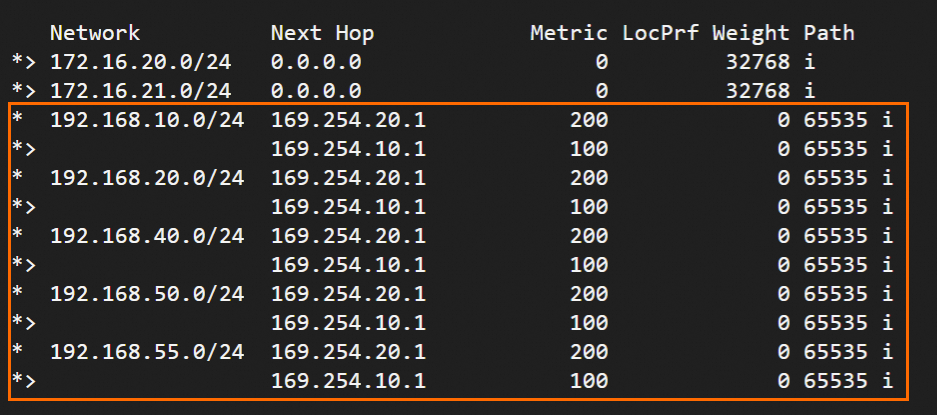
Run
exitto exit and runshow ip bgpto view BGP routes.The strongSwan device has learned routes from the VPC. The data center and VPC can communicate.
Static routing
Create two scripts for strongSwan and configure routes to forward traffic.
Create and edit /root/connect_1.sh.
vi /root/connect_1.shAdd and save the following script.
#!/usr/bin/env bash
if [ x"$PLUTO_VERB" == "xup-client" ]; then
	echo "ip route add 192.168.0.0/16 dev ipsec0" >> /root/vpn_route.log;ip route add 192.168.0.0/16 dev ipsec0 metric 100
elif [ x"$PLUTO_VERB" == "xdown-client" ]; then
	echo "ip route del 192.168.0.0/16 dev ipsec0" >> /root/vpn_route.log;ip route del 192.168.0.0/16 dev ipsec0 metric 100
fi
Script purpose: If the status of Tunnel 1 is UP, add a route to transmit traffic from the data center to the VPC whose CIDR block is 192.168.0.0/16 through the XFRM virtual network interface of Tunnel 1. In addition, set the metric value of this route to 100 to assign this route a higher priority than the route that points to the XFRM virtual network interface of Tunnel 2. If the status of Tunnel 1 is DOWN, withdraw the route.
Create and edit /root/connect_2.sh.
vi /root/connect_2.shAdd and save the following script.
#!/usr/bin/env bash
if [ x"$PLUTO_VERB" == "xup-client" ]; then
	echo "ip route add 192.168.0.0/16 dev ipsec1" >> /root/vpn_route.log;ip route add 192.168.0.0/16 dev ipsec1 metric 101
elif [ x"$PLUTO_VERB" == "xdown-client" ]; then
	echo "ip route del 192.168.0.0/16 dev ipsec1" >> /root/vpn_route.log;ip route del 192.168.0.0/16 dev ipsec1 metric 101
fi
Script purpose: If the status of Tunnel 2 is UP, add a route to transmit traffic from the data center to the VPC whose CIDR block is 192.168.0.0/16 through the XFRM virtual network interface of Tunnel 2. In addition, set the metric value of this route to 101 to assign this route a lower priority than the route that points to the XFRM virtual network interface of Tunnel 1. If the status of Tunnel 2 is DOWN, withdraw the route.
Run the following command to make the scripts executable:
sudo chmod +x /root/connect_1.sh
sudo chmod +x /root/connect_2.sh
Restart the strongSwan process.
sudo systemctl restart strongswanRun the following command to check whether the changes in the configuration file take effect:
route -n
One egress - BGP dynamic routing
BGP dynamic routing is based on XFRM interfaces. To use XFRM interfaces, the strongSwan version must be 5.8.0 or later, the Linux kernel version must be 4.19 or later, the iproute2 version must be 5.1.0 or later, and the kernel must support the XFRM module. If lsmod | grep xfrm is not displayed, XFRM interfaces are not supported. For more information, see XFRM Interfaces on Linux.
Create two virtual network interfaces for establishing IPsec-VPN tunnels.
ip link add ipsec0 type xfrm dev eth0 if_id 42 # Create an XFRM virtual network interface for Tunnel 1, with the interface ID 42 and the public interface eth0 as the underlying interface. ip link add ipsec1 type xfrm dev eth0 if_id 43 # Create an XFRM virtual network interface for Tunnel 2, with the interface ID 43 and the public interface eth0 as the underlying interface. ip link set ipsec0 up # Start the XFRM virtual network interface for Tunnel 1. ip link set ipsec1 up # Start the XFRM virtual network interface for Tunnel 2.ImportantThe preceding configuration for creating virtual network interfaces is a temporary configuration. After you restart the strongSwan device, you must add the configuration again and run the
sudo systemctl restart strongswan;swanctl --load-allcommand. The command requires root permissions. If you want to configure a script that runs on system startup to automatically create virtual network interfaces after the strongSwan device is restarted, perform the following steps.Modify the strongSwan configuration file.
Back up the original strongSwan configuration file.
mv /etc/strongswan/swanctl/swanctl.conf /etc/strongswan/swanctl/swanctl.conf.bakCreate a strongSwan configuration file.
vi /etc/strongswan/swanctl/swanctl.confAdd and save the following configurations based on the example.
connections {
   vco1 {                            # The VPN configurations of IPsec-VPN Tunnel 1.
      version = 2                    # The IKE version, which must be the same as that configured for Tunnel 1 on Alibaba Cloud. A value of 2 indicates IKEv2.
      local_addrs  = 172.16.20.80    # The private IP address of eth0.
      remote_addrs = 47.XX.XX.151    # Set the remote address of Tunnel 1 to the VPN gateway address of Tunnel 1 on Alibaba Cloud, which is IPsec Address 1.
      dpd_delay = 10
      rekey_time = 84600             # The SA lifetime of Tunnel 1, which must be the same as that specified in the IKE configurations of Tunnel 1 on Alibaba Cloud.
      over_time = 1800
      proposals = aes-sha1-modp1024  # The encryption algorithm, authentication algorithm, and DH group of Tunnel 1, which must be the same as those specified in the IKE configurations of Tunnel 1 on Alibaba Cloud. A value of group2 indicates modp1024.
      encap = yes

      local {
         auth = psk                  # Set the authentication algorithm of the data center to PSK.
         id = 120.XX.XX.202          # The IP address of the Internet egress of eth0. This value must be the same as RemoteId of Tunnel 1.
      }
      remote {
         auth = psk                  # Set the authentication algorithm of the VPC to PSK.
         id = 47.XX.XX.151           # IPsec Address 1 on the Alibaba Cloud side. This value must be the same as LocalId of Tunnel 1.
      }
      children {
         vco_child1 {
            local_ts  = 0.0.0.0/0    # Specify that the CIDR block of the protected data flows for the destination-based route mode on Alibaba Cloud is 0.0.0.0/0.
            remote_ts = 0.0.0.0/0    # Specify that the CIDR block of the protected data flows for the destination-based route mode on Alibaba Cloud is 0.0.0.0/0.
            mode = tunnel
            rekey_time = 85500
            life_time = 86400        # The SA lifetime of Tunnel 1, which must be the same as that specified in the IPsec configurations of Tunnel 1 on Alibaba Cloud.
            dpd_action = restart
            start_action = start
            close_action = start
            esp_proposals = aes-sha1-modp1024   # The encryption algorithm, authentication algorithm, and DH group of Tunnel 1, which must be the same as those specified in the IPsec configurations of Tunnel 1 on Alibaba Cloud. A value of group2 indicates modp1024.

            if_id_out = 42           # Specify that the XFRM virtual network interface of Tunnel 1 is used as the egress port and ingress port of Tunnel 1.
            if_id_in = 42
         }
      }
   }
  vco2 {                             # The VPN configurations of IPsec-VPN Tunnel 2.
      version = 2                    # The IKE version, which must be the same as that configured for Tunnel 2 on Alibaba Cloud. A value of 2 indicates IKEv2.
      local_addrs  = 172.16.20.80    # The private IP address of eth0.
      remote_addrs = 47.XX.XX.87     # Set the remote address of Tunnel 2 to the VPN gateway address of Tunnel 2 on Alibaba Cloud, which is IPsec address 2.
      dpd_delay = 10
      rekey_time = 84600             # The SA lifecycle of Tunnel 2, which must be the same as that specified in the IKE configurations of Tunnel 2 on Alibaba Cloud.
      over_time = 1800               #
      proposals = aes-sha1-modp1024  # The encryption algorithm, authentication algorithm, and DH group of Tunnel 2, which must be the same as those specified in the IKE configurations of Tunnel 2 on Alibaba Cloud. A value of group2 indicates modp1024.
      encap = yes

      local {
         auth = psk                  # Set the authentication algorithm of the data center to PSK.
         id = 120.XX.XX.202          # The IP address of the Internet egress of eth0. This value must be the same as RemoteId of Tunnel 2.
      }
      remote {
         auth = psk                  # Set the authentication algorithm of the VPC to PSK.
         id = 47.XX.XX.87            # IPsec Address 2 on the Alibaba Cloud side. This value must be the same as LocalId of Tunnel 2.
      }
      children {
         vco_child2 {
            local_ts  = 0.0.0.0/0    # Specify that the CIDR block of the protected data flows for the destination-based route mode on Alibaba Cloud is 0.0.0.0/0.
            remote_ts = 0.0.0.0/0    # Specify that the CIDR block of the protected data flows for the destination-based route mode on Alibaba Cloud is 0.0.0.0/0.
            mode = tunnel
            rekey_time = 85500
            life_time = 86400        # The SA lifetime of Tunnel 2, which must be the same as that specified in the IPsec configurations of Tunnel 1 on Alibaba Cloud.
            dpd_action = restart
            start_action = start
            close_action = start
            esp_proposals = aes-sha1-modp1024     # The encryption algorithm, authentication algorithm, and DH group of Tunnel 2, which must be the same as those specified in the IPsec configurations of Tunnel 2 on Alibaba Cloud. A value of group2 indicates modp1024.
            if_id_out = 43           # Specify that the XFRM virtual network interface of Tunnel 2 is used as the egress port and ingress port of Tunnel 2.
            if_id_in = 43

         }
      }
   }
}

secrets {
   ike-vco1 {
      secret = ChangeMe***            # The PSK of Tunnel 1, which must be the same as that configured for Tunnel 1 on Alibaba Cloud.
   }
   ike-vco2 {
      secret = ChangeMe***            # The PSK of Tunnel 2, which must be the same as that configured for Tunnel 2 on Alibaba Cloud.
   }
}
Restart the strongSwan process and view the tunnel status.
sudo systemctl restart strongswan
swanctl --load-all
watch swanctl --list-sas
In the following figure, the strongSwan device and VPN gateway are connected through an IPsec-VPN connection. You still need to configure routing so that they can communicate.

Configure BGP dynamic routing.
NoteAfter the strongSwan device restarts, re-add the BGP configuration.
Run the following command to configure BGP IP addresses.
ip address add 169.254.10.2/30 dev ipsec0
ip address add 169.254.20.2/30 dev ipsec1
Install frr.
yum install -y frrRun the
vi /etc/frr/daemonscommand to enable BGP dynamic routing.Press
ito enter the edit mode. Change the value of the bgpd parameter toyesto enable BGP dynamic routing. PressEscto exit and enter:wqto save the change.Run the frr feature.
systemctl enable frr
systemctl restart frr
Add the BGP configuration.
Run the following command to access the configuration interface.
vtyshRun the following command to enter the configuration mode.
config terminalAdd the BGP configuration.
Run the following command to replace the following addresses with the actual ones.
Replace “169.254.10.1” and “169.254.20.1” with the actual tunnel BGP IP addresses on the Alibaba Cloud side.
Replace “65535” with the actual BGP ASN of the VPN gateway.
Replace “172.16.20.0/24” and “172.16.21.0/24” with the actual CIDR blocks of the data center.
route-map allow-all permit 1
exit

router bgp 65530
 bgp router-id 169.254.10.2
 neighbor 169.254.10.1 remote-as 65535
 neighbor 169.254.10.1 timers 10 30
 neighbor 169.254.20.1 remote-as 65535
 neighbor 169.254.20.1 timers 10 30

 address-family ipv4 unicast
  network 172.16.20.0/24
  network 172.16.21.0/24
  neighbor 169.254.10.1 soft-reconfiguration inbound
  neighbor 169.254.10.1 route-map allow-all in
  neighbor 169.254.10.1 route-map allow-all out
  neighbor 169.254.20.1 soft-reconfiguration inbound
  neighbor 169.254.20.1 route-map allow-all in
  neighbor 169.254.20.1 route-map allow-all out
  maximum-paths 32
 exit-address-family
exit
Run
exitto exit and runshow ip bgpto view BGP routes.The strongSwan device has learned routes from the VPC. The data center and VPC can communicate.
One egress - static routing
If you use this method and the active tunnel on Alibaba Cloud is down, traffic is automatically failed over to the standby tunnel. This may cause service interruptions. You can check the value of XfrmInTmplMismatch in the /proc/net/xfrm_stat file to determine whether traffic is failed over to the standby tunnel. You can also modify the priority value of the standby tunnel in the /etc/strongswan/swanctl/swanctl.conf file to preferably route traffic from the data center to the cloud through the standby tunnel.
Back up the original strongSwan configuration file.
mv /etc/strongswan/swanctl/swanctl.conf /etc/strongswan/swanctl/swanctl.conf.bakCreate a strongSwan configuration file.
vi /etc/strongswan/swanctl/swanctl.confAdd and save the following configurations based on the Examples section.
connections {
   vco1 {                            # The VPN configurations of IPsec-VPN Tunnel 1.
      version = 2                    # The IKE version, which must be the same as that configured for Tunnel 1 on Alibaba Cloud. A value of 2 indicates IKEv2.
      local_addrs  = 172.16.20.80      # The private IP addess of eth0.
      remote_addrs = 47.XX.XX.151      # Set the remote address of Tunnel 1 to the VPN gateway address of Tunnel 1 on Alibaba Cloud, which is IPsec Address 1.
      dpd_delay = 10
      rekey_time = 84600             # The SA lifetime of Tunnel 1, which must be the same as that specified in the IKE configurations of Tunnel 1 on Alibaba Cloud.
      over_time = 1800
      proposals = aes-sha1-modp1024  # The encryption algorithm, authentication algorithm, and DH group of Tunnel 1, which must be the same as those specified in the IKE configurations of Tunnel 1 on Alibaba Cloud. A value of group2 indicates modp1024.
      encap = yes

      local {
         auth = psk                   # Set the authentication algorithm of the data center to PSK.
         id = 120.XX.XX.202            # The IP address of the local Internet egress. This value must be the same as RemoteId of Tunnel 1.
      }
      remote {
         auth = psk                  # Set the authentication algorithm of the VPC to PSK.
         id = 120.XX.XX.202            # IPsec Address 1 on the Alibaba Cloud side. This value must be the same as LocalId of Tunnel 1.
      }
      children {
         vco_child1 {
            local_ts  = 172.16.0.0/16   # The local protected data flows. Enter the private CIDR block of the data center, which is 172.16.0.0/16.
            remote_ts = 192.168.0.0/16  # The protected data flows on the Alibaba Cloud side. Enter the VPC CIDR block, which is 192.168.0.0/16.
            mode = tunnel
            rekey_time = 85500
            life_time = 86400        # The SA lifetime of Tunnel 1, which must be the same as that specified in the IPsec configurations of Tunnel 1 on Alibaba Cloud.
            dpd_action = restart
            start_action = start
            close_action = start
            esp_proposals = aes-sha1-modp1024   # The encryption algorithm, authentication algorithm, and DH group of Tunnel 1, which must be the same as those specified in the IPsec configurations of Tunnel 1 on Alibaba Cloud. A value of group2 indicates modp1024.
            priority = 1                        # The priority of Tunnel 1. Prioritize Tunnel 1.
         }
      }
   }
  vco2 {                             # The VPN configurations of IPsec-VPN Tunnel 2.
      version = 2                    # The IKE version, which must be the same as that configured for Tunnel 2 on Alibaba Cloud. A value of 2 indicates IKEv2.
      local_addrs  = 172.16.20.80    # The private IP address of eth0.
      remote_addrs = 47.XX.XX.87     # Set the remote address of Tunnel 2 to the VPN gateway address of Tunnel 2 on Alibaba Cloud, which is IPsec address 2.
      dpd_delay = 10
      rekey_time = 84600             # The SA lifetime of Tunnel 2, which must be the same as that specified in the IKE configurations of Tunnel 2 on Alibaba Cloud.
      over_time = 1800
      proposals = aes-sha1-modp1024  # The encryption algorithm, authentication algorithm, and DH group of Tunnel 2, which must be the same as those specified in the IKE configurations of Tunnel 2 on Alibaba Cloud. A value of group2 indicates modp1024.
      encap = yes

      local {
         auth = psk                  # Set the authentication algorithm of the data center to PSK.
         id = 120.XX.XX.202          # The public IP address of the local Internet egress. This value must be the same as RemoteId of Tunnel 2.
      }
      remote {
         auth = psk                  # Set the authentication algorithm of the VPC to PSK.
         id = 47.XX.XX.87            #  IPsec Address 2 on the Alibaba Cloud side. This value must be the same as LocalId of Tunnel 2.
      }
      children {
         vco_child2 {
            local_ts  = 172.16.0.0/16     # The local protected data flows. Enter the private CIDR block of the data center, which is 172.16.0.0/16.
            remote_ts =  192.168.0.0/16   # The protected data flows on the Alibaba Cloud side. Enter the VPC CIDR block, which is 192.168.0.0/16.
            mode = tunnel
            rekey_time = 85500
            life_time = 86400        # The SA lifetime of Tunnel 2, which must be the same as that specified in the IPsec configurations of Tunnel 2 on Alibaba Cloud.
            dpd_action = restart
            start_action = start
            close_action = start
            esp_proposals = aes-sha1-modp1024     # The encryption algorithm, authentication algorithm, and DH group of Tunnel 2, which must be the same as those specified in the IPsec configurations of Tunnel 2 on Alibaba Cloud. A value of group2 indicates modp1024.
            priority = 2                          # The priority of Tunnel 2, which is lower than Tunnel 1.
         }
      }
   }
}

secrets {
   ike-vco1 {
      secret = ChangeMe***            # The PSK of Tunnel 1, which must be the same as that configured for Tunnel 1 on Alibaba Cloud.
   }
   ike-vco2 {
      secret = ChangeMe***            # The PSK of Tunnel 2, which must be the same as that configured for Tunnel 2 on Alibaba Cloud.
   }
}
Restart the strongSwan process and view the tunnel status.
sudo systemctl restart strongswan
swanctl --load-all
watch swanctl --list-sas
In the following figure, the strongSwan device and VPN gateway are connected through an IPsec-VPN connection. The data center and VPC can communicate.

5. Test the connectivity and high availability.
Verify network connectivity between the data center and VPC.
If echo reply packets are returned after you
pingECS instances in the VPC from a client in the data center, the connection is established.ping <The IP address of an ECS instance in the VPC>Test the high availability of the IPsec-VPN connection.
Close the active tunnel when the connection is up.
You can close the active tunnel by modifying the pre-shared key of the active tunnel. The active tunnel is closed when the two sides of the tunnel use different pre-shared keys.
After the active tunnel is closed, you can run the
pingcommand to check the connectivity. If echo reply packets are returned after youpingan ECS instance, it indicates that the standby tunnel takes over after the active tunnel is down.
FAQ
How do I configure the strongSwan device when IPsec-VPN connections are associated with transit routers?
Refer to the preceding steps and configure the strongSwan device. We recommend that you use BGP dynamic routing. You can view the routes learned from the VPC on the strongSwan device. The two tunnels of the IPsec-VPN connection are used for ECMP routing. 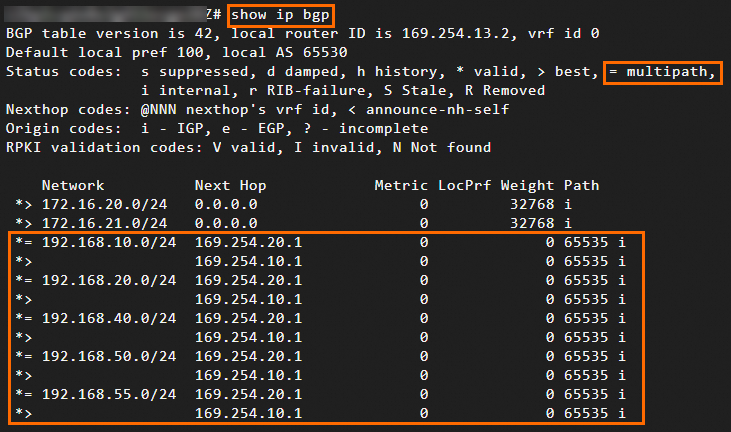
Is IKEv1 supported by IPsec-VPN connections created by using strongSwan?
Yes, a VPN gateway can forward traffic of Elastic Compute Service (ECS) instances that are deployed in different zones of a VPC.
To use IKEv1, specify version = 1 when you configure the /etc/strongswan/swanctl/swanctl.conf file.
How do I specify protected data flows?
To specify protected data flows, add CIDR blocks as described in the following code block when you configure the /etc/strongswan/swanctl/swanctl.conf file. Make sure that protected data flows are specified for the IPsec-VPN connection on the Alibaba Cloud side.
If you need to specify multiple CIDR blocks on the data center side or Alibaba Cloud side, the strongSwan device and the IPsec-VPN connection on the Alibaba Cloud side must use IKEv2.
children {
         vco_child1 {
            local_ts  = 192.168.20.0/24,192.168.50.0/24    # The CIDR block of the data center.
            remote_ts = 10.0.0.0/16    # The CIDR block of the VPC.
         }
}
How do I configure a strongSwan device whose NIC is assigned a public IP address?
In such non-NAT scenarios, the visible IP addresses on the strongSwan device are public IP addresses. You need to change the local_addrs field of each tunnel in the /etc/strongswan/swanctl/swanctl.conf file to the corresponding public IP address.
connections {
   vco1 {
      local_addrs  = 1.1.XX.XX     # The public IP address assigned to the NIC of the strongSwan device.
   }
}
How do I configure the single-tunnel mode?
If your VPN gateway supports only single-tunnel IPsec-VPN connections, we recommend that you upgrade your VPN gateway to enable the dual-tunnel mode. IPsec-VPN connections in dual-tunnel mode support disaster recovery across zones. This effectively enhances the high availability of the network. For more information, see Upgrade a VPN gateway to enable the dual-tunnel mode.
Configure a FortiGate firewall to use a single tunnel
Scenarios
The following scenario is an example. You can configure strongSwan on an on-premises gateway to establish dual-tunnel IPsec-VPN connections to Alibaba Cloud.

Subnetting
Data center side
Private CIDR block: 10.0.0.0/16
strongSwan device: NIC eth0 uses 10.0.0.1 and NAT-mapped egress 1 uses 1.1.XX.XX
NoteFor more information about non-NAT scenarios, see How do I configure a strongSwan device whose NIC is assigned a public IP address?
Alibaba Cloud side
VPC CIDR block: 172.16.0.0/16
vSwitch1 CIDR block: 172.16.1.0/24
vSwitch2 CIDR block: 172.16.2.0/24
VPN gateway
IPsec address: 3.3.XX.XX
NoteAfter you create a VPN gateway, the system automatically assigns an IPsec address to the VPN gateway.
VPN configurations
Make sure that the configurations on the strongSwan device and on Alibaba Cloud are the same.
Pre-shared key: ChangeMe***
IKE configurations
IKE version: ikev2
Negotiation mode: main
Encryption algorithm: aes
Authentication algorithm: sha1
DH group: group2
SA lifetime (seconds): 86400
IPsec configurations:
Encryption algorithm: aes
Authentication algorithm: sha1
DH group: group2
SA lifetime (seconds): 86400
Preparations on Alibaba Cloud
Before you configure the strongSwan device, perform the following steps on the Alibaba Cloud side: Create a VPN gateway, Create a customer gateway, Create an IPsec-VPN connection, and Configure VPN gateway routes. For more information, see Connect a VPC to a data center in single-tunnel mode.
When you create an IPsec-VPN connection, set Routing Mode to Protected Data Flow.
For the local CIDR block, enter the CIDR block of the VPC, which is 172.16.0.0/16.
For the peer CIDR block, enter the CIDR block of the data center, which is 10.0.0.0/16.
Configure the strongSwan device
In the following example, a strongSwan device that runs CentOS Stream 9 64-bit is used. For more information about other operating systems, see strongSwan documentation.
1. Configure an Allow firewall policy
Configure an Allow policy for ESP (IP protocol 50) on UDP port 500 and UDP port 4500.
iptables -I INPUT -p 50 -j ACCEPT
iptables -I INPUT -p udp --dport 500 -j ACCEPT
iptables -I INPUT -p udp --dport 4500 -j ACCEPT2. Enable traffic forwarding
echo 1 > /proc/sys/net/ipv4/ip_forwardThe preceding command is a temporary command. After you restart the strongSwan device, you must run the command again. If you want to enable traffic forwarding for the strongSwan device permanently, perform the following steps.
3. Install strongSwan
dnf install epel-release -y
dnf install strongswan-5.9.10 -y4. Configure the tunnel
Start configuration based on the strongSwan protected data flows.
Back up the original strongSwan configuration file.
mv /etc/strongswan/swanctl/swanctl.conf /etc/strongswan/swanctl/swanctl.conf.bakCreate a strongSwan configuration file.
vi /etc/strongswan/swanctl/swanctl.confAdd and save the following configurations based on the example:
connections {
   vco1 {                            # The VPN configurations of IPsec-VPN Tunnel 1.
      version = 2                    # The IKE version, which must be the same as that configured for Tunnel 1 on Alibaba Cloud. A value of 2 indicates IKEv2.
      local_addrs  = 10.0.0.1        # The IP address of the local NIC.
      remote_addrs = 3.3.XX.XX     # Set the remote address of Tunnel 1 to the VPN gateway address of Tunnel 1 on Alibaba Cloud, which is IPsec Address 1.
      dpd_delay = 10
      rekey_time = 84600             # The SA lifetime of Tunnel 1, which must be the same as that specified in the IKE configurations of Tunnel 1 on Alibaba Cloud.
      over_time = 1800
      proposals = aes-sha1-modp1024  # The encryption algorithm, authentication algorithm, and DH group of Tunnel 1, which must be the same as those specified in the IKE configurations of Tunnel 1 on Alibaba Cloud. A value of group2 indicates modp1024.
      encap = yes

      local {
         auth = psk                  # Set the authentication algorithm of the data center to PSK.
         id = 1.1.XX.XX              # The IP address of the Internet egress. This value must be the same as RemoteId of Tunnel 1.
      }
      remote {
         auth = psk                  # Set the authentication algorithm of the VPC to PSK.
         id = 3.3.XX.XX              # The IPsec address on the Alibaba Cloud side. This value must be the same as LocalId of Tunnel 1.
      }
      children {
         vco_child1 {
            local_ts  = 10.0.0.0/16    # Specify that the CIDR block of the protected data flows for the destination-based route mode on Alibaba Cloud is 0.0.0.0/0.
            remote_ts = 172.16.0.0/16    # Specify that the CIDR block of the protected data flows for the destination-based route mode on Alibaba Cloud is 0.0.0.0/0.
            mode = tunnel
            rekey_time = 85500
            life_time = 86400        # The SA lifetime of Tunnel 1, which must be the same as that specified in the IPsec configurations of Tunnel 1 on Alibaba Cloud.
            dpd_action = restart
            start_action = start
            close_action = start
            esp_proposals = aes-sha1-modp1024   # The encryption algorithm, authentication algorithm, and DH group of Tunnel 1, which must be the same as those specified in the IPsec configurations of Tunnel 1 on Alibaba Cloud. A value of group2 indicates modp1024.
         }
      }
   }

}

secrets {
   ike-vco1 {
      secret = ChangeMe***            # The PSK of Tunnel 1, which must be the same as that configured for Tunnel 1 on Alibaba Cloud.
   }
}
Restart the strongSwan process.
systemctl restart strongswanCheck the tunnel status.
watch swanctl --list-sas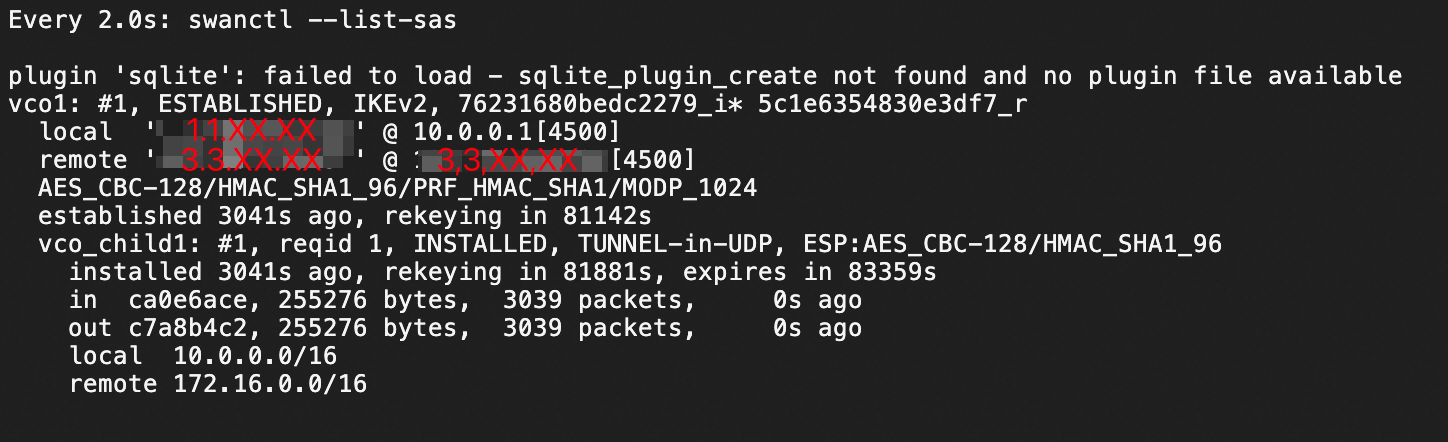
As shown in the figure, an IPsec-VPN connection is established between the strongSwan device and the VPN gateway.
5. Test the connectivity
Test the connectivity between the strongSwan device and the VPC:
If echo reply packets are returned after you ping ECS instances in the VPC from the strongSwan device, the connection is established.
ping <The IP address of an ECS instance in the VPC>