ApsaraVideo VOD is an all-in-one solution that integrates media management, processing, and distribution. This guide walks you through building a secure, cost-effective, and production-ready video-on-demand platform from scratch.
Before you begin
Log on to the ApsaraVideo VOD console and activate the service. Choose either the pay-as-you-go or resource plan billing method. For details, see Billing overview.
ApsaraVideo VOD offers a free trial for new users to help you explore the service.
Region selection
ApsaraVideo VOD services are isolated by region. Choose a nearby region to reduce network latency and improve data transfer speeds. Supported features vary by region. For details, see Service regions.
Set up your video-on-demand platform
Step 1: Configure storage
Go to the Storage page in the ApsaraVideo VOD console. From the menu bar at the top, select the region where you want to activate the service.
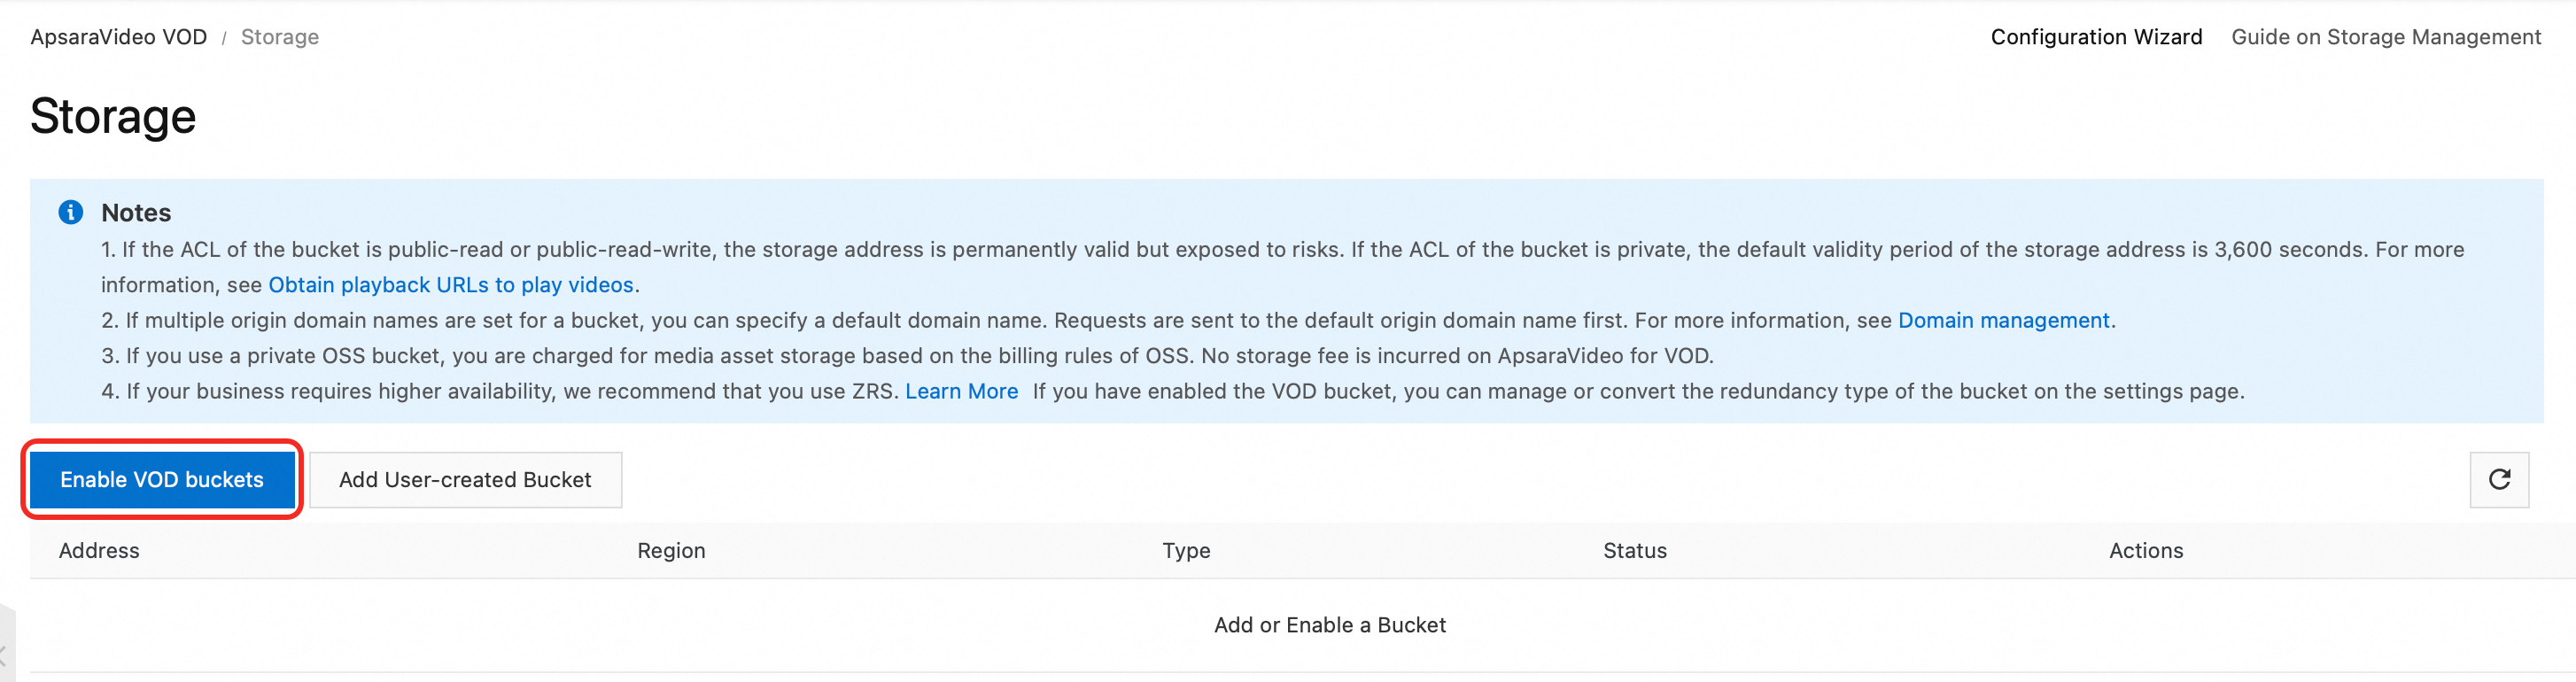
Click Enable VOD Bucket and select a redundancy type: Enabling a storage location may take some time. The storage address is available only after its status changes to Normal.
Zone-redundant storage (ZRS): Stores data across multiple zones within the same region. Data remains accessible even if a zone becomes unavailable.
Locally redundant storage (LRS): Stores data on multiple devices across separate facilities within a single zone. Ensures data durability and availability in the event of hardware failure.
Step 2: Upload audio and video files
Configure a transcoding template group before uploading audio and video files. This ensures that versions in multiple definitions are automatically generated after upload, which optimizes the playback experience and saves bandwidth.
(Optional) Create a transcoding template group
Go to the Transcoding Template Groups page. Click Create Transcoding Template Group, set the required parameters, and save the configuration. For details, see Transcoding.

Choose an upload method
Method | Best for | Description |
SDK upload (Recommended) | Production environments | Backend calls an SDK to get an upload credential. The client uploads directly to ApsaraVideo VOD. Most secure and efficient. See Overview of media upload. |
Console upload | Small files or testing | Upload from the Audio/Video page in the console. |
Batch upload from URLs | Offline migration | Pull files from URLs when files are not stored locally. See Batch upload by pulling from URLs. |
Windows client | Batch uploading large files |
Upload using an SDK (Recommended)
The backend service calls an SDK to obtain an upload credential, and the client (web browser or app) uploads the file directly to ApsaraVideo VOD.
# Python example: The backend service obtains an upload credential and address.
from aliyunsdkvod.request.v20170321 import CreateUploadVideoRequest
from aliyunsdkcore.client import AcsClient
import json

# 1. Initialize the client.
# Replace the placeholders with your AccessKey ID, AccessKey secret, and region ID.
client = AcsClient('your-access-key-id', 'your-access-key-secret', 'cn-shanghai')

# 2. Create an API request and set the parameters.
request = CreateUploadVideoRequest.CreateUploadVideoRequest()
request.set_Title('My Test Video')
request.set_FileName('video_test.mp4')
# request.set_TemplateGroupId('your-transcode-template-group-id') # Optional. Specify a transcoding template.

# 3. Send the request and obtain the response.
response = client.do_action_with_exception(request)
response_data = json.loads(response)

# 4. Return UploadAddress and UploadAuth to the client.
upload_address = response_data['UploadAddress']
upload_auth = response_data['UploadAuth']
video_id = response_data['VideoId']

# After the client obtains the credential, use the upload SDK to upload the file.
Upload using the console
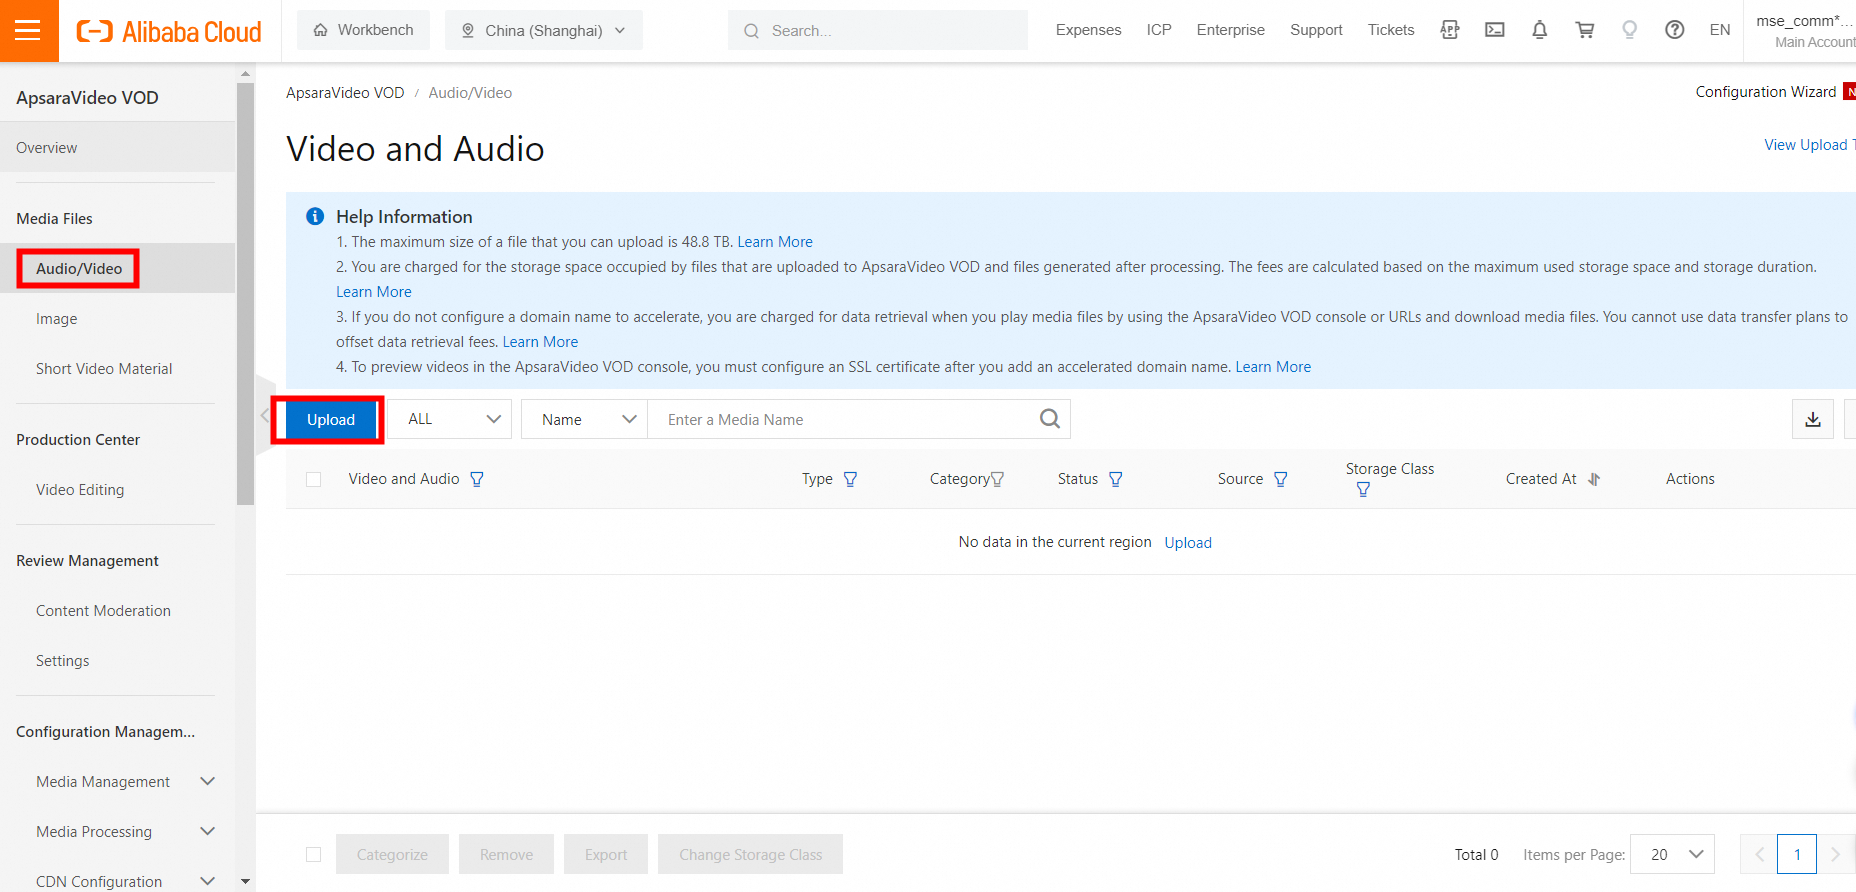
Go to the Audio/Video page in the ApsaraVideo VOD console. Click Upload, then click Add Media. Select a local file or drag the file to the upload area.
(Optional) Step 3: Configure an accelerated domain name
Streaming directly from a playback URL incurs charges based on storage outbound traffic. To reduce costs, configure an accelerated domain name. The acceleration service fee is lower than the fee for outbound traffic from storage. For details, see Add an accelerated domain name.
Step 4: Play the media file
Option 1: Playback credential (Recommended)
Backend: obtain a playback credential
The backend service calls an API to dynamically generate a time-limited playback credential (PlayAuth) for each playback request.
# Python example: Obtain a playback credential.
from aliyunsdkvod.request.v20170321 import GetVideoPlayAuthRequest

# The client has been initialized in the upload step.
request = GetVideoPlayAuthRequest.GetVideoPlayAuthRequest()
request.set_VideoId('your-video-id') # Replace the placeholder with the actual VideoId.
request.set_AuthInfoTimeout(3000)  # The validity period of the credential in seconds. In this example, the period is 50 minutes.

response = client.do_action_with_exception(request)
play_auth = json.loads(response)['PlayAuth']

# Return the obtained play_auth and video_id to the frontend.
Frontend: integrate the player
The frontend player uses the vid and playAuth obtained from the backend to initialize playback.
Web
<!-- Web player example -->
<div id="player-container"></div>
<script src="https://g.alicdn.com/de/prismplayer/2.15.2/aliplayer-min.js"></script>

<script>
  var player = new Aliplayer({
    id: 'player-container',
    width: '100%',
    height: '500px',
    vid: 'your-video-id',      // Obtained from the backend
    playauth: 'your-play-auth', // Obtained from the backend
    cover: 'https://your-domain.com/cover.jpg' // Thumbnail URL
  }, function (player) {
    console.log('The player is created.');
  });
</script>
Android
// 1. Create a player.
AliPlayer player = AliPlayerFactory.createAliPlayer(context);

// 2. Configure the playback source.
VidAuth vidAuth = new VidAuth();
vidAuth.setVid("your-video-id");
vidAuth.setPlayAuth("your-play-auth");
vidAuth.setRegion("cn-shanghai"); // Set the region.

// 3. Prepare for playback.
player.setDataSource(vidAuth);
player.prepare();
iOS
// 1. Create a player.
let player = AliPlayer()

// 2. Configure the playback source.
let vidAuth = AVPVidAuthSource()
vidAuth.vid = "your-video-id"
vidAuth.playAuth = "your-play-auth"
vidAuth.region = "cn-shanghai" // Set the region.

// 3. Prepare for playback.
player.setSource(vidAuth)
player.prepare()
Option 2: URL signing
URL signing appends signature information to the URL. This method is less secure than using playback credentials and is suitable for scenarios where modifying the player is inconvenient. For details, see URL signing.
Option 3: Web player testing
For testing and demonstration, use the demo web player to play media files.
Go to the Audio/Video page in the ApsaraVideo VOD console. In the Actions column of the target video, click Manage.
Select the Video URL tab. In the Actions column of the target definition, click Copy.
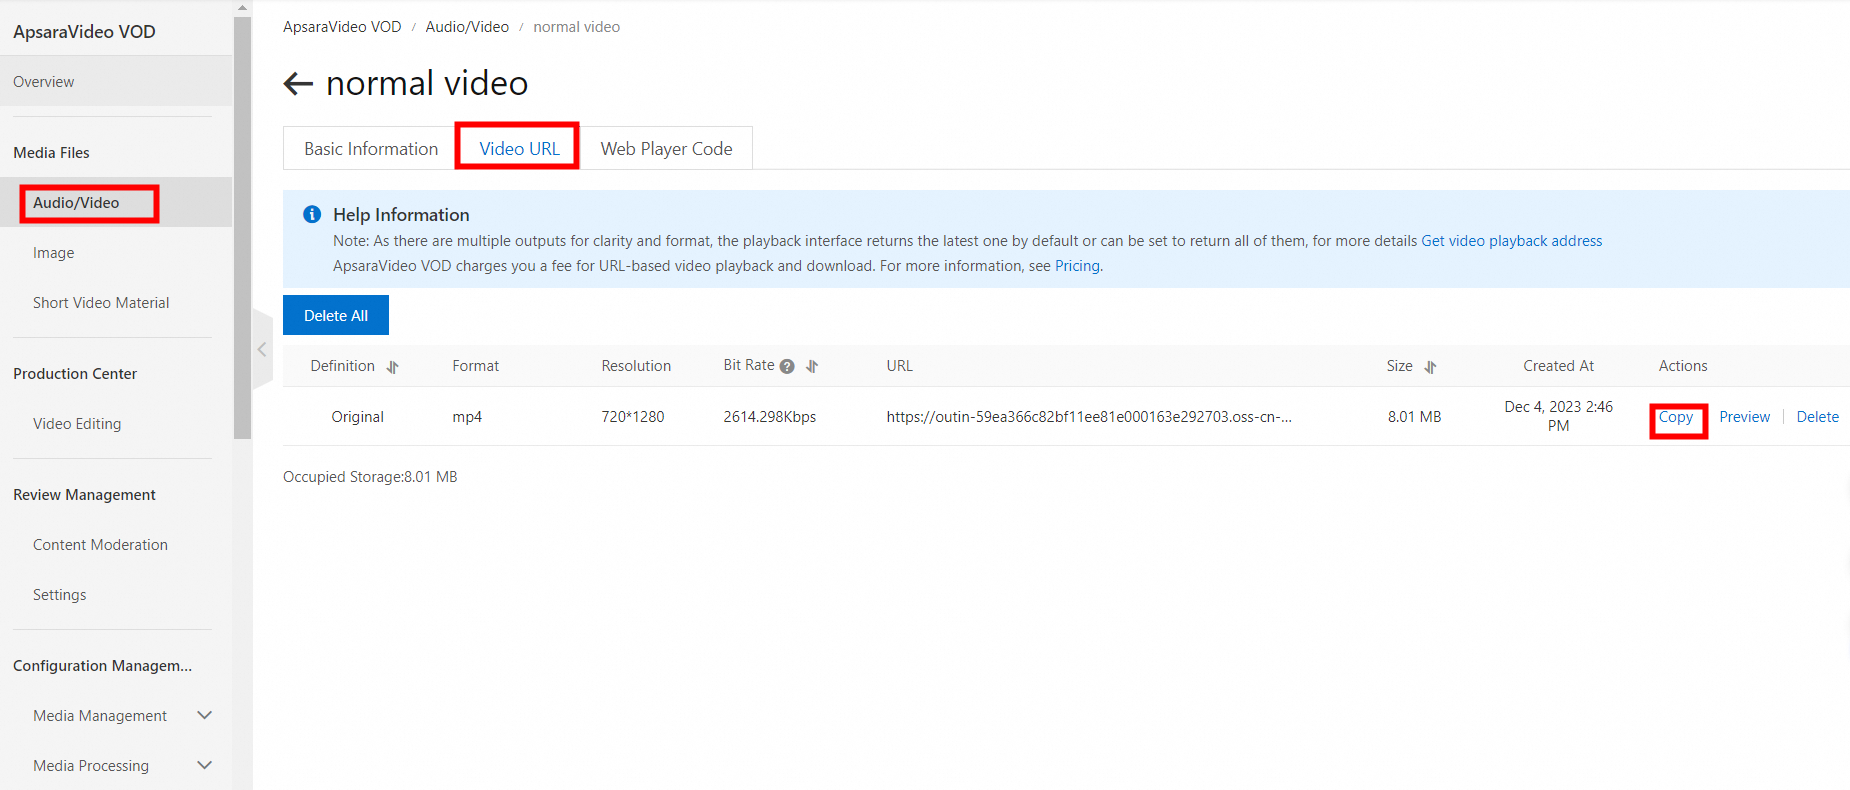
Use the playback URL in the web player to play the video.
References
Transcoding: Set a transcoding template to automatically transcode videos upon upload and generate outputs in multiple definitions.
Workflow: Set up a workflow to automatically perform video processing tasks such as transcoding, taking snapshots, and adding watermarks after a video is uploaded.
Video editing: Perform professional video editing online or using an API or SDK.
Add an accelerated domain name: Configure an accelerated domain name to speed up video uploads and downloads and receive traffic discounts.
FAQ
How do I upload media files in batches?
Upload multiple audio and video files at a time using a PC client, batch uploading from URLs, or an upload SDK. For details, see Overview of media upload.
How do I migrate media files from OSS to ApsaraVideo VOD?
Two options are available:
Add your OSS bucket directly to ApsaraVideo VOD. Both of the following conditions must be met:
An OSS bucket of the Standard storage class exists in the destination region.
ApsaraVideo VOD is authorized to access your OSS resources on the RAM Quick Authorization page.
Prepare source file addresses and use an upload tool for migration. For details, see Overview of media upload.