Integrate public events in the Alibaba Cloud ticket system into EventBridge
This topic describes how to integrate public event in the AlibabaCloud ticket system into Event Bridge.The Alibaba Cloud ticket system provides the following types of public events: a ticket is created, a dialogue is started, and the status of a ticket is changed. If you want to listen to ticket-related events submitted by your Alibaba Cloud account, you can refer to this topic to integrate public events in the Alibaba Cloud ticket system into EventBridge.
Prerequisites
EventBridge is activated. For more information, see Step 1: Activate EventBridge.
An account ID that is provided by the Alibaba Cloud ticket system is obtained.
You must submit a ticket or contact your business manager to apply to integrate public events in the Alibaba Cloud ticket system into EventBridge. After your application is passed, the Alibaba Cloud ticket system provides an account ID to you.
Procedure
Create a RAM role
For security reasons, you must create a Resource Access Management (RAM) role and use the RAM role to integrate public events in the Alibaba Cloud ticket system into Eventbridge. Make sure that the required permissions are granted to the RAM role.
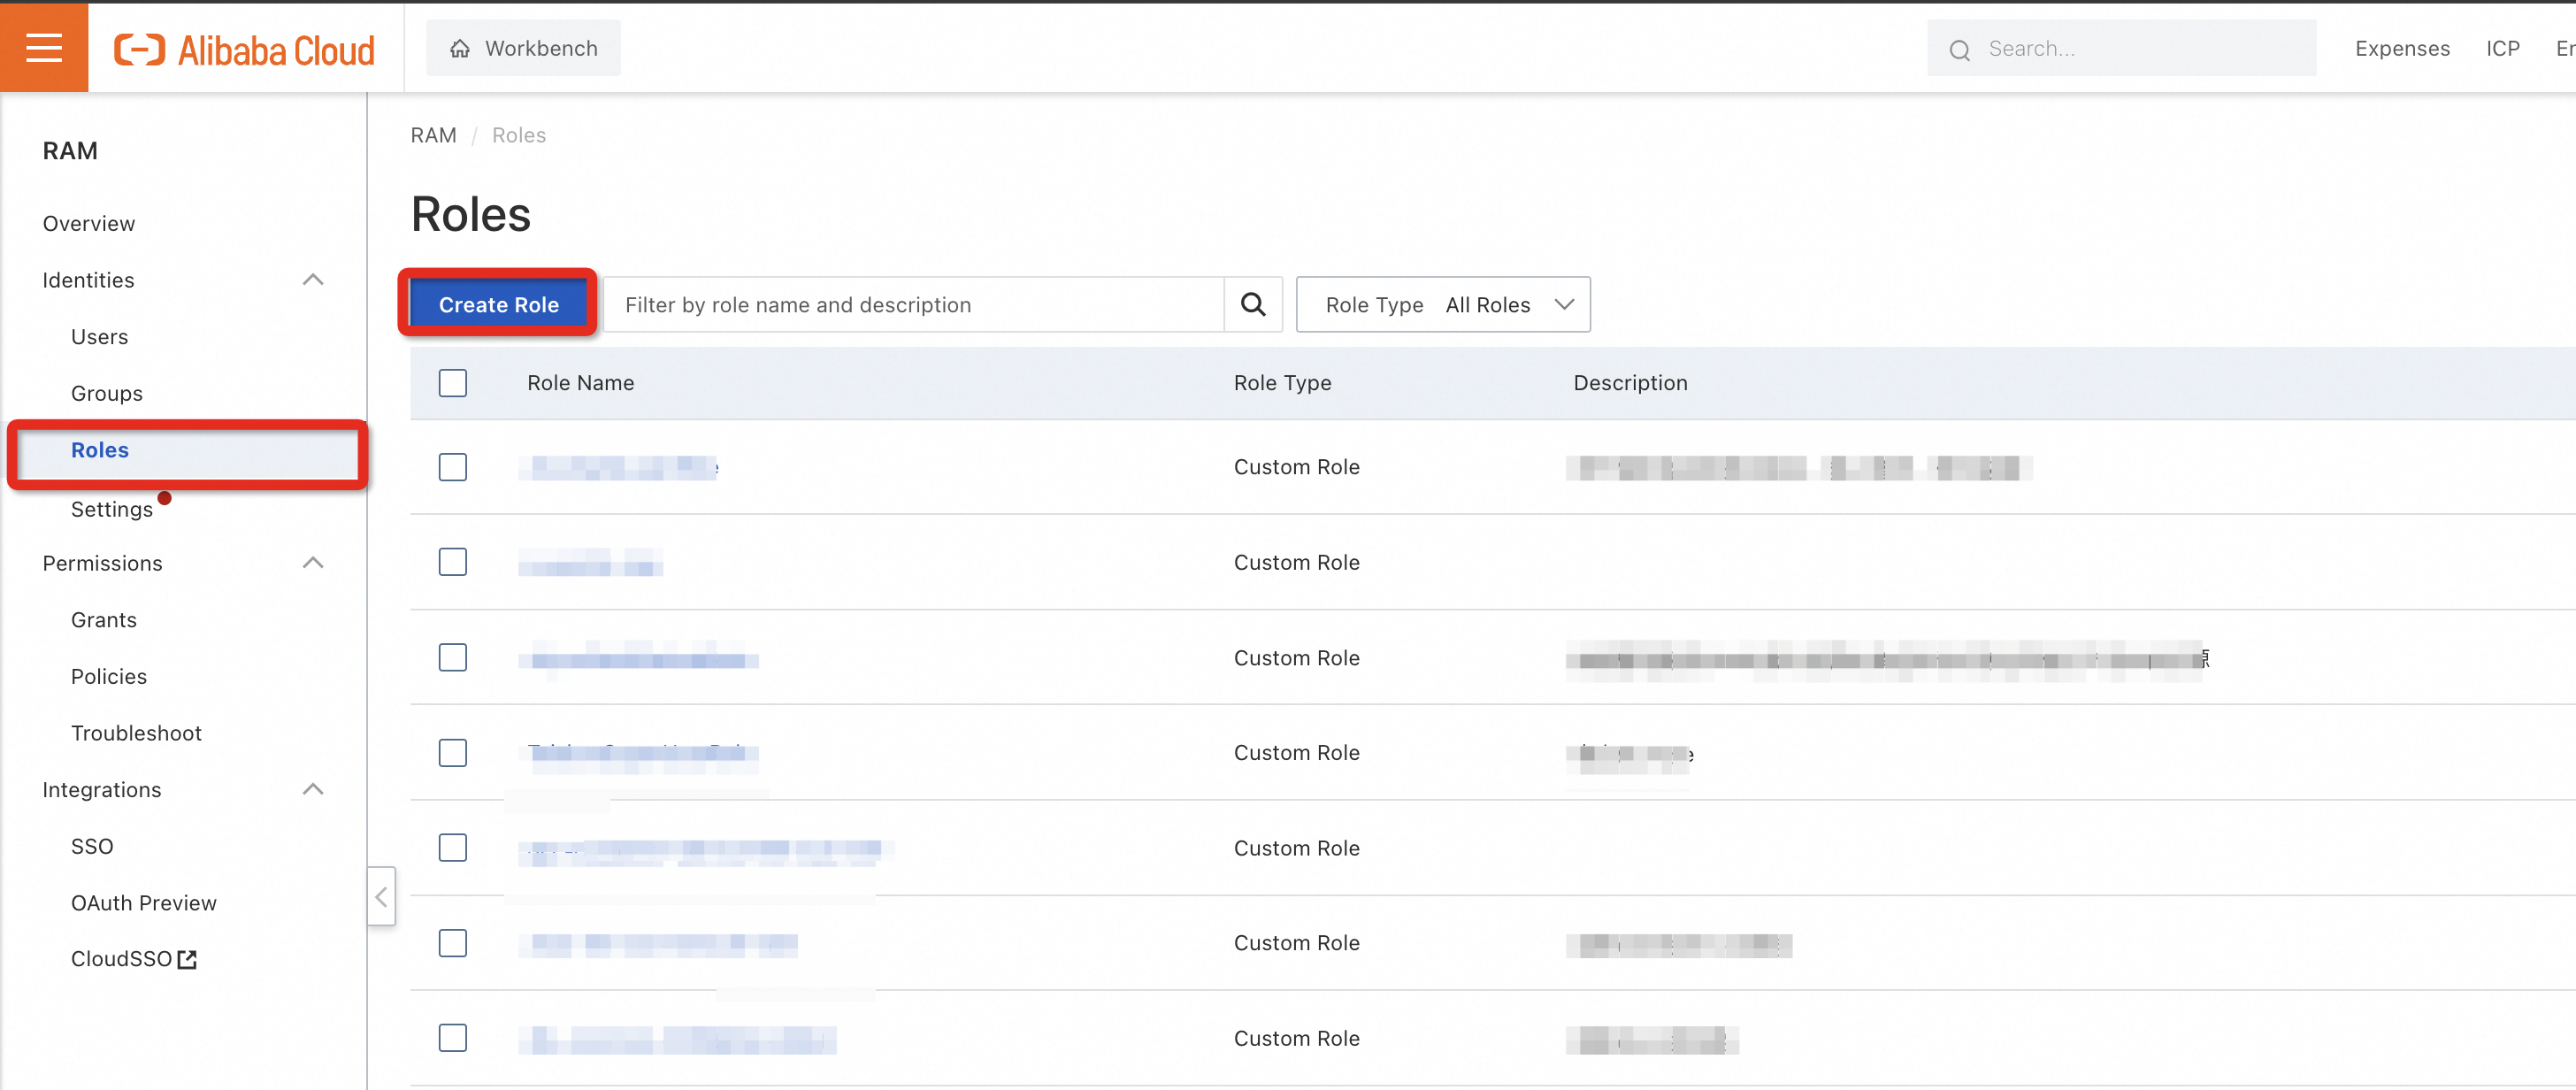
Log on to the RAM console by using your Alibaba Cloud account.
In the left-side navigation pane, choose Identities > Roles.
On the Roles page, click Create Role.
Create a RAM role.
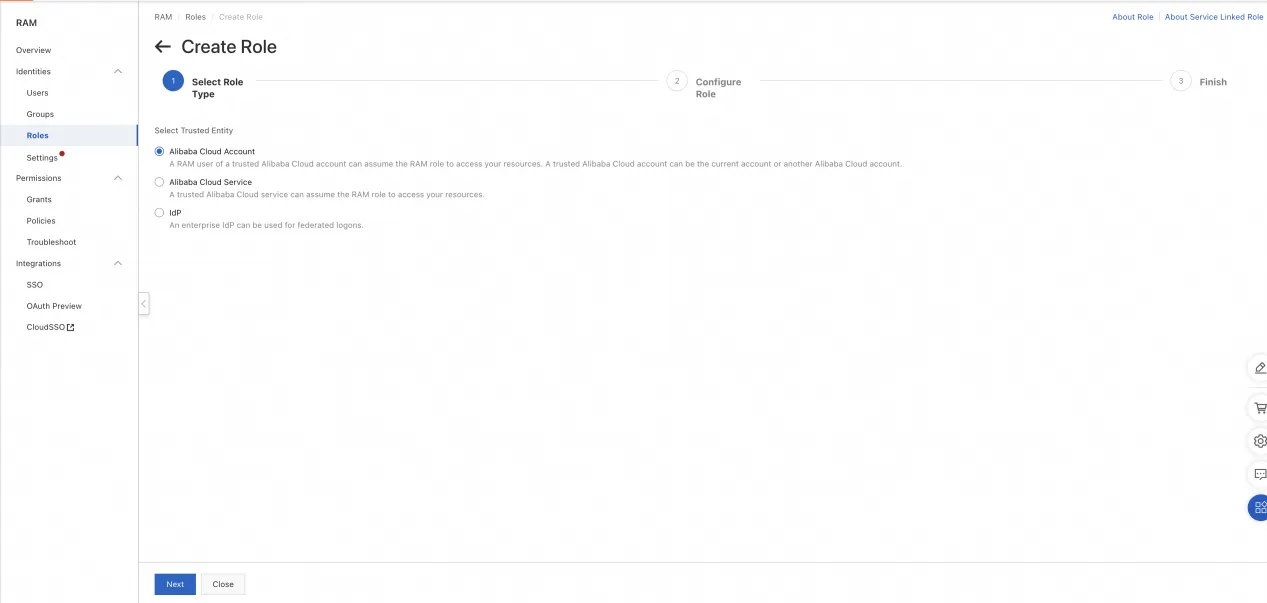
In the Select Role Type step of the Create Role wizard, select Alibaba Cloud Account as the trusted entity. Then, click Next.
In the Configure Role step of the Create Role wizard, configure the following parameters:
RAM Role Name: the name of the RAM role that you want to create. Example: sts- eventBridge-test.
(Optional) Note: the description of the RAM role.
Select Trusted Alibaba Cloud Account: the trusted Alibaba Cloud account. Select Other Alibaba Cloud Account and enter the account ID that you obtained in the "Prerequisites" section of this topic.
Click OK.

Grant permissions to the RAM role and modify the trust policy
After you create a RAM role, you must grant the required permissions to the RAM role and add the account ID provided by the Alibaba Cloud ticket system as the trusted account. Then, you can obtain the public events in the Alibaba Cloud ticket system by using the account.
Log on to the RAM console by using your Alibaba Cloud account.
In the left-side navigation pane, choose Identities > Roles.
In the role list, find the RAM role that you created and click Grant Permission in the Actions column.
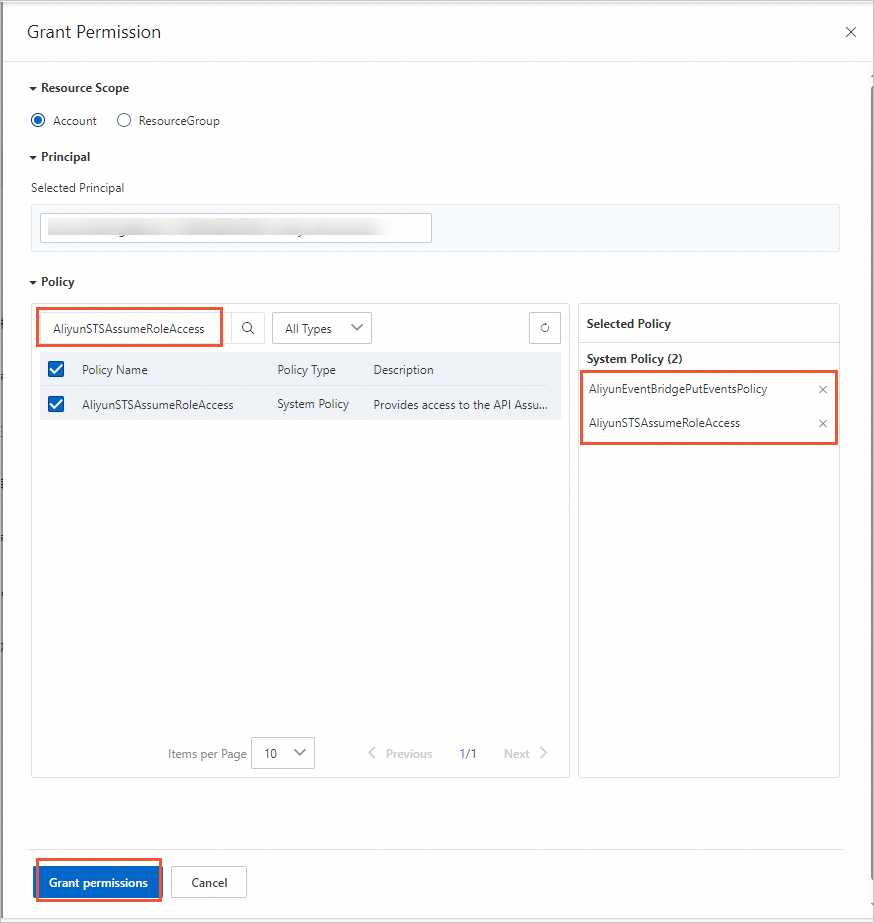
In the Grant Permission panel, configure the following parameters:
Resource Scope: Select Account.
Principal: The system automatically fills in the RAM role that you selected.
Policy: Search for and select the AliyunEventBridgePutEventsPolicy and AliyunSTSAssumeRoleAccess policies.
Click Grant Permissions.
Modify the trust policy. On the Roles page, click the name of the RAM role that you created.
On the page that appears, click the Trust Policy tab. Then, click Edit Trust Policy.
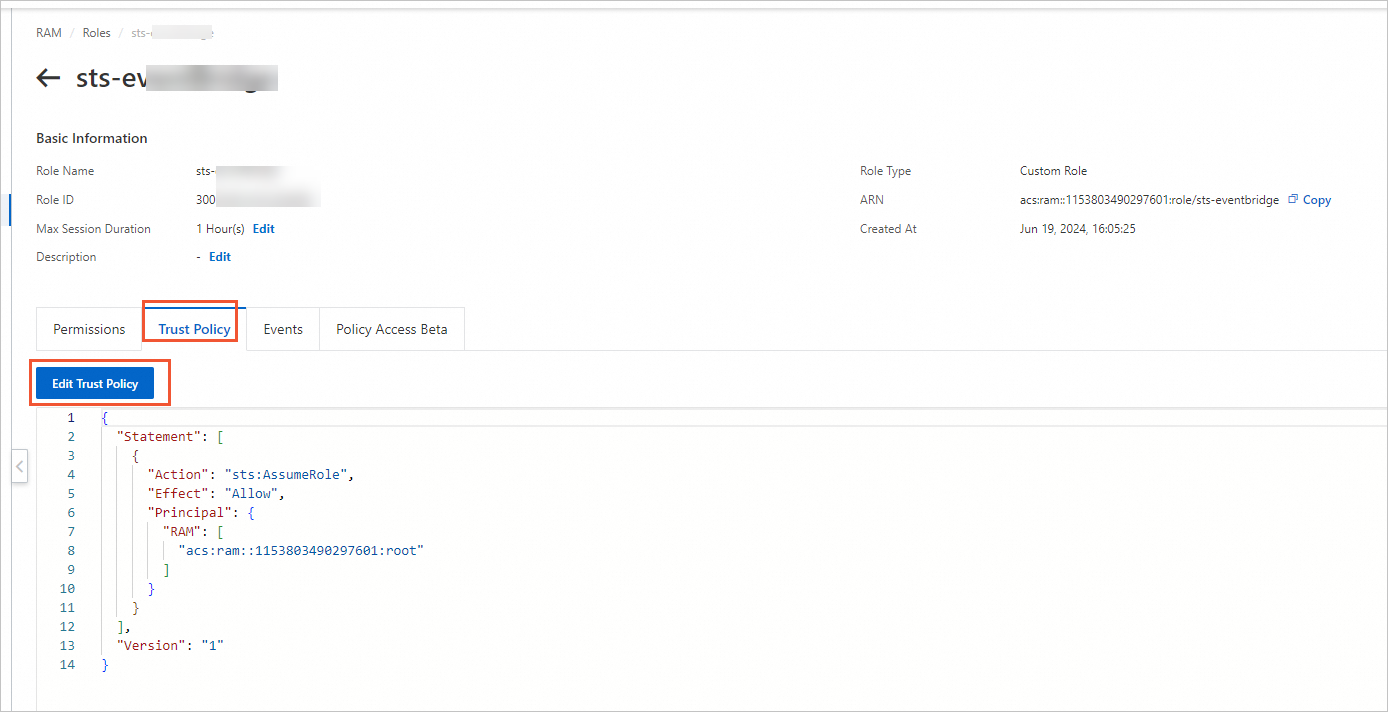 Copy the following content to the code editor that appears. Replace ${AliyunSupportUid} with the account ID that you obtained in the "Prerequisites" section of this topic.
{
"Statement":[
        {
            "Action":"sts:AssumeRole",
            "Effect":"Allow",
            "Principal":{
                "Service":[
                    "${AliyunSupportUid}@eventbridge.aliyuncs.com"
                ]
            }
        }
    ],
    "Version":"1"
}
Click Save trust policy document.
Create an event bus to receive public events
After you create an event bus, you must provide the name and region of the event bus to the technical engineer of the Alibaba Cloud ticket system for integration.
Log on to the EventBridge console by using your Alibaba Cloud account. In the top navigation bar, select a region.
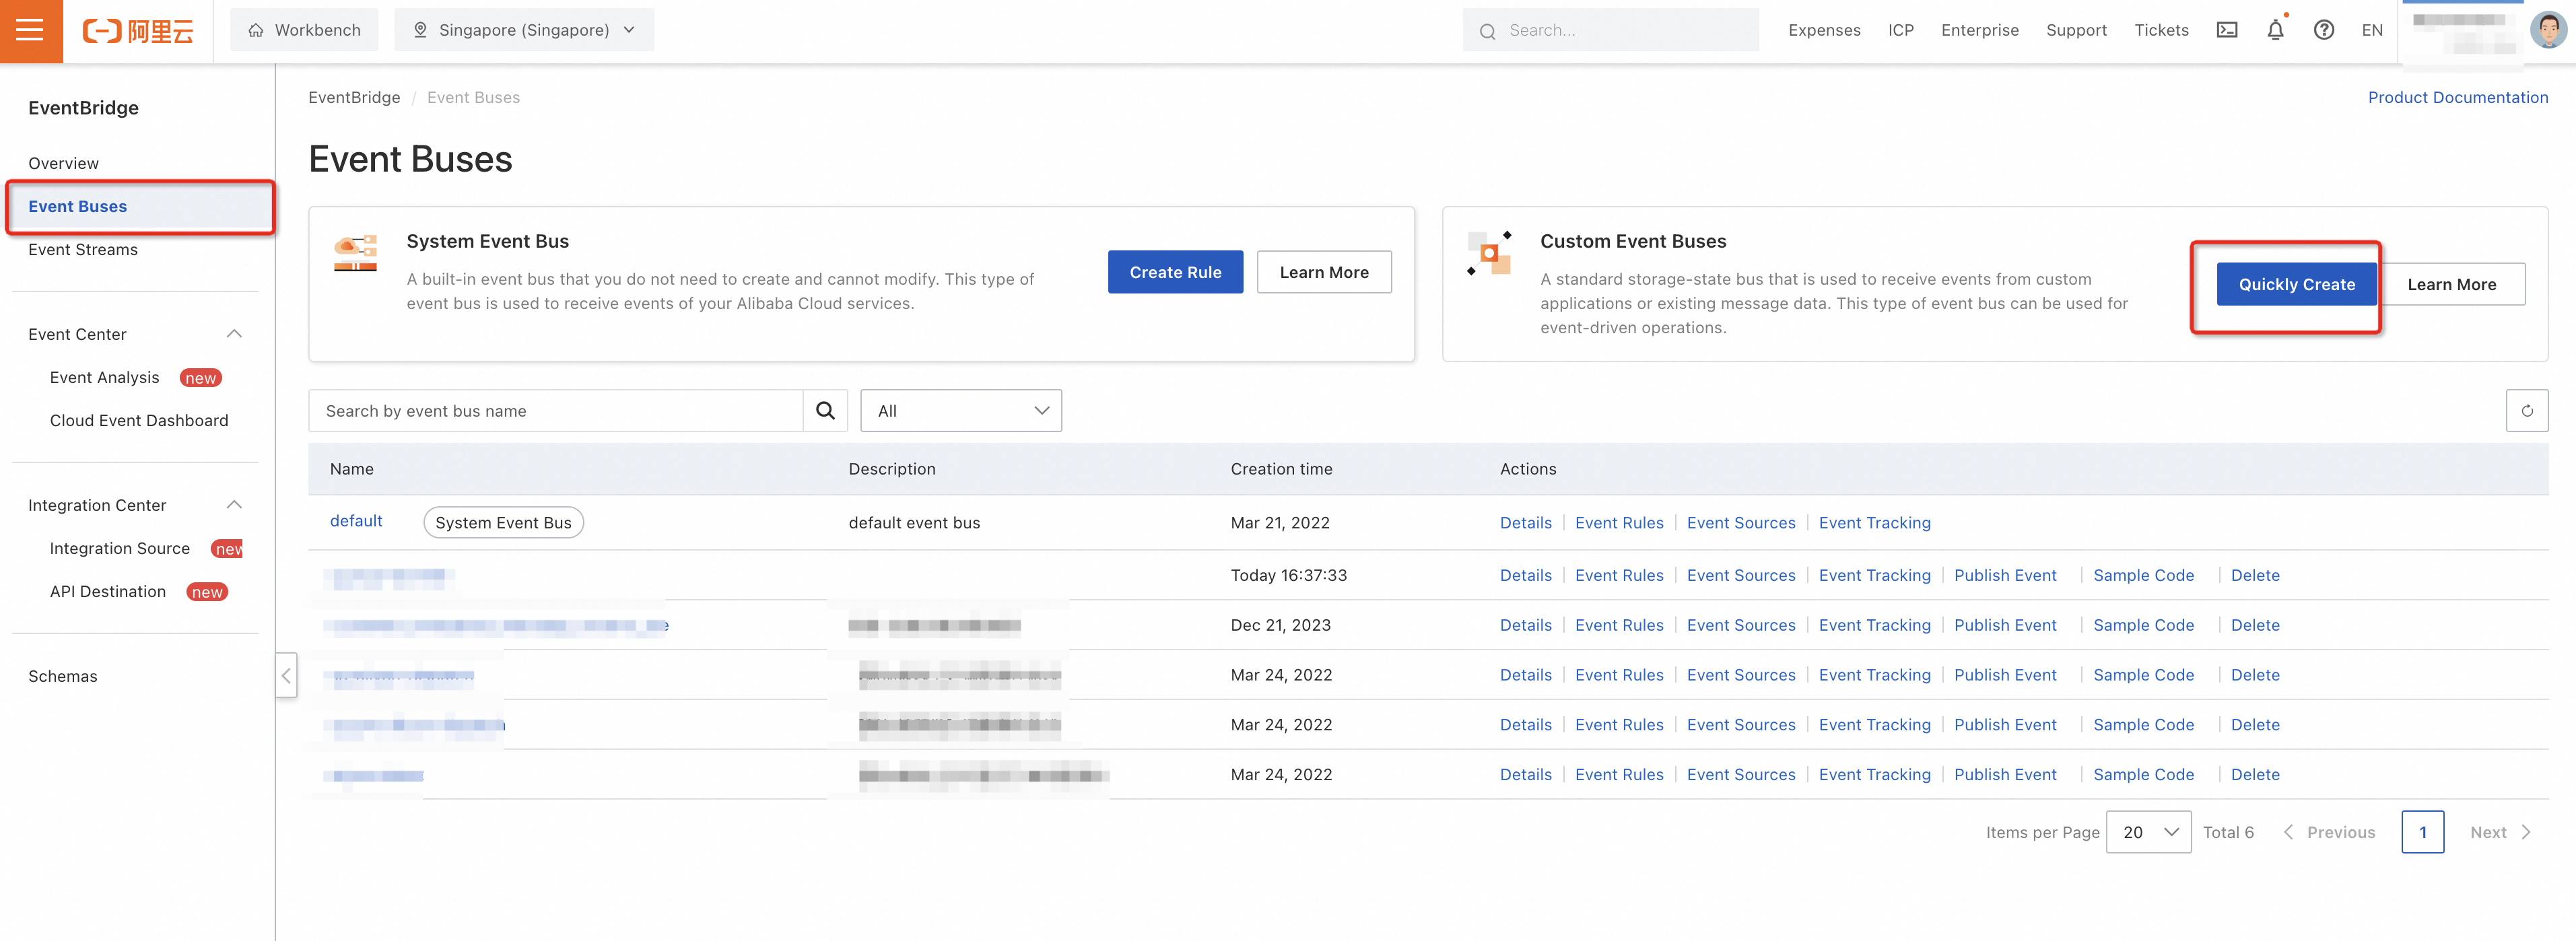
In the left-side navigation pane, click Event Buses.
On the Event Buses page, click Quickly Create in the Custom Event Buses section.
In the Create Custom Event Bus panel, configure the parameters.
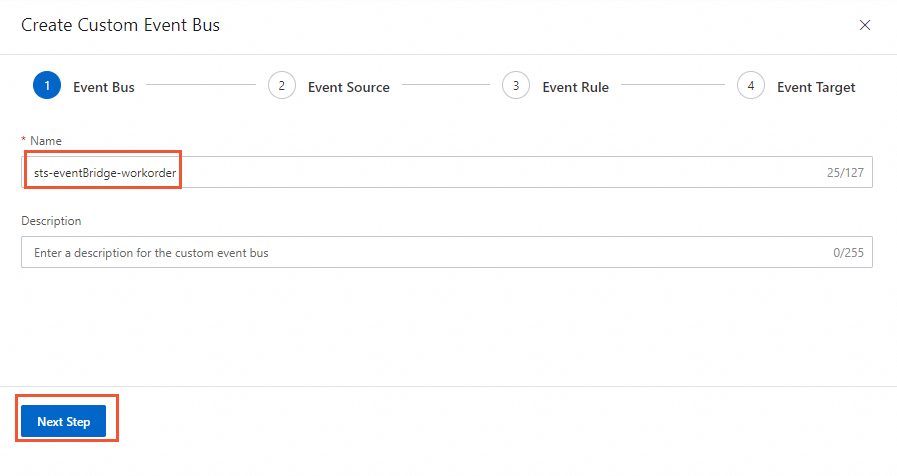
In the Event Bus step, specify a name for the custom event bus. Example: sts-eventBridge-workorder. Then, click Next Step.
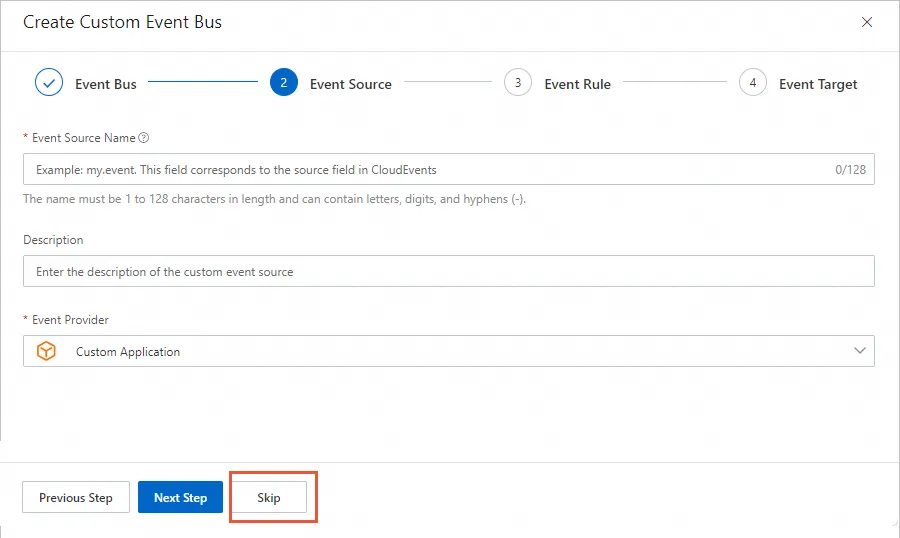
In the Event Source step, click Skip.
In the Event Rule step, specify a rule to filter and transform events. Enter a rule name in the Event Rule Name field and configure the Pattern Content code editor. If you enter {} in the code editor, all events are matched. For information about how to match specific events, see Event patterns. Then, click Next Step.

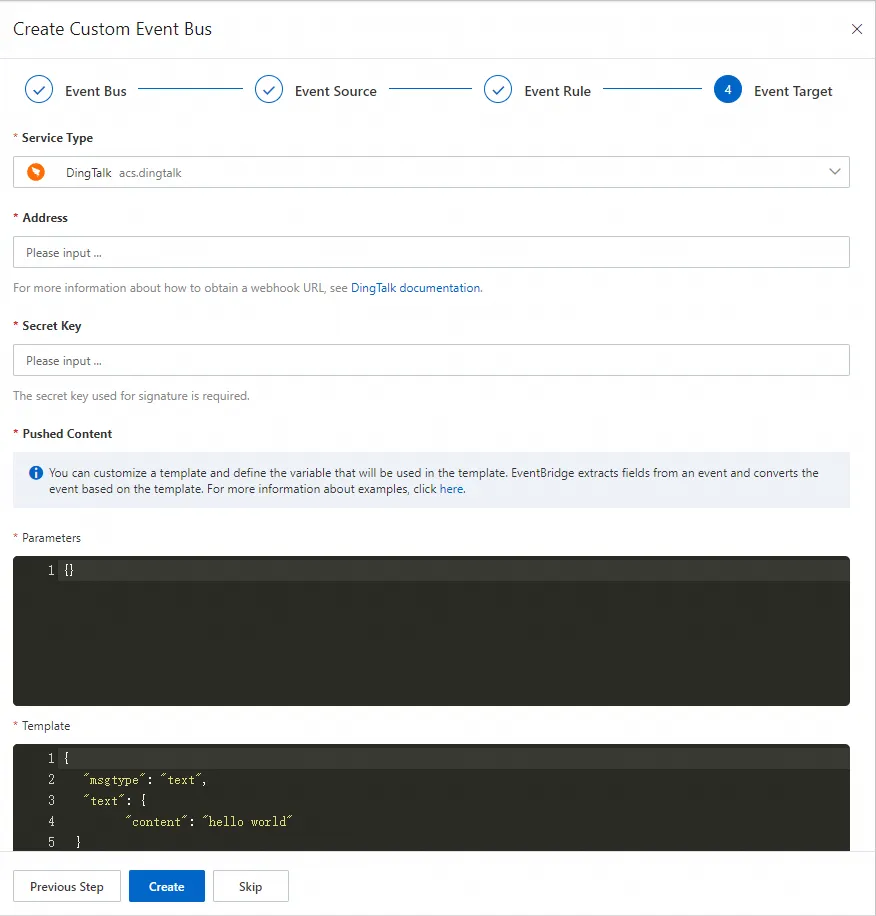
In the Event Target step, configure the target to which events are routed. Configure the Service Type parameter based on your business requirements. For more information, see Event targets. Then, click Create.
Integrate the Alibaba Cloud ticket system into EventBridge
Provide the following information to the technical engineer:
The ID of the Alibaba Cloud account that is used to create EventBridge and add the account ID provided by the Alibaba Cloud ticket system as the trusted account.
The name of the RAM role that you created and to which you granted permissions.
The event bus that you created and the region where the event bus resides.
The ID of the Alibaba Cloud account that you want to use to receive public events in the Alibaba Cloud ticket system.
Query the details of an event in the Alibaba Cloud ticket system
After the Alibaba Cloud ticket system is integrated into EventBridge, EventBridge records all events that occur when you create tickets. You can use the event tracking feature to query the details of an event related to a ticket.
Log on to the EventBridge console by using your Alibaba Cloud account. In the top navigation bar, select the region where the event bus that you created resides.
In the left-side navigation pane, click Event Buses.
On the Event Buses page, find the event bus that you created.
Click Event Tracking in the Actions column. On the page that appears, configure the query conditions and click Query. Then, you can view information about the queried event.
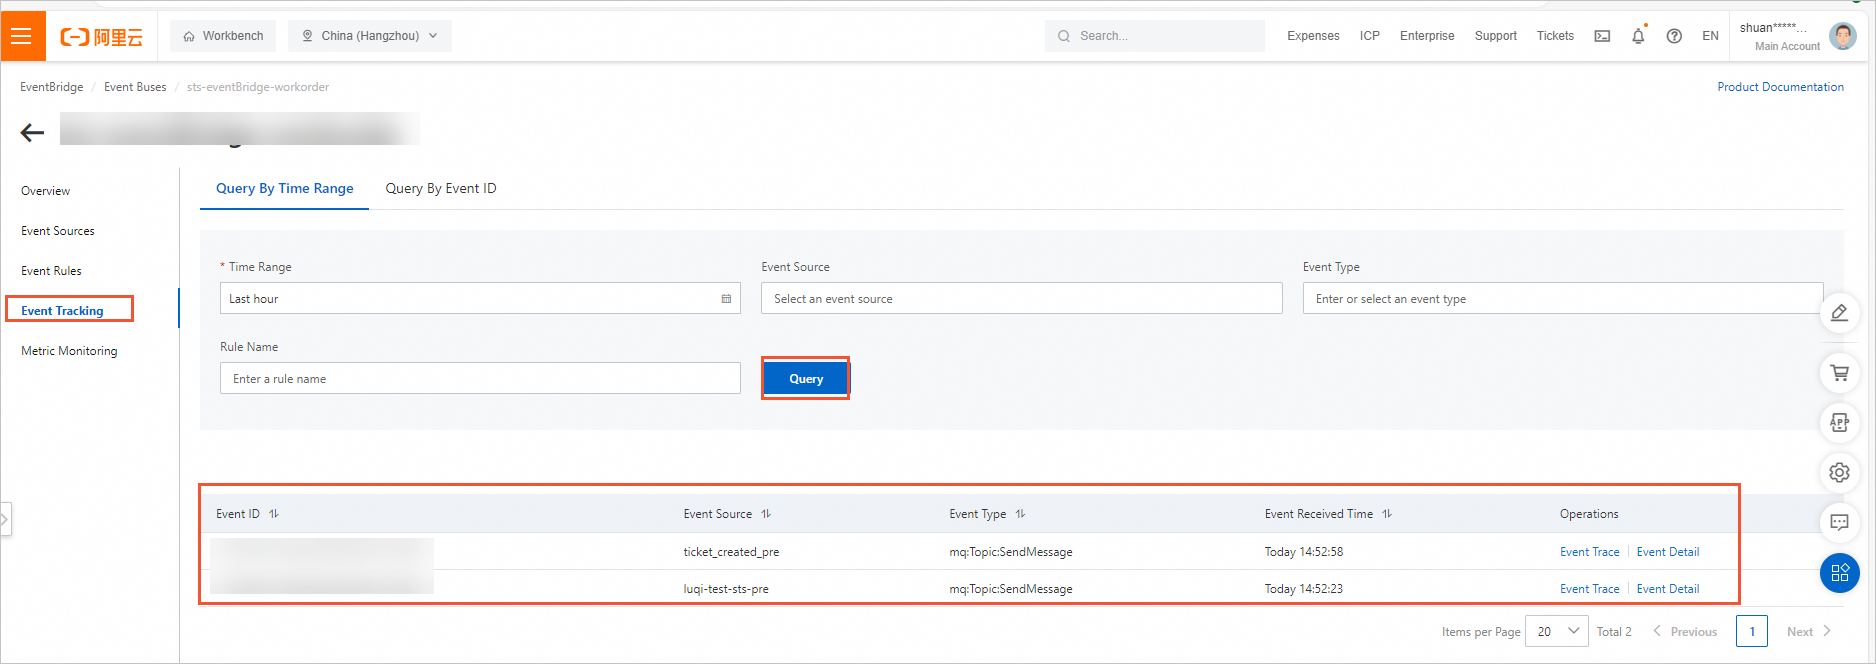
Click Event Details in the Actions column of the corresponding event to view the details of the queried event.
Event structure description
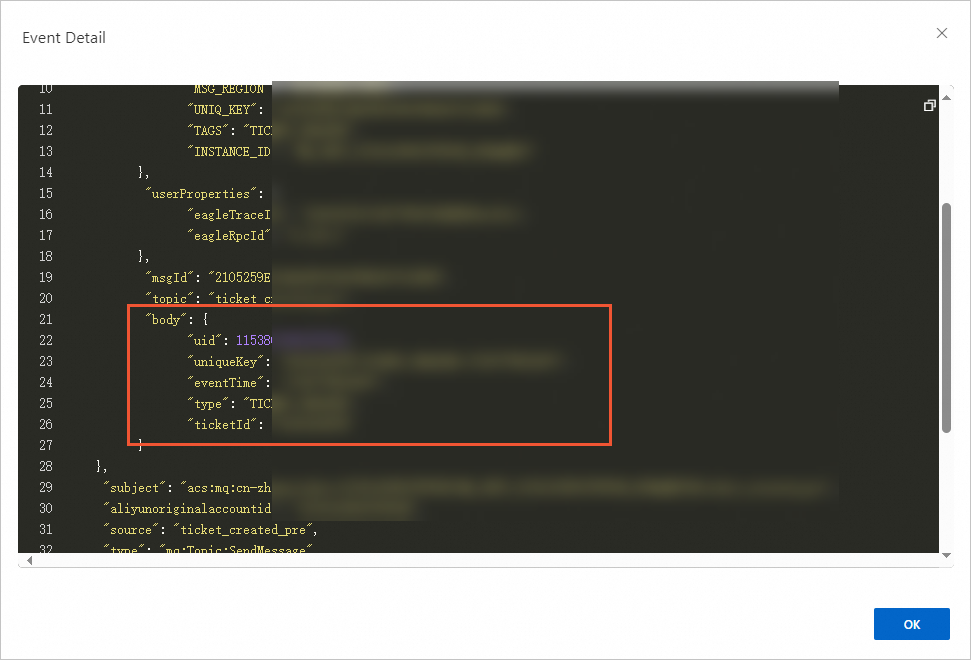
The following sample code shows the structure of a public event in the Alibaba Cloud ticket system. When you query such an event, take note of the data in the $.data.body field. The other fields are common fields for events in EventBridge and messages in ApsaraMQ for RocketMQ.
{
    "datacontenttype": "application/json;charset=utf-8",
    "aliyunaccountid": "1289xxxxxxxxxxx",
    "data": {
        "systemProperties": {
            "MIN_OFFSET": "0",
            "TRACE_ON": "true",
            "MAX_OFFSET": "1",
            "KEYS": "1065D0AFPS_5981xxxxxxxxxx_TICKET_CREATED",
            "MSG_REGION": "ap-southeast-1",
            "UNIQ_KEY": "0A10061A12F80833B09713064A2xxxxxx",
            "TAGS": "TICKET_CREATED",
            "INSTANCE_ID": "MQ_INST_1034xxxxxxxxx_BYwhPsIn"
        },
        "userProperties": {
            "eagleTraceId": "210f470117174903723783806xxxxx",
            "eagleRpcId": "0.79.1"
        },
        "msgId": "0A10061A12F80833B09713064A2xxxxx",
        "topic": "sg_ticket_created_pre",
        "body": {
            "uid": 5981xxxxxxxxxx,
            "uniqueKey": "1065D0AFPS-TICKET_CREATED-171749037xxxx",
            "eventTime": "1717490379299",
            "type": "TICKET_CREATED",
            "ticketId": "1065D0AFxx"
        }
    },
    "subject": "acs:mq:ap-southeast-1:1034xxxxxxxxx:MQ_INST_1034xxxxxxxxx_BYwhPsIn%sg_ticket_created_pre",
    "aliyunoriginalaccountid": "1034xxxxxxxxx",
    "source": "sg_ticket_created_pre",
    "type": "mq:Topic:SendMessage",
    "aliyunoriginalregionid": "ap-southeast-1",
    "aliyunpublishtime": "2024-06-04T08:39:39.906Z",
    "specversion": "1.0",
    "aliyuneventbusname": "sg-xxxxxxxx",
    "id": "0A10061A12F80833B09713064A2B000B",
    "time": "2024-06-04T08:39:39.307Z",
    "aliyunregionid": "ap-southeast-1",
    "aliyunpublishaddr": "10.80.xx.xx"
}
The following table describes the parameters in the $.data.body field.
Parameter | Description |
uid | The UID of the Alibaba Cloud account that is used to create the ticket. |
uniqueKey | The unique ID of the event. |
eventTime | The timestamp that indicates when the event occurred. |
type | The type of the event. Alibaba Cloud supports the following types of public events in the Alibaba Cloud ticket system: TICKET_CREATED: A ticket is created. DIALOG: A dialogue is started. TICKET_STATUS: The status of a ticket is changed. |
ticketId | The ticket number. |