If the available space of the data disk on your simple application server is insufficient, you can extend the data disk based on your business requirements. This topic describes how to extend a data disk on a simple application server.
Procedure
Step 1: Create a snapshot
If you extend a data disk, data loss may occur. Before you extend a data disk, we recommend that you create a snapshot to back up the disk data.
Go to the Servers page in the Simple Application Server console.
On the Servers page, find the server for which you want to create a snapshot and click the server ID in the server card.
Click the Disk tab.
In the Actions column of the data disk, click Create Snapshot.
In the Create Snapshot dialog box, check the disk information, enter a name for the snapshot, and then click Confirm.
Step 2: Extend the data disk
Go to the Servers page in the Simple Application Server console.
Click the server ID in the card of the server whose data disk you want to extend.
Click the Disk tab.
In the upper-left corner of the page that appears, click Scale up a data disk.
In the Precautions dialog box, read the precautions and click Data Disk Operation.
Verify the current configurations and expiration time of the disk, and select a data disk size next to Data Disk.
The data disk can be extended to up to 16,380 GB.
ImportantData disks can only be extended. The value of the selected data disk size must be greater than the value of the original data disk size.
Read and confirm the relevant agreements and click Buy Now.
Follow the on-screen instructions to complete the payment.
Connect to the simple application server to extend the partitions and file systems on the data disk.
Perform the following operations based on the operating system of the simple application server:
Extend the partition and file system on the data disk of a Linux server
In the following example, the data disk is extended from 40 GB to 60 GB.
NoteThe default device name of the data disk on a simple application server is
/dev/vdb.Connect to the Linux server.
For more information, see Connect to a Linux server.
Run the following command to switch to the
rootuser:sudo su rootView the disk and partition of the simple application server.
Run the following command to view the disks of the simple application server:
fdisk -luExtending the data disk does not affect the size of the system disk. The following figure shows only the information about the data disk (
/dev/vdb).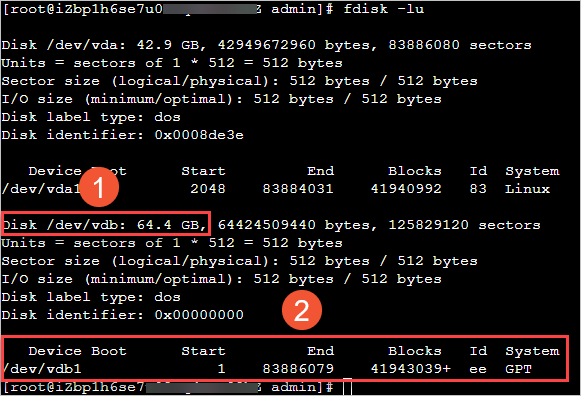 Elements in the preceding figure:
Squared area labeled ①: indicates the new data disk size after the
/dev/vdbdata disk is extended.Squared area labeled ②: The information below
Deviceindicates that the partition name of the data disk is/dev/vdb1, and the information belowSystemindicates that the partition style of the data disk is GUID Partition Table (GPT).
Run the following command to view information about the partition:
df -ThThe default file system type of the
/dev/vdb1data disk partition on the Simple Application Server is ext4. The following figure shows the command output, which indicates that the file system of the data disk partition remains 40 GB in size. You must extend the partition and file system to extend the data disk.
Extend the partition.
Run the following command to install the gdisk utility.
If the partition is in the GPT format, you must perform this step. If the partition is in the Master Boot Record (MBR) format, skip this step.
yum install gdisk -yRun the following command to install the growpart utility.
The commands that are used to install the growpart utility vary based on the operating system of the simple application server.
If the simple application server runs CentOS 7 or later, run the following command:
yum install -y cloud-utils-growpartIf the simple application server runs Debian 9 or later, or Ubuntu 14 or later, run the following commands in sequence.
Run the following command to update the software repository:
apt-get updateRun the following command to install cloud-guest-utils:
apt-get install -y cloud-guest-utils
Run the following command to extend the partition.
NoteUse a space to separate
/dev/vdband1in the command.growpart /dev/vdb 1The following command output is returned:
[root@iZbp1h6se7u09oqdmea**** admin]# growpart /dev/vdb 1
CHANGED: partition=1 start=2048 old: size=83881984 end=83884032 new: size=125827038 end=125829086
If an error occurs when the command is run, troubleshoot the issue. For more information, see Step 1: Resize a disk to extend the disk capacity.
Extend the file system.
The default file system type of the
/dev/vdb1data disk partition on the simple application server is ext4. This step describes how to extend an ext4 file system.Simple Application ServerRun the following command to extend the file system:
resize2fs /dev/vdb1Run the following command to check whether the file system is extended:
df -ThIf the file system is 60 GB in size as shown in the following figure, the file system is extended.
 After you extend the data disk, check whether the actual size of the data disk is the expected size.
 If the business programs on the simple application server run as expected, the data disk is extended.
If the business programs on the simple application server do not run as expected, the data disk is not extended. Use the snapshot that you created in Step 1 to roll back the disk. For more information, see the Create a snapshot section of the "Manage snapshots" topic.
Extend the file system on the data disk of a Windows server
In the following example, a simple application server that runs a Windows Server 2012 R2 64-bit operating system is used. The data disk is extended from 40 GB to 60 GB.
Connect to the Windows server whose data disk you extended in the Simple Application Server console.
For more information, see Connect to a Windows server.
In the lower-left corner of the Windows desktop, right-click the
 icon and click Disk Management.
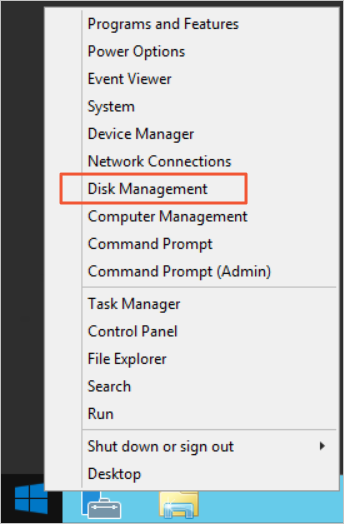
In the Disk Management dialog box, choose to view the unallocated disk size.
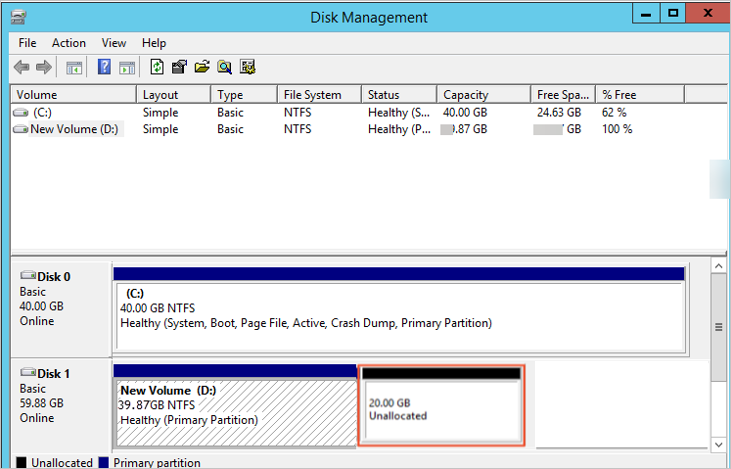
Disk 1 is the data disk.
Right-click the blank space in the Disk 1 section and select Extend Volume...
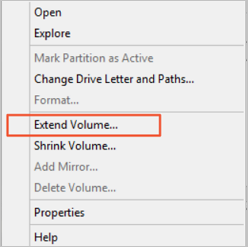
In the Extend Volume Wizard dialog box, use the default settings to extend the volume.
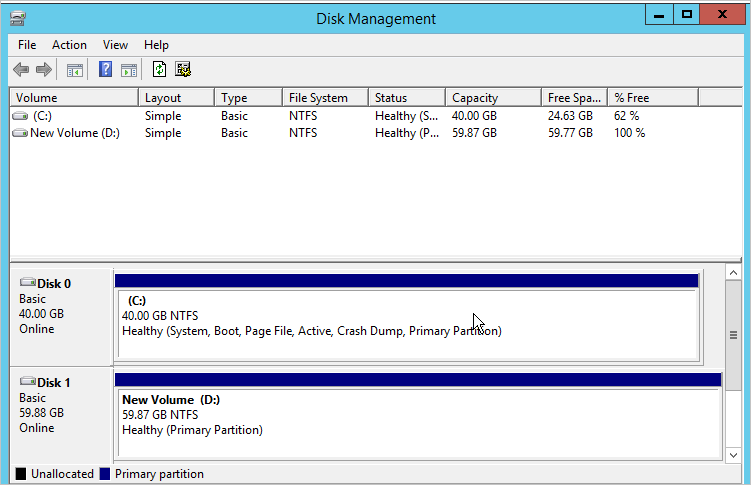
The new space is automatically added to the original volume, as shown in the following figure.
After you extend the data disk, check whether the actual size of the data disk is the expected size.
If the business programs on the simple application server run as expected, the data disk is extended.
If the business programs on the simple application server do not run as expected, the data disk is not extended. Use the snapshot that you created in Step 1 to roll back the disk. For more information, see the Create a snapshot section of the "Manage snapshots" topic.