You can connect to your Linux server using a browser, an SSH client, or a rescue connection, depending on your needs.
Connection method | Recommended scenario |
Workbench (Recommended) | Connect to your server quickly and easily through a browser without installing a client. |
SSH client | Supports key pair logon. Suitable for frequent or long-duration connections. |
VNC rescue connection | Use this for emergencies, such as when the SSH service is abnormal or you cannot log on remotely. It can be used for troubleshooting. |
Method 1: Connect using Workbench (Recommended)
Log on to the Simple Application Server console.
In the server list, find the server's card and click Remote Connection.
In the dialog box that appears, choose one of the following logon methods.
One-click logon with Workbench
In the One-click Logon with Workbench section, click Log On Now.
Password logon with Workbench
Click Log On By Using Other Methods. Under Password Logon With Workbench, click Log On Now and enter the
rootuser's password.ImportantA default password is not provided for the server. Before you log on for the first time, you must set a password for the server.
Method 2: Connect using an SSH client
Prerequisites
To obtain the public IP address of the server, you can log on to the Simple Application Server console and find the public IP Address on the server card.
Prepare your logon credentials. Complete one of the following operations based on the authentication method that you want to use.
Password logon: A default password is not provided for the server. Before you log on for the first time, you must set a password for the server.
Key pair logon: To use a key pair, you must first attach a key pair to the instance.
Password logon
On Windows (using PuTTY)
Open PuTTY and configure the session.
Parameter
Description
Host Name(or IP address)
Enter Root@Public IP Address. Example:
root@121.40.XX.XX.Port
Enter 22.
Saved Sessions
Enter a session name, such as My-Server, and then click Save to save the session for quick logons.

Click Open. At the command line prompt, enter the server logon password and press the
Enterkey.For security, the password characters are not displayed on the command line.
On macOS or Linux (using the built-in terminal as an example)
Open the terminal on your local Linux or macOS computer.
Run the following command. Replace
<Public IP address of the server>with the actual IP address.ssh root@<Public IP address of the server>If you are connecting for the first time, type
yesand press theEnterkey to confirm that you trust the server.Enter the server's logon password and press the
Enterkey.For security, the password characters are not displayed on the command line.
Key pair logon
On Windows (using PuTTY)
Convert the format of the private key file. Use PuTTYgen to convert the
.pemprivate key file to the.ppkformat.Open PuTTYgen and click Load.
Select All Files (*.*). Find and select the
.pemprivate key file. In the dialog box that appears, click OK.
Click Save private key. In the dialog box, click Yes.
Enter a new File Name and save the converted private key as a
.ppkfile.
Open PuTTY and configure the session.
Parameter
Description
Host Name(or IP address)
Enter Root@Public IP Address. Example:
root@121.40.XX.XX.Port
Enter 22.
Saved Sessions
Enter a session name, such as My-Server, and then click Save to save the session for quick logons.

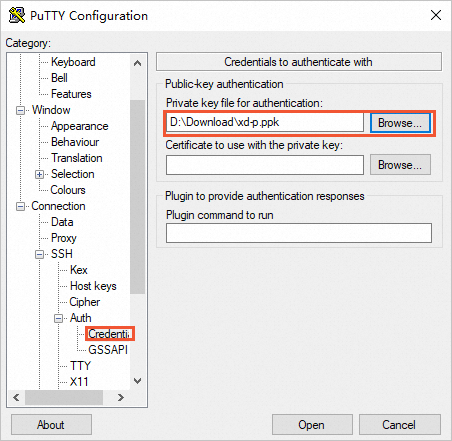
Configure the private key for authentication.
In the navigation pane on the left, choose Connection > SSH > Auth > Credentials.
Under Private key file for authentication:, click Browse.
Select the
.ppkprivate key file you just saved and click Open.
Click Open to log on.
On macOS or Linux (using the built-in terminal as an example)
Find the saved private key file (in
.pemformat) on your local computer.Run the following command to modify the permissions of the private key file.
Replace
/test/XXX.pemin the command with the actual path to your private key file.chmod 400 /test/XXX.pemRun the following command to connect to the server using the private key.
Replace
<Public IP address of the Linux server>and/test/XXX.pemwith the actual information.ssh root@<Public IP address of the Linux server> -i /test/XXX.pemIf the connection fails and the message
no mutual signature supportedappears, run the following command:ssh -o PubkeyAcceptedKeyTypes=+ssh-rsa root@<Public IP address of the Linux server> -i /test/XXX.pem
Method 3: Connect using rescue logon
If you cannot connect to the server using standard methods such as Workbench or SSH, you can use this method for emergency troubleshooting.
A rescue connection session has a timeout limit. The default timeout period is 300 seconds. If the connection times out due to inactivity, you must start a new session.
Log on to the Simple Application Server console.
On the server card, click Remote Connection. In the dialog box that appears, click Log On By Using Other Methods.
In the Rescue Logon section, click Log On Now.
You are automatically redirected to the rescue logon page. If you are not redirected, check your browser settings to ensure that pop-up windows are not blocked.
On the VNC logon page, enter the username
rootand press theEnterkey.Enter the server's logon password and press the
Enterkey.For security, the password characters are not displayed.
A successful logon is indicated by a screen similar to the following one.

To copy long text, such as a command or a file download URL, from your local device to the server, you can use the Copy Command feature in the upper-right corner of the page.
FAQ
For more information about remote connection issues, such as connection timeouts or failures, see Remote connection FAQ.
References
Use Alibaba Cloud Client to connect to a server
You can install Alibaba Cloud Client on your on-premises computer to connect to a server.
Set a custom port to connect to a server
The default remote connection port for a Linux server is
22. To improve security, you can change the default remote connection port.