After you attach a data disk to your simple application server, you must partition and format the data disk before you can use it. This topic describes how to partition and format a data disk.
Background
Data disks attached to simple application servers must be partitioned and formatted before the disks can be used. Procedures to partition and format data disks vary based on the operating systems of the servers to which the data disks are attached.
For information about how to partition and format the data disk on a Linux server, see Partition and format the data disk on a Linux server.
For information about how to partition and format the data disk on a Windows server, see Partition and format the data disk on a Windows server.
Partitioning and formatting data disks is a high-risk operation and may result in data loss. However, data disks that are attached when you create simple application servers are new empty disks and are unavailable. You can partition and format these disks without data loss risks.
Partition and format the data disk on a Linux server
The following example describes how to use the Parted and e2fsprogs utilities to partition and format the data disk on a Linux server. CentOS 7.6 64-bit is used in the example.
To partition and format the data disk on a Linux server, we recommend that you use the GUID Partition Table (GPT) partition format and the XFS or EXT4 file system.
Connect to the Linux server and install Parted and e2fsprogs.
Connect to the simple application server.
For more information, see Connect to a Linux server.
Run the following commands to switch to the
rootuser and go back to the root directory:sudo su root cdRun the following commands in sequence to install Parted and e2fsprogs.
Run the following command to install Parted:
yum install -y partedRun the following command to install e2fsprogs:
yum install -y e2fsprogs
Run the following command to view the data disk on the Linux server:
fdisk -lThe information of the data disk is returned, as shown in the following figure.
NoteEach simple application server can have only one data disk attached. The device name of the data disk is
/dev/vdb.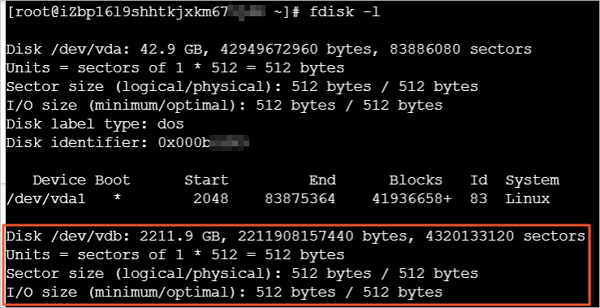
Use Parted to partition the data disk.
Run the following command to partition the data disk:
parted /dev/vdbRun the following command to set the partition format to GPT:
mklabel gptYou are prompted that the partition format change will result in data loss on the disk. The data disk described in this topic is a new empty disk. Enter Yes at the prompt.
Run the following command to create a primary partition and specify the start and end sectors for the partition:
mkpart primary 1 100%Run the following command to check whether the partitions are aligned:
align-check optimal 1The command output similar to the following one indicates that the partitions are aligned.

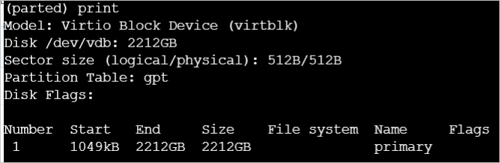
Run the following command to view the partition table:
printThe information of the partition is returned, as shown in the following figure.
Run the following command to exit Parted:
quit
Run the following command to re-read the partition table:
partprobeRun one of the following commands to create a file system for the /dev/vdb1 partition.
Run one of the following commands to create a file system.
Run the following command to create an EXT4 file system:
mkfs -t ext4 /dev/vdb1Run the following command to create an XFS file system:
mkfs -t xfs /dev/vdb1
In this example, an EXT4 file system is created.
Write the information of the new partition to /etc/fstab to have the partition automatically mounted on server startup.
Run the following command to create a mount point named /test:
mkdir /testRun the following command to back up etc/fstab:
cp /etc/fstab /etc/fstab.bakRun the following command to write the information of the new partition to /etc/fstab:
echo `blkid /dev/vdb1 | awk '{print $2}' | sed 's/\"//g'` /test ext4 defaults 0 0 >> /etc/fstabNoteIn this example, the /dev/vdb1 partition device name, the /test mount point, and the ext4 file system are used. You can change these settings based on actual conditions.
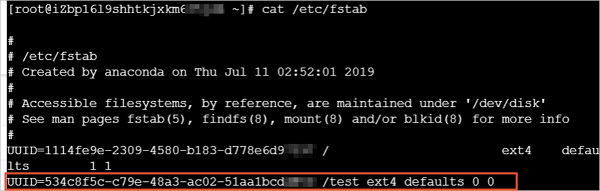
Run the following command to check the information of /etc/fstab:
cat /etc/fstabIf the command output shows the information of the new partition, the information is written to /etc/fstab.
Run the following command to make the data disk mount entries in etc/fstab take effect:
mount -a
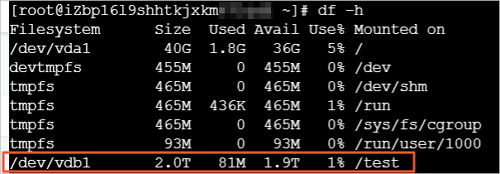
Run the following command to view the current disk space and usage:
df -hIf the command output shows the information of the new file system, the partition is mounted. You can use the new file system.
Partition and format the data disk on a Windows server
The interface varies based on the Windows version. The following example describes how to partition and format the data disk on a Windows server. The Windows Server 2012 R2 64-bit operating system is used in the example.
Connect to the Windows server.
For more information, see Connect to a Windows server.
In the lower part of the desktop, right-click the
 icon and then click Disk Management.
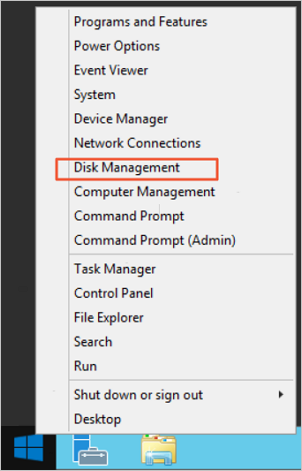
In the Disk Management window, find the data disk that you want to partition and format. In this example, Disk 1 is to be partitioned and formatted. The disk is in the Not Initialized state.
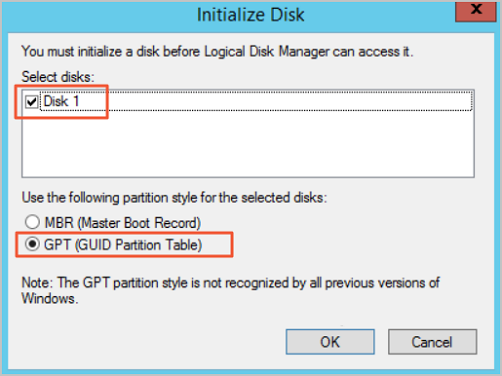
Right-click the blank area next to Disk 1 and select Initialize Disk.
In the Initialize Disk dialog box, select Disk 1, select GPT (GUID Partition Table), and then click OK.
In this example, the GPT partition format is selected. GPT and Master Boot Record (MBR) are different partition formats.
GPT is a new partition format that cannot be recognized by early Windows versions. The maximum data disk size that GPT supports is determined based on the operating system and the file systems. In Windows, GPT supports up to 128 primary partitions on each disk.
MBR is the most frequently used partition format. MBR supports data disks up to 2 TiB in size and a maximum of four primary partitions per disk. If you want to divide a disk into more than four partitions, you must use a primary partition as an extended partition and create logical partitions in the partition.
In the Disk Management window, right-click the Unallocated space of Disk 1 and then select New Simple Volume.

In the New Simple Volume wizard, perform the following operations:
Click Next.
Specify the size of the simple volume.
If you want to create only one primary partition, use the default value. Then, click Next. You can also divide Disk 1 into multiple partitions.
Assign a driver letter and path.
Select a driver letter. G is used in this example. Then, click Next.
Format the partitions.
Configure formatting settings such as the file system, allocation unit size, and volume label, and then optionally select Perform a quick format and Enable file and folder compression. In this example, the default settings are used. Then, click Next.
When the dialog box indicates that the new simple volume is created, click Finish.
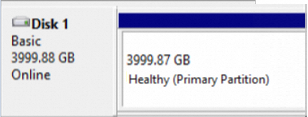
Wait for the partitions to be formatted. When Disk 1 is in the Healthy state in the Disk Management window as shown in the following figure, the partitions are formatted.