If you deploy multiple independent websites for different business on a simple application server, you can modify Apache configuration files to point multiple domain names to different websites. This helps you make full use of server resources and improve management and operation efficiency.
Prerequisites
A simple application server is created from a Linux, Apache, MySQL, and PHP (LAMP) application image. For more information, see Build a LAMP development environment.
Multiple domain names are registered. For more information about how to register a domain name with Alibaba Cloud, see Register a generic domain name.
Environment preparation
In the examples, the following resources are used:
Server: a simple application server created from the LAMP 7.4 application image.
Two test websites:
test01andtest02.Two test domain names:
test01.example.comandtest02.example.com.
After you complete the configurations described in this topic, you can perform the following operations:
Use
test01.example.comto access thetest01website.Use
test02.example.comto access thetest02website.
In actual operations, you must replace these example resources with your own resources.
Step 1: Create test websites
If the code of your multiple websites is already stored in the root directory of websites on the server, skip this step.
Connect to the LAMP server.
For more information, see Connect to a Linux server.
Run the following command to go to the root directory of websites.
The root directory of websites varies based on the LAMP versions in the LAMP application images used on simple application servers.
If the LAMP 7.4 application image is used on servers, the root directory of websites is /data/wwwroot/example.
If the LAMP 6.1.0 application image is used on servers, the root directory of websites is /home/www/htdocs.
In this example, the LAMP 7.4 application image is used. Therefore, run the following command to go to the root directory of websites:
cd /data/wwwroot/exampleRun the following commands in sequence to create two subdirectories.
The subdirectories are used to store the code of websites.
sudo mkdir test01sudo mkdir test02Run the following command to go to the test01 subdirectory. Create a file named index.html in the test 01 subdirectory and edit the file.
Go to the test01 subdirectory.
cd /data/wwwroot/example/test01/Run the following command to create the
index.htmlfile:sudo vi index.htmlPress the
Ikey to enter the edit mode and add the following test information to the file:Test page 01Press the
Esckey, enter:wq, and then press the Enter key to save and close the file.
Go to the
test02subdirectory, and create and edit theindex.htmlfile.Run the following command to go to the
test02subdirectory:cd /data/wwwroot/example/test02/Run the following command to create the
index.htmlfile:sudo vi index.htmlPress the
Ikey to enter the edit mode and add the following test information to the file:Test page 02Press the
Esckey, enter:wq, and then press the Enter key to save and close the file.
Step 2: Modify Apache configuration files
Modify the httpd.conf configuration file.
Run the following command to open the httpd.conf file:
sudo vi /etc/httpd/conf/httpd.confPress the I key to enter the edit mode and modify configurations.
Find the following configurations:
# Virtual hosts
#Include conf/extra/httpd-vhosts.conf
Remove
#from the beginning of the#Include conf/extra/httpd-vhosts.confline.The following figure shows the lines after modification.

Press the Esc key, enter
:wq, and then press the Enter key to save and close the file.
Modify the vhosts.conf configuration file.
Run the following command to open the vhosts.conf configuration file:
sudo vi /etc/httpd/conf.d/vhost.confPress the
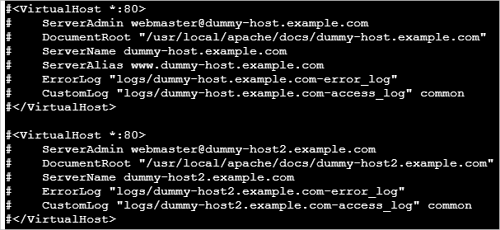
Ikey to enter the edit mode and modify configurations.You must comment out the default configurations that are enclosed by the
<VirtualHost *:80></VirtualHost>tags in the file and manually add multiple domain names.In this example, perform the following operations:
Comment out the default configurations, as shown in the following figure.

Add the following configurations to the end of the file:
<VirtualHost *:80>
     DocumentRoot "/data/wwwroot/example/test01"
     ServerName test01.example.com
</VirtualHost>

<VirtualHost *:80>
     DocumentRoot "/data/wwwroot/example/test02"
     ServerName test02.example.com
</VirtualHost>
You can configure the following parameters based on your needs:
DocumentRoot: the website directory. Specify this parameter in theDocumentRoot "<Website directory>"format.ServerName: the domain name. Specify this parameter in theServerName <Domain name>format.
Press the
Esckey, enter:wq, and then press theEnterkey to save and close the file.
Run the following command to restart Apache:
sudo systemctl restart httpd
Step 3: Bind domain names
For the two test domain names used in this example, you must add the mappings between these domain names and the public IP address of the LAMP server to the hosts file on your Windows computer.
If you use actual domain names when you configure the websites, skip this step. You must bind multiple domain names to the LAMP server. For more information, see Bind and resolve domain names. After domain names are bound, you can use the domain names to access the corresponding websites.
Go to the
C:\Windows\System32\drivers\etcdirectory.Copy the
hostsfile for backup.Retain the hosts - copy file, which can be used to restore the hosts file to the initial state after the test is complete.
Modify the
hostsfile.Append the following content to the end of the hosts file:
<Public IP address of the simple application server> test01.example.com
<Public IP address of the simple application server> test02.example.com
Return to the Windows desktop and run the command prompt as an administrator.
Run the following command in the Command Prompt window to make the new configurations of the
hostsfile immediately take effect:ipconfig /flushdns
Step 4: Access the websites by using the bound domain names
Use a browser to access the test websites on your Windows computer.
Use
test01.example.comto access thetest01website, as shown in the following figure.
Use
test02.example.comto access thetest02website, as shown in the following figure.
References
You can configure HTTPS access for a domain name to convert the data transmission protocol from HTTP to HTTPS at a lower cost. This implements authentication and encrypted data transmission of websites to prevent data tampering or information leaks during transmission. For more information, see the following topics: