SAE incorporates the sae-jenkins-plugin plug-in in Jenkins. This plug-in allows you to use Jenkins to continuously deploy applications to SAE. This topic describes how to build a deployment job in the Jenkins console and apply the configurations to an application in SAE by using one of the following methods: create a Freestyle project, use the pipeline plug-in, use Maven, and use the Job DSL plug-in.
Prerequisites
An SAE application is created. For more information, see Deploy a Java application to SAE 1.0.
Jenkins is installed. For more information, see Install Jenkins. Only Jenkins V2.303 and later are supported.
Before you begin
Step 1: Install the sae-jenkins-plugin plug-in
Download sae-jenkins-plugin installation package. The latest version is 1.2.4.
Log on to Jenkins. In the left-side navigation pane of the Jenkins homepage, click Manage Jenkins. In the System Configuration section of the Manage Jenkins page, click Manage Plugins.

On the Plugin Manager page, click the Advanced tab. In the Deploy Plugin section, follow the on-screen instructions to upload the plug-in installation package that you downloaded in Step1, and then click Deploy.
Step 2: Configure the account information
Log on to Jenkins. In the left-side navigation pane of the Jenkins homepage, click Manage Jenkins. In the System Configuration section of the Manage Jenkins page, click Configure System.

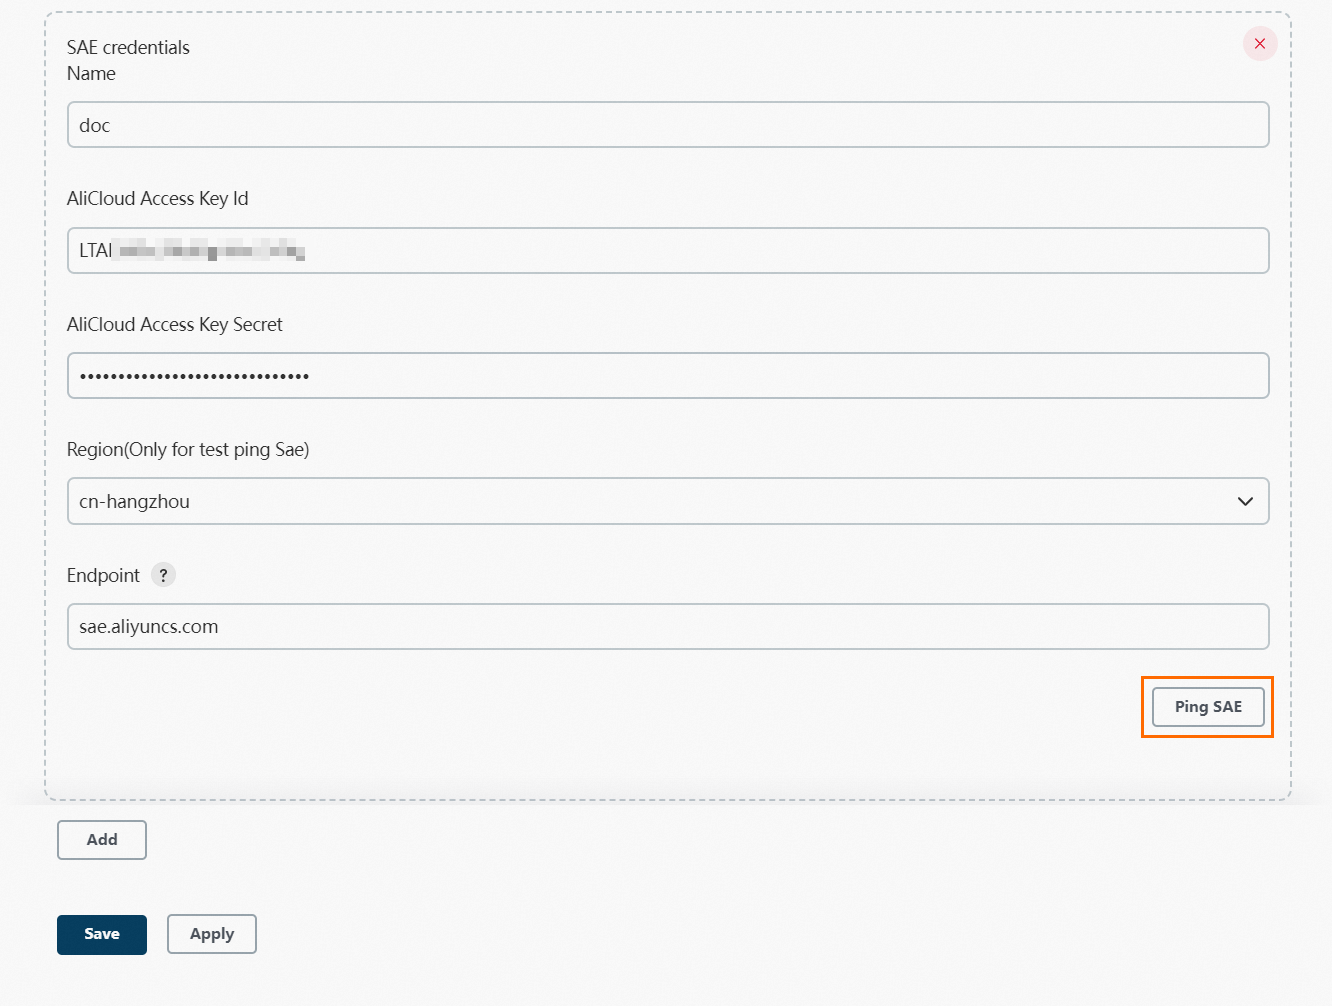
In the Deploy to SAE section of the Configure System page, click Add, configure the account information, and then click Ping SAE.
Parameter
Description
Name
Specify a name for the AccessKey pair.
AliCloud Access Key Id
Enter an AccessKey ID. For more information, see Create an AccessKey pair.
AliCloud Access Key Secret
Enter an AccessKey secret. For more information, see Create an AccessKey pair.
Region
Click Advanced... to configure this parameter.
Select the region where you want to deploy the application from the drop-down list. Default value: cn-hangzhou. This parameter is used to test the connectivity to the SAE server in the corresponding region and the validity of the account information. This setting does not affect the deployment operation.
Endpoint
Click Advanced... to configure this parameter.
Default value: sae.aliyuncs.com. In most cases, you do not need to change the value. If the server where Jenkins resides is deployed in a virtual private cloud (VPC) but cannot access the Internet, you must use the endpoint of the VPC where the SAE application resides to ensure the connectivity to SAE. For example, if the VPC endpoint is
sae-vpc.cn-hangzhou.aliyuncs.com, you must changecn-hangzhouto the region where the VPC resides.If success is displayed, the account information is configured.
Click Save.
Use Jenkins to build an application deployment job
You can quickly build application deployment jobs by using the following methods: Freestyle project, pipeline plug-in, Job DSL plug-in, and Maven plug-in.
Method 1: Use a Freestyle project to build a deployment job
Log on to Jenkins. In the left-side navigation pane of the Jenkins page, click New Item.
In the Enter an item name field, enter a project name. Then, select Freestyle project and click OK.
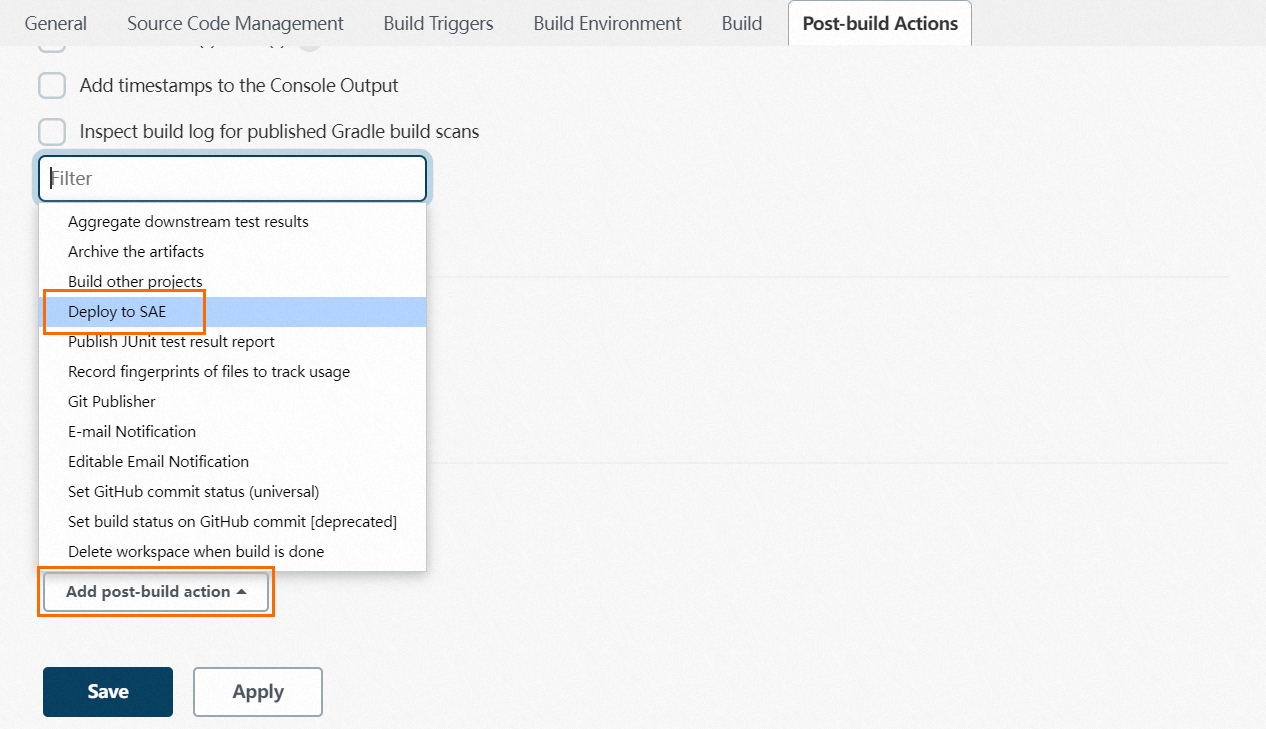
Click the Post-build Actions tab. On this tab, select Deploy to SAE from the Add post-build action drop-down list.
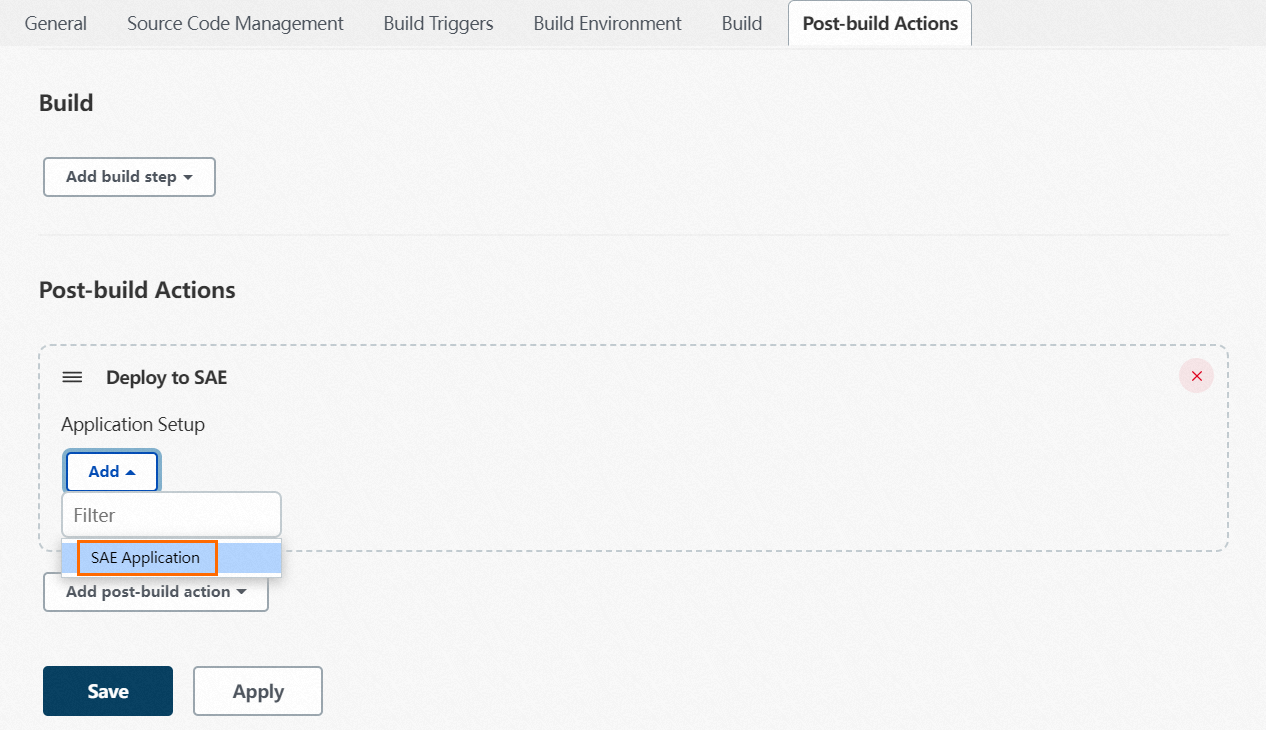
In the Deploy to SAE section, select SAE Application from the Add drop-down list.
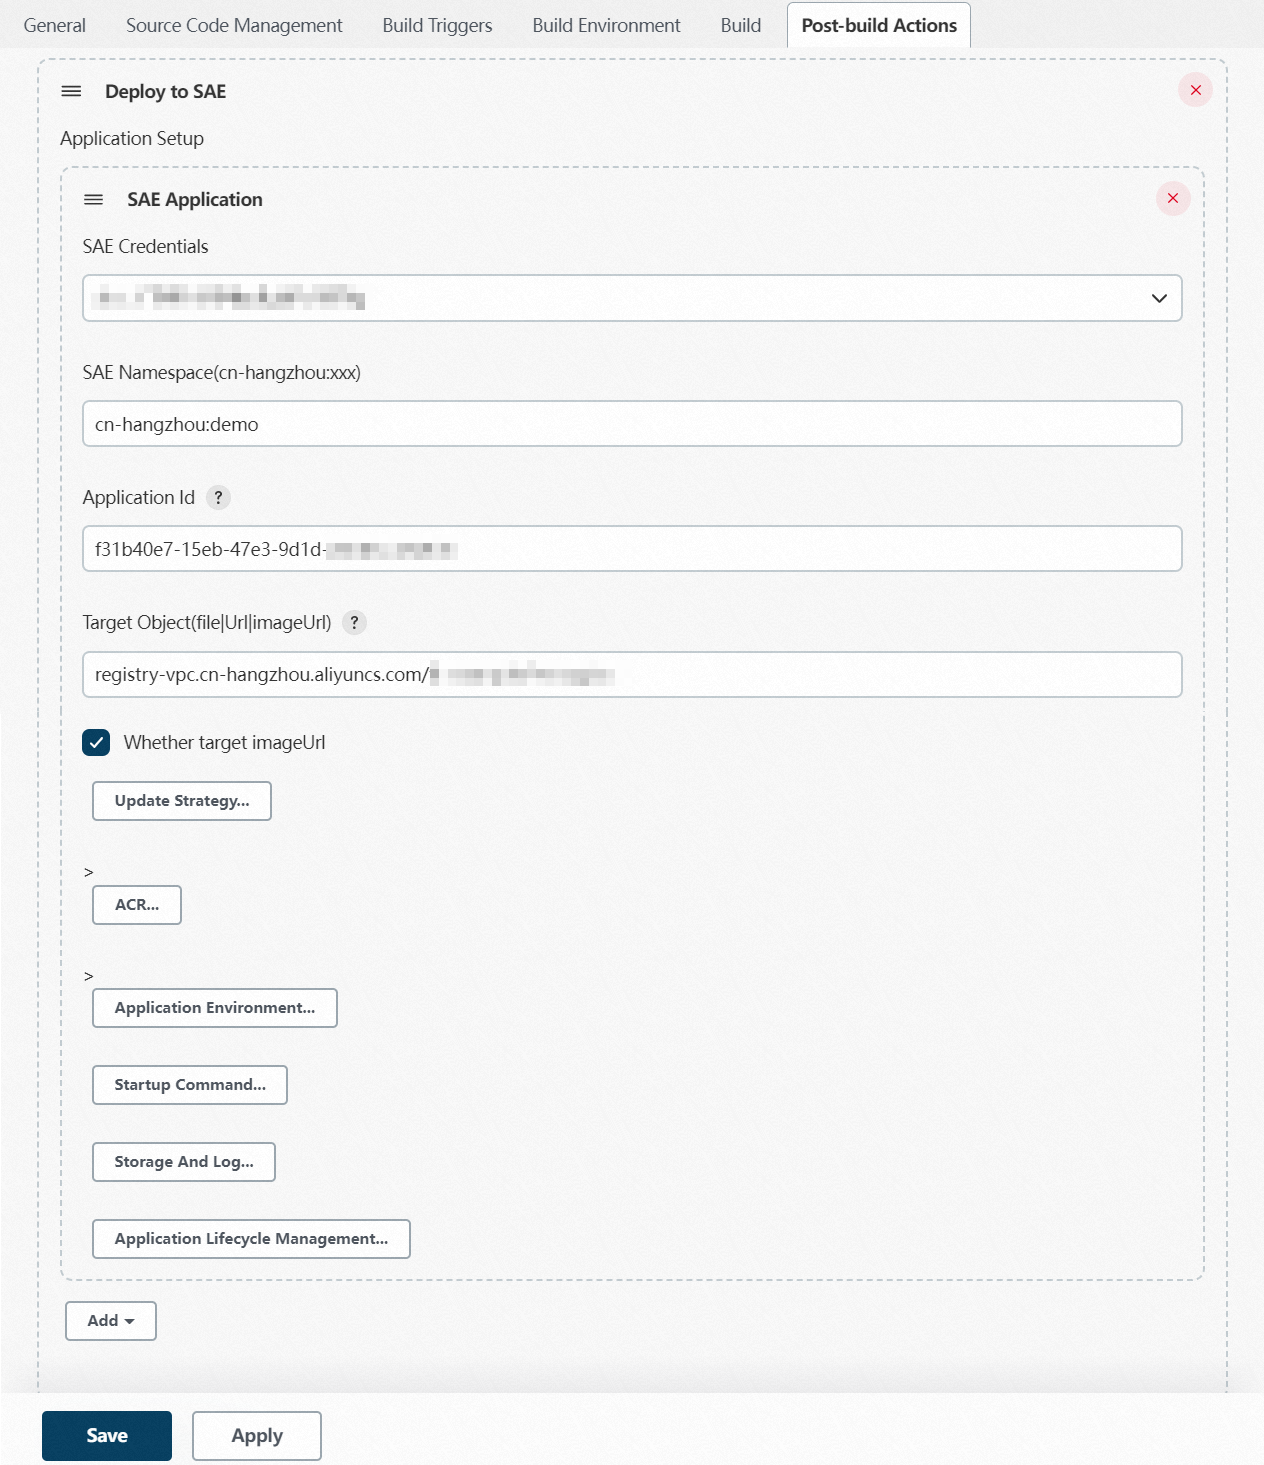
In the SAE Application section, configure the parameters.
In this example, an image is used to deploy an application, as shown in the following figure. The following table describes the parameters.
Category
Parameter
Description
Basic settings
SAE Credentials
Select the name of the specified AccessKey pair from the drop-down list.
SAE Namespace
Enter the ID of the namespace to which the application belongs. Format:
<RegionId>:<NamespaceId>. Example:cn-hangzhou:test. For information about the regions that are supported by SAE, see Supported regions.Application Id
The ID of the application that you want to deploy.
Target Object
The address of the deployment package or image. Supported methods:
Deployment package address: You can upload an on-premises or remote deployment package, such as Java JAR package, WAR package, and PHP ZIP package. Examples:
On-premises deployment package
SPRING-CLOUD-CONSUMER.jarIf the working directory of the project is /var/${jenkins_home}/workspace/test and the full path of the built package is /var/${jenkins_home}/workspace/test/SPRING-CLOUD-CONSUMER.jar, you need to only set the Target Object parameter to
SPRING-CLOUD-CONSUMER.jar.Remote deployment package
http://xx.oss-cn-hangzhou-internal.aliyuncs.com/demo/SPRING-CLOUD-CONSUMER.jarIf you use a remote deployment package, make sure that the network of the deployed application and the network of the remote file are connected. For example, you can upload a deployment package to Alibaba Cloud Object Storage Service (OSS).
Image address: Make sure that the deployed application can pull the specified image. For example, you can specify the address of an image in an Alibaba Cloud image repository. Example:
registry-vpc.cn-hangzhou.aliyuncs.com/demo/consumer:1.0
NoteAfter you create an application, you must select the same deployment method that you select when you create the application each time you deploy the application.
Whether target imageUrl
If you set the Target Object parameter to the address of an image, you must select this parameter.
Advanced settings
This section includes multiple settings such as the upgrade strategy, environment variables, and startup command. For example, if you want to upgrade application instances, you can use the canary release or phased release method to upgrade the instances. To upgrade the application, click Update Strategy to configure the parameters. You can click the
 icon next to each parameter to view the corresponding description.
 Click Save.
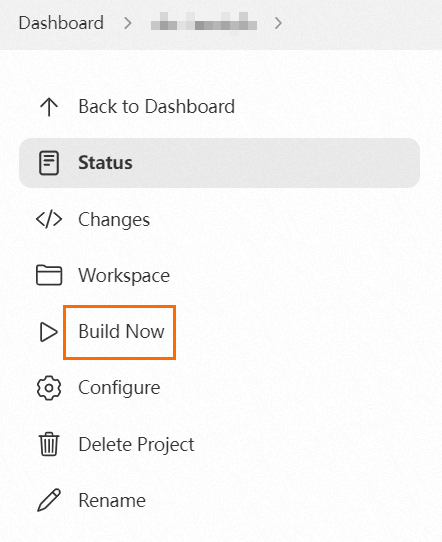
In the left-side navigation pane of the project page, click Build Now to run the job.
In the Build History section, view the build record. If the
 icon is displayed, the deployment is successful. You can click trend to go to the details page of the build record to view the details. You can also log on to the SAE console. On the Change Records page of the application, view the change record and check whether the Change Status is Executed. For more information, see View change records.
Method 2: Use the pipeline plug-in to create a deployment job
The sae-jenkins-plugin plug-in supports the built-in Snippet Generator of Jenkins Pipeline. This allows you to build a pipeline in Jenkins and deploy an application to SAE.
Log on to Jenkins. On the Jenkins homepage, click New Item.
Enter a project name in the Enter an item name field, select Pipeline, and then click OK.
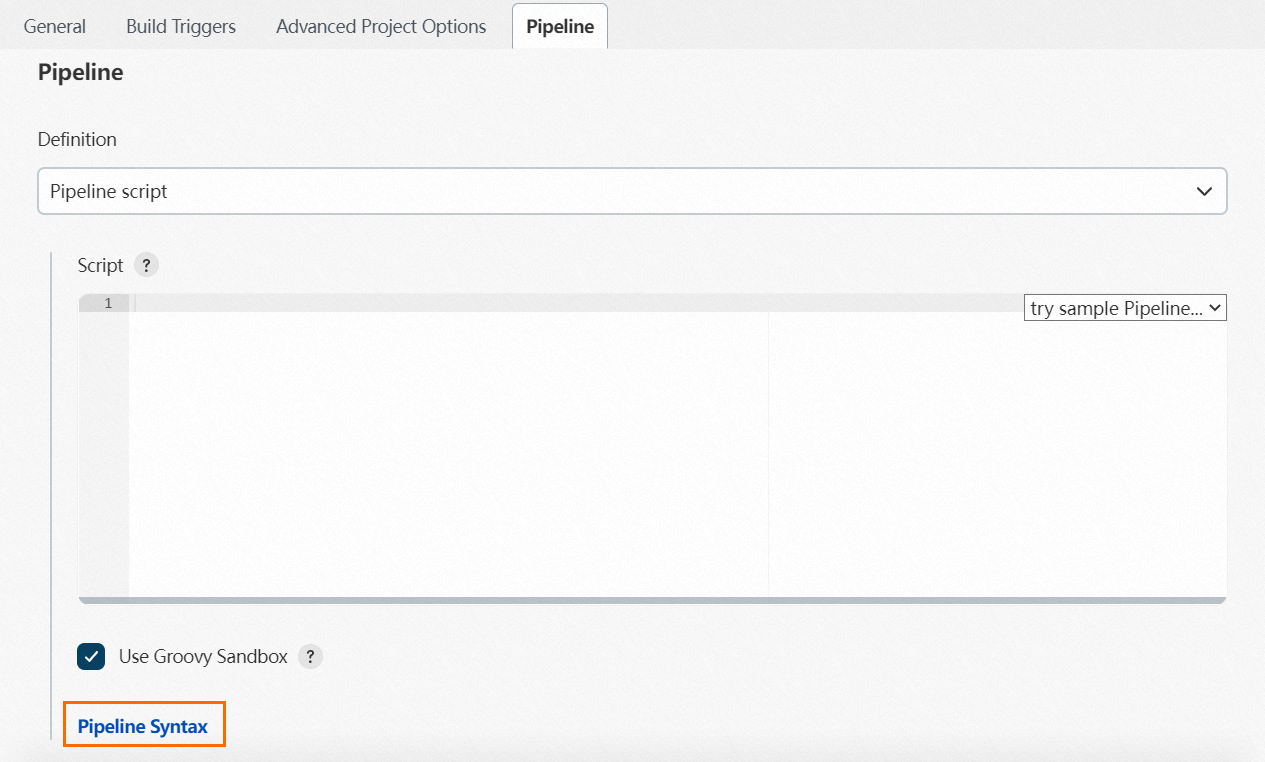
On the Pipeline tab, click Pipeline Syntax.
 Note
NoteIf you have created a pipeline, you can click the pipeline name in the project list to go to the pipeline management page. In the left-side navigation pane, click Pipeline Syntax to go to the Snippet Generator page.
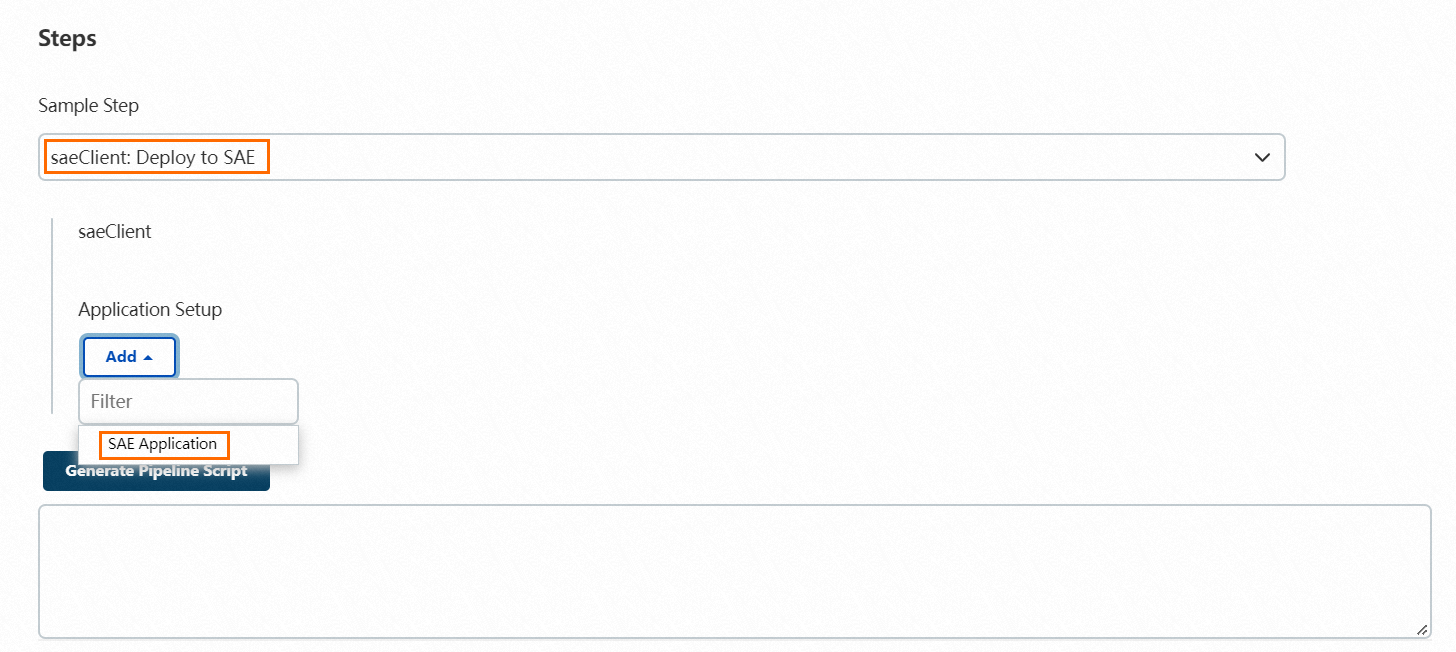
On the Snippet Generator page, select saeClient: Deploy into SAE from the Sample Step drop-down list, and then select SAE Application from the Add drop-down list.
In the SAE Application section, configure the parameters.
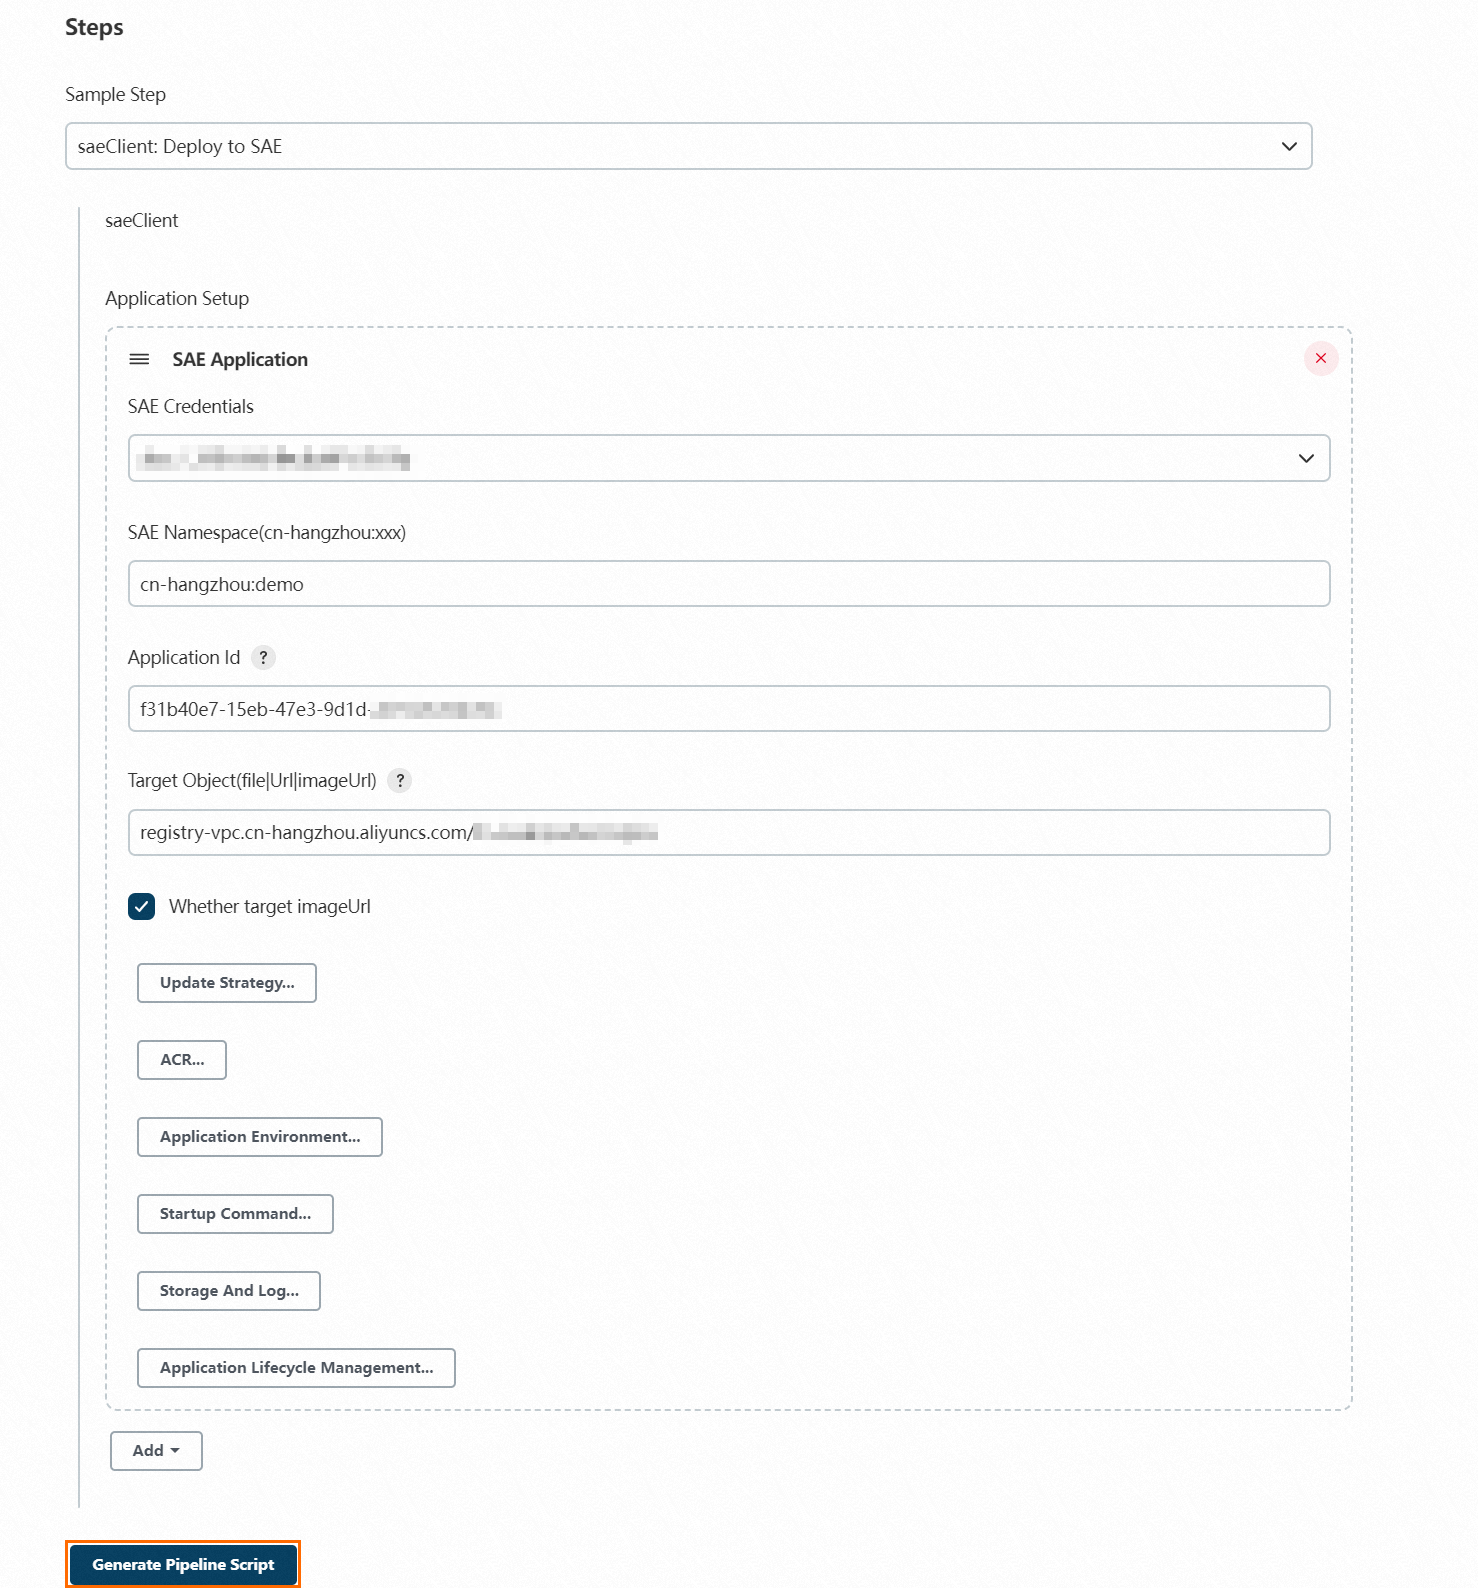
In this example, an image is used to deploy an application, as shown in the following figure. The following table describes the parameters.

Category
Parameter
Description
Basic settings
SAE Credentials
Select the name of the specified AccessKey pair from the drop-down list.
SAE Namespace
Enter the ID of the namespace to which the application belongs. Format:
<RegionId>:<NamespaceId>. Example:cn-hangzhou:test. For information about the regions that are supported by SAE, see Supported regions.Application Id
The ID of the application that you want to deploy.
Target Object
The address of the deployment package or image. Supported methods:
Deployment package address: You can upload an on-premises or remote deployment package, such as Java JAR package, WAR package, and PHP ZIP package. Examples:
On-premises deployment package
SPRING-CLOUD-CONSUMER.jarIf the working directory of the project is /var/${jenkins_home}/workspace/test and the full path of the built package is /var/${jenkins_home}/workspace/test/SPRING-CLOUD-CONSUMER.jar, you need to only set the Target Object parameter to
SPRING-CLOUD-CONSUMER.jar.Remote deployment package
http://xx.oss-cn-hangzhou-internal.aliyuncs.com/demo/SPRING-CLOUD-CONSUMER.jarIf you use a remote deployment package, make sure that the network of the deployed application and the network of the remote file are connected. For example, you can upload a deployment package to Alibaba Cloud Object Storage Service (OSS).
Image address: Make sure that the deployed application can pull the specified image. For example, you can specify the address of an image in an Alibaba Cloud image repository. Example:
registry-vpc.cn-hangzhou.aliyuncs.com/demo/consumer:1.0
NoteAfter you create an application, you must select the same deployment method that you select when you create the application each time you deploy the application.
Whether target imageUrl
If you set the Target Object parameter to the address of an image, you must select this parameter.
Advanced settings
This section includes multiple settings such as the upgrade strategy, environment variables, and startup command. For example, if you want to upgrade application instances, you can use the canary release or phased release method to upgrade the instances. To upgrade the application, click Update Strategy to configure the parameters. You can click the
 icon next to each parameter to view the corresponding description.
 Click Generate Pipeline Script and copy the generated pipeline script.

In the left-side navigation pane, click Back to return to the pipeline management page. In the left-side navigation pane, click Configure. Then, enter the script that you copied in the previous step in the Pipeline section.
In this example, a simple pipeline is configured and only specific parameters are modified, as shown in the following figure. The following table describes the parameters.
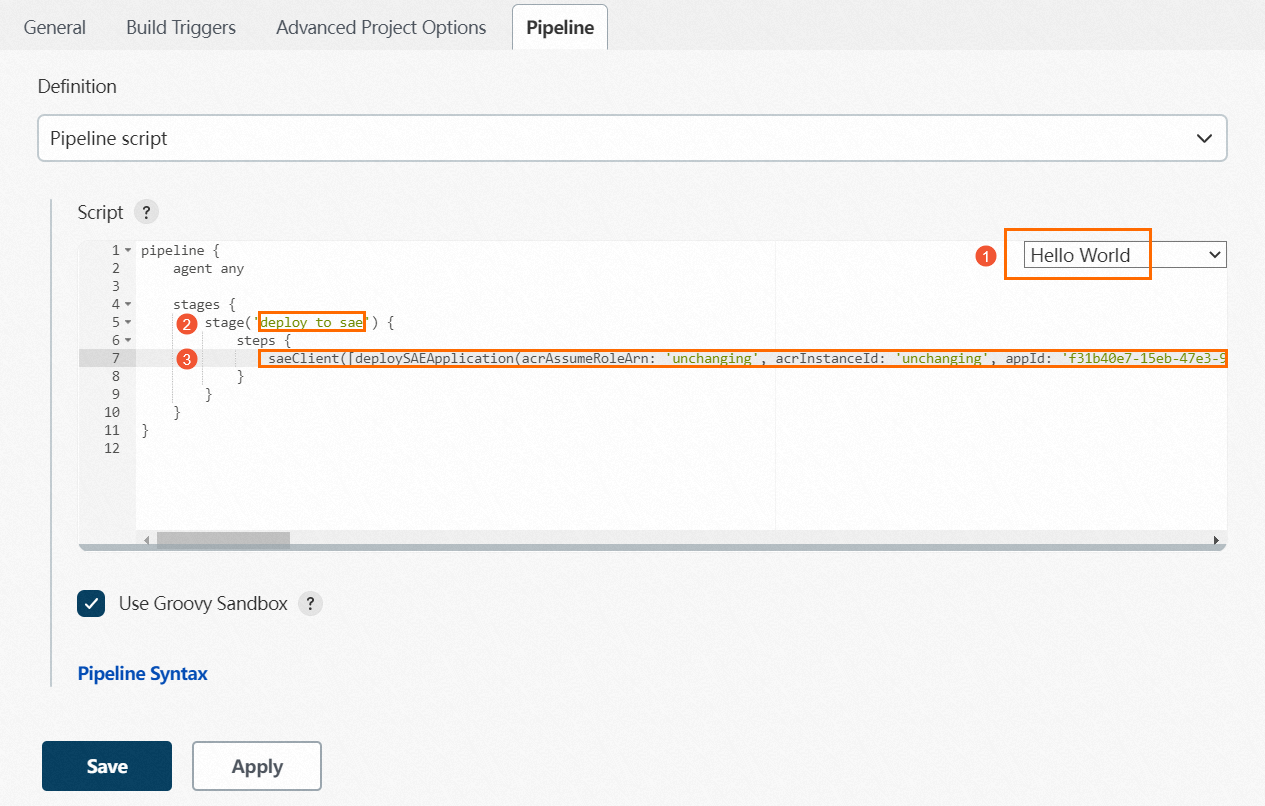
Label No.
Description
①
Select Hello World from the drop-down list on the right side of the Script field.
②
Replace the value with
deploy to sae.③
Replace the value with the script that is generated in Step6.
Click Save.
In the left-side navigation pane of the project page, click Build Now to run the job.

In the Build History section, view the build record. If the
 icon is displayed, the deployment is successful. You can click trend to go to the details page of the build record to view the details. You can also log on to the SAE console. On the Change Records page of the application, view the change record and check whether the Change Status is Executed. For more information, see View change records.
Method 3: Use Maven to build a deployment job
After you use a Maven plug-in to build an application, you can use the sae-jenkins-plugin plug-in to deploy the application. Before you use this method, you must install Maven. For more information, see Downloading Apache Maven 3.9.1.
Use a Maven plug-in to build a Java application.
For more information, see Build a Java app with Maven.
Use the sae-jenkins-plugin plug-in to deploy the Java application.
Log on to Jenkins. On the Jenkins homepage, click the name of an existing project to go to the details page.
In the left-side navigation pane, click Pipeline Syntax.
On the Snippet Generator page, select saeClient: Deploy into SAE from the Sample Step drop-down list, and then select SAE Application from the Add drop-down list.
In the SAE Application section, configure the parameters.
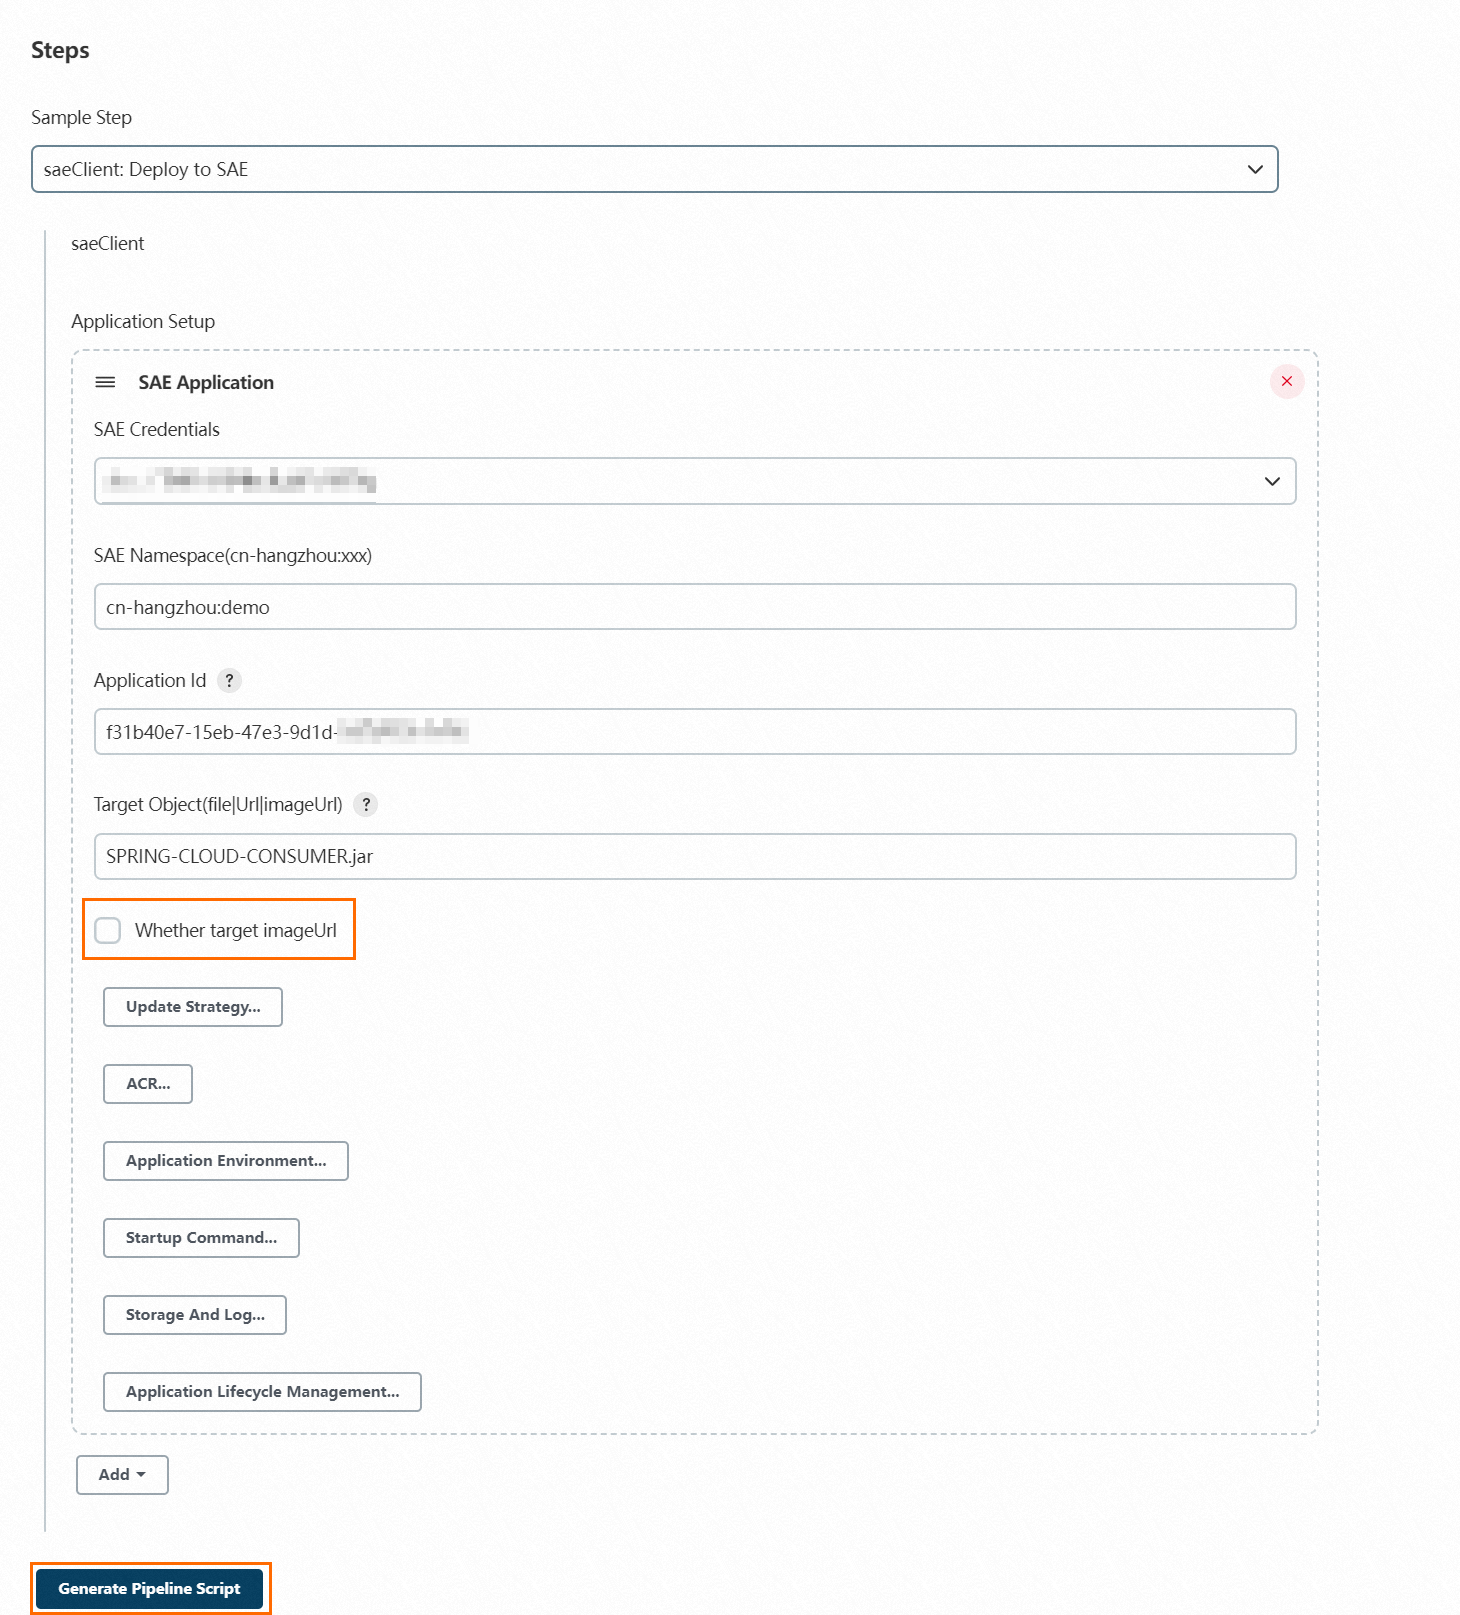
Category
Parameter
Description
Basic settings
SAE Credentials
Select the name of the specified AccessKey pair from the drop-down list.
SAE Namespace
Enter the ID of the namespace to which the application belongs. Format:
<RegionId>:<NamespaceId>. Example:cn-hangzhou:test. For information about the regions that are supported by SAE, see Supported regions.Application Id
The ID of the application that you want to deploy.
Target Object
Enter the address of the deployment package. You can upload an on-premises or remote deployment package, such as Java JAR package, WAR package, and PHP ZIP package. Examples:
On-premises deployment package
SPRING-CLOUD-CONSUMER.jarIf the working directory of the project is /var/${jenkins_home}/workspace/test and the full path of the built package is /var/${jenkins_home}/workspace/test/SPRING-CLOUD-CONSUMER.jar, you need to only set the Target Object parameter to
SPRING-CLOUD-CONSUMER.jar.Remote deployment package
http://xx.oss-cn-hangzhou-internal.aliyuncs.com/demo/SPRING-CLOUD-CONSUMER.jarIf you use a remote deployment package, make sure that the network of the deployed application and the network of the remote file are connected. For example, you can upload a deployment package to Alibaba Cloud OSS.
NoteAfter you create an application, you must select the same deployment method that you select when you create the application each time you deploy the application.
Whether target imageUrl
You do not need to configure this parameter. This parameter must be selected if you set the Target Object parameter to the address of an image.
Advanced settings
The advanced settings include the following parameters: Update Strategy, ACR, Application Environment, Startup Command, Storage And Log, and Application Lifecycle Management. Click the required text box to configure the parameters. You can click the
 icon next to each parameter to view the corresponding description.
 Click Generate Pipeline Script and copy the generated pipeline script.

In the left-side navigation pane, click Back to return to the pipeline management page. In the left-side navigation pane, click Configure. Then, enter the script that you copied in the previous step in the Pipeline section.
In this example, a simple pipeline is configured and only specific parameters are modified. Select Hello World from the drop-down list on the right side of the Script field and change the original parameter values.

Click Save.
In the left-side navigation pane of the project page, click Build Now to run the job.

In the Build History section, view the build record. If the
 icon is displayed, the deployment is successful. You can click trend to go to the details page of the build record to view the details. You can also log on to the SAE console. On the Change Records page of the application, view the change record and check whether the Change Status is Executed. For more information, see View change records.
Method 4: Use the Job DSL plug-in to create a deployment job
In Jenkins, you can use the Job DSL plug-in to build a job template and quickly build and deploy jobs based on the template. Before you use this method, you must install the Job DSL plug-in. For more information, see Job DSL.
Log on to Jenkins. On the Jenkins homepage, click New Item.
In the Enter an item name field, enter a project name. Then, select Freestyle project and click OK.
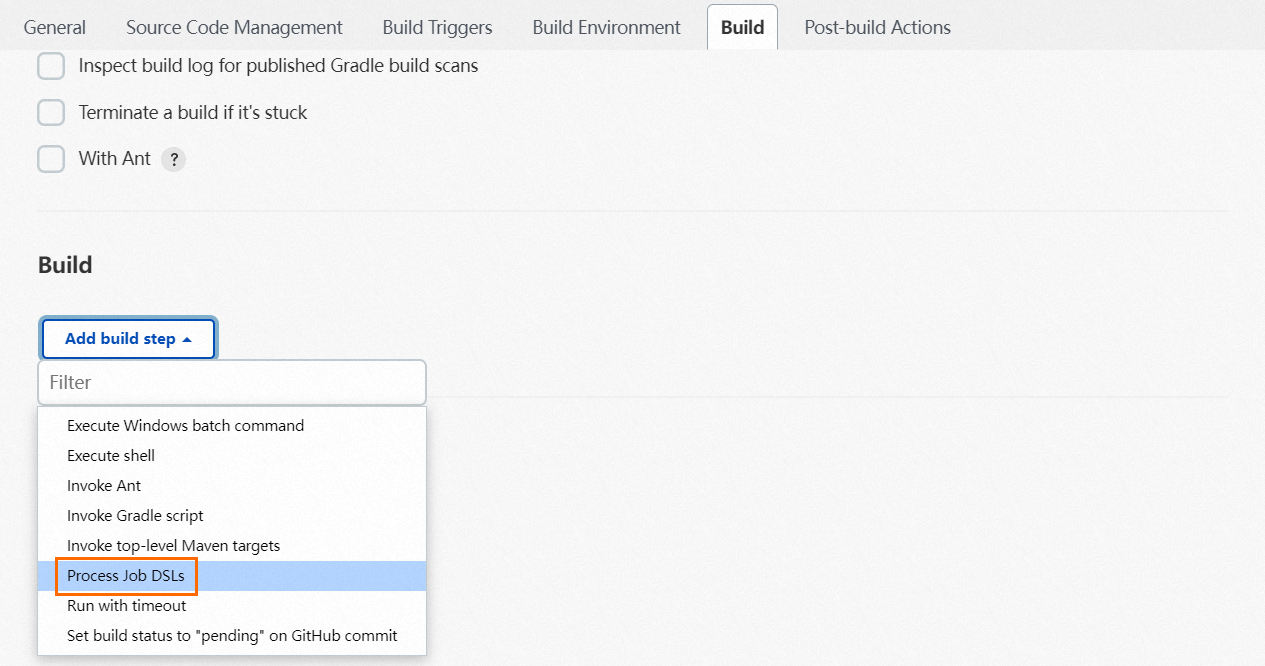
On the Build tab, select Process Job DSLs from the Add build step drop-down list.
In the Process Job DSLs section, click Use the provided DSL script. In the DSL Script field, enter the configuration script.
job('sae') {                                        // The name of the job that you want to build.
  publishers {                                      // The type of the SAE plug-in.
    saeClient {                                     // The name of the client that calls the SAE plug-in.
      deploySAEApplication('', '', '', '', '', ...) // The method that is used to call the application that you want to deploy to SAE.
    }
  }
}
The following deployment methods are supported:
void deploySAEApplication(
    String namespace,
    String credentialsString,
    String appId,
    String targetObject,
    Boolean image,
    String edasContainerVersion,
    String webContainer,
    String jdk,
    String packageVersion,
    String envs,
    String startupCommand,
    String args,
    Integer minReadyInstances,
    Integer minReadyInstanceRatio,
    Boolean autoEnableApplicationScalingRule,
    Boolean enableGreyTagRoute,
    String acrInstanceId,
    String acrAssumeRoleArn,
    String imagePullSecrets,
    Boolean enableImageAccl,
    String customHostAlias,
    String timezone,
    String configMapMountDesc,
    String jarStartOptions,
    String jarStartArgs,
    String warStartOptions,
    String tomcatConfig,
    String nasId,
    String mountHost,
    String mountDesc,
    String ossMountDesc,
    String ossAkId,
    String ossAkSecret,
    String slsConfigs,
    String kafkaConfigs,
    String postStart,
    String preStop,
    Integer terminationGracePeriodSeconds,
    String readiness,
    String liveness,
    Boolean enableAhas,
    Boolean associateEip,
    String updateStrategy) ;
Click Save.
In the left-side navigation pane of the project page, click Build Now to run the job.

In the Build History section, view the build record. If the
 icon is displayed, the deployment is successful. You can click trend to go to the details page of the build record to view the details. You can also log on to the SAE console. On the Change Records page of the application, view the change record and check whether the Change Status is Executed. For more information, see View change records.