You can use Resource Orchestration Service (ROS) to generate a template based on a collection of existing resources in a resource management scenario. After the template is generated, you can modify the template based on your business requirements and use the modified template as a common template to deploy multiple resources at a time.
Use case
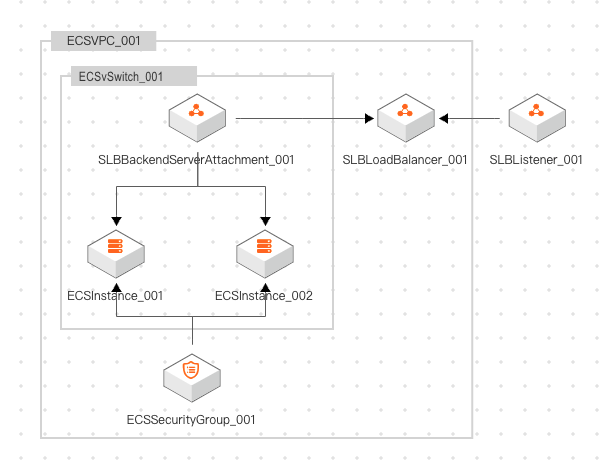
If you want to create resources to deploy a web application, you can add the app:web tag to the resources. This way, you can filter the required resources by tag when you create a resource management scenario. You can click Create Template to generate a template based on the resource scenario. After the template is generated, you can add the Parameters section to the template to improve the flexibility and reusability of the template. Then, you can use the modified template as a common template to create a stack and deploy multiple resources at a time. In this example, the following resources are deployed:
One virtual private cloud (VPC)
One vSwitch
One security group
Two Elastic Compute Service (ECS) instances
One Server Load Balancer (SLB) instance
Step 1: Create resources and add tags to the resources
Create the preceding resources in the relevant consoles and add the app:web tag to the resources. The tag key is app and the tag value is web. For more information about tags, see What is Tag?.
If the resources already exist, you need to only add the tag to the resources.
In the VPC console, create a VPC and a vSwitch, and add the
app:webtag to them.For more information, see Create a VPC and Add tags to an instance.
NoteTo add the tag to a vSwitch, find the vSwitch and click the
 icon in the Tags column. You can perform similar operations to add the tag to a VPC.
 In the ECS console, create a security group of the VPC type and add the
app:webtag to the security group. When you create the security group, select the VPC that you created in 1 from the Network drop-down list.For more information, see Create a security group and Modify the tags of a security group.
Create two ECS instances and add the
app:webtag to the instances.Select the VPC and the vSwitch that you created in 1.
Select the security group that you created in 2.
Configure relevant parameters for the ECS instances.
For more information about the parameters, see Create an instance on the Custom Launch tab.
Add the
app:webtag to the instances.For more information, see Create or add a tag.
In the SLB console, create an SLB instance and add the
app:webtag to the instance. In this example, an Application Load Balancer (ALB) instance is created.Select the VPC that you created in 1 to create the ALB instance.
Create a backend server group and add the ECS instances that you created in 3 to the group.
Configure a listener and domain name resolution based on your business requirements.
Add the
app:webtag to the ALB instance.
For more information, see Use an ALB instance to balance loads for IPv4 services and Manage tags.
Step 2: Create a resource management scenario
Create a resource management scenario and filter the resources created in Step 1: Create a resource and bind tags.
Log on to the ROS console.
In the left-side navigation pane, click Scenarios.
In the top navigation bar, select a region where you want to create the resource scenario from the region drop-down list.
On the Scenarios page, click Create Scenario.
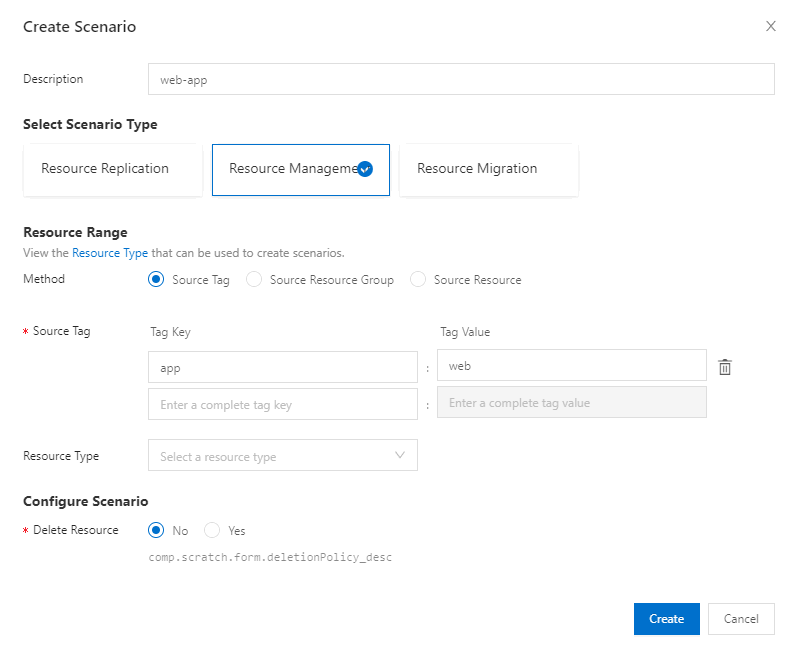
In the Create Scenario dialog box, specify the Description parameter and select Resource Management as Select Scenario Type.
Configure the parameters in the Resource Range section.
Set Method to Source Tag.
In the Source Tag section, set Tag Key to
appand Tag Value toweb.

Set Delete Resource to No.
NoteIn this example, the resources in the stack are retained if the stack is deleted.
Click Create.
After the resource scenario is created, Created appears in the Status column on the Scenarios page.
Step 3: Generate a template based on the resource scenario
On the Scenarios page, click the ID of the resource scenario.
In the upper-right corner of the resource scenario management page, click Create Template to generate a template.
The generated template is in the JSON and YAML formats. In this example, the JSON template is used. The following section describes the template body and structure.
Step 4: Modify the generated template
In the generated template, the resource property values are literal values that are parsed from the parameters selected when you created the resources in the relevant consoles in Step 1: Create resources and add tags to the resources. You can add the Parameters and the Outputs sections to modify the generated template. This way, you can use the template as a common template in different business cases. In the Parameters section, you can specify values for parameters to overwrite the literal values of relevant properties such as zones and instance types.
Before the change
ROSTemplateFormatVersion: '2015-09-01' // The syntax version of the template.
Resources: {} // The details of the resources.After the change
ROSTemplateFormatVersion: '2015-09-01' // The syntax version of the template.
Description: {} // The description of the template, including the use cases and architecture of the template.
Parameters: {} // The parameters for which you can specify values to overwrite the literal values of relevant resource properties.
Resources: {} // The details of the resources.
Outputs: {} // The outputs of the template, such as the return values of resource properties. To query outputs, call the GetStack operation or go to the Outputs tab in the ROS console.
For more information about the parameters, see Template syntax.
Mappings between resources, parameters, and outputs
Resource name | Parameter | Output |
ECSVPC_001 |
| None. |
ECSvSwitch_001 |
| None. |
| ||
ECSSecurityGroup_001 | None. | None. |
ECSInstance_00X |
|
|
| ||
| ||
SLBLoadBalancer_001 |
|
|
| ||
|
Procedure
Complete common template
ROSTemplateFormatVersion: '2015-09-01'
Parameters:
ZoneId:
Type: String
AssociationProperty: ALIYUN::ECS::Instance:ZoneId
Description: the ID of the zone
Label: Zone
SlaveZoneId:
Type: String
Description: the ID of the secondary zone
Label: SLB Secondary Zone
VpcCidrBlock:
Type: String
Label: VPC IPv4 CIDR Block
Description: the CIDR Block of the VPC
Default: 172.16.0.0/12
VSwitchCidrBlock:
Type: String
Label: VSwitch CIDR Block
Description: the CIDR block of the vSwitch must belong to the CIDR block of the VPC
Default: 172.16.0.0/24
ECSInstanceType:
Type: String
Description: the ECS instance type
Label: ECS Instance Type
AssociationProperty: ALIYUN::ECS::Instance::InstanceType
AssociationPropertyMetadata:
ZoneId: ZoneId
SystemDiskCategory:
Type: String
Description: the category of the system disk
AssociationProperty: ALIYUN::ECS::Disk::SystemDiskCategory
AssociationPropertyMetadata:
ZoneId: ZoneId
InstanceType: ECSInstanceType
Label: System Disk Category
LoadBalancerSpec:
Type: String
AssociationProperty: ALIYUN::SLB::Instance::InstanceType
Description: the specification of the instance
Label: SLB Specification
AssociationPropertyMetadata:
ZoneId: ZoneId
Default: slb.s1.small
Resources:
ECSVPC_001:
Type: ALIYUN::ECS::VPC
Properties:
CidrBlock:
Ref: VpcCidrBlock
VpcName: web-vpc
EnableIpv6: false
Description: web-vpc
Tags:
- Value: web
Key: app
ECSVSwitch_001:
Type: ALIYUN::ECS::VSwitch
Properties:
VSwitchName: web-vsw
VpcId:
Ref: ECSVPC_001
Description: web-vsw
Tags:
- Value: web
Key: app
ZoneId:
Ref: ZoneId
CidrBlock:
Ref: VSwitchCidrBlock
DependsOn:
- ECSVPC_001
ECSSecurityGroup_001:
Type: ALIYUN::ECS::SecurityGroup
Properties:
VpcId:
Ref: ECSVPC_001
Description: web-sg
SecurityGroupName: web-sg
Tags:
- Value: web
Key: app
SecurityGroupIngress:
- PortRange: 80/80
NicType: intranet
Priority: 1
SourceCidrIp: 0.0.0.0/0
Policy: accept
IpProtocol: tcp
- PortRange: 443/443
NicType: intranet
Priority: 1
SourceCidrIp: 0.0.0.0/0
Policy: accept
IpProtocol: tcp
- PortRange: 22/22
NicType: intranet
Priority: 1
SourceCidrIp: 0.0.0.0/0
Policy: accept
IpProtocol: tcp
SecurityGroupType: normal
DependsOn:
- ECSVPC_001
ECSInstance_001:
Type: ALIYUN::ECS::Instance
Properties:
DeletionProtection: true
SystemDiskCategory:
Ref: SystemDiskCategory
VpcId:
Ref: ECSVPC_001
Description: web-ecs
Tags:
- Value: web
Key: app
VSwitchId:
Ref: ECSVSwitch_001
SystemDiskSize: 40
ImageId: centos_7_9_x64_20G_alibase_2022****.vhd
SpotStrategy: NoSpot
AllocatePublicIP: false
InstanceChargeType: PostPaid
IoOptimized: optimized
SecurityGroupIds:
- Ref: ECSSecurityGroup_001
InternetChargeType: PayByTraffic
ZoneId:
Ref: ZoneId
InstanceName: web-ecs002
InstanceType:
Ref: ECSInstanceType
SystemDiskPerformanceLevel: PL0
DependsOn:
- ECSSecurityGroup_001
- ECSVSwitch_001
- ECSVPC_001
ECSInstance_002:
Type: ALIYUN::ECS::Instance
Properties:
DeletionProtection: true
SystemDiskCategory:
Ref: SystemDiskCategory
VpcId:
Ref: ECSVPC_001
Description: web-ecs
Tags:
- Value: web
Key: app
VSwitchId:
Ref: ECSVSwitch_001
SystemDiskSize: 40
ImageId: centos_7_9_x64_20G_alibase_2022****.vhd
SpotStrategy: NoSpot
AllocatePublicIP: false
InstanceChargeType: PostPaid
IoOptimized: optimized
SecurityGroupIds:
- Ref: ECSSecurityGroup_001
InternetChargeType: PayByTraffic
ZoneId:
Ref: ZoneId
InstanceName: web-ecs001
InstanceType:
Ref: ECSInstanceType
SystemDiskPerformanceLevel: PL0
DependsOn:
- ECSSecurityGroup_001
- ECSVSwitch_001
- ECSVPC_001
SLBListener_001:
Type: ALIYUN::SLB::Listener
Properties:
AclStatus: 'off'
Protocol: tcp
Description: tcp_80
HealthCheck:
Interval: 2
HealthyThreshold: 3
Switch: 'on'
UnhealthyThreshold: 3
HealthCheckType: tcp
LoadBalancerId:
Ref: SLBLoadBalancer_001
ListenerPort: 80
Bandwidth: -1
BackendServerPort: 80
Scheduler: tch
StartListener: true
Persistence:
PersistenceTimeout: 0
DependsOn:
- SLBLoadBalancer_001
SLBLoadBalancer_001:
Type: ALIYUN::SLB::LoadBalancer
Properties:
DeletionProtection: false
VpcId:
Ref: ECSVPC_001
AddressIPVersion: ipv4
Tags:
- Value: web
Key: app
SupportPrivateLink: true
PayType: PayOnDemand
AddressType: intranet
VSwitchId:
Ref: ECSVSwitch_001
LoadBalancerName: web-slb
InternetChargeType: paybytraffic
LoadBalancerSpec:
Ref: LoadBalancerSpec
MasterZoneId:
Ref: ZoneId
SlaveZoneId:
Ref: SlaveZoneId
DependsOn:
- ECSVPC_001
- ECSVSwitch_001
SLBBackendServerAttachment_001:
Type: ALIYUN::SLB::BackendServerAttachment
Properties:
BackendServers:
- ServerId:
Ref: ECSInstance_001
Type: ecs
Weight: 100
- ServerId:
Ref: ECSInstance_002
Type: ecs
Weight: 100
LoadBalancerId:
Ref: SLBLoadBalancer_001
DependsOn:
- SLBLoadBalancer_001
- ECSInstance_001
- ECSInstance_002
Outputs:
  ECSInstance_001:
    Description: TheinstanceIDofcreatedecsinstance
    Value:
      Fn::GetAtt:
        - ECSInstance_001
        - InstanceId
  ECSInstance_002:
    Description: TheinstanceIDofcreatedecsinstance
    Value:
      Fn::GetAtt:
        - ECSInstance_002
        - InstanceId
SLBListenerIpAddress:
Description: TheIPaddressoftheloadbalancer.
Value:
Fn::GetAtt:
- SLBLoadBalancer_001
- IpAddressStep 5: (Optional) Deploy multiple resources at a time
You can use the common template to create a stack and deploy multiple resources at a time.
In the ROS console, use the common template that you created in Step 4: Modify the generated template to create a stack and deploy multiple resources at a time.
For more information, see Create a stack.
On the stack details page, click the Parameters tab to view the details of the deployed resources.
