Starting August 01, 2019, ApsaraDB RDS for MySQL no longer supports the TokuDB engine. This topic describes how to change the storage engine from TokuDB to InnoDB.
Background information
Percona no longer provides support for TokuDB, known bugs cannot be fixed, and business loss occur in extreme cases. As a result, ApsaraDB RDS for MySQL terminated its support for the TokuDB engine from August 01, 2019. If you directly change the storage engine, DML operations may be blocked and concurrency is affected. We recommend that you evaluate your workloads at the earliest opportunity and use one of the following solutions to change your storage engine.
Effective date
August 01, 2019
Application scope
RDS instances that use the TokuDB storage engine
You can execute the SHOW ENGINES; statement to view the current default engine of your RDS instance, or the SHOW CREATE TABLE <table name>; statement to view the storage engine of a table.
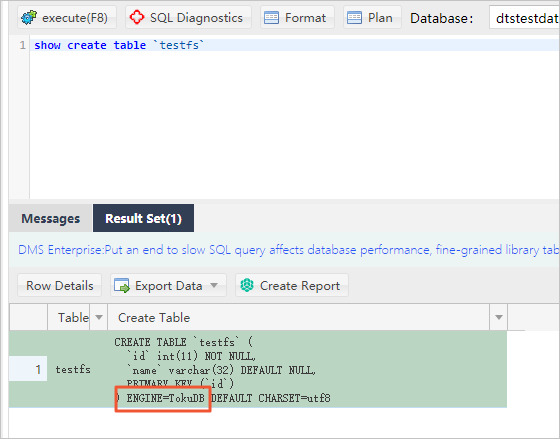
Usage notes
After the storage engine is changed, storage usage increases. The storage capacity that you need to reserve for the engine change operation is approximately twice the storage of TokuDB tables during parallel operations. Pay attention to the storage usage during operations.
After the storage engine is changed, CPU utilization decreases but IOPS increases when the same volume of data is read. This is because data pages are not compressed.
During full migration, the endpoint is switched. We recommend that you perform the migration during off-peak hours.
If the database engine version is changed during full migration, we recommend that you test the compatibility in advance.
Solution recommendations
If the table size in an RDS instance is less than 100 MB and short-term blocking is acceptable, you can use Solution 1. This solution locks tables for a short period of time and frees you from configuring various tools.
If the table size in an RDS instance is larger than 5 GB, we recommend that you use Solution 2 or 3.
If you need to change the storage engine for all tables in an RDS instance to the InnoDB engine, we recommend that you use Solution 3 or 4.
After the storage engine is changed, you must change the value of the default_storage_engine parameter to InnoDB.
Solution 1
This solution directly changes the storage engine. However, DML operations may be blocked during the entire process, and a long period of time is required to migrate large tables.
Log on to an RDS MySQL instance through DMS Use Data Management (DMS) to log on to an RDS instance.
In the top navigation bar, choose .
Execute the following statement:
Alter table test.testfs engine innodb
Solution 2
This solution uses a third-party tool to migrate tables. Various third-party tools, such as pt-osc developed by Percona and gh-ost developed by GitHub, support online DDL operations. In this example, gh-ost is used to describe the migration process. For more information, see gh-ost.
Principle
To migrate a table, gh-ost creates a temporary table that has the same schema as the original table and incrementally copies data from the original table to the temporary table. After all data is copied to the temporary table, gh-ost reads binary logs by using a simulated slave process and synchronizes table changes from the original table to the temporary table in real time. Then, gh-ost renames the tables to complete the migration during off-peak hours. This solution affects the I/O performance during initial full data synchronization. However, you can modify parameters to limit I/O.
Advantages: gh-ost allows you to specify the point in time for data migration and control the synchronization process.
Disadvantages: Each table needs to be synchronized by using commands. If a large number of tables exist, the operations are cumbersome.
Parameters
Parameter | Description |
--initially-drop-old-table | Checks and deletes an existing table. |
--initially-drop-ghost-table | Checks and deletes an existing ghost table. |
--aliyun-rds | Migrates tables on ApsaraDB RDS. |
--assume-rbr | Configures gh-ost to read binary logs in the Row Based Replication (RBR) format. |
--allow-on-master | Runs gh-ost on the primary database. |
--assume-master-host | Specifies the endpoint of the primary database. |
--user | Specifies the name of the database account. |
--password | Specifies the password of the database account. |
--host | Specifies the endpoint of the database, which must be the same as that of the primary database. |
--database | Specifies the name of the database. |
--table | Specifies the name of the table. |
--alter | Alters the table. |
--chunk-size | Specifies the number of rows that are submitted by batch. |
--postpone-cut-over-flag-file | Specifies the file that is used to postpone the migration process. If you delete the file at the specified point in time, tables are immediately migrated. |
--panic-flag-file | Specifies the file that is used to stop the ghost process. After this file is generated, the ghost process immediately stops. |
--serve-socket-file | Receives interactive commands. |
--execute | Directly executes table migration. |
Prerequisites
gh-ost is installed on your on-premises host or Elastic Compute Service (ECS) instance.
The IP address of the on-premises host or ECS instance is added to the IP address whitelist of your RDS instance.
Procedure
Run the following command on the on-premises host or ECS instance to perform a migration and wait until the migration is complete:
gh-ost --user="test01" --password="Test123456" --host="rm-bpxxxxx.mysql.rds.aliyuncs.com" --database="test" --table="testfs" --alter="engine=innodb" --initially-drop-old-table --initially-drop-ghost-table --aliyun-rds --assume-rbr --allow-on-master --assume-master-host="rm-bpxxxxx.mysql.rds.aliyuncs.com" --chunk-size=500 --postpone-cut-over-flag-file="/tmp/ghostpost.postpone" --panic-flag-file="/tmp/stop.flag" --serve-socket-file="/tmp/ghost.sock" --execute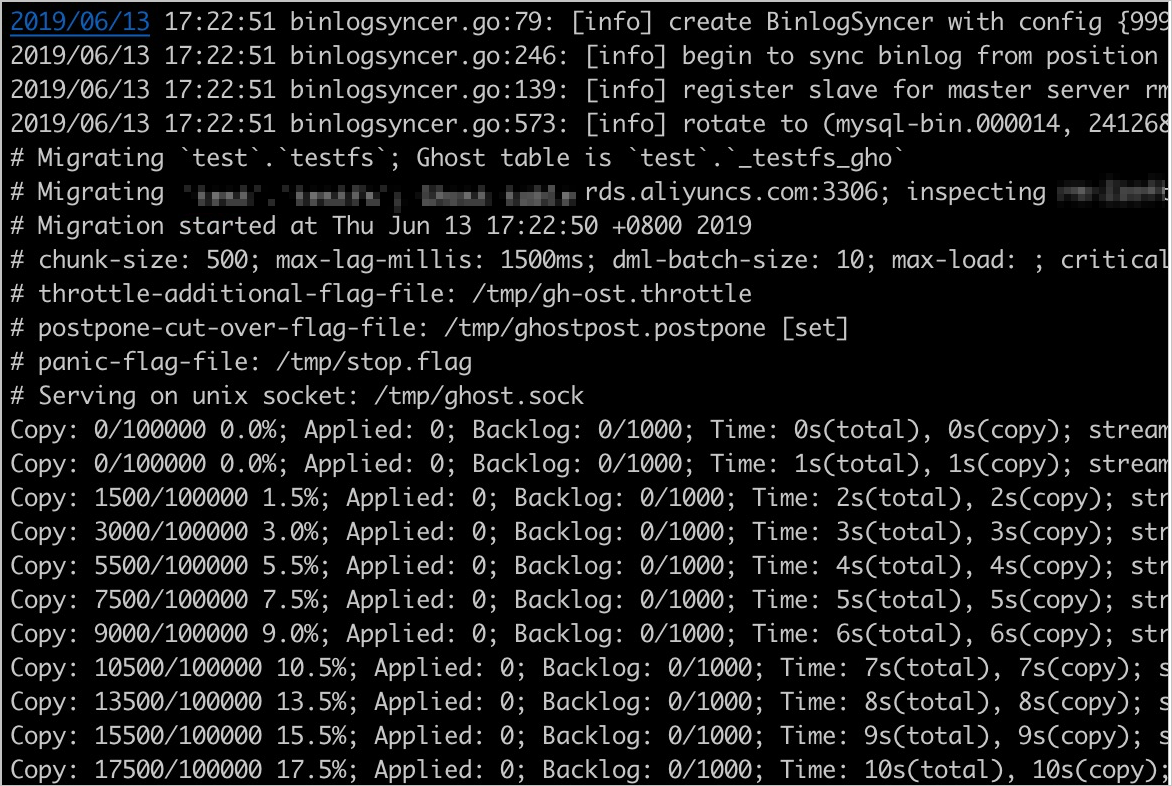
Log on to an RDS MySQL instance through DMS Use DMS to log on to an RDS instance.
In the left-side navigation pane, check the tables. Temporary tables ending with _ gho and _ ghc are displayed.
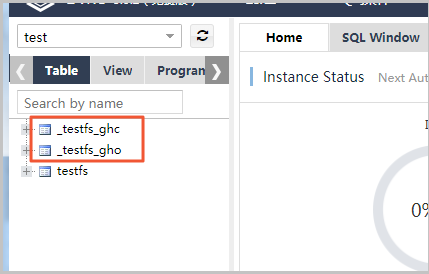
Run the
rm /tmp/ghostpost.postponecommand to start table migration. The following figure shows a sample output. Note
NoteYou can ignore the displayed error in the output. The migration has been completed.
Check the tables and verify the data.
NoteVerify that the data is correct and then delete the _del table.
Solution 3
This solution uses Alibaba Cloud Data Transmission Service (DTS) to synchronize data from an original table to a temporary table in real time, and then locks the original table and renames the tables during off-peak hours. You can use this solution to simultaneously migrate a large number of tables.
In the top navigation bar, choose .
Run the following command to create a temporary table:
CREATE TABLE `testfs_tmp` ( `id` int(11) NOT NULL AUTO_INCREMENT, `vc` varchar(8000) DEFAULT NULL, PRIMARY KEY (`id`) ) ENGINE=innodb DEFAULT CHARSET=utf8- Note
You are charged for the data synchronization instance. For more information, see Data Transmission Service Pricing.
In the left-side navigation pane of the DTS console, click Data Synchronization.
Find the purchased data synchronization instance and click Configure Synchronization Channel in the Actions column.
Configure the parameters. The following table describes the parameters.
Section
Parameter
Description
Source Instance Details
Instance Type
Select RDS Instance.
Instance ID
Select the RDS instance for which you want to change the storage engine.
Encryption
Select Non-encrypted or SSL-encrypted. If you want to select SSL-encrypted, you must enable SSL encryption. Enabling SSL encryption significantly increases CPU utilization. For more information, see Configure SSL encryption for an RDS instance.
Destination Instance Details
Instance Type
Select RDS Instance.
Instance ID
Select the RDS instance for which you want to change the storage engine.
Encryption
Select Non-encrypted or SSL-encrypted. If you want to select SSL-encrypted, you must enable SSL encryption. Enabling SSL encryption significantly increases CPU utilization. For more information, see Configure SSL encryption for an RDS instance.
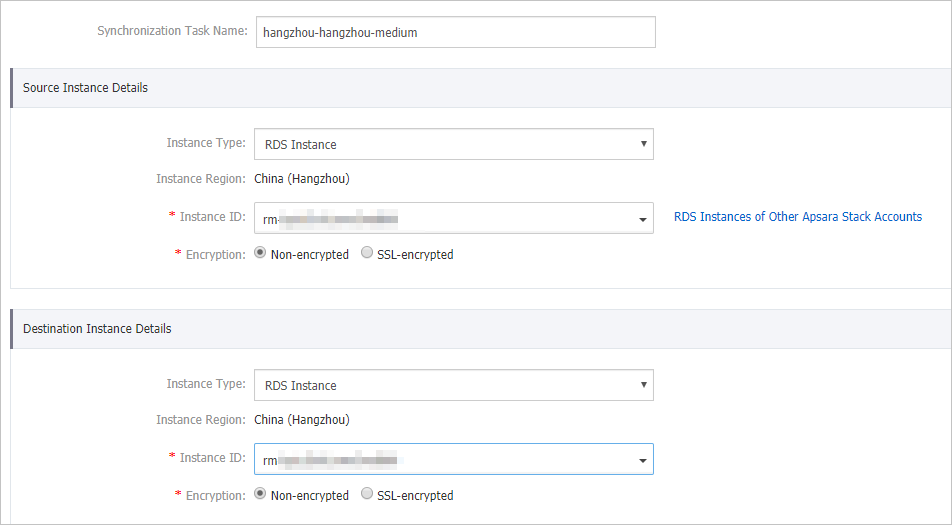
Click Set Whitelist and Next.
Wait until synchronization accounts are created. Then, click Next.
Move the testfs table from the left-side section to the right-side section and click Edit.

Set the database name to testfs_tmp and click OK.
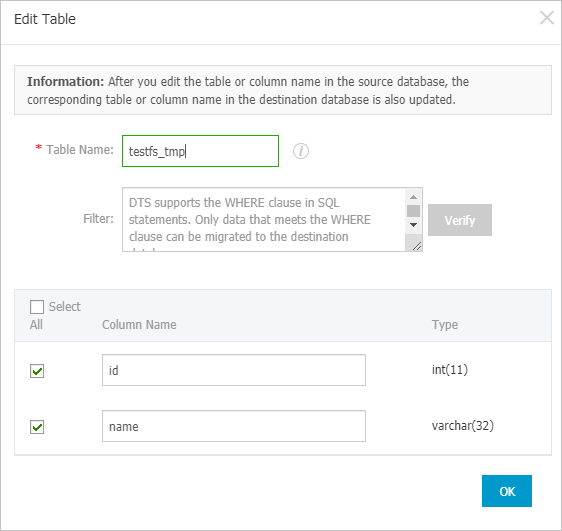
Click Next.
Select Initial Full Data Synchronization and click Precheck.

Wait until the precheck is complete. Then, click Close.
Wait until data synchronization is complete. If 0 Milliseconds is displayed for the Delay parameter, data synchronization is complete.

Run the command to rename tables in the SQL window of DMS:
rename table `testfs` to `testfs_del`,`testfs_tmp` to `testfs`;NoteAfter the migration, DTS reports an synchronization error, which can be ignored.
To prevent additional charges, we recommend that you release the data synchronization instance at the earliest opportunity after you verify the data.
Solution 4
This solution uses DTS to synchronize data from a database instance to a new instance. This solution applies to instances that require instance upgrade or can accept a relatively long service downtime.
Export all schema scripts from the source instance, and delete or modify the engine part in the scripts.
NoteFor example, change
create table t1(id int,name varchar(10)) engine=tokudb;tocreate table t1(id int,name varchar(10)) engine=innodb;.Create an RDS instance and use the modified scripts to create databases and tables. For more information, see Create an ApsaraDB RDS for MySQL instance.
Use DTS to migrate data from the source instance to a new instance. For more information, see Configure one-way data synchronization between ApsaraDB RDS for MySQL instances.
NoteDuring synchronization initialization, select only Initial Full Data Synchronization.

After you confirm that no synchronization latencies occur, change the application connection address to the endpoint of the new instance.