This topic explains how to establish a Tencent TDSQL-H LibraDB data source.
Prerequisites
You must have already created the Tencent TDSQL-H LibraDB database.
Limits
Support is limited to mainstream mergetree-type table engines.
Procedure
Add Quick BI to the whitelist.
Before connecting to Tencent TDSQL-H LibraDB, ensure the IP address of Quick BI is whitelisted in Tencent TDSQL-H LibraDB.
Establish the data source connection.
Access the or the international Quick BI console.
To add a data source, please refer to the instructions provided in the figure below.
Access the data source creation interface through the data source creation entry.
On the Tencent Cloud Database tab, select TencentDB for SQL Server data source.

In the Configure Connection dialog box, you can configure the following settings to suit your business scenario.
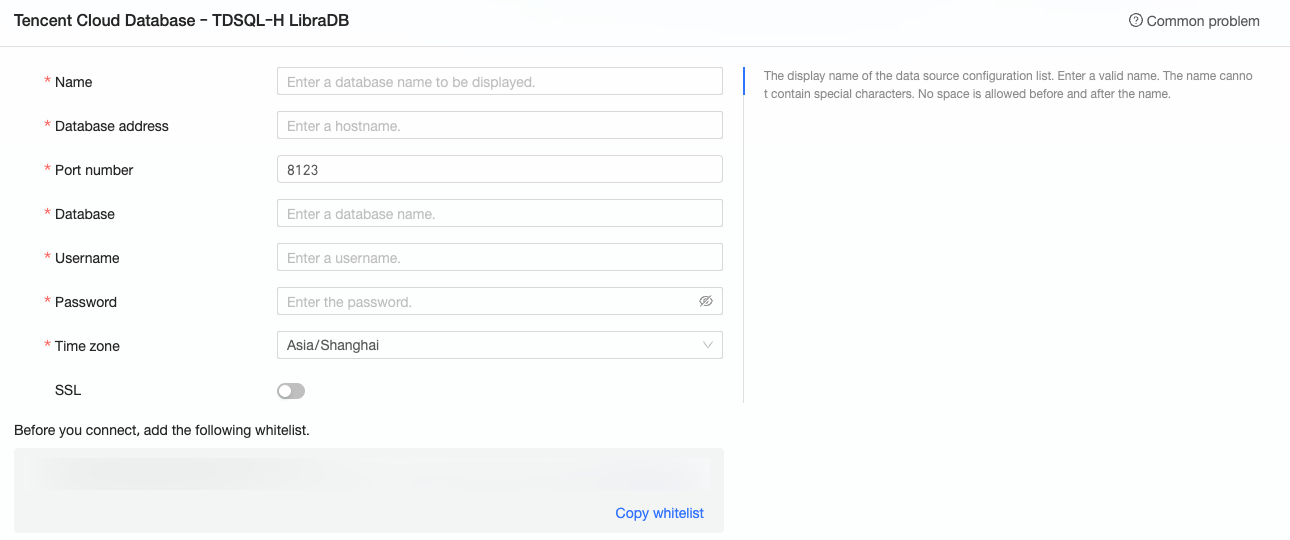
Name
Description
Display Name
The display name in the datasource config list.
The name cannot contain special characters or start or end with spaces.
Database Address and Port
The public address where the Tencent TDSQL-H LibraDB database is deployed. Log on to the Tencent TDSQL-H LibraDB console, enable the public address on the instance product page, and view it in the basic information.
Database
The name of the database to be connected.
Username and Password
The username and password to log on to the Tencent TDSQL-H LibraDB database.
NoteEnsure that the user who logs on to the Tencent TDSQL-H LibraDB database has create, insert, update, and delete permissions on the tables in the database.
Time Zone
The time zone where the Tencent TDSQL-H LibraDB database is deployed.
SSL
If the target data source has SSL configured, you can select the secure protocol SSL to protect data security.
To verify the data source connectivity, click Connection Test.

Once the test succeeds, click OK to finalize the addition of the data source.
What to Do next
Following data source creation, proceed to dataset creation and data analysis.
For adding data tables or custom SQL statements from the Tencent TDSQL-H LibraDB data source to Quick BI, refer to Create and Manage Datasets.
For creating visualization charts and data analysis, see Create a Bashboard and Visualization Chart Overview.
For in-depth data analysis and drilling, consult Drill Settings and Display.