This topic describes how to deploy the open-source Kohya_ss service by using Elastic Algorithm Service (EAS) to fine-tune a Low-Rank Adaptation (LoRA) model. In AI image generation scenarios, you can apply the fine-tuned LoRA model to a Stable Diffusion (SD) service to enhance the quality of generated images.
Prerequisites
You have activated Platform for AI (PAI) and created a default Workspace. For more information, see Activate PAI and create the default workspace.
If you use a RAM user to deploy the model, you must grant the RAM user administrative permissions for EAS. For more information, see Cloud service dependencies and authorizations for EAS.
You have created an Object Storage Service (OSS) bucket and directories in the same Region to store training data, output model files, and logs. For instructions on how to upload files, see Upload files by using the OSS console.
Preparations
Log on to the OSS console and navigate to a bucket path in the same region. For example:
oss://kohya-demo/kohya/.In the bucket, create a new project folder. For example:
KaraDetroit_loar. Within this project folder, create three subfolders:Image,Log, andModel. If you have a JSON configuration file, you can also upload it to this project folder.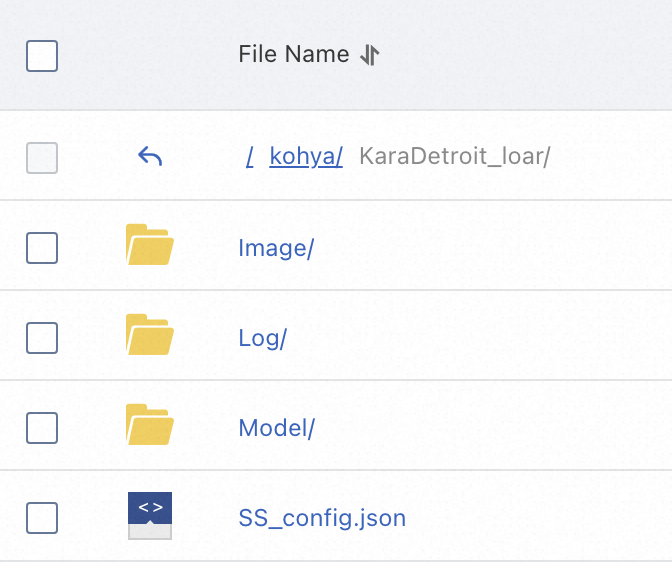
Image: Stores the training data.
Model: Stores the output model files.
Log: Stores logs.
SS_config.json: (Optional) A JSON file for batch-configuring parameters. If you use this file, you can modify parameters such as folder paths and the output model name. For configuration details, see the project on GitHub. For a sample JSON file, see SS_config.json.
Upload your prepared images to the
Imagefolder. This tutorial uses the sample images and description files from 100_pic.zip. Download and decompress the file, then upload the resulting folder to OSS. The result should look like the following figure: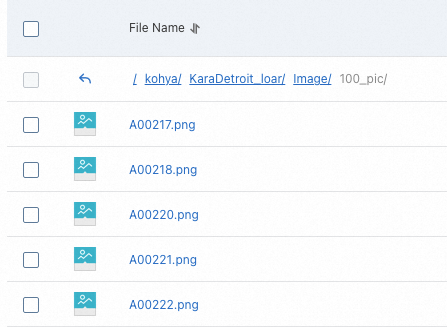 Important
Supported image formats are
.png,.jpg,.jpeg,.webp, and.bmp.Each image must have a corresponding description file with the same name and a
.txtextension. The description must be on the first line. If you have multiple descriptive tags, separate them with commas.The image folder name must follow the format
number_name. For example,100_pic. Thenumberspecifies the number of times each image is repeated during training, with a recommended value of 100 or greater. Thenamecan be any string that complies with OSS file naming rules. The total number of training steps should generally be 1,500 or more.If the folder contains 10 images, each image is trained
1500 / 10 = 150times. The number in the folder name can be150.If the folder contains 20 images, each image is trained
1500 / 20 = 75times, which is less than the recommended 100. In this case, the number in the folder name should be100.
Deploy a Kohya_ss service
-
Log on to the PAI console. Select a region on the top of the page. Then, select the desired workspace and click Elastic Algorithm Service (EAS).
-
Click Deploy Service. In the Custom Model Deployment section, click Custom Deployment.
On the Custom Deployment page, configure the parameters using a form or a JSON script.
Configure parameters using a form
Parameter
Description
Basic Information
Service Name
Enter a custom name for the service. This tutorial uses
kohya_ss_demo.Environment Information
Deployment Method
Select Image-based Deployment, and select Enable Web App.
Image Configuration
Select Kohya_ss > kohya_ss:2.2 from the Alibaba Cloud Image list.
NoteThe image version is updated frequently. Select the latest version when you deploy the service.
Mount storage
Select the OSS mount type and configure the following parameters:
Uri: Select an OSS path in the same Region. This tutorial uses
oss://kohya-demo/kohya/.Mount Path: Enter a custom path. This tutorial uses
/workspace.ImportantLeave the Enable Read-only Mode switch disabled. Otherwise, the model files cannot be written to your OSS bucket.
Command
The system automatically populates this field after you select an image. This tutorial uses:
python -u kohya_gui.py --listen=0.0.0.0 --server_port=8000 --headless.--listen: Binds the application to a specific local IP address to receive and process external requests.--server_port: Specifies the listening port number.
Resource Information
Resource Type
Select Public Resources.
Deployment Resources
For the Instance Type, we recommend
GPU > ml.gu7i.c16m60.1-gu30for the best cost-effectiveness. This tutorial uses the minimum available specification,ml.gu7i.c8m30.1-gu30.Configure parameters using a JSON script
Click Edit in the Service Configuration section, and configure the JSON script.
Sample JSON file:
ImportantReplace the value of "name" in line 4 and the value of "oss" in line 18 with actual values.
{
    "metadata":
    {
        "name": "kohya_ss_demo",
        "instance": 1,
        "enable_webservice": true
    },
    "cloud":
    {
        "computing":
        {
            "instance_type": "ecs.gn6e-c12g1.12xlarge",
            "instances": null
        }
    },
    "storage": [
    {
        "oss":
        {
            "path": "oss://kohya-demo/kohya/",
            "readOnly": false
        },
        "properties":
        {
            "resource_type": "model"
        },
        "mount_path": "/workspace"
    }],
    "containers": [
    {
        "image": "eas-registry-vpc.cn-hangzhou.cr.aliyuncs.com/pai-eas/kohya_ss:1.2",
        "script": "python -u kohya_gui.py --listen=0.0.0.0 --server_port=8000 --headless",
        "port": 8000
    }]
}
Check the form configuration, and then click Deploy. The deployment takes a few minutes to complete. The service is successfully deployed when the Service Status changes to Running.
Fine-tune a LoRA model
In the service list, find your target service and click Web Application in the Overview column to open the Kohya_ss service UI.
Select LoRA (LoRA).

Configure the Configuration file. This step is optional. If you do not have an
SS_config.jsonfile, skip this step.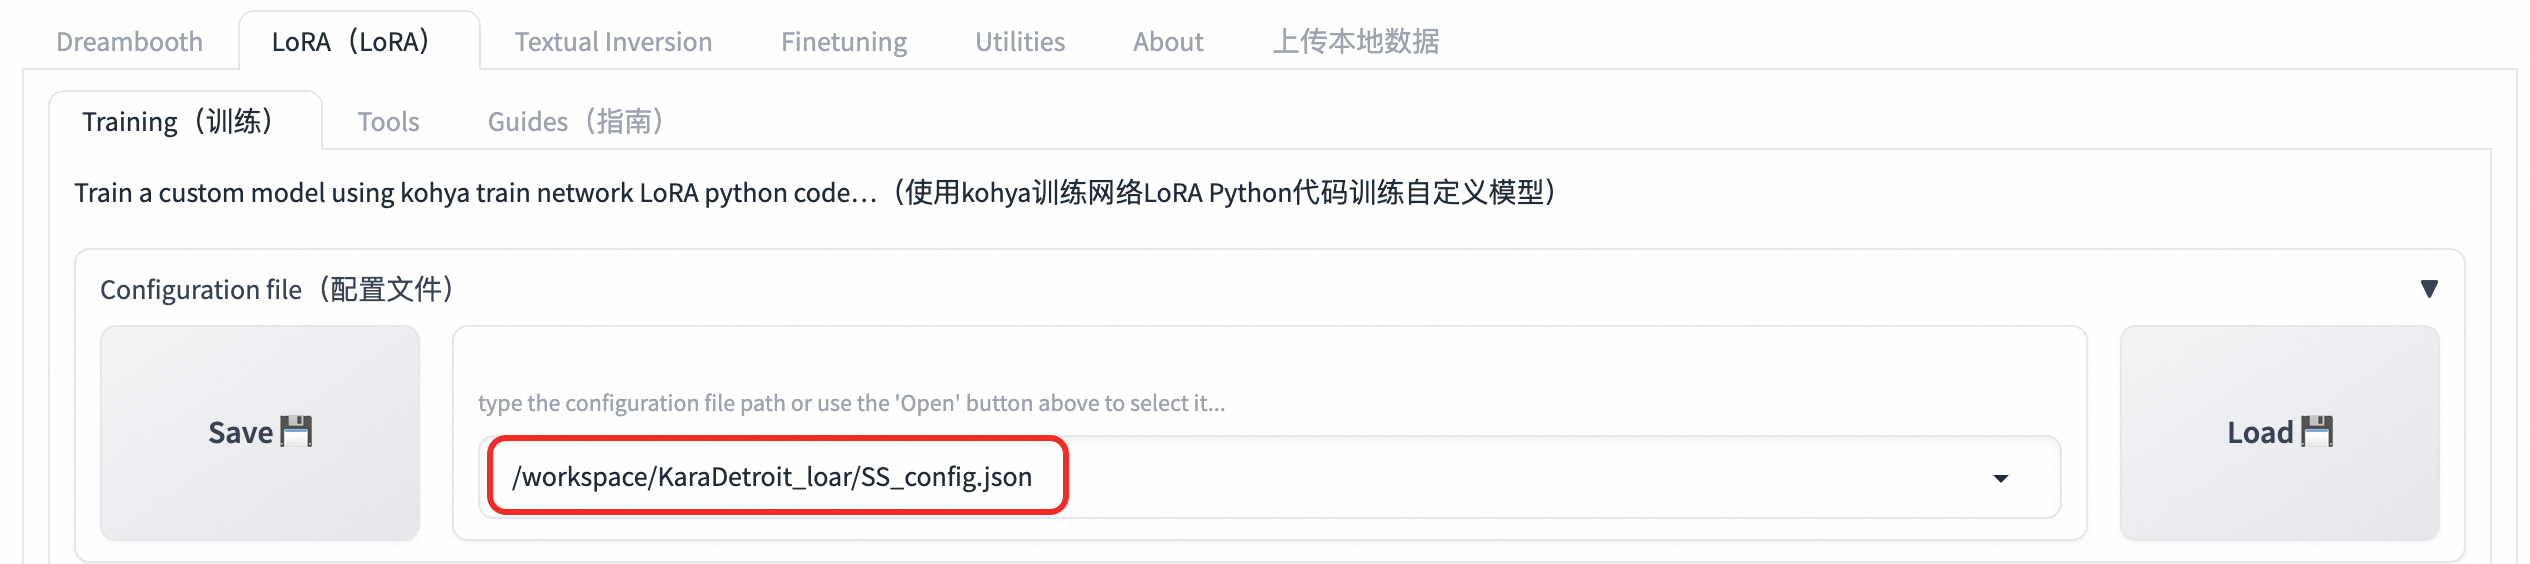 Note
NoteThe configuration file path is formed by joining the Mount Path that you specified in the Configure parameters using a form step, the path of the folder that you created in OSS, and the SS_config.json file. In this tutorial, the path is:
/workspace/KaraDetroit_loar/SS_config.json.Configure the Source Model. This tutorial uses safetensors, which is more secure than checkpoint.

Configure the Folders. Enter the paths for the
Image,Log, andModelfolders you created in OSS, and specify an output file name.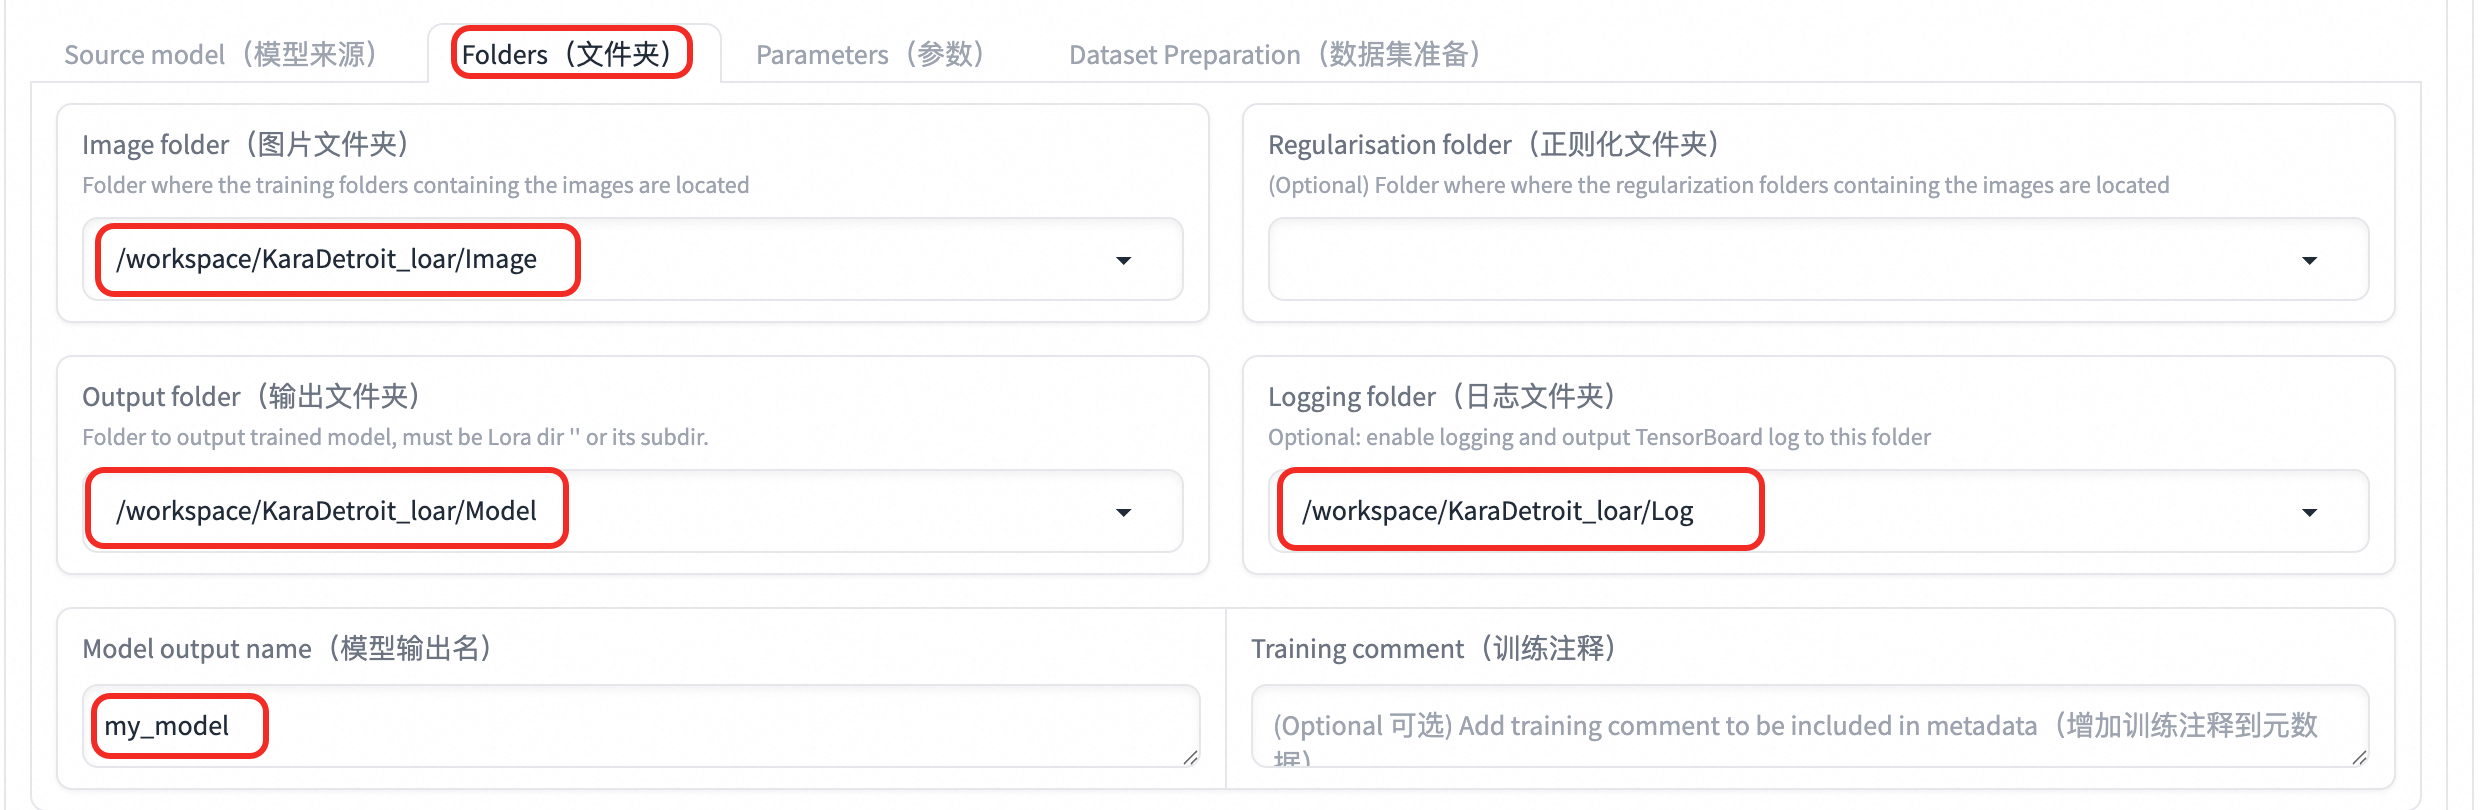
Parameter
Description
Image folder
The path to the folder containing the training images. This path is the Mount Path from your service configuration joined with the
Imagefolder path in OSS. In this tutorial, the path is:/workspace/KaraDetroit_loar/Image.Logging folder
The path to the folder where logs are saved. This path is the Mount Path from your service configuration joined with the
Logfolder path in OSS. In this tutorial, the path is:/workspace/KaraDetroit_loar/Log.Output folder
The path to the folder where the output model is saved. This path is the Mount Path from your service configuration joined with the
Modelfolder path in OSS. In this tutorial, the path is:/workspace/KaraDetroit_loar/Model.Model output name
The name for the output model file. For example,
my_model.Configure the Parameters. For sample values, refer to the
SS_config.jsoncontent mentioned in the Prepare the training data section.Parameter
Description
LoRA type
The type of LoRA:
LoCON: Can adjust every layer of SD, such asRes,Block, andTransformer.LoHA: Processes more information with the same size.
LoRA network weights
Optional. If you are continuing to train a model, select the last trained LoRA file.
Train batch size
The size of the training batch. A larger value requires more GPU memory (VRAM).
Epoch
The number of training epochs. All data is trained once in one epoch. Configure the parameter as needed. In most cases:
Total number of training sessions in Kohya = Number of images used for training × Number of repetitions × Number of training epochs / Number of training batches.Total number of training sessions in web UI = Number of images used for training × Number of repetitions.
If you use class images, the total training steps in both Kohya and WebUI are doubled, and the number of times the model is saved in Kohya is halved.
Save every N epochs
Saves a checkpoint every N epochs. For example, if set to 2, a training result is saved after every 2 epochs.
Caption Extension
Optional. The file extension for caption files, for example,
.txt.Mixed precision
The mixed precision setting, which depends on your GPU performance. Options are
no,fp16, andbf16. For GPUs with over 30 GB of VRAM,bf16is recommended.Save precision
The save precision. Same as Mixed precision.
Number of CPU threads per core
The number of CPU threads per core. Adjust this based on your selected instance and requirements.
Learning rate
The learning rate. The default is
0.0001.LR Scheduler
The learning rate scheduler. Select a function such as
cosineorcosine with restartas needed.LR Warmup (% Of Steps)
The number of learning warmup steps. The default is 10. Set to 0 if no warmup is needed.
Optimizer
The optimizer. Select as needed. The default is
AdamW8bit.DAdaptationprovides automatic optimization.Max Resolution
The maximum resolution. Set this based on your image dimensions.
Network Rank (Dimension)
The complexity of the model. A value of 128 is sufficient for most scenarios.
Network Alpha
This value is typically less than or equal to the Network Rank (Dimension). A common configuration is a Network Rank of 128 and a Network Alpha of 64.
Conv dims
& Conv alphas
The convolution dimension, which affect the scope of the LoRA fine-tuning. Adjust this based on the selected LoRA Type.
Official Kohya recommendations:
LoCon: Setdim <= 64andalpha = 1(or lower).LoHA: Setdim <= 32andalpha = 1.
Clip skip
The number of layers to skip in the CLIP model. The value ranges from 1 to 12. A smaller value produces an image closer to the original or input image.
For realistic models, select 1.
For anime-style models, select 2.
Sample every n steps
Saves a sample image every N steps.
Sample prompts
Use the following parameters:
--n: the prompts or negative prompts.--w: the width of the image.--h: the height of the image.--d: the seed of the image.--l: the Classifier Free Guidance (CFG) scale, which indicates the relevance of the image generation to the prompt.--s: the number of iteration steps.
At the bottom of the page, click Start training to begin training.

On the Elastic Algorithm Service (EAS) page, in the service list, click the corresponding service name. Click Logs to view the training progress in real time.
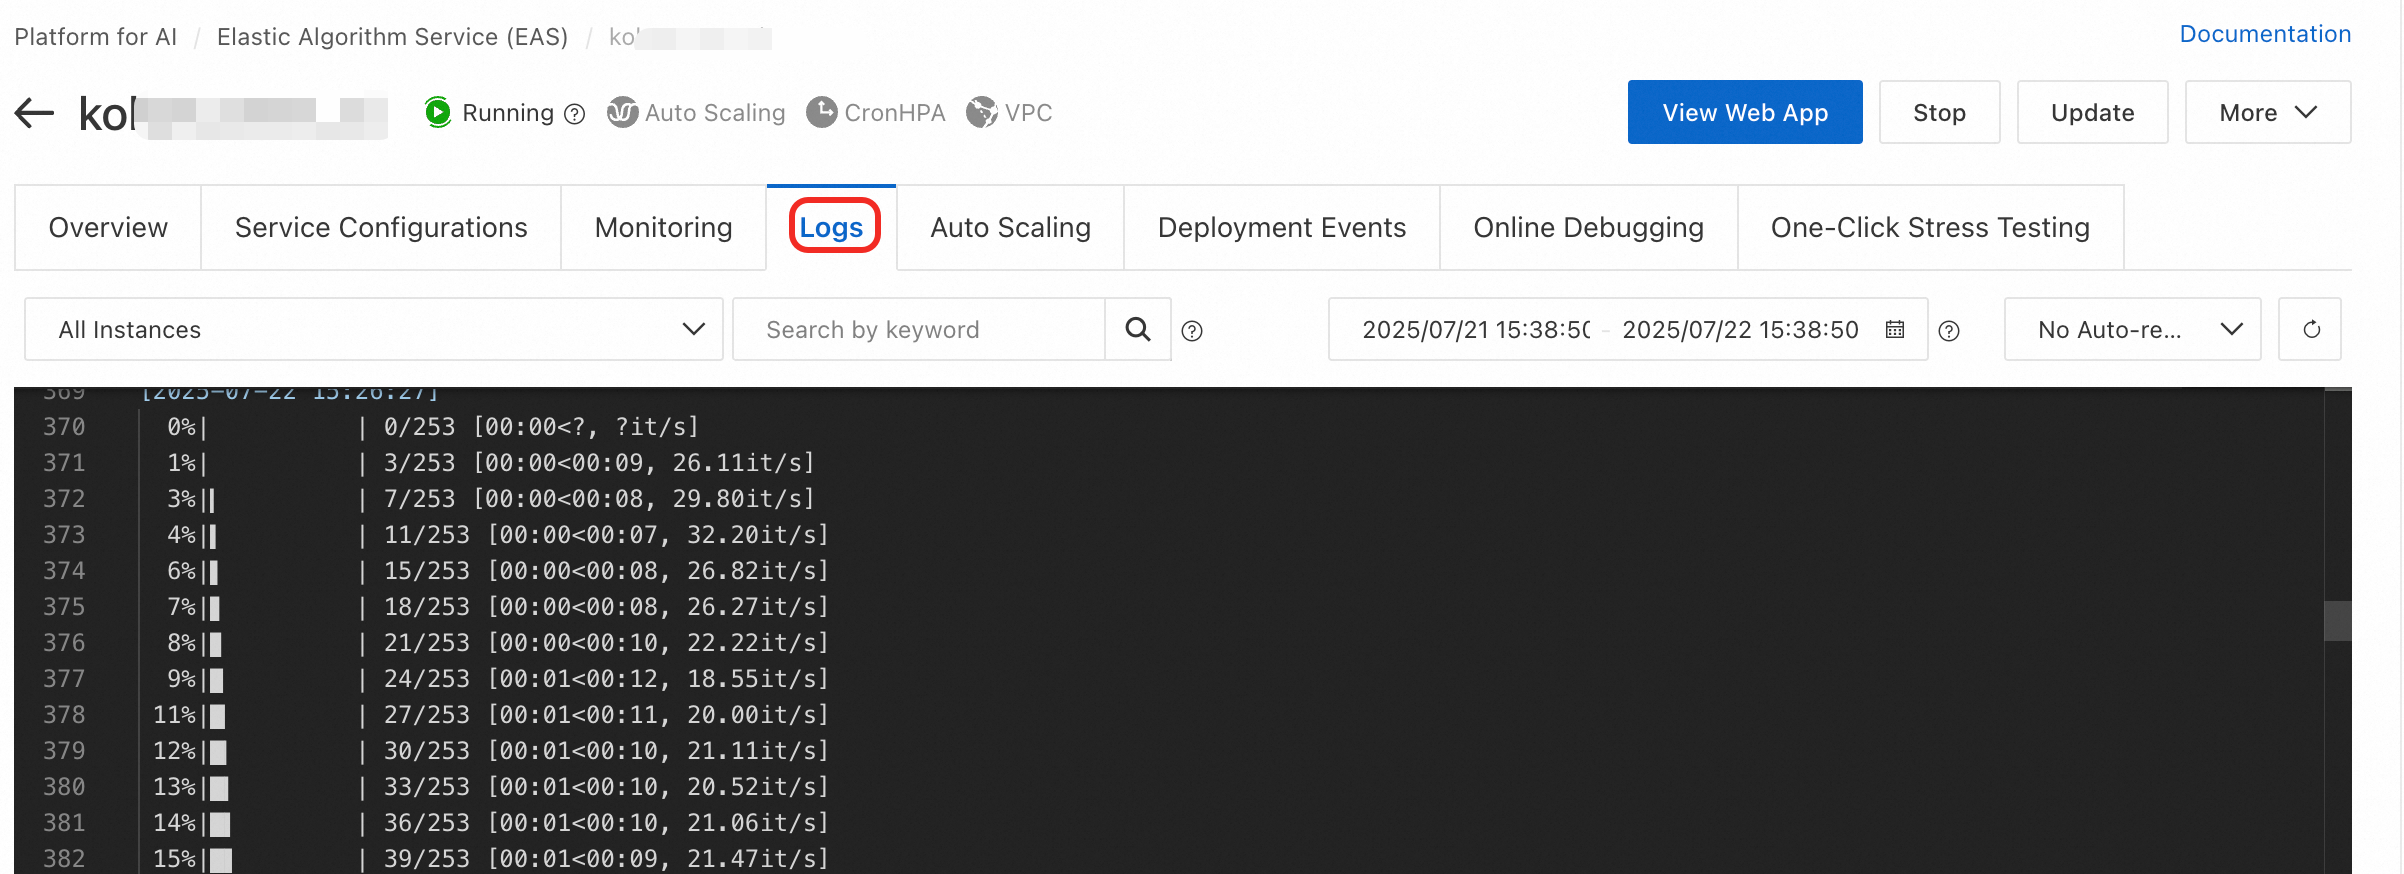
When
model savedappears in the log, the training is complete.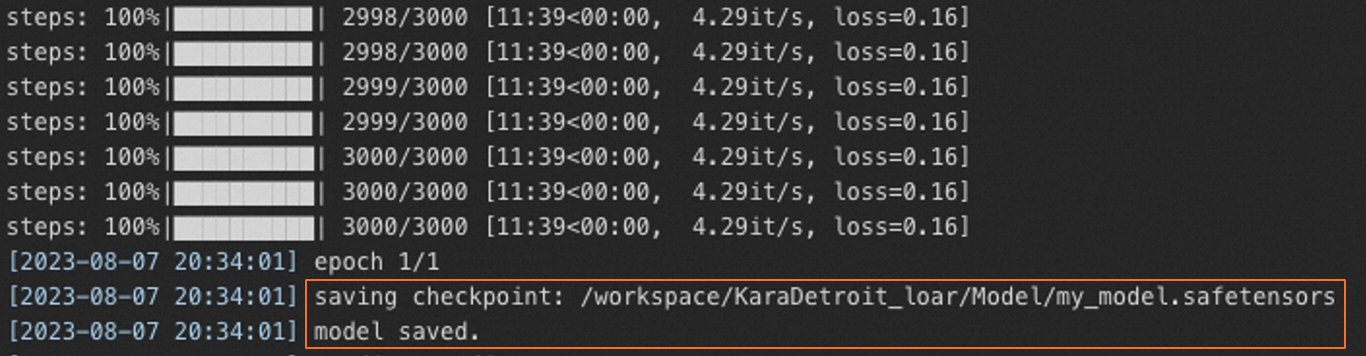
After the training is complete, find the generated LoRA model file in the configured model output directory (
Model). For example,my_model.safetensors.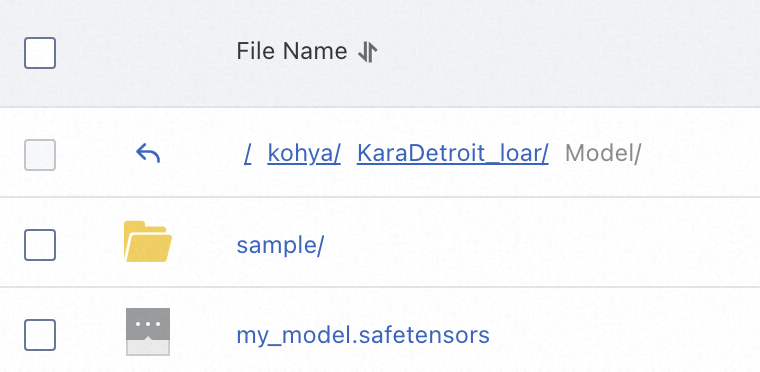
Use a fine-tuned LoRA model with Stable Diffusion
After fine-tuning your LoRA model, you can upload it to the appropriate directory in your Stable Diffusion WebUI service to generate images. For instructions on how to deploy a Stable Diffusion service, see Deploy Stable Diffusion for AI image generation with EAS in a few clicks.
The following section describes how to upload a LoRA model to the SD Web Application.
SD web application (cluster edition)
Configure the Stable Diffusion WebUI image. You must select a
-clusterversion (for example,stable-diffusion-webui:4.2-cluster-webui).Add the following parameters to Command:
--lora-dir: optional.If
--lora-diris not specified, each user's model files are isolated. The service only loads model files from the{OSS-path}/data-{current-user-ID}/models/Loradirectory.If
--lora-diris specified, the service loads model files from both the specified directory and the{OSS-path}/data-{current-user-ID}/models/Loradirectory for all users. For example:--lora-dir /code/stable-diffusion-webui/data-oss/models/Lora.
--data-dir {OSS mount path}. Example:--data-dir /code/stable-diffusion-webui/data-oss.
Upload the LoRA model file to the
{OSS-path}/data-{current-user-ID}/models/Loradirectory. For example:oss://bucket-test/data-oss/data-1596******100/models/Lora.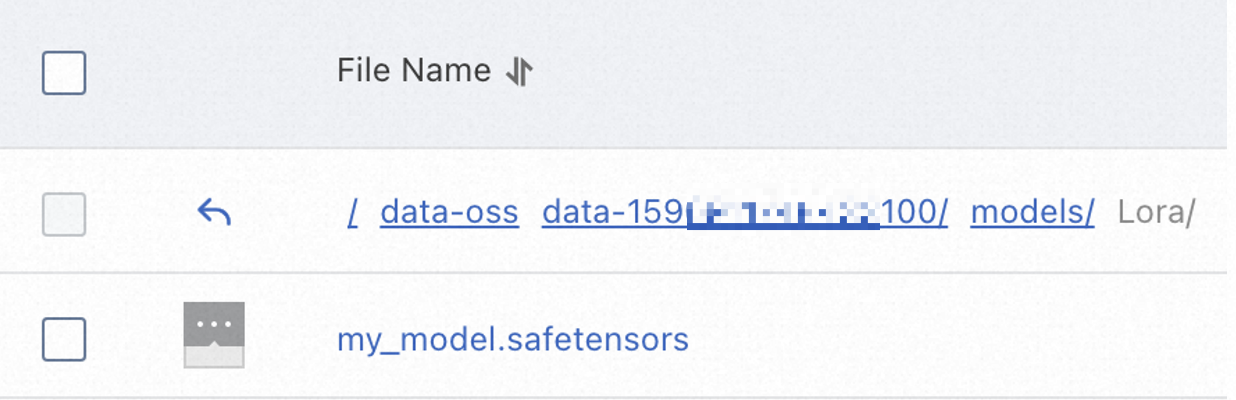 Note
NoteThe service automatically creates the
/data-{current-user-ID}/models/Lorapath in your OSS bucket after it starts. Therefore, upload the model file only after the service has started. You can find your{current-user-ID}by clicking your profile avatar in the upper-right corner of the console.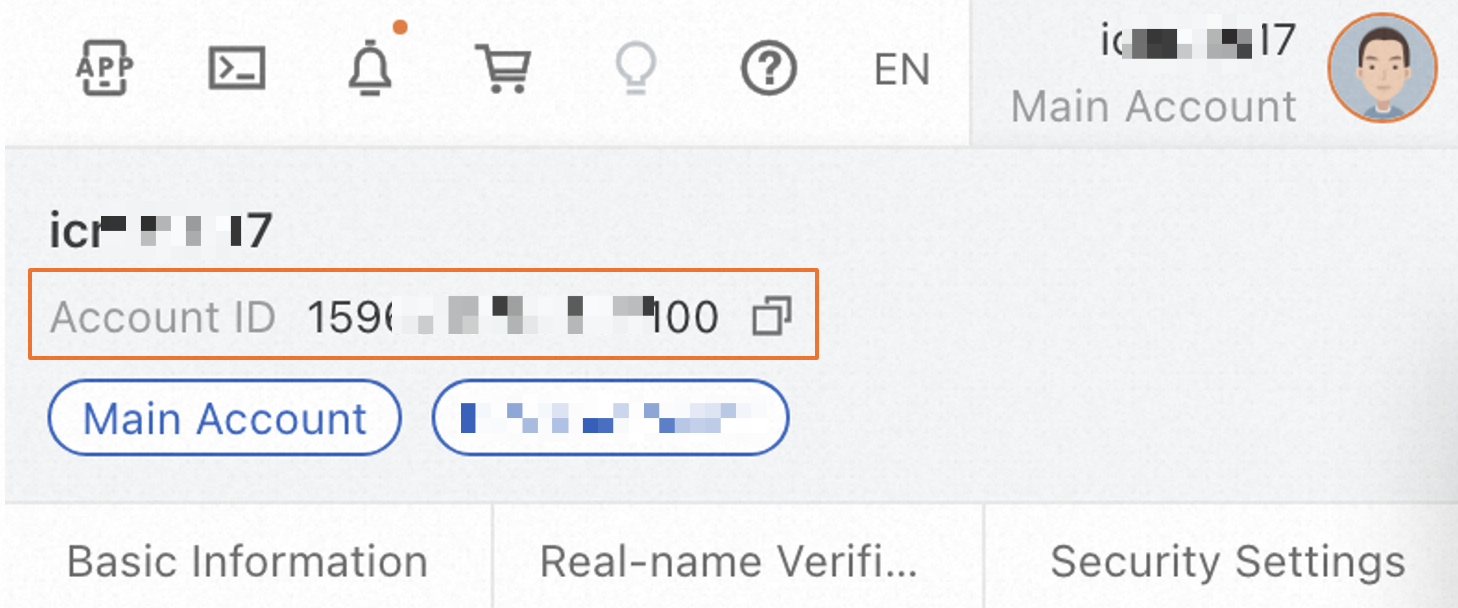
SD web application (basic edition)
Configure the Stable Diffusion WebUI image. You must select a non-
-clusterversion (for example,stable-diffusion-webui:4.2-standard).Add the following parameter to the Command:
--data-dir {OSS-mount-path}. For example:--data-dir /code/stable-diffusion-webui/data-oss.Upload the LoRA model file to the
{OSS-path}/models/Loradirectory. For example:oss://bucket-test/data-oss/models/Lora.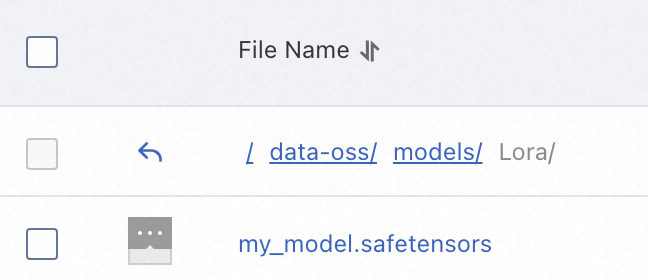 Note
NoteThe service automatically creates the
/models/Lorapath in your mounted OSS bucket after it starts. Do not create this path manually. Therefore, upload the model file only after the service has started.