Nacos configuration centers of Microservices Engine (MSE) allow you to configure access permissions based on instances, namespaces, groups, or data IDs. This prevents malicious users from obtaining or modifying configurations of an instance. This topic describes how to configure fine-grained authentication for Nacos configuration centers of MSE.
Prerequisites
MSE is activated. If you do not activate MSE, go to the MSE product page.
A Nacos engine is created. For more information, see Create a Nacos engine.
Authentication is enabled. For more information, see Enable authentication.
A RAM user or a RAM role is created. For more information, see Create a RAM user or Create a RAM role.
Procedure
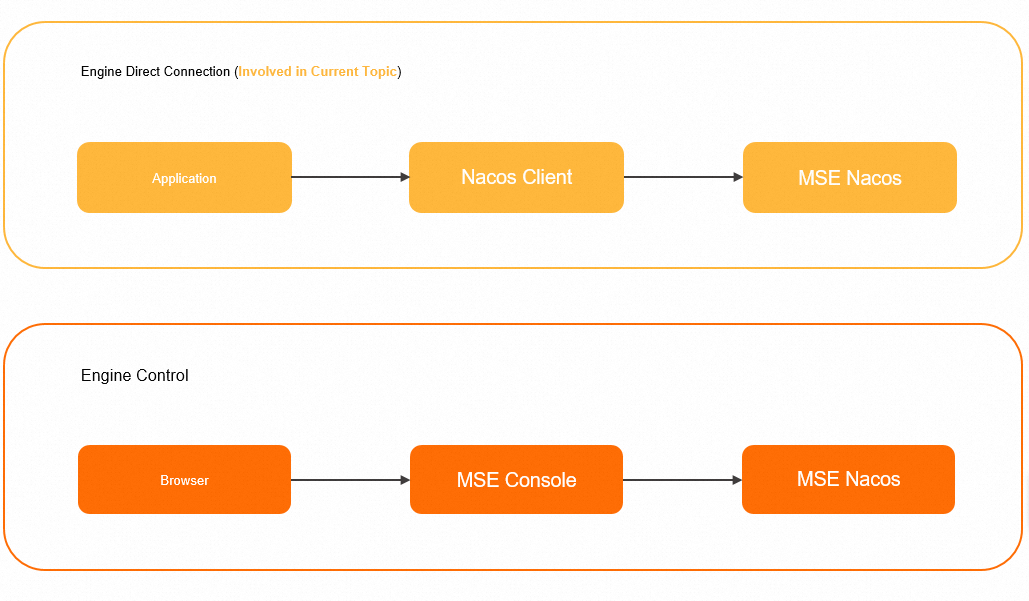
This topic describes how to grant and configure access permissions on the direct connection of the engine shown in the following figure. After the permissions are granted, you can use the Nacos client to access the MSE Nacos instance as a RAM user.

To configure and use access authentication for engine control, you need to grant the RAM user the permissions to use the MSE console. For more information, see Grant permissions on Microservices Registry resources.
Step 1: Create a fine-grained policy
Log on to the RAM console as a RAM administrator.
In the left-side navigation pane, choose .
On the Policies page, click Create Policy.
On the Create Policy page, click the JSON tab.
Configure the policy.
The following table describes the actions that are involved in fine-grained authentication in configuration centers.
Action
Description
mse:QueryNacosConfig
The read permission on configurations of an MSE Nacos configuration center. These permissions allow you to obtain and monitor configurations by using SDKs.
mse:UpdateNacosConfig
The update permission on configurations of an MSE Nacos configuration center. This permission allows you to release and modify configurations by using SDKs.
The resources that are involved in fine-grained authentication in a configuration center must be specified in the following format:
acs:mse:*:*:instance/${instance_id}/${namespaceId}/${group}/config/${dataId}You can also modify the policy document based on the description provided in Examples.
For more information about the syntax and structure of RAM policies, see Policy structure and syntax.
Click Optional advanced optimize in the upper part of the page, and click Perform. The system performs the following operations during the advanced optimization.
The advanced policy optimization feature allows you to perform the following operations:
Split resources or conditions that are incompatible with actions.
Narrow down resources.
Deduplicate or merge policy statements.
On the Create Policy page, click OK.
In the Create Policy dialog box, specify Name and Description for the policy, and click OK.
Step 2: Grant permissions to a RAM user or a RAM role
Grant permissions to a RAM user
Log on to the RAM console as a RAM administrator.
In the left-side navigation pane, choose .
On the Users page, find the required RAM user, and click Add Permissions in the Actions column.

You can also select multiple RAM users and click Add Permissions in the lower part of the page to grant permissions to the RAM users at a time.
In the Grant Permission panel, select Custom Policy from the drop-down list in the Policy section. Enter the name of the policy that you created in Step 1 in the field, click the name of the policy that is displayed, and then click Grant permissions.
In the Grant Permission panel, confirm that authorization is successful and click Close.
Grant permissions to a RAM role
Log on to the RAM console as a RAM administrator.
In the left-side navigation pane, choose .
On the Roles page, find the RAM role that you want to manage and click Grant Permission in the Actions column.

You can also select multiple RAM roles and click Grant Permission in the lower part of the RAM role list to grant permissions to multiple RAM roles at a time.
In the Grant Permission panel, select Custom Policy from the drop-down list in the Policy section. Enter the name of the policy that you created in Step 1 in the field, click the name of the policy that is displayed, and then click Grant permissions.
In the Grant Permission panel, confirm that authorization is successful and click Close.
Examples
Grant a user the read-only permission on configurations of specific instances.
{
    "Version": "1",
    "Statement": [
        {
            "Action": [
                "mse:QueryNacosConfig"
            ],
            "Resource": [
                "acs:mse:*:*:instance/${instanceId1}",
                "acs:mse:*:*:instance/${instanceId2}"
            ],
            "Effect": "Allow"
        }
    ]
}
Grant a user the permission to read and modify configurations of specific instances.
{ "Version": "1", "Statement": [ { "Action": [ "mse:QueryNacosConfig", "mse:UpdateNacosConfig" ], "Resource": [ "acs:mse:*:*:instance/${instanceId1}", "acs:mse:*:*:instance/${instanceId2}" ], "Effect": "Allow" } ] }Note${instanceId1} and ${instanceId2} indicate the instance IDs.
Grant a user the read-only permission on configurations in a specific namespace of an instance.
{
    "Statement": [
        {
            "Effect": "Allow",
            "Action": "mse:QueryNacosConfig",
            "Resource": "acs:mse:*:*:instance/${instance_id}/${namespaceId}"
        }
    ],
    "Version": "1"
}
Grant a user the permission to read and modify configurations of the ${group} group in a specific namespace of an instance.
{
    "Statement": [
        {
            "Effect": "Allow",
            "Action": [
                "mse:QueryNacosConfig",
                "mse:UpdateNacosConfig"
            ],
            "Resource": "acs:mse:*:*:instance/${instance_id}/${namespaceId}/${group}"
        }
    ],
    "Version": "1"
}
Grant a user the read-only permission on the ${dataId} configuration of the ${group} group.
{
    "Statement": [
        {
            "Effect": "Allow",
            "Action": "mse:QueryNacosConfig",
            "Resource": "acs:mse:*:*:instance/${instance_id}/${namespaceId}/${group}/config/${dataId}"
        }
    ],
    "Version": "1"
}
Grant a user the permission to read and modify the ${serviceName} service of the ${group} group.
{
    "Statement": [
        {
            "Effect": "Allow",
            "Action": [
                "mse:QueryNacosConfig",
                "mse:UpdateNacosConfig"
            ],
            "Resource": "acs:mse:*:*:instance/${instance_id}/${namespaceId}/${group}/config/${dataId}"
        }
    ],
    "Version": "1"
}
References
For more information about instance-level authentication of configuration centers, see Access authentication by the Nacos client.