Custom steps are used in functional testing to meet non-generic requirements by implementing code. Custom steps can be inserted as functional testing steps into normal test case scripts and are typically used to implement common logic related to business or test case scenarios.
Prerequisites
You have a basic knowledge of the Appium engine. For more information, see Appium documentation.
You have basic Python programming skills. For more information, see Python documentation.
The Test Case page of the specified app is displayed. For more information, see Go to the Test Case page.
Procedure
Log on to the Mobile Testing console.
In the left-side navigation pane, choose Testing Management > Test Case. The Scripts tab appears.
Select a test case library and a test case library version from the Case Library drop-down list.

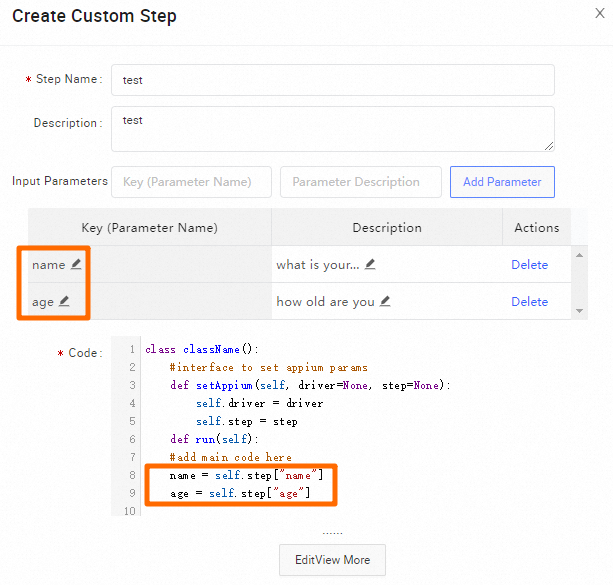
On the Custom Steps tab, click Create Custom Step. The Create Custom Step panel appears.
In the Create Custom Step panel, configure the parameters.

The following table describes the parameters.
Parameter
Description
Step Name
The name of the custom step.
Description
The information of the custom step. The description facilitates subsequent query and review.
Input Parameters
The input parameters of the custom step.
Operation instructions
Enter a parameter name and a parameter description.
Click Add Parameter and use
self.step["Parameter name"]to add parameters, such asnameandage, to the list below.Repeat the preceding steps to add multiple input parameters.
Code
The code for the custom step.
[Operation instructions] Click Edit /View More. The Edit Code panel appears.
[Related information] Coding specifications and Sample code
Click OK.
Coding specifications
The code for custom steps must be written based on the Appium engine and Python 3 or later.
Custom steps are globally shared among Android or iOS app projects. Therefore, the function names of custom steps must be unique.
The code for custom steps must comply with the Python syntax and conventions. Example:
class className():
    def setAppium(self, driver=None, step=None):
        self.driver = driver
        self.step = step

    def run(self):
        #code
The following table describes the required functions.
Function
Description
classNameA class name that is used to uniquely identify a custom step.
setAppiumAn initialization interface. Before this operation is performed, the script passes in the parameters that may be required for the current operation by using setAppium:
driver: the Appium driver that is used to communicate with Appium and perform Appium-related operations.step: the current step, which is represented as a dictionary object in the{key(string):value(string)}format.
NoteIn addition to the standard libraries, Mobile Testing provides the following third-party libraries in the execution environment of the Appium client: Appium-Python-Client, selenium, matplotlib, cv2, numpy, pycurl, subprocess32, MySQL-python, cx-Oracle, and ibm_db.
Sample code
Example 1: Call the driver method to perform simple swipe actions.
class test():
    #interface to set appium params
    def setAppium(self, driver=None, step=None):
        self.driver = driver
        self.step = step

    def run(self):
        #add main code here
        # Perform a swipe left action.
        # Obtain the height of the screen.
        x = driver.get_window_size()['width']
        print float(6.0/7)*x
        # Obtain the width of the screen.
        y = driver.get_window_size()['height']
        # Swipe left starting from the middle of the right side of the screen. The Hotspot tab is displayed after the swipe action.
        driver.swipe(0.89*x, 0.5*y, 0.12*x, y/2, 500)
Example 2: Calculate the difference between the values of param1 and param2, and save the return value to the result parameter.
import desired_capabilities
class minus():
    def setAppium(self, driver=None, step=None):
        self.driver = driver
        self.step = step

    def run(self):
        result = step.get("param1") - step.get("param2")
        step.put("result", result)
Example 3: Enable the WebView debugging mode.
from AppiumLib import AppiumLib
from time import sleep
class OpenWebviewDebug():
    def setAppium(self, driver=None, step=None):
        if driver is not None:
            self.driver = driver
            self.appiumLib = AppiumLib(self.driver)
        if step is not None:
            self.step = step

    def run(self):
        platform = self.step.get("platform")
        self.appiumLib.openWebviewDebug(platform)
        # Tap Permanent.
        self.appiumLib.touch(xpath="//android.widget.CheckBox[@text='Permanent' or @content-desc='Permanent']")
        # Tap OK.
        self.appiumLib.touch(xpath="//android.widget.TextView[@text='OK' or @content-desc='OK']")
        sleep(2)
If you configure the platform input parameter, the platform parameter is passed as a key of the step dictionary for the current operation. You can use the ${platform} syntax in your test description to reference the platform parameter, which is parsed as an actionable parameter that is recorded online and provided for testing purposes.
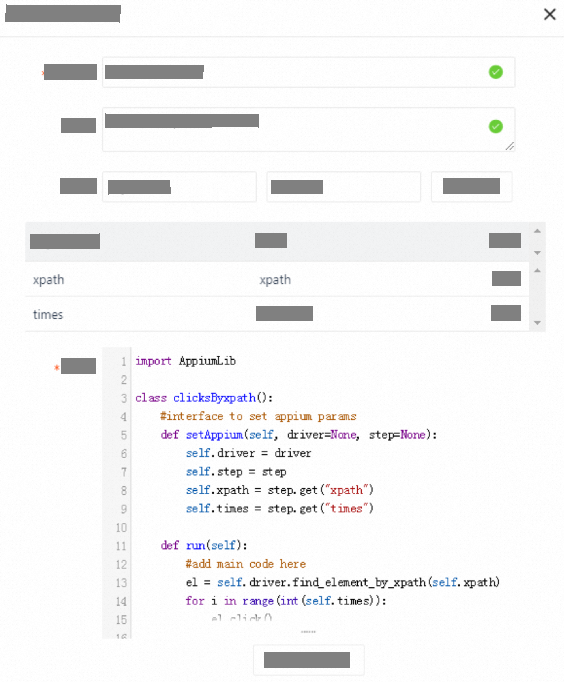
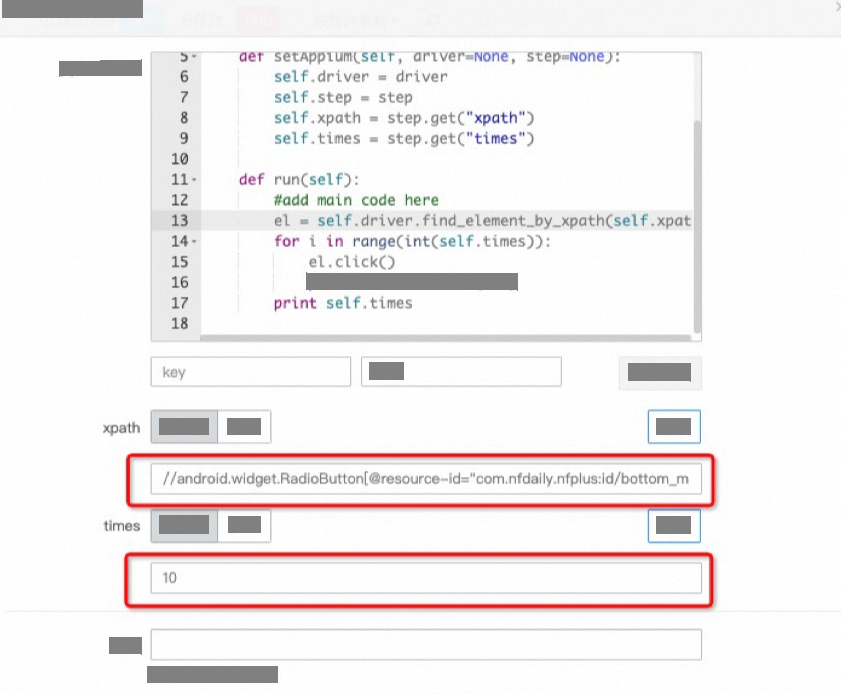
Example 4: Consecutively tap a control.
import AppiumLib
class clicksByxpath():
        #interface to set appium params
        def setAppium(self, driver=None, step=None):
            self.driver = driver
            self.step = step
            self.xpath = step.get("xpath")
            self.times = step.get("times")

        def run(self):
            #add main code here
            el = self.driver.find_element_by_xpath(self.xpath)
            for i in range(int(self.times)):
                el.click()
                print '%d clicks' %(i +1)
            print self.times
Platform display: You can use the online recording feature to automatically generate the XPath path of a control. Specifically, you can tap Generate Step to the right of a control to create a step containing the XPath path of the control. Then, you can copy and paste the path into your test

script to use the path during the test run.
