This topic describes how to configure push channels for Android and iOS.
Configure an Android push channel
To improve the reach rate of push, mPaaS integrates push channels from vendors such as Huawei, Xiaomi, OPPO, and vivo. Use Xiaomi notification bar messages, Huawei notification bar messages, OPPO notification bar messages and vivo notification bar messages to achieve message push. When the application is not run time, a notification can still be sent, and the user can activate the process by clicking on the notification bar.
After you connect a manufacture-owned push channel, your application can achieve stable push performance. Therefore, we recommend that you connect the manufacture-owned push channel to your application.
This article will guide you to complete the console-side configuration required when you access the Xiaomi, Huawei, OPPO, and vivo push channels.
Prerequisites
You must configure the client-side access. For more information, see Connect the manufacture push channel.
Procedure
Configure a Huawei push channel
In the left-side navigation pane, choose Message Push Service > Settings > Channel Configuration.
Click Configure in the upper-right corner of the Huawei Push Channel section. The configuration entry is displayed.
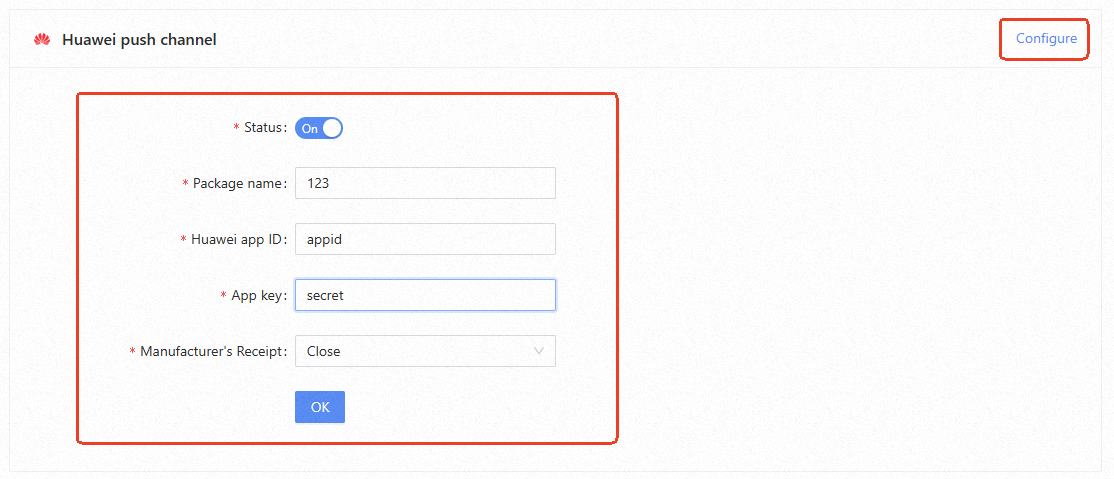
Parameter
Required
Description
Status
Yes
The access status switch of the channel. If you turn on the switch, MPS will access the Huawei push channel based on the configuration; if you turn off the switch, the access is canceled.
SDK package
Yes
Enter the Huawei application package name.
Huawei App ID
Yes
Enter the App ID of the Huawei application.
Huawei App Key
Yes
Enter the Huawei app Key (App Secret).
Manufacturer's Receipt
Yes
Control whether MPS supports vendor receipts.
NoteYou can log on to the Huawei Developer Alliance website and choose Management Center > My Product > mobile application Details to obtain the application package name, application ID, and key.
Click OK to save the configurations.
Configure an HONOR push channel
In the left-side navigation pane, choose Message Push Service > Settings > Channel Configuration.
Click Configure in the upper-right corner of the HONOR Push Channel configuration section. The configuration entry is displayed.
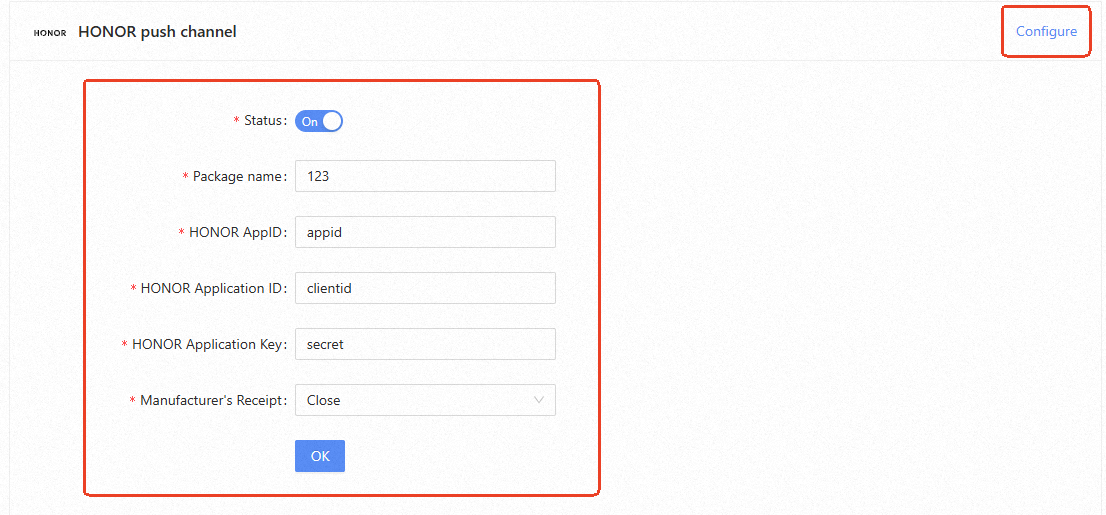
Parameter
Required
Description
Status
Yes
The access status switch of the channel. Turn on the switch, MPS will access the HONOR push channel according to the configuration; Turn off the switch, that is, cancel the access.
Package name
Yes
Support custom HONOR application package name.
HONOR AppID
Yes
The unique application identifier, which is generated when the HONOR Push service of the corresponding application is activated on the developer platform.
HONOR Application ID
Yes
The customer ID of the application, which is used to obtain the ID of the message sending token. It is generated when the corresponding application PUSH service is activated on the developer platform.
HONOR Application Key
Yes
Enter the HONOR app Key (App Secret).
Manufacturer's Receipt
Yes
Control whether MPS supports vendor receipts.
NoteYou can log on to the HONOR Developer Alliance website and go to the Management Center > My Products > mobile application Details page to obtain the application package name, application ID, and key.
Click OK to save the configurations.
Configure a Xiaomi push channel
In the left-side navigation pane, choose Message Push> Settings> Channel Configuration.
Click Configure in the upper-right corner of the Xiaomi Push Channel section. The configuration entry is displayed.
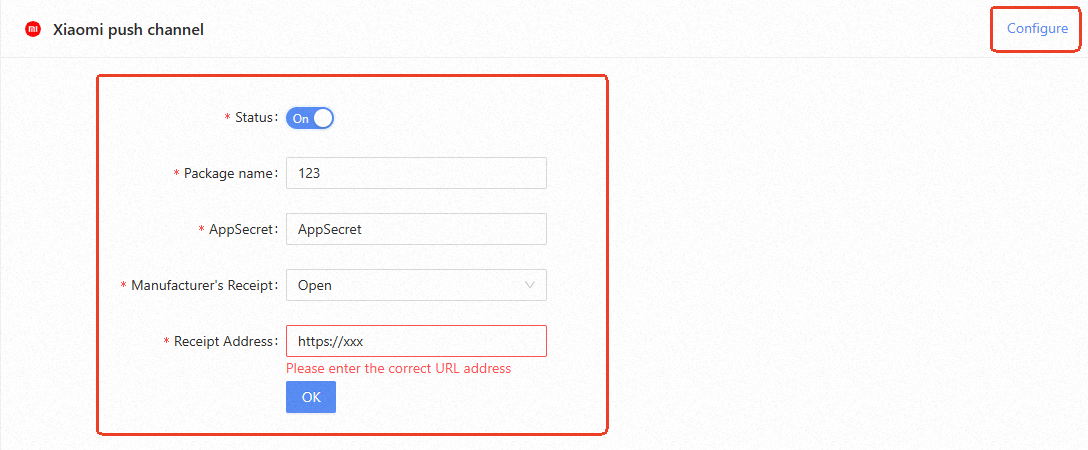
Parameter
Required
Description
Status
Yes
The access status switch of the channel. If you turn on the switch, MPS will access the Xiaomi push channel according to the configuration. If you turn off the switch, the access is canceled.
Package name
Yes
Enter the main package name of the Xiaomi app.
AppSecret
Yes
Enter the AppSecret of the Xiaomi app.
Manufacturer's Receipt
Yes
Control whether MPS supports vendor receipts.
Receipt Address
No
Required when enabling manufacturer receipt, the protocol must be HTTPS.
NoteTo obtain the package name and key, log on to the Xiaomi Open Platform console and choose Application Management > Application Information.
Click OK to save the configurations.
Configure an OPPO push channel
In the left-side navigation pane, choose Message Push> Settings> Channel Configuration.
In the upper-right corner of the OPPO Push Channel section, click Configure. The configuration entry is displayed.
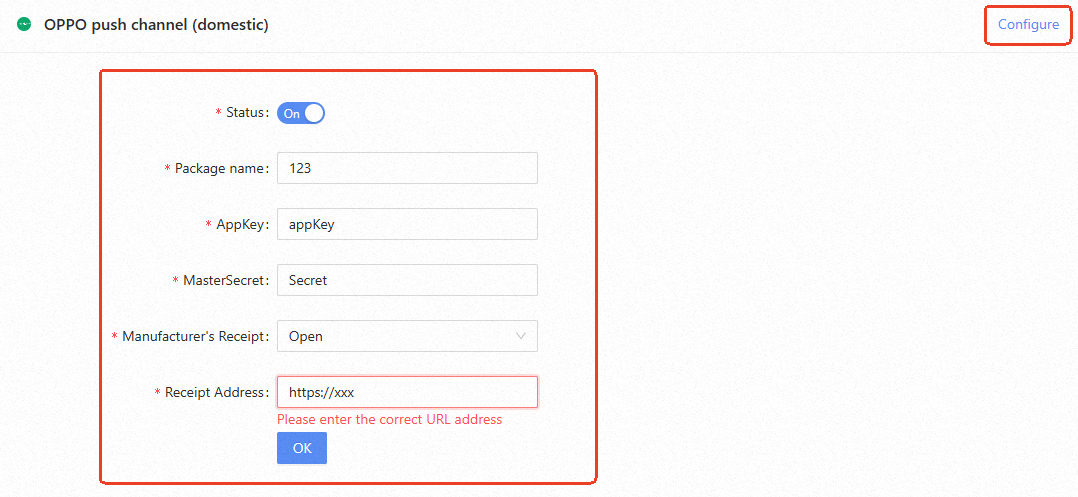
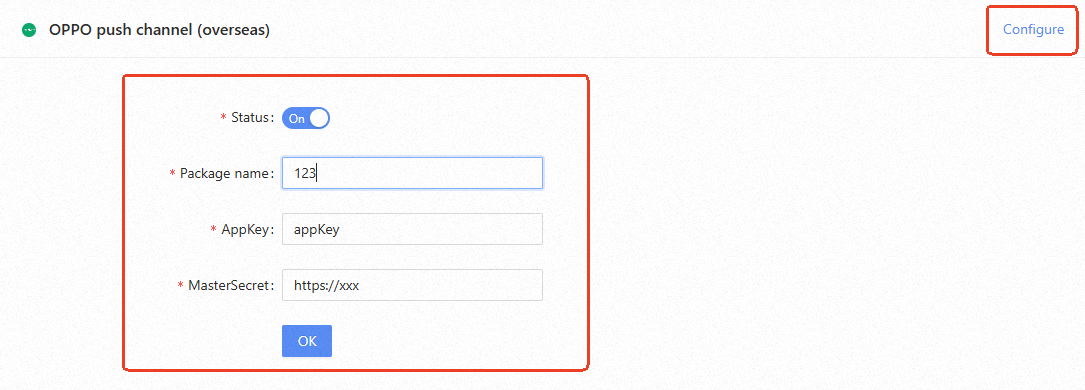
Parameter
Required
Description
Status
Yes
The access status switch of the channel. If you turn on the switch, MPS connects to the OPPO push channel based on the configuration. If you turn off the switch, the access is canceled.
AppKey
Yes
The AppKey is the identity of the client and is used when the client SDK is initialized.
MasterSecret
Yes
The MasterSecret is used by developers to verify their identities when they call API operations on the server.
Manufacturer's Receipt
Yes
Control whether MPS supports vendor receipts.
Receipt Address
No
Required when enabling manufacturer receipt, the protocol must be HTTPS.
NoteOn the OPPO Open Platform, after you grant the OPPO push permission, you can view the AppKey and MasterSecret of the application on the OPPO Push Platform > Configuration Management > Application Configuration page.
Click OK to save the configurations.
Configure a vivo push channel
In the left-side navigation pane, choose Message Push> Settings> Channel Configuration.
In the upper-right corner of the VIVO Push Channel section, click Configure. The configuration entry is displayed.
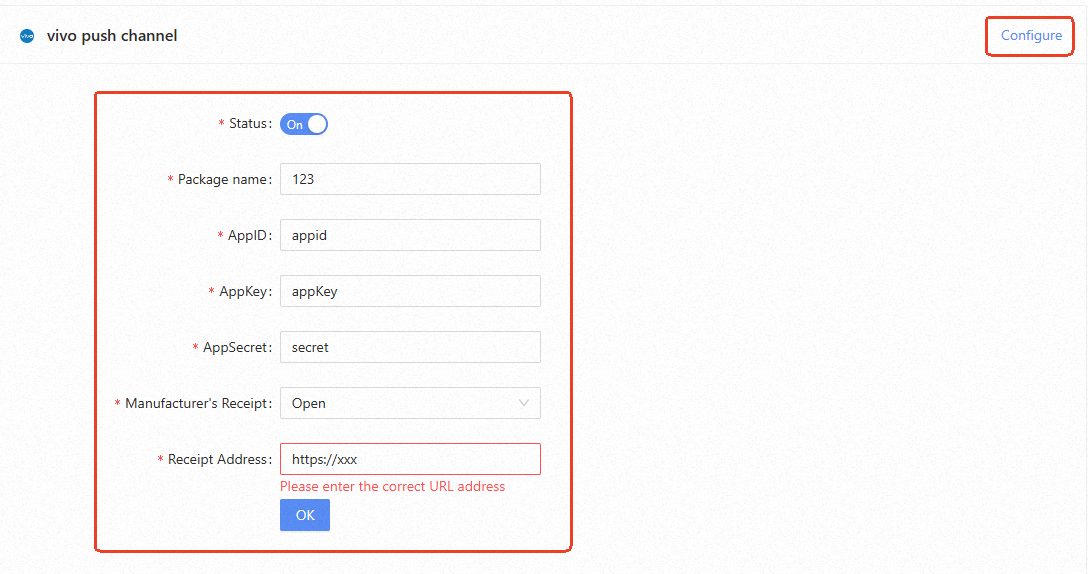
Parameter
Required
Description
Status
Yes
The access status switch of the channel. If you turn on the switch, MPS connects to the vivo push channel based on the configuration. If you turn off the switch, the access is canceled.
APP ID
Yes
AppId is the identity of the client and is used when the client SDK is initialized.
AppKey
Yes
The AppKey is the identity of the client and is used when the client SDK is initialized.
MasterSecret
Yes
The MasterSecret is used by developers to verify their identities when they call API operations on the server. This parameter corresponds to the AppSecret that you obtained from the vivo developer platform.
Manufacturer's Receipt
Yes
Control whether MPS supports vendor receipts.
Receipt Address
No
Required when enabling manufacturer receipt, the protocol must be HTTPS.
NoteAfter you apply for the push service for an application on the vivo open platform, you can obtain the AppId,AppKey, and MasterSecret(AppSecret) of the application.
Click OK to save the configurations.
Configure a FCM push channel
If you use Google's FCM service as the message push gateway when you connect Android devices outside China, you must configure the FCM push channel in the console.
Prerequisites
Before you configure the FCM push channel, you need to obtain the FCM server key on the Firebase console.
Procedure
In the left-side navigation pane, choose Message Push Service > Settings > Channel Configuration.
Click Configure in the upper-right corner of the FCM Push Channel section to configure the channel.
Click the Status switch. If you turn on the switch, MPS is connected to FCM. If you turn off the switch, MPS is not connected to FCM.
Enter the FCM server key. Make sure that the key is the server key. The Android key, iOS key, and browser key are rejected by FCM.
Click OK to save the configuration.
Configure a New FCM push channel
The old FCM API will no longer be supported and retired starting June 20, 2024. To avoid any disruption for MPS, please migrate to the new FCM API as soon as possible.
Upload the FCM authentication file through the console.

Firebase projects support Google service account, which you can use to call the Firebase server API from your application server or a trusted environment. If you write code locally, or deploy your app locally, you can authorize server requests through credentials obtained by this service account.
NoteTo authenticate the service account and grant it access to Firebase services, you must generate a private key file in JSON format by following these steps:
In the Firebase console, choose Settings > Service Account.
Click Generate New Private Key and confirm by clicking the Generate Key button.
Store the JSON file containing the key in a safe place.
Switch the push link mode.
The link switching method provided by the new version of FCM logic is to add an extended parameter (extended_params) configuration and add a key-value pair
useNewFcmApi=1to push messages through the new link.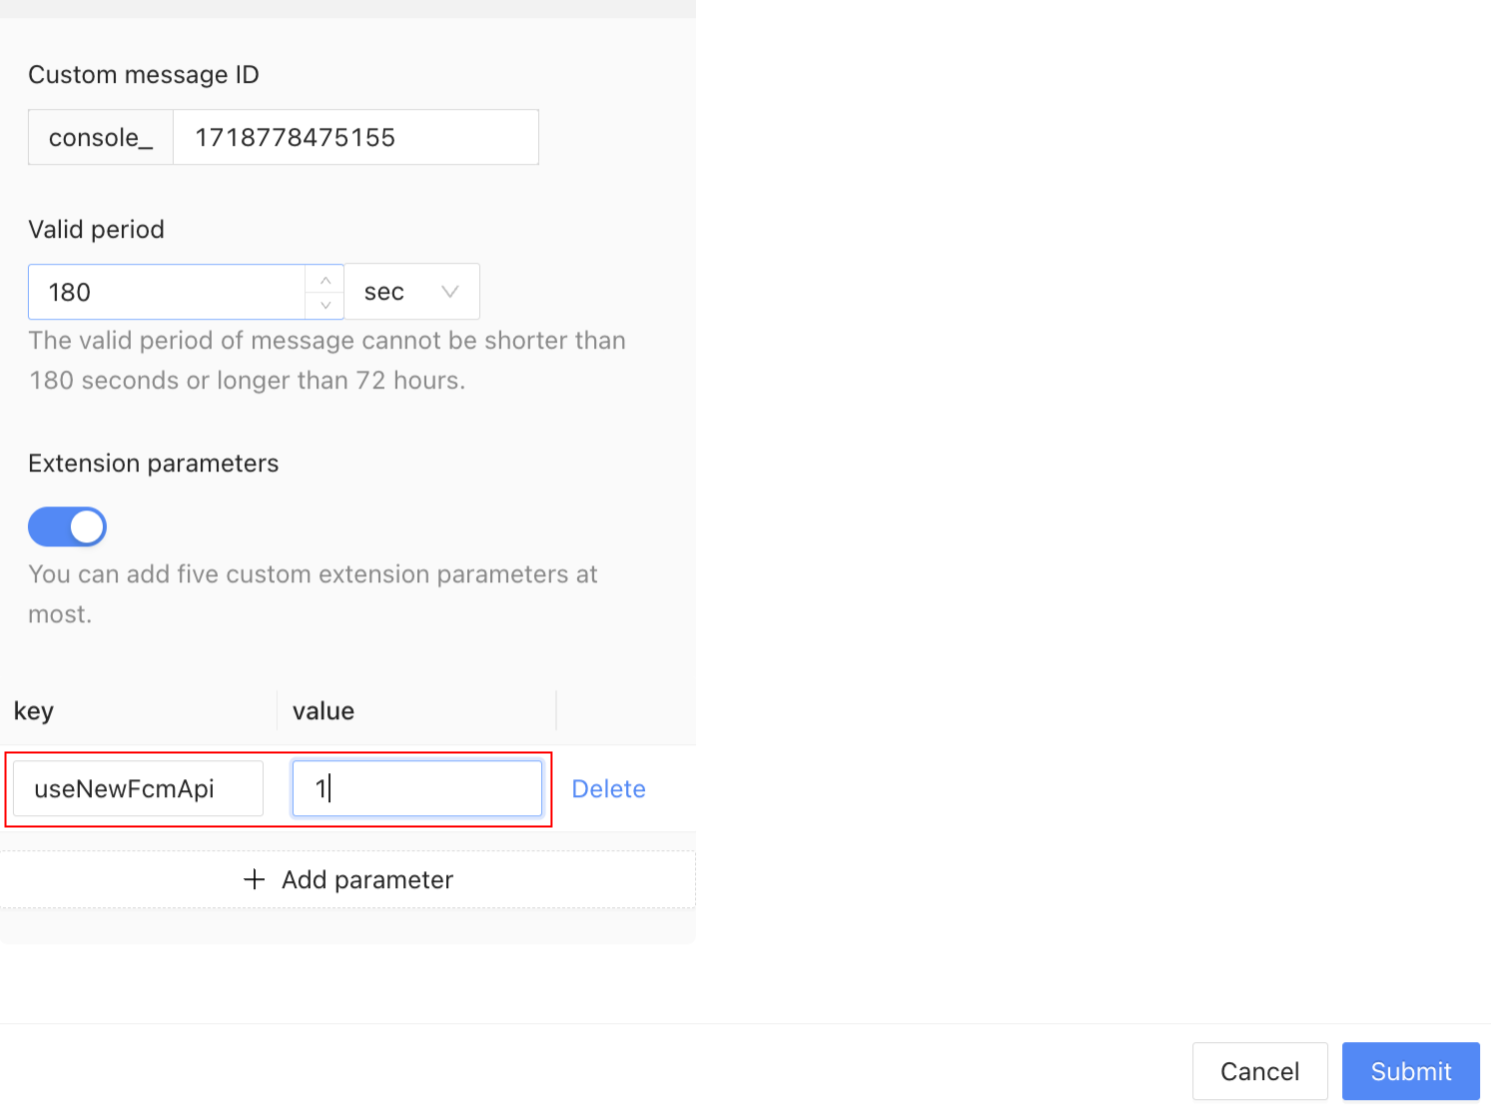
When pushing messages, you need to add extended parameter:
Old version:
useNewFcmApi, 0;New version:
useNewFcmApi, 1;
If no extended parameters are added, the old version is used by default.
Configure an iOS push channel
When accessing an Apple mobile phone, it relies on the APNs service as the message push gateway. You need to upload an iOS push certificate on the console side to connect to the APNs service.
Complete these steps to configure the iOS push certificate:
Log on to the mPaaS console. In the left-side navigation pane, choose Message Push Service > Settings.
On the right-side Settings page, click the Channel Settings tab. In the iOS Channel section, configure the iOS certificate.
Select Certificate File: Select and upload the prepared iOS push certificate. The backend parses the uploaded certificate to obtain the certificate environment and the BundleId. For more information about how to create an iOS push certificate, see Create an iOS push certificate.
Certificate Password: Enter the certificate password that you set when you export the. p12 certificate.
Click Upload to save the configuration. If the format of the certificate is correct, you can view the details of the certificate. If you need to verify whether the certificate corresponds to the environment and is valid, you can test it by pushing a message in the console.
An iOS push certificate has a validity period. Update the certificate before the push certificate expires to prevent message push from working properly. The system starts reminding you to replace the certificate 15 days before the certificate expires. To replace the certificate, click Re-upload below the certificate information to upload a new certificate.
Configure iOS live activity message push certificate
Before configuring the iOS live activity message push certificate, you must first make sure that the iOS original push certificate, that is, the .p12 certificate, has been configured, otherwise the live activity message certificate can not be configured.
The steps to configure the iOS live activity messaging certificate are as follows:
Log in to the mPaaS console, select the target application, and enter the Message Push Service > Settings page from the left navigation bar.
On the settings page of the iOS channel, check the Token Authentication configuration. After configuring bundleId, keyId, and teamId, upload the p8AuthKey private key file, which is a
.p8file, and click OK.
The above parameters can be obtained by referring to Create iOS P8 Real-time Activity Certificate.
The environment for pushing live activity messages is bound to the original iOS certificate, so the usage effect is as follows:
If the original iOS certificate is a test environment sandbox certificate, live activity messages in the test environment will be pushed.
If the original iOS certificate is a production environment certificate, live activity messages of the production environment will be pushed.
Configure the receipt address
Currently, the vendors that support receipts are: Huawei, Honor, HarmonyOS, Xiaomi, OPPO, and vivo.
Vendor | Receipts Configuratoin |
Huawei | The receipt switch needs to be enabled in Message Push Service > Settings > Channel configuration, and the receipt address needs to be configured on the platform provided by the vendor. |
Honor | The receipt switch needs to be enabled in Message Push Service > Settings > Channel configuration, and the receipt address needs to be configured on the platform provided by the vendor. |
HarmonyOS | The receipt switch needs to be enabled in Message Push Service > Settings > Channel configuration, and the receipt address needs to be configured on the platform provided by the vendor. |
Xiaomi | Message Push Service > Settings > Channel configuration, enable the receipt and configure the receipt address. |
OPPO | Message Push Service > Settings > Channel configuration, enable the receipt and configure the receipt address. |
vivo | Message Push Service > Settings > Channel configuration, enable the receipt and configure the receipt address. |