This topic describes how to create, edit, or delete foreign tables in HoloWeb. It also describes how to preview foreign table data and DDL statements.
Prerequisites
You have logged on to an instance. For more information, see Log on to an instance.
Create a foreign table
-
Log on to the Hologres Management Console.
-
In the navigation pane on the left of the top menu bar, select the desired region.
-
You can click Go to HoloWeb to go to the HoloWeb development page.
-
In the top navigation bar of the HoloWeb developer page, click . Then, click Create Foreign Table.
Alternatively, on the Metadata Management page, you can find the target database in the Logged On Instances list. Click the target database, right-click the target schema under the database, and select Create MaxCompute External Table.
-
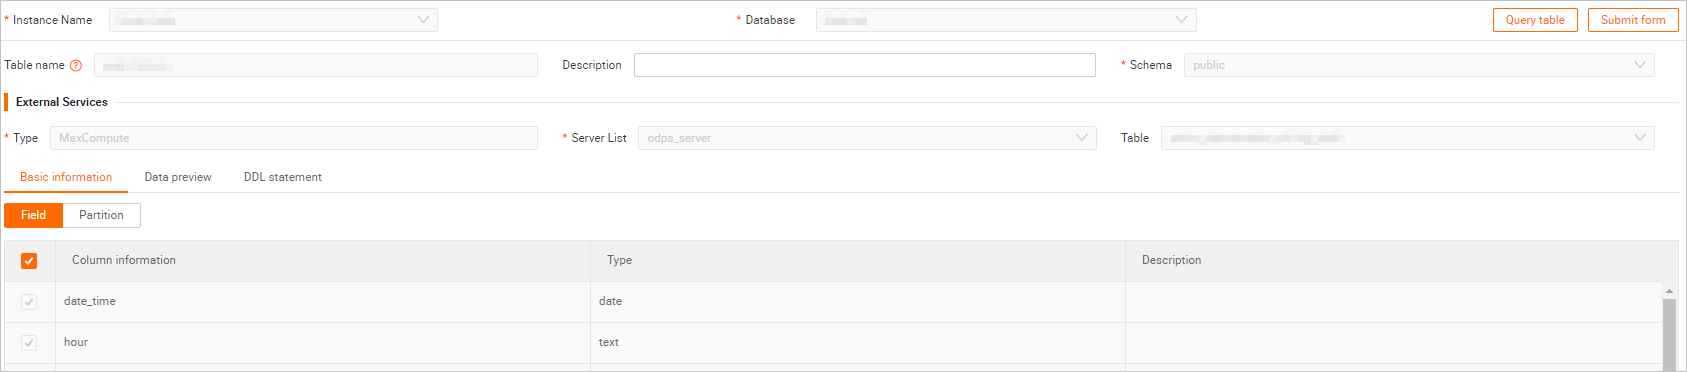
On the Create Foreign Table page, configure the corresponding parameters based on the acceleration method.
Accelerate entire database
Category
Parameter
Description
Acceleration Method
Select an acceleration method.
Hologres supports three acceleration methods:
-
Entire Project
-
Selected Tables
-
Single Table
Select Entire Project.
MaxCompute data source
Project Name
The name of the MaxCompute project.
Schema Name
The schema name in MaxCompute.
For MaxCompute projects where schemas are enabled, you can configure the names of all schemas for which you have permissions. You do not need to configure this parameter for projects where schemas are not enabled. For more information about schemas, see Schema operations.
Destination Table Position
Holo Schema
The schema name.
You can select the default public schema, or you can select a newly created schema.
Advanced Settings
Processing Rule for Table Name Conflicts
Three ways to resolve table name conflicts:
-
Ignore and continue to create other tables
-
Update and modify the table with the same name
-
Report an error and stop creation
Processing Rule for Unsupported Data Types
The following two data types do not support this processing method:
-
Report an error and fail the import
-
Ignore and Skip Table of Unsupported Fields
Partial Acceleration
Category
Parameter
Description
Acceleration Method
Select an acceleration method.
Hologres supports three acceleration methods:
-
Entire Project
-
Selected Tables
-
Single Table
Select Selected Tables.
MaxCompute data source
Project Name
The name of the MaxCompute project.
Schema Name
The schema name in MaxCompute.
For MaxCompute projects where schemas are enabled, you can configure the names of all schemas for which you have permissions. You do not need to configure this parameter for projects where schemas are not enabled. For more information about schemas, see Schema operations.
Destination Table Position
Holo Schema
Pattern name.
You can select the default public schema, or you can select the name of a new schema.
Advanced Settings
Processing Rule for Table Name Conflicts
Three ways to resolve table name conflicts:
-
Ignore and continue to create other tables
-
Update and modify the table with the same name
-
Report an error and stop creation
Processing Rule for Unsupported Data Types
The following two data types do not support processing methods:
-
Report an error and fail the import
-
Ignore and Skip Table of Unsupported Fields
Search
Perform a fuzzy search by table name. A maximum of 200 tables can be displayed. If the limit is exceeded, no more tables are shown.
Accelerate a single table
Category
Parameter
Description
Acceleration Method
Select an acceleration method.
Hologres supports three acceleration methods:
-
Entire Project
-
Selected Tables
-
Single Table
Select Single Table.
MaxCompute data source
Project Name
The name of the MaxCompute project.
Schema Name
The schema name in MaxCompute.
For MaxCompute projects where schemas are enabled, you can configure the names of all schemas for which you have permissions. You do not need to configure this parameter for projects where schemas are not enabled. For more information about schemas, see Schema operations.
Table Name
The data table in the corresponding MaxCompute schema. Fuzzy search by table prefix is supported.
Destination Hologres Table
Schema
The schema name.
You can select the default public schema, or you can select a newly created schema name.
Table Name
The name of the single table to be accelerated in Hologres.
Destination Table Description
The description of the single table to be accelerated in Hologres.
NoteWhen you create a foreign table to sync data from a MaxCompute table, the comments for the table fields and columns in the database are also synced to Hologres.
-
-
Click Submit to complete the creation of the foreign table. After submitting, you can refresh the newly created foreign table in the corresponding schema in the left navigation bar.
-
Optional:You can click Query Table on the page of created foreign tables to enter the SQL query window and develop using the standard PostgreSQL language.
Edit a foreign table
-
In the navigation pane on the left, click Logged-in Instances to display all logged-in instance names.
-
Click Database for the target instance to display all created databases.
-
Click the Schema of the target database, and then click the Foreign Tables to display all created foreign tables.
-
Right-click the target foreign table and select Open Table.
-
In the upper-right corner of the target table tab, click Edit Table.
-
You can change the Fields or Partitions of the external source table that you need to map, as needed.
-
Click Submit to complete editing the current foreign table.
Rename a foreign table
-
In the navigation pane on the left, query the target foreign table in the Logged-in Instances interface.
-
Click Database under the target instance to display all created databases.
-
Click Foreign Tables under the Schema of the target database to display all created foreign tables.
-
Right-click the target foreign table and select Rename.
-
Click OK.
Delete a foreign table
-
In the navigation pane on the left, query the target foreign table on the Logged-in Instances page.
-
Click the Database section under the target instance to display all created databases.
-
Click Foreign Tables under the Schema of the target database to display all created foreign tables.
-
Right-click the target foreign table, select Delete Table.
-
Click OK.
Preview data
-
In the navigation pane on the left, on the Logged On Instances page, query the target foreign table.
-
Click the Database under the target instance to display all created databases.
-
Click the Schema of the target database, and then click the Foreign Tables to display all foreign tables.
-
Double-click the target foreign table and click Data Preview on the foreign table tab.
References
You can also use SQL statements to create, modify, and delete foreign tables. For more information, see: