You can create event functions to process various events generated by Alibaba Cloud services. Such events include but are not limited to file uploads to Object Storage Service (OSS) and alerts triggered by your monitoring products. For more information about events, see Trigger overview. When implementing event functions, you can focus entirely on your business logic, as event integration and management of underlying computing resources are all handled by Function Compute. Moreover, Function Compute provisions and automatically scales instances on demand, destroying them after event processing to ensure that you only pay for the resources actually consumed.
Sample scenario
Consider a requirement to store uncompressed files in OSS while accepting ZIP uploads for transfer efficiency. In this case, an automated process is needed to decompress the files and save them back to OSS.
Conventional approaches would necessitate building and integrating multiple programs to monitor and process file changes on OSS, while also considering the deployment and maintenance of these programs. In contrast, using event functions allows you to focus solely on the decompression logic. Whenever a file is uploaded to OSS, the preconfigured event trigger automatically invokes your logic if the event meets your specified conditions. After processing, computing resources are released automatically, saving costs.

The following part of this topic demonstrates event function implementation.
It simulates an OSS upload event that triggers an event function to decompress the file, printing file metadata, such as name and bucket information, on the Function Compute console. This demo does not rely on any actual OSS resources, so that you do not need to prepare an OSS bucket.
You will experience the following items in the demo:
Completing the entire process of creating event functions, writing handlers, and testing functions in the Function Compute console
Understanding key concepts such as the Function Compute execution environment and built-in runtimes
Learning about the request parameters
eventandcontextin the handler
Prerequisites
Procedure
1. Select the function type
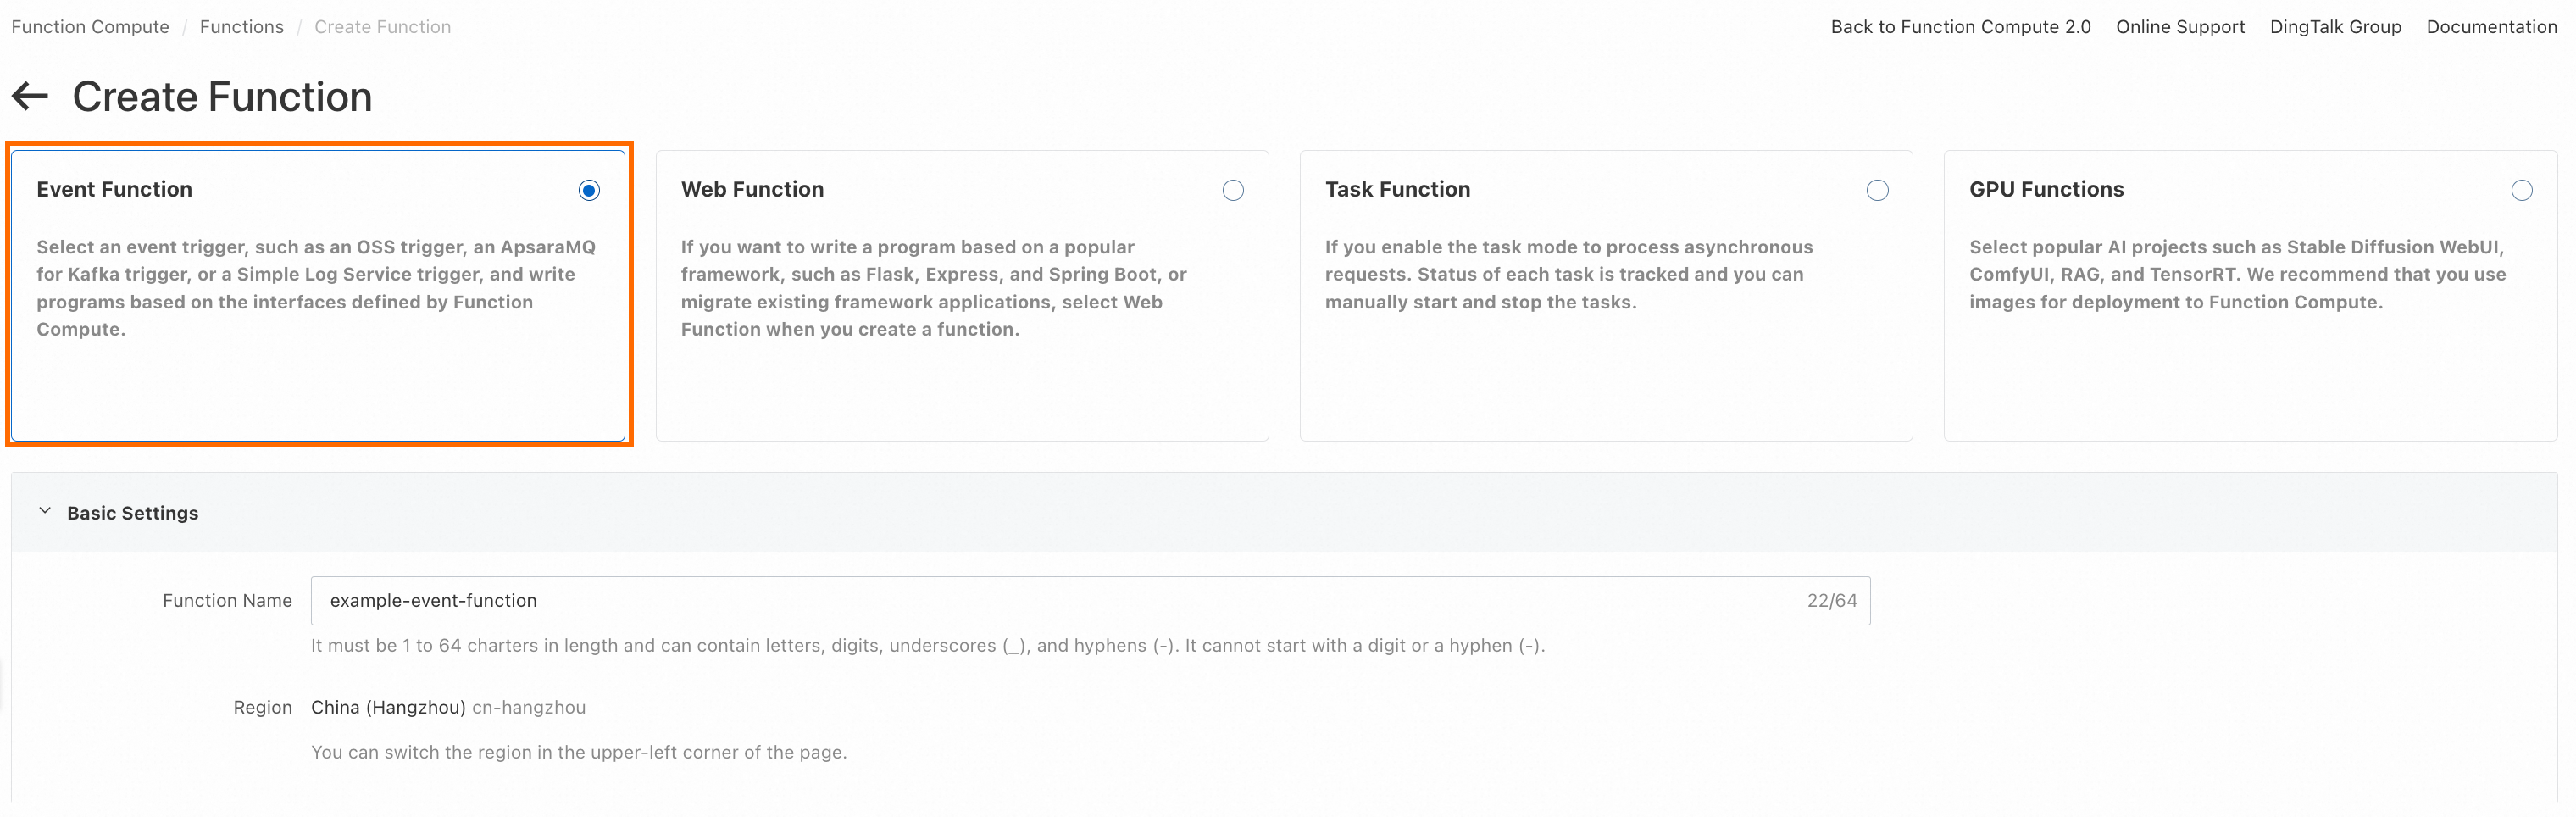
Log on to the Function Compute console. In the left-side navigation pane, click Functions. In the top navigation bar, select the region where you want to create the function, such as China (Hangzhou). Then, click Create Function.
On the Create Function page, click Event Function. You can customize Function Name.
2. Select the runtime
Python
For Runtime, select Built-in Runtimes > Python > Python 3.10.
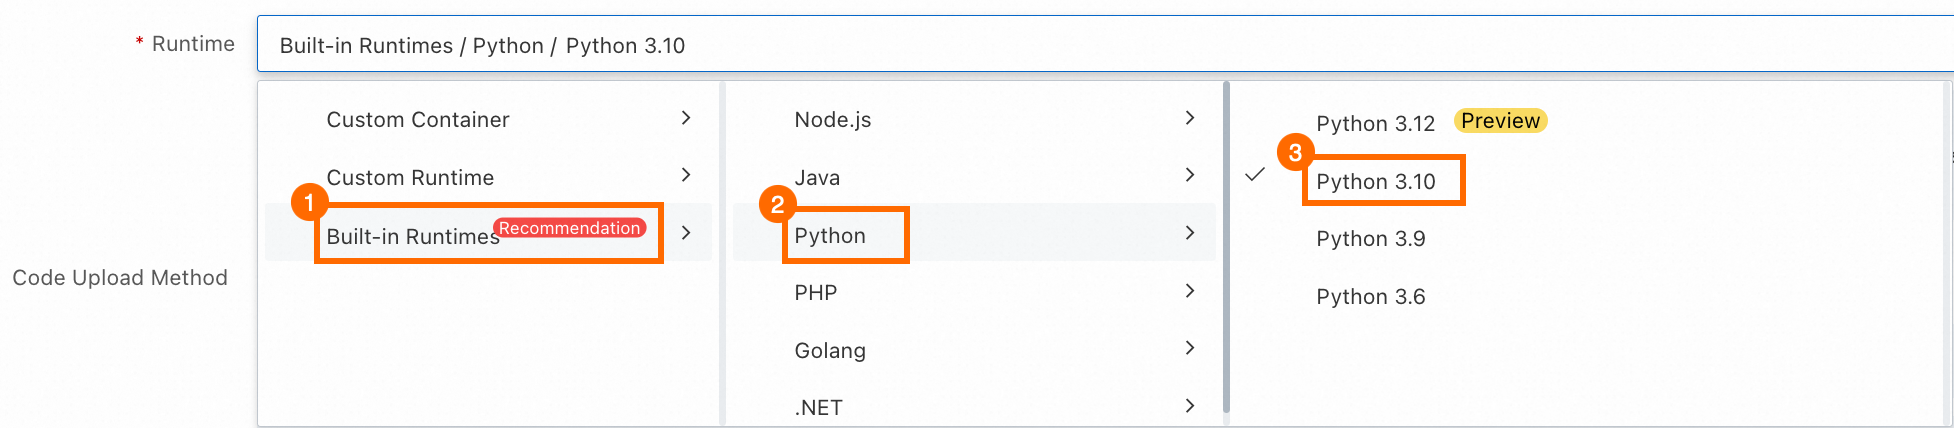
We recommend that you use a built-in runtime for your event function because built-in runtimes include the dependencies needed to respond to events from other Alibaba Cloud services. For example, a built-in Python runtime includes an oss2 module, which is necessary for accessing OSS. For more information, see Overview (Python). If you use a custom runtime or a Custom Container runtime, you must install the required dependencies. For more information about the comparison between different types of runtimes, see Function runtime environment selection.
Node.js
For Runtime, select Built-in Runtimes > Node.js > Node.js 20.
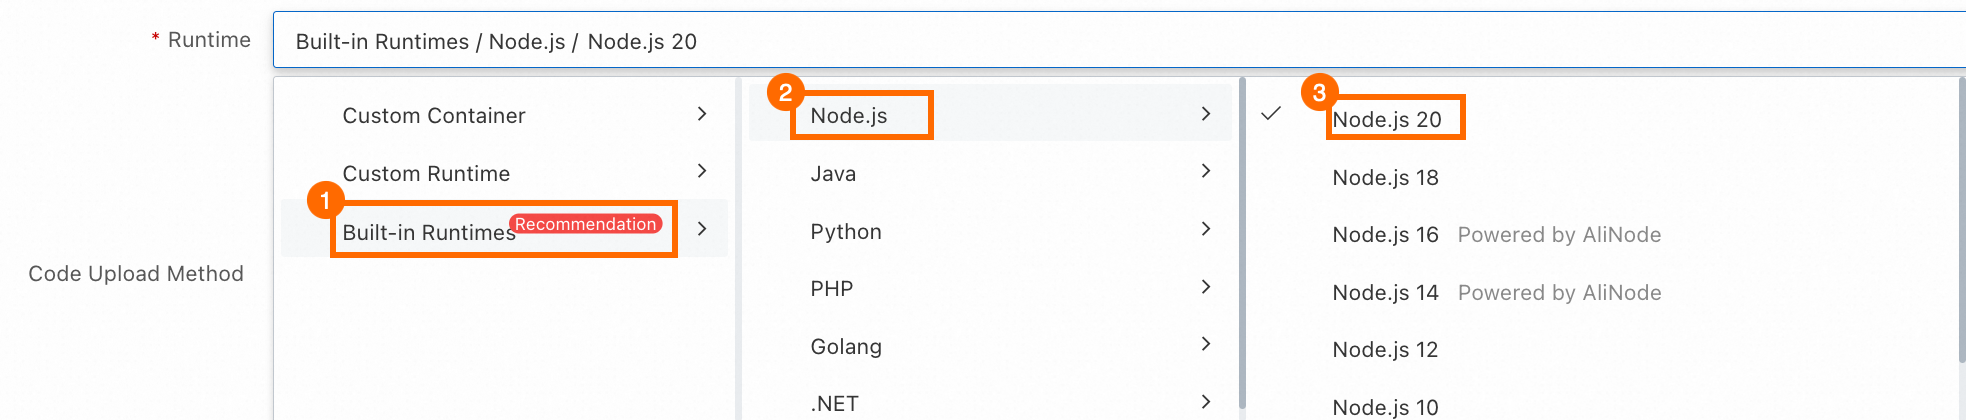
We recommend that you use a built-in runtime for your event function because built-in runtimes include the dependencies needed to respond to events from other Alibaba Cloud services. For example, a built-in Node.js runtime includes an ali-oss module, which is necessary for accessing OSS. For more information, see Overview (Node.js). If you use a custom runtime or a Custom Container runtime, you must install the required dependencies. For more information about the comparison between different types of runtimes, see Function runtime environment selection.
3. Create the function
Use sample code Hello, world! to create the function. Retain the default values for Advanced Settings and Environment Variables. Click Create.

Once the event function is created, you can view the generated sample code in WebIDE on the Code tab. The following figure shows the generated code in the Python 3.10 runtime.
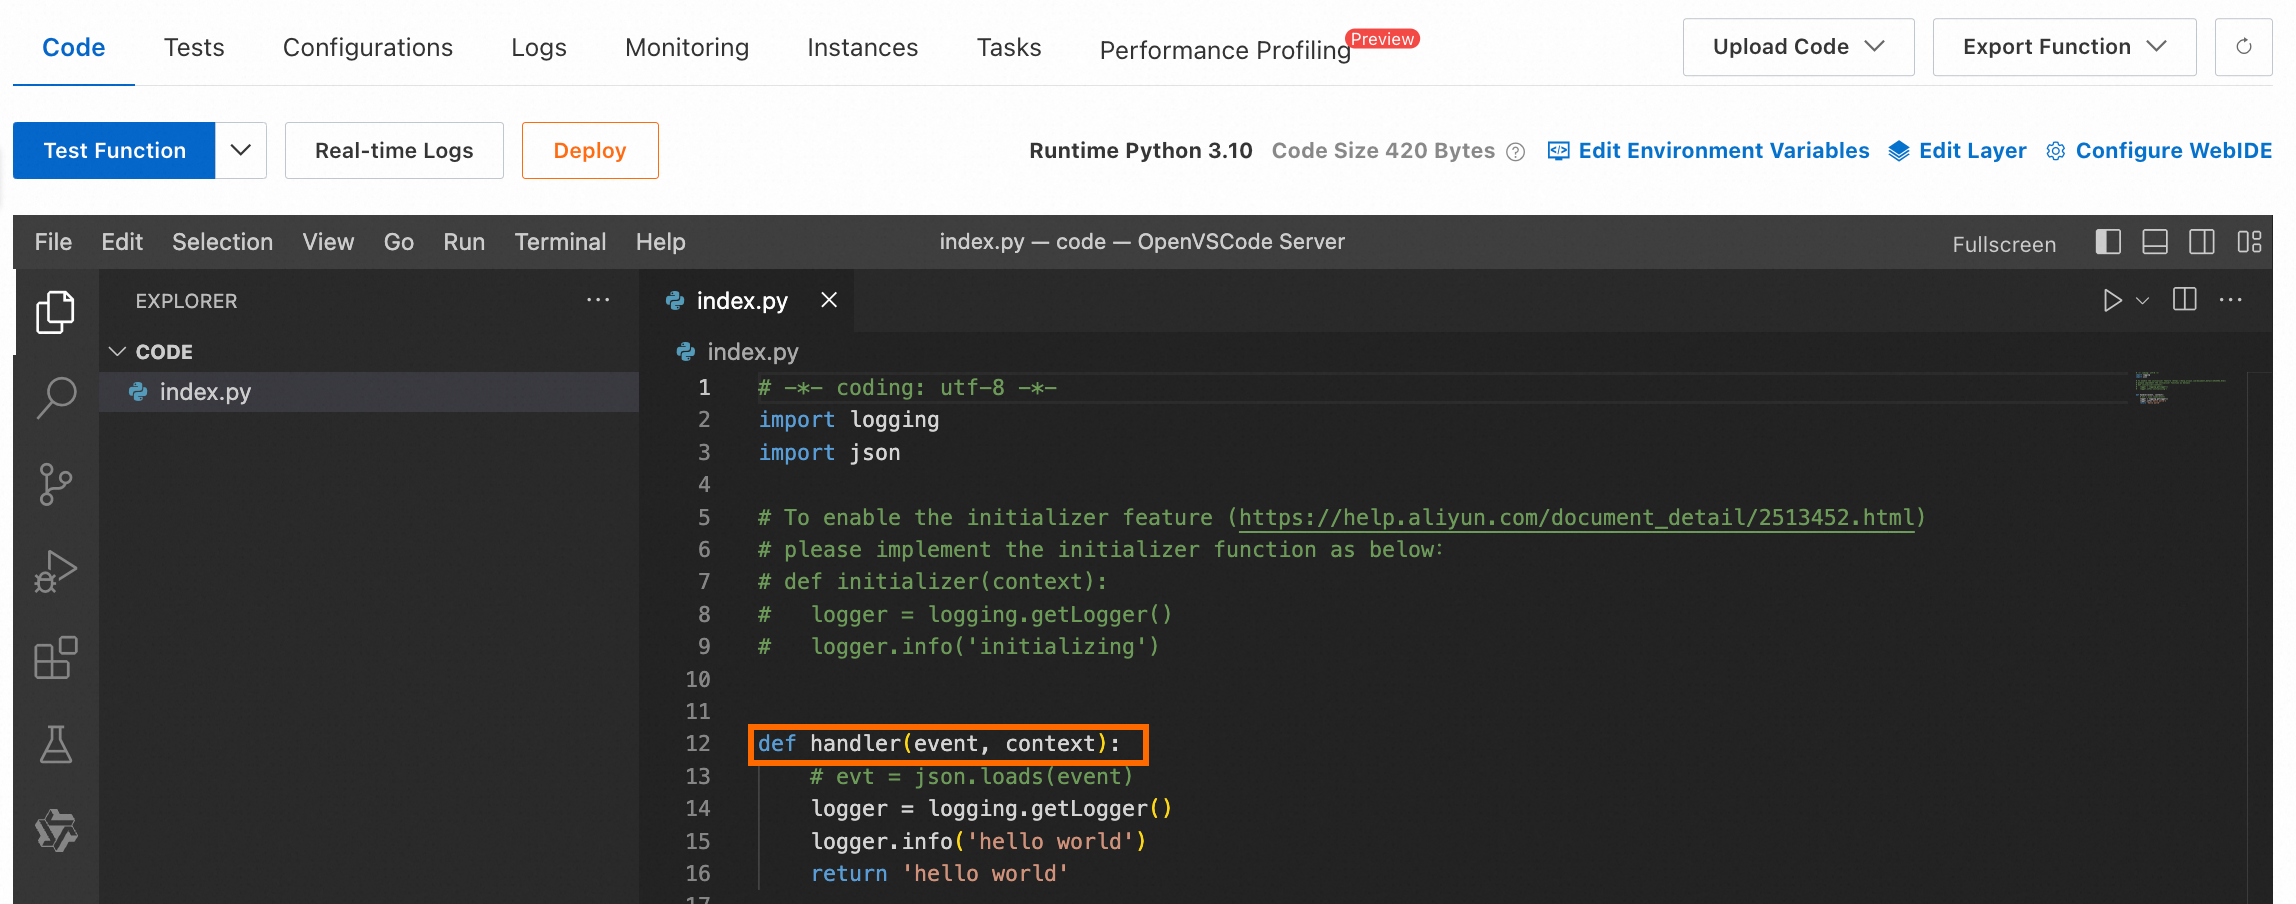
As shown in the figure, a function template with a handler is automatically generated. You can write your business code directly based on this template in the following steps.
4. Modify and deploy the code
Interpreted languages like Python and Node.js support direct code modification and deployment within WebIDE, whereas compiled languages such as Java only allow local compilation of code packages for subsequent upload and lack WebIDE integration.
Python
Open index.py in WebIDE, replace the current code with the following code, and click Deploy.
# -*- coding: utf-8 -*-
import logging
import json
# import oss2  # Uncomment this section if you want to create an OSS client instance.
logger = logging.getLogger()


def handler(event, context): # The handler serves as the entry point for code execution.
    logger.info("Parsing event information...")
    input_events = json.loads(event)
    if not input_events.get('events'): # Check the format of the incoming event.
        raise Exception("Invalid event format: events array is missing or empty")
    event_obj = input_events['events'][0]
    bucket_name = event_obj['oss']['bucket']['name']  # Parse the OSS bucket name.
    object_name = event_obj['oss']['object']['key']  # Parse the file name.
    region = context.region  # Parse the region where the function is located.
    logger.info(f"OSS bucket: {bucket_name}, file: {object_name}, region: {region}")
    # If you already have an OSS bucket, uncomment the following section to create an OSS client instance.
    # bucket = get_bucket(region, bucket_name, context)
    bucket = None
    result = process_event(bucket, object_name)  # Invoke event processing subroutine.
    return result


def process_event(bucket, object_name):
    logger.info("Starting event processing...")
    # Add logic here for event processing.
    # zip_file = download_file(bucket, object_name)
    # result = extract_and_upload(bucket, zip_file)
    logger.info("Event processing completed")
    result = 0
    return result  # 0 indicates successful event processing.


# def get_bucket(region, bucket_name, context):
#     # Create an OSS bucket client instance. The required authentication information can be obtained from the context.
#     creds = context.credentials  # Obtain the Security Token Service (STS) token.
#     auth = oss2.StsAuth(
#         creds.access_key_id,
#         creds.access_key_secret,
#         creds.security_token)
#     endpoint = f'oss-{region}-internal.aliyuncs.com'
#     bucket = oss2.Bucket(auth, endpoint, bucket_name)
#     return bucket


# def download_file(bucket, object_name):
#     # Example code for downloading a file from OSS
#     try:
#         file_obj = bucket.get_object(object_name)
#         return file_obj
#     except oss2.exceptions.OssError as e:
#         logger.error(f"File download failed: {e}")


# def extract_and_upload(bucket, file_obj):
#     # Add logic here to decompress files and upload them to OSS.
#     return 0;
Function code description
def handler(event, context):handler: This Python function serves as the handler. While your code may contain multiple Python functions, the handler remains the entry point for code execution. Keep the handler's name unchanged during code modifications to ensure that Function Compute recognizes the handler properly. For more information, see What is a handler?
event: When an event triggers the function, event-related information, such as the bucket name and file name in an OSS file upload event, is passed to the function via theeventparameter. This parameter is formatted as a JSON object. For more information about what information is included in theeventparameter for each type of event, see Formats of event for different triggers.context: The context object is passed to the function via thecontextparameter, containing information about function invocations, configurations, and authentication credentials. The authentication credentials originate from the role assigned to your function. Based on the function role, Function Compute calls the AssumeRole operation to obtain an STS token, which is then passed to your function via thecredentialsfield in thecontextobject. For more information about this process, see Grant Function Compute permissions to access other Alibaba Cloud services. For more information about what information is included in a context object, see Context.
logger.info(): You can use the standard logging features of your programming language to output logs. For example, in a Python runtime, you can use theloggingmodule to log information. This demo prints the bucket name, file name, and region. After the function execution, you can view the log output in the Function Compute console. For more information, see Logs.
Node.js
Open index.mjs in WebIDE, replace the current code with the following code, and click Deploy.
'use strict';
// import OSSClient from 'ali-oss'; // Uncomment this section if you want to create an OSS client instance.

export const handler = async (event, context) => { // The handler serves as the entry point for code execution.
  console.log("Parsing event information...");
  const inputEvents = JSON.parse(event);
  if (!Array.isArray(inputEvents.events) || inputEvents.events.length === 0) { // Check the format of the incoming event.
    throw new Error("Invalid event format: events array is missing or empty");
  }
  const eventObj = inputEvents.events[0];
  const bucketName = eventObj.oss.bucket.name; // Parse the OSS bucket name.
  const objectName = eventObj.oss.object.key; // Parse the file name.
  const region = context.region;  // Parse the region where the function is located.
  console.log(`OSS bucket: ${bucketName}, object: ${objectName}, region: ${region}`);
  // If you already have an OSS bucket, uncomment the following section to create an OSS client instance.
  // const bucket = getBucket(region, context)
  const bucket = null;
  const result = processEvent(bucket, objectName); // Invoke event processing subroutine.
  return result;
};


async function processEvent (bucket, objectName) {
  console.log("Starting event processing...");
  // Add logic here for event processing.
  // const zipFile = downloadFile(bucket, objectName);
  // const result = extractAndUpload(bucket, zipFile);
  console.log("Event processing completed");
  const result = 0;
  return result;
}


// function getBucket (region, context) {
//   // Create an OSS bucket client instance. The required authentication information can be obtained from the context.
//   const bucket = new OSSClient({
//     region: region,
//     accessKeyId: context.credentials.accessKeyId,
//     accessKeySecret: context.credentials.accessKeySecret,
//     securityToken: context.credentials.securityToken
//   });
//   return bucket;
// }


// async function downloadFile (bucket, objectName) {
//   try {
//     // Example code for downloading a file from OSS
//     const result = await bucket.get(objectName, objectName);
//     console.log(result);
//     return result;
//   } catch (e) {
//     console.log(e);
//   }
// }

// async function extractAndUpload (bucket, zipFile) {
//     // Add logic here to decompress files and upload them to OSS.
//     return 0;
// }
Function code description
export const handler = async (event, context)handler: This Node.js function serves as the handler. While your code may contain multiple Node.js functions, the handler remains the entry point for code execution. Keep the handler's name unchanged during code modifications to ensure that Function Compute recognizes the handler properly. For more information, see What is a handler?
event: When an event triggers the function, event-related information, such as the bucket name and file name in an OSS file upload event, is passed to the function via theeventparameter. This parameter is formatted as a JSON object. For more information about what information is included in theeventparameter for each type of event, see Formats of event for different triggers.context: The context object is passed to the function via thecontextparameter, containing information about function invocations, configurations, and authentication credentials. The authentication credentials originate from the role assigned to your function. Based on the function role, Function Compute calls the AssumeRole operation to obtain a Security Token Service (STS) token, which is then passed to your function via thecredentialsfield in thecontextobject. For more information about this process, see Grant Function Compute permissions to access other Alibaba Cloud services. For more information about what information is included in a context object, see Context.
console.log(): You can use the standard logging features of your programming language to output logs. For example, in a Node.js runtime, you can use theconsolemodule to log information. This demo prints the bucket name, file name, and region. After the function execution, you can view the log output in the Function Compute console. For more information, see Logs.
5. Test the function
To simulate a file upload to OSS triggering the function, we will define a simulated event and use it to invoke the function.
In addition to testing with simulated events, you can also test using real OSS events to trigger the function. For more information, see Advanced operations.
Create a simulated event: On the Function Details page, click the Code tab, click the drop-down icon next to Test Function, and then select Configure Test Parameters from the drop-down list. In the Configure Test Parameters panel, select OSS from the Event Template drop-down list. A simulated event is automatically generated in the same format as a real OSS event.
You can customize Event Name and the parameter values of the event object, such as the OSS bucket name and file name. Click OK.

Click Test Function to trigger immediate execution. After the execution, check the result in the Response tab. A return value of 0 indicates the event was processed successfully. Click Log Output to view the log information generated during the execution.
To test the function, Function Compute passes the content of the simulated event to the
handlervia theeventparameter and executes the code you deployed in the previous step, which involves parsing theeventparameter and processing the file.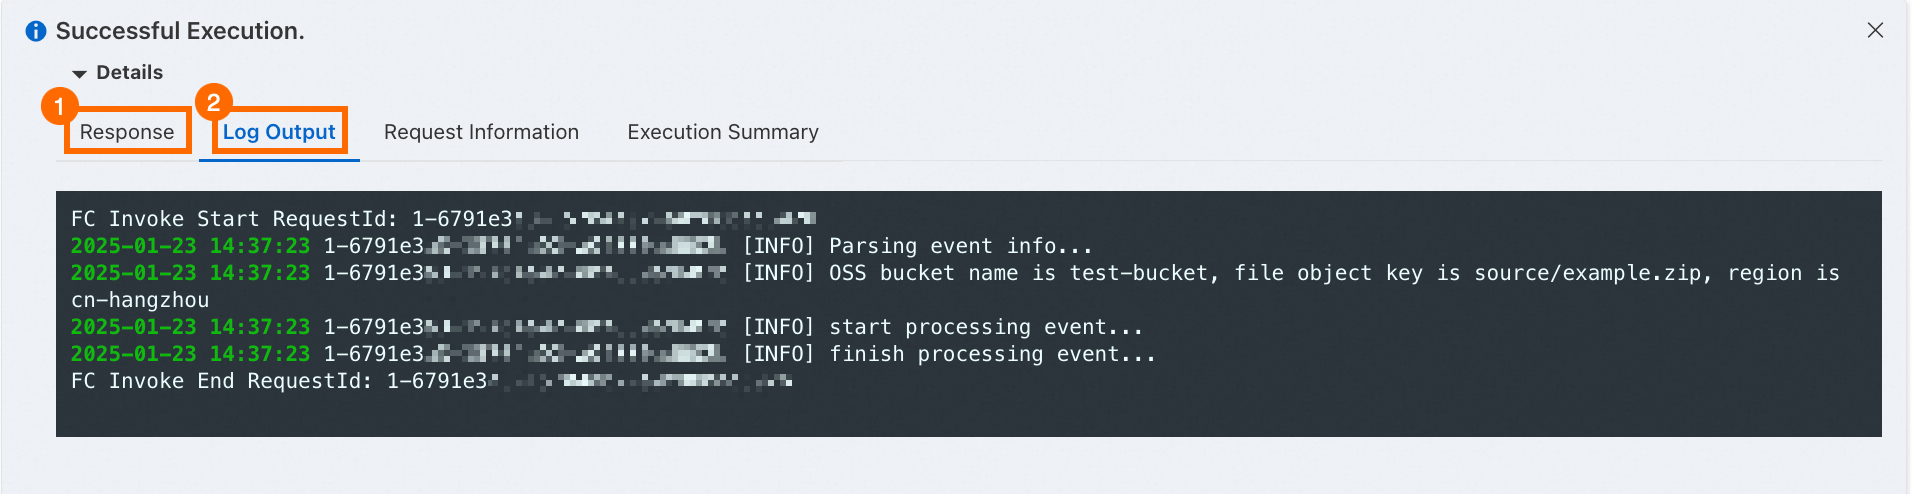
6. (Optional) Clear resources
Function Compute is billed based on the actual resources you consume. Created functions incur charges only when they are used. Take note of other Alibaba Cloud services or resources that are used when functions are invoked, such as data stored in OSS and File Storage NAS (NAS).
To delete a function, log on to the Function Compute console. In the left-side navigation pane, click Functions. In the top navigation bar, select a region. On the Functions page, find the function that you want to delete and choose in the Actions column. In the dialog box that appears, confirm that the function that you want to delete is not bound to any resources. Then, click Delete.

Advanced operations
You have now created an event function via the Function Compute console, configured the function handler, and tested the function using a simulated event. For further configuration, refer to the following advanced operations based on your business requirements:
Add a trigger:
Considering that you may not already have an OSS bucket, the demo in this topic used a simulated OSS event for testing, without relying on any actual OSS resources. However, if you want to process real OSS events in your business, you must add an OSS trigger for your function. For more information about adding a trigger, see Configure a native OSS trigger.
In addition to OSS, events from various other Alibaba Cloud services (such as message queue services, Tablestore, and Simple Log Service) can also trigger function execution in Function Compute. For more information about the trigger types supported by Function Compute, see Trigger types.
Add dependencies: While common dependencies for event processing are already included in each built-in runtime of Function Compute, they may not meet your specific business requirements. In this case, the simplest solution is to package your code and any additional dependencies into a ZIP file and deploy it to Function Compute. For detailed steps, see Deploy a code package. If you want to reduce the size of code packages to mitigate the cold start of functions, you can use layers to manage the dependencies. For more information, see Create a custom layer.
Configure logging: To facilitate debugging, troubleshooting, and security auditing of functions, we recommend that you configure the logging feature for your function. For detailed steps, see Configure the logging feature.
References
In addition to using the Function Compute console to create a function, you can also use Serverless Devs to do so. For more information, see Quick start.
We recommend that you refer to the following hands-on tutorial to learn more about event functions: