This topic describes how to use a Function Compute node in DataWorks to call a function that is created in Function Compute to send emails.
Background information
DataWorks allows you to use a Function Compute node to call a Function Compute service. You can perform custom configurations for various features in a Function Compute service and then use a Function Compute node in DataWorks to call the service.
Prerequisites
DataWorks is activated. For more information, see Activate DataWorks.
Function Compute is activated. For more information, see Quickly create a function.
Limits
Limits on features
DataWorks allows you to invoke only event functions. If you want to periodically schedule an event processing function in DataWorks, you must create an event function rather than an HTTP function to process event requests in Function Compute. For information about more function types, see Function type selection.
Limits on regions
You can use the features provided by Function Compute only in the workspaces that are created in the following regions: China (Hangzhou), China (Shanghai), China (Beijing), China (Zhangjiakou), China (Shenzhen), China (Hong Kong), Singapore, UK (London), US (Silicon Valley), US (Virginia) and Germany (Frankfurt).
Step 1: Create a function
Log on to the Function Compute console. In the top navigation bar, select a region in which you want to create a function.
In the left-side navigation pane, click Functions.
On the Functions page, click Create Function.
On the Create Function page, select Event Function and configure parameters.
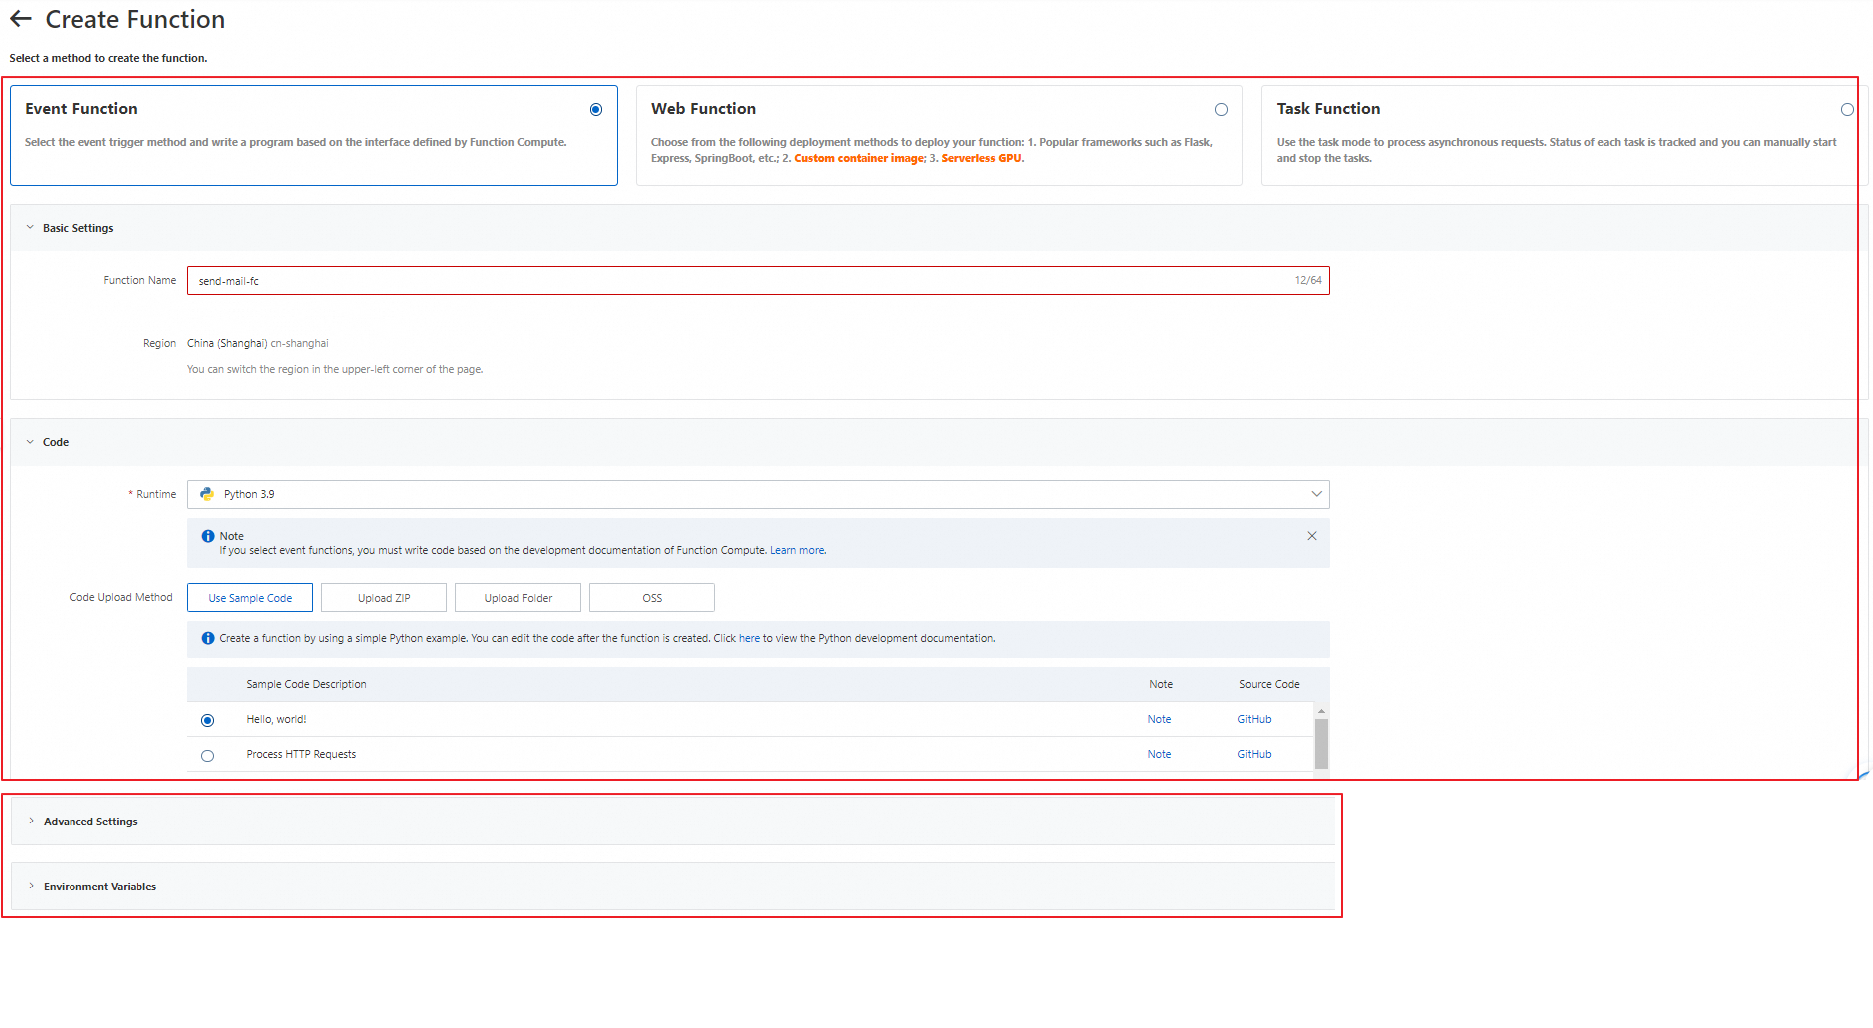
Parameter
Description
Function Name
The name of the function. In this example, set this parameter to
send-mail-fc.Runtime
In this example, select Python 3.9 from the Runtime drop-down list.
Code Upload Method
In this example, set this parameter to Use Sample Code and set Sample Code Description to Hello, world! .
Configure parameters in the Advanced Settings and Environment Variables sections based on your business requirements. For more information, see Manage functions.
Click Create. A function is created. The Code subtab of the Function Details tab appears.

Edit the
index.pyfile and write business logic code. In this example, write code for sending an email.ImportantConfigure the
mail_host,mail_port,mail_username,mail_password,mail_sender, andmail_receiversparameters in the following code based on your business requirements.Simple Mail Transfer Protocol (SMTP) authentication must be enabled for the email account that you want to use. Some email service providers do not enable SMTP authentication by default. You need to check whether SMTP authentication is enabled for a desired email account. If SMTP authentication is not enabled, you must enable this feature. For example, SMTP authentication is not enabled for the 163 mailbox by default.
For security purposes, some email service providers may use a dedicated password similar to an authorization code for logon from a third-party email client. In this case,
mail_passwordmust be set to an authorization code instead of an account password. For example, an authorization code exists for the 163 mailbox. When you use a third-party client to access the 163 mailbox, you must use the authorization code as a password.
# -*- coding: utf-8 -*-
import logging
import json
import smtplib
from email.mime.text import MIMEText

def handler(event, context):
  evts = json.loads(event)

  logger = logging.getLogger()
  logger.info('event: %s', evts)
  mail_host = 'smtp.163.com'                 ## The address of the email server.
  mail_port = '465';                         ## The SMTP port of the email server.
  mail_username = 'sender_****@163.com'      ## The logon username.
  mail_password = 'EWEL******KRU'            ## The logon password.
  mail_sender = 'sender_****@163.com'        ## The email address of the sender.
  mail_receivers = ['receiver_****@163.com'] ## The email address of the recipient.

  mail_content=generate_mail_content(evts)
  message = MIMEText(mail_content,'plain','utf-8')
  message['Subject'] = 'mail test'
  message['From'] = mail_sender
  message['To'] = mail_receivers[0]
  smtpObj = smtplib.SMTP_SSL(mail_host + ':' + mail_port)
  smtpObj.login(mail_username,mail_password)
  smtpObj.sendmail(mail_sender,mail_receivers,message.as_string())
  smtpObj.quit()
  return 'mail send success'

def generate_mail_content(evt):
  mail_content=''
  if 'msg' in evt.keys():
      mail_content=evt['msg']
  else:
      logger = logging.getLogger()
      logger.error('msg not present in event')
  '''
  You can add code for reading email content here.
  '''
  return mail_content
Click Deploy.
Click the
 icon next to Test Function and select Configure Test Parameters. In the Configure Test Parameters panel, configure parameters for a test and click OK.
 Enter the following event content:
{
    "msg": "This is a test message"
}
Click Test Function to test the function.

Check whether a test email is received in the mailbox of the recipient.
NoteSome email servers may identify an email that is sent by an unknown user as a spam email and intercept the email. If the test email is not found in the inbox, you can search for the test email in the spam folder.
Step 2: Create and configure a Function Compute node in the DataWorks console
Log on to the DataWorks console.
In the left-side navigation pane, click Workspaces.
In the top navigation bar, select the region that you specified in Step 1: Create a function.
On the Workspaces page, find the desired workspace and click the name of the workspace in the Workspace Name/Display Name column to go to the Workspace Details page. If no workspace is available in the current region, create a workspace. For more information, see Create a workspace.
In the left-side navigation pane, choose Data Modeling and Development > DataStudio to go to the DataStudio page.
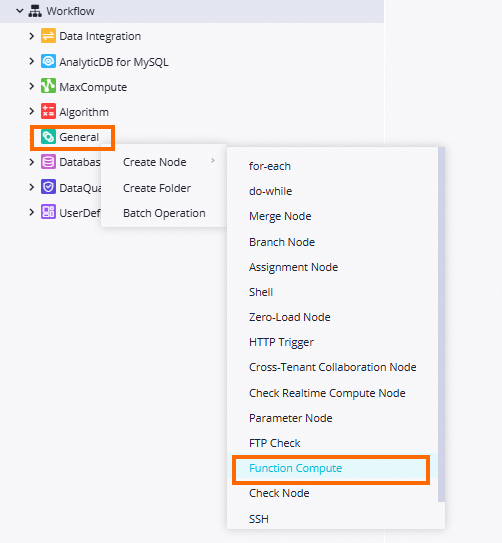
In the Scheduled Workflow pane, click the name of the desired workflow. Then, right-click General and choose . In the Create Node dialog box, configure the Name parameter and click Confirm. A Function Compute node is created.
On the configuration tab of the Function Compute node, configure parameters for the Function Compute node. The following table describes the parameters.
Parameter
Description
Select Service
Select the service that you created in Step 1: Create a function. In this example, select
send-mail-service. For information about how to create a service, see Quickly create a function.Select Version Or Alias
Select the version or alias of the service that you want to use for subsequent function invocation. If you select Default Version, the Version parameter is displayed and is fixed as LATEST. In this example, select Default Version.
Service version
Function Compute provides the service-level versioning feature, which allows you to release one or more versions for a service. A version is similar to a service snapshot that contains the information such as the service settings, and the code and settings of functions that belong to the service. A version does not contain trigger information. When you release a version, the system generates a snapshot for the service and assigns a version number that is associated with the snapshot for future use. For more information about how to release a version, see Manage versions.
Version alias
Function Compute allows you to create an alias for a service version. An alias points to a specific version of a service. You can use an alias to perform version release, rollback, or canary release with ease. An alias is dependent on a service or a version. When you use an alias to access a service or function, Function Compute parses the alias into the version to which the alias points. This way, the invoker does not need to know the specific version to which the alias points. For information about how to create an alias, see Manage aliases.
Select Function
Select the function that you created in Step 1: Create a function. In this example, select
send-mail-fc. For information about how to create a function, see Manage functions.NoteDataWorks allows you to invoke only event functions. If you want to periodically schedule an event processing function in DataWorks, you must create an event function rather than an HTTP function to process event requests in Function Compute. For information about more function types, see Function type selection.
Invocation Method
In this example, select Synchronous Invocation. For more information about invocation methods, see Invoke Functions.
Synchronous Invocation: When you synchronously invoke a function, an event directly triggers the function, and Function Compute executes the function and waits for a response. After the function is invoked, Function Compute returns the execution results of the function.
Asynchronous Invocation: When you asynchronously invoke a function, Function Compute immediately returns a response after the request is persisted instead of returning a response only after the request execution is complete.
If your function has the logic that is time-consuming, resource-consuming, or error-prone, you can use this method to allow your programs to respond to traffic spikes in an efficient and reliable manner.
We recommend that you use this method for Function Compute tasks of which the running duration exceeds one hour.
Variable
The parameters that are assigned to variables as values in the function. Example:
{
    "msg": "This is a test message from dataworks!"
}
Optional. Debug and run the Function Compute node. After the Function Compute node is configured, you can click the
 icon in the top toolbar of the configuration tab to specify the resource group for running the node and assign constants to variables in the code to debug and run the node and test whether the code logic of the node is correct.
 Configure scheduling properties for the node to schedule and run the node on a regular basis. DataWorks provides scheduling parameters, which are used to implement dynamic parameter passing in node code in scheduling scenarios. For more information about settings of scheduling parameters, see Supported formats of scheduling parameters. For more information about scheduling properties, see Overview.
Step 3: Commit and deploy the Function Compute node
Function Compute nodes can be automatically scheduled only after they are committed and deployed to the production environment.
Save and commit the Function Compute node.
Click the
 and
and  icons in the top toolbar on the configuration tab of the Function Compute node to save and commit the Function Compute node. When you commit a node, enter a change description as prompted and specify whether to perform code review and smoke testing. Note
You can commit the node only after you configure the Rerun and Parent Nodes parameters on the Properties tab.
If the code review feature is enabled, a node can be deployed only after the code of the node is approved by a specified reviewer. For more information, see Code review.
To ensure that the node you created can be run as expected, we recommend that you perform smoke testing before you deploy the node. For more information, see Perform smoke testing.
Optional. Deploy the Function Compute node.
If the workspace that you use is in standard mode, you must click Deploy in the upper-right corner to deploy the node after you commit it. For more information, see Differences between workspaces in basic mode and workspaces in standard mode and Deploy nodes.
What to do next
After you commit and deploy the Function Compute node to Operation Center in the production environment, you can perform O&M operations on the node in Operation Center. For more information, see Perform basic O&M operations on auto triggered nodes.
After you learn the basic steps of creating and using a Function Compute node, you can follow best practices to obtain an in-depth knowledge of Function Compute nodes. For more information, see Dynamically add watermarks to PDF files by using a Function Compute node in DataWorks.