As a computing framework with unified stream and batch processing, Flink can process streaming data with low latency and batch data with high throughput. Realtime Compute for Apache Flink supports batch processing in features such as draft development, deployment O&M, workflows, queue management, and data profiling. You can use the batch processing capability to meet your business requirements. This topic describes how to use key features of Realtime Compute for Apache Flink to perform batch processing.
Features
The following key features of Realtime Compute for Apache Flink support batch processing:
SQL draft development: On the Drafts tab of the SQL Editor page, you can create a batch draft. You can deploy the batch draft as a batch deployment and run the batch deployment. For more information, see Develop an SQL draft.
Deployment management: On the Deployments page, you can directly deploy a JAR or Python batch draft as a batch deployment. For more information, see Deployment management. On the Deployments page, select BATCH from the drop-down list of the deployment type. Expand the desired batch deployment to view the jobs. In most cases, different jobs of a batch deployment use the same data processing logic but different parameters, such as the data processing date.
Scripts: On the Scripts tab of the SQL Editor page, you can execute DDL statements or short query statements to quickly manage data and perform data profiling. For more information about how to create a script, see Scripts. The short query statements are executed in a session that is created in advance in Realtime Compute for Apache Flink. This way, you can perform simple queries with low latency by reusing resources.
Catalogs: On the Catalogs page, you can create and view a catalog that contains information about databases and tables. For more information, see Manage catalogs. You can also view a catalog on the Catalogs tab of the SQL Editor page. This improves development efficiency.
Workflows: On the Workflows page, you can create a workflow and configure dependencies for tasks that run in the workflow in a visualized manner. The tasks are associated with batch deployments. For more information, see Workflows (public preview). Batch deployments are run in a workflow based on the dependencies that you configure. You can run tasks in a workflow that you created based on manual scheduling or periodic scheduling.
Queue management: On the Queue Management page, you can divide resources in a workspace to prevent resource contention among stream deployments, batch deployments, and deployments of different priorities. For more information, see Manage queues.
Precautions
A workspace is created. For more information, see Activate Realtime Compute for Apache Flink.
Object Storage Service (OSS) is activated. For more information, see Get started by using the OSS console. The storage class of the OSS bucket must be Standard. For more information, see Overview.
The example in this topic uses Apache Paimon to store data and applies only to Realtime Compute for Apache Flink that uses Ververica Runtime (VVR) 8.0.5 or later.
Example
The example in this topic processes business data of an e-commerce platform and stores the data in the lakehouse format in Apache Paimon. A data warehouse structure is simulated, including the operational data store (ODS), data warehouse detail (DWD), and data warehouse service (DWS) layers. The batch processing capability of Realtime Compute for Apache Flink allows you to process and cleanse data, and then write the data to Apache Paimon tables. This way, a layered data storage structure is established.

Preparations
Create a script.
On the Scripts tab of the SQL Editor page, you can create a catalog, create a database and table in the catalog, and then insert simulated data into the table.
Create an Apache Paimon catalog.
In the script editor of the Scripts tab, enter the following SQL statement:
CREATE CATALOG `my_catalog` WITH (
  'type' = 'paimon',
  'metastore' = 'filesystem',
  'warehouse' = '<warehouse>',
  'fs.oss.endpoint' = '<fs.oss.endpoint>',
  'fs.oss.accessKeyId' = '<fs.oss.accessKeyId>',
  'fs.oss.accessKeySecret' = '<fs.oss.accessKeySecret>'
);
The following table describes the parameters in the sample code.
Parameter
Description
Required
Remarks
type
The catalog type.
Yes
Set the value to Paimon.
metastore
The metadata storage type.
Yes
The value is set to filesystem in the sample code. For more information about other types, see Manage Apache Paimon catalogs.
warehouse
The data warehouse directory that is specified in OSS.
Yes
The format is oss://<bucket>/<object>. Parameters in the directory:
bucket: indicates the name of the OSS bucket that you created.
object: indicates the path in which your data is stored.
You can view the bucket name and object name in the OSS console.
fs.oss.endpoint
The endpoint of OSS.
No
This parameter is required if the OSS bucket specified by the warehouse parameter is not in the same region as the Realtime Compute for Apache Flink workspace or an OSS bucket within another Alibaba Cloud account is used.
For more information, see Regions and endpoints.
fs.oss.accessKeyId
The AccessKey ID of the Alibaba Cloud account or RAM user that has the read and write permissions on OSS.
No
This parameter is required if the OSS bucket specified by the warehouse parameter is not in the same region as the Realtime Compute for Apache Flink workspace or an OSS bucket within another Alibaba Cloud account is used. For more information about how to obtain the AccessKey pair, see Create an AccessKey.
fs.oss.accessKeySecret
The AccessKey secret of the Alibaba Cloud account or RAM user that has the read and write permissions on OSS.
No
Select the preceding code and click Run on the left side of the script editor.
If the
The following statement has been executed successfully!message appears, the catalog is created. You can view the catalog that you created on the Catalogs page or on the Catalogs tab of the SQL Editor page.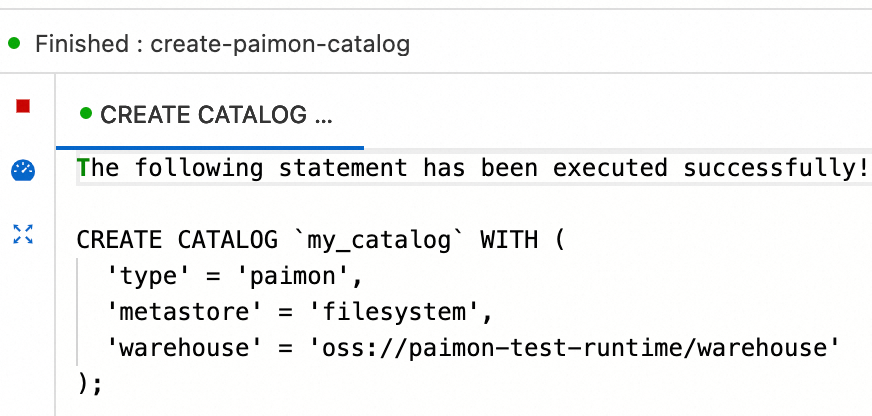
Procedure
Step 1: Create tables at the ODS layer and insert test data into the tables
Test data is directly inserted into tables at the ODS layer for subsequent data generation in tables at the DWD or DWS layer. This simplifies the procedure in the example. In actual production environments, Realtime Compute for Apache Flink uses the stream processing capability to read data from external data sources and write the data to a data lake as data at the ODS layer. For more information, see Getting started with basic features of Apache Paimon.
In the script editor of the Scripts tab, enter and select the following SQL statements and click Run on the left side of the script editor.
CREATE DATABASE `my_catalog`.`order_dw`; USE `my_catalog`.`order_dw`; CREATE TABLE orders ( order_id BIGINT, user_id STRING, shop_id BIGINT, product_id BIGINT, buy_fee BIGINT, create_time TIMESTAMP, update_time TIMESTAMP, state INT ); CREATE TABLE orders_pay ( pay_id BIGINT, order_id BIGINT, pay_platform INT, create_time TIMESTAMP ); CREATE TABLE product_catalog ( product_id BIGINT, catalog_name STRING ); -- Insert test data into the tables. INSERT INTO orders VALUES (100001, 'user_001', 12345, 1, 5000, TO_TIMESTAMP('2023-02-15 16:40:56'), TO_TIMESTAMP('2023-02-15 18:42:56'), 1), (100002, 'user_002', 12346, 2, 4000, TO_TIMESTAMP('2023-02-15 15:40:56'), TO_TIMESTAMP('2023-02-15 18:42:56'), 1), (100003, 'user_003', 12347, 3, 3000, TO_TIMESTAMP('2023-02-15 14:40:56'), TO_TIMESTAMP('2023-02-15 18:42:56'), 1), (100004, 'user_001', 12347, 4, 2000, TO_TIMESTAMP('2023-02-15 13:40:56'), TO_TIMESTAMP('2023-02-15 18:42:56'), 1), (100005, 'user_002', 12348, 5, 1000, TO_TIMESTAMP('2023-02-15 12:40:56'), TO_TIMESTAMP('2023-02-15 18:42:56'), 1), (100006, 'user_001', 12348, 1, 1000, TO_TIMESTAMP('2023-02-15 11:40:56'), TO_TIMESTAMP('2023-02-15 18:42:56'), 1), (100007, 'user_003', 12347, 4, 2000, TO_TIMESTAMP('2023-02-15 10:40:56'), TO_TIMESTAMP('2023-02-15 18:42:56'), 1); INSERT INTO orders_pay VALUES (2001, 100001, 1, TO_TIMESTAMP('2023-02-15 17:40:56')), (2002, 100002, 1, TO_TIMESTAMP('2023-02-15 17:40:56')), (2003, 100003, 0, TO_TIMESTAMP('2023-02-15 17:40:56')), (2004, 100004, 0, TO_TIMESTAMP('2023-02-15 17:40:56')), (2005, 100005, 0, TO_TIMESTAMP('2023-02-15 18:40:56')), (2006, 100006, 0, TO_TIMESTAMP('2023-02-15 18:40:56')), (2007, 100007, 0, TO_TIMESTAMP('2023-02-15 18:40:56')); INSERT INTO product_catalog VALUES (1, 'phone_aaa'), (2, 'phone_bbb'), (3, 'phone_ccc'), (4, 'phone_ddd'), (5, 'phone_eee');NoteIn this example, Apache Paimon append-only tables without primary keys are created. The tables have better batch write performance than Apache Paimon tables with primary keys, but do not support data updates based on primary keys.
The execution result contains multiple sub-tabs. If the
The following statement has been executed successfully!message appears, the execution of the DDL statements is successful.If a job ID is returned, DML statements, such as the INSERT statement, are executed. In this case, a Realtime Compute for Apache Flink deployment is created and run in a Realtime Compute for Apache Flink session. You can click Flink UI on the left side of the Results tab to view the execution status of the statements. Wait a few seconds for the execution of statements to be complete.
Perform data profiling in tables at the ODS layer.
In the script editor of the Scripts tab, enter and select the following SQL statements and click Run on the left side of the script editor.
SELECT count(*) as order_count FROM `my_catalog`.`order_dw`.`orders`;
SELECT count(*) as pay_count FROM `my_catalog`.`order_dw`.`orders_pay`;
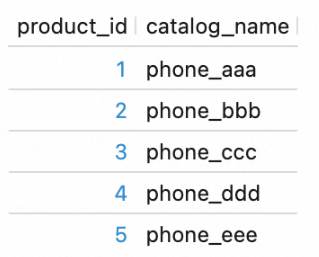
SELECT * FROM `my_catalog`.`order_dw`.`product_catalog`;
These SQL statements are also executed in a Realtime Compute for Apache Flink session. You can view the execution results on the Results tab of each of the three queries.


Step 2: Create tables at the DWD and DWS layers
In the script editor of the Scripts tab, enter and select the following SQL statements and click Run on the left side of the script editor.
USE `my_catalog`.`order_dw`;

CREATE TABLE dwd_orders (
    order_id BIGINT,
    order_user_id STRING,
    order_shop_id BIGINT,
    order_product_id BIGINT,
    order_product_catalog_name STRING,
    order_fee BIGINT,
    order_create_time TIMESTAMP,
    order_update_time TIMESTAMP,
    order_state INT,
    pay_id BIGINT,
    pay_platform INT COMMENT 'platform 0: phone, 1: pc',
    pay_create_time TIMESTAMP
) WITH (
    'sink.parallelism' = '2'
);

CREATE TABLE dws_users (
    user_id STRING,
    ds STRING,
    total_fee BIGINT COMMENT 'Total amount of payment that is complete on the current day'
) WITH (
    'sink.parallelism' = '2'
);

CREATE TABLE dws_shops (
    shop_id BIGINT,
    ds STRING,
    total_fee BIGINT COMMENT 'Total amount of payment that is complete on the current day'
) WITH (
    'sink.parallelism' = '2'
);Apache Paimon append-only tables are created in this step. If you use an Apache Paimon table as a Flink sink, automatic inference of parallelism is not supported. You must explicitly configure the parallelism for Apache Paimon tables. Otherwise, an error may occur.
Step 3: Create drafts at the DWD and DWS layers and deploy the drafts as deployments
Create a draft at the DWD layer and deploy the draft as a deployment.
Create an update draft for a table at the DWD layer.
On the page, create a blank batch draft named dwd_orders and copy the following SQL statement to the script editor. We recommend that you select a VVR version with the RECOMMENDED lable. By default, Flink SQL statements are used and SQL dialects are unavailable for engines of earlier versions. The INSERT OVERWRITE statement is used to overwrite the table at the DWD layer because the table at the DWD layer is an Apache Paimon append-only table.
INSERT OVERWRITE my_catalog.order_dw.dwd_orders
SELECT
    o.order_id,
    o.user_id,
    o.shop_id,
    o.product_id,
    c.catalog_name,
    o.buy_fee,
    o.create_time,
    o.update_time,
    o.state,
    p.pay_id,
    p.pay_platform,
    p.create_time
FROM
    my_catalog.order_dw.orders as o,
    my_catalog.order_dw.product_catalog as c,
    my_catalog.order_dw.orders_pay as p
WHERE o.product_id = c.product_id AND o.order_id = p.order_id
In the upper-right corner of the SQL Editor page, click Deploy. Then, click OK to deploy the dwd_orders draft as a deployment.
Create drafts at the DWS layer and deploy the drafts as deployments.
Create update drafts for tables at the DWS layer.
Create two blank batch drafts named dws_shops and dws_users by referring to Create an update draft for a table at the DWD layer. Then, copy one of the following SQL statements to the script editor of the related draft:
INSERT OVERWRITE my_catalog.order_dw.dws_shops
SELECT
    order_shop_id,
    DATE_FORMAT(pay_create_time, 'yyyyMMdd') as ds,
    SUM(order_fee) as total_fee
FROM my_catalog.order_dw.dwd_orders
WHERE pay_id IS NOT NULL AND order_fee IS NOT NULL
GROUP BY order_shop_id, DATE_FORMAT(pay_create_time, 'yyyyMMdd');
INSERT OVERWRITE my_catalog.order_dw.dws_users SELECT order_user_id, DATE_FORMAT(pay_create_time, 'yyyyMMdd') as ds, SUM(order_fee) as total_fee FROM my_catalog.order_dw.dwd_orders WHERE pay_id IS NOT NULL AND order_fee IS NOT NULL GROUP BY order_user_id, DATE_FORMAT(pay_create_time, 'yyyyMMdd');In the upper-right corner of the SQL Editor page, click Deploy. Then, click OK to deploy the dws_shops and dws_users drafts as deployments.
Step 4: Start and view the deployments at the DWD and DWS layers
Start and view the deployment at the DWD layer.
On the page, select BATCH from the drop-down list of the deployment type. Find the dwd_orders deployment and click Start in the Actions column.
A batch job in the STARTING state is generated, as shown in the following figure.

If the state of the job changes to FINISHED, data processing is complete.
View the data profiling result.
In the script editor of the Scripts tab, enter and select the following SQL statement and click Run on the left side of the script editor to query data in the table at the DWD layer:
SELECT * FROM `my_catalog`.`order_dw`.`dwd_orders`;The following figure shows the query result.

Start and view the deployments at the DWS layer.
On the page, select BATCH from the drop-down list of the deployment type. Find the dws_shops and dws_users deployments and click Start in the Actions column of each deployment.
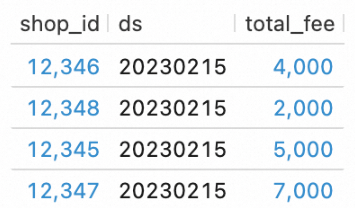
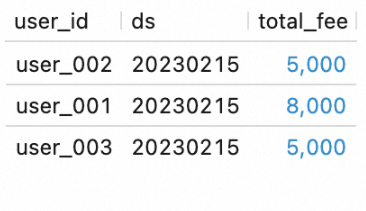
In the script editor of the Scripts tab, enter and select the following SQL statements and click Run on the left side of the script editor to query data in the tables at the DWS layer:
SELECT * FROM `my_catalog`.`order_dw`.`dws_shops`;
SELECT * FROM `my_catalog`.`order_dw`.`dws_users`;
The following figure shows the query result.
Step 5: Orchestrate the deployments as a batch processing workflow
This section describes how to orchestrate the deployments that you created in the previous sections as a workflow. This way, you can run the deployments based on a specific sequence in a unified manner.
Create a workflow.
In the left-side navigation pane of the Realtime Compute for Apache Flink console, click . On the page that appears, click Create Workflow.
In the Create Workflow panel, enter wf_orders in the Name field, keep the value of the Scheduling Type parameter unchanged (default value: Manual Scheduling), select default-queue for the Resource Queue parameter, and then click Create. The workflow editing page appears.
Edit the workflow.
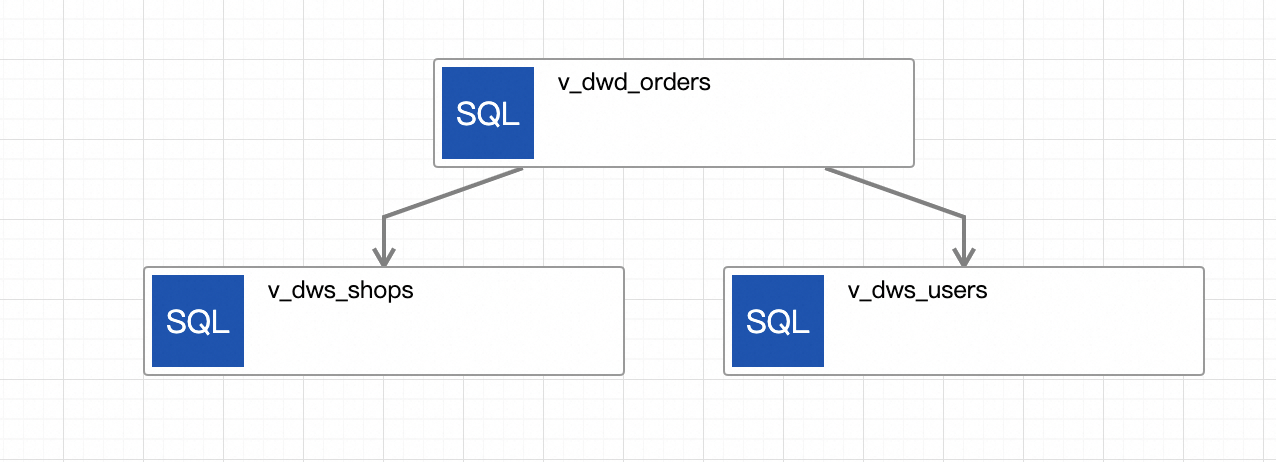
Click the initial task, name the task v_dwd_orders, and then select the dwd_orders deployment for the task.
Click Add Task to create a task named v_dws_shops. Select the dws_shops deployment for the task and configure the v_dwd_orders task as the upstream task.
Click Add Task again to create a task named v_dws_users. Select the dws_users deployment for the task and configure the v_dwd_orders task as the upstream task.
On the workflow editing page, click Save in the upper-right corner and then click OK.
The following figure shows the workflow that you created.
Manually run the workflow.
NoteYou can change the scheduling type of a workflow to Periodic Scheduling by clicking Edit Workflow in the Actions column of the workflow on the Workflows page. For more information, see Workflows (public preview).
Before you run the workflow, insert some data into the tables at the ODS layer to verify the execution result of the workflow.
In the script editor of the Scripts tab, enter and select the following SQL statements and click Run on the left side of the script editor.
USE `my_catalog`.`order_dw`;

INSERT INTO orders VALUES
(100008, 'user_001', 12346, 1, 10000, TO_TIMESTAMP('2023-02-15 17:40:56'), TO_TIMESTAMP('2023-02-15 18:42:56'), 1),
(100009, 'user_002', 12347, 2, 20000, TO_TIMESTAMP('2023-02-15 18:40:56'), TO_TIMESTAMP('2023-02-15 18:42:56'), 1),
(100010, 'user_003', 12348, 3, 30000, TO_TIMESTAMP('2023-02-15 19:40:56'), TO_TIMESTAMP('2023-02-15 18:42:56'), 1);

INSERT INTO orders_pay VALUES
(2008, 100008, 1, TO_TIMESTAMP('2023-02-15 20:40:56')),
(2009, 100009, 1, TO_TIMESTAMP('2023-02-15 20:40:56')),
(2010, 100010, 1, TO_TIMESTAMP('2023-02-15 20:40:56'));
On the left side of the Results tab, click Flink UI to view the deployment status.
On the page, find the workflow that you created and click Execute in the Actions column. In the dialog box that appears, click OK to run the workflow.

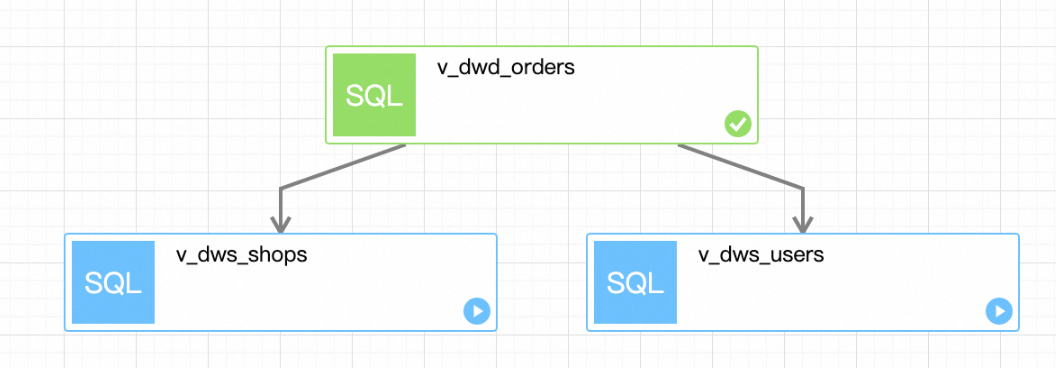
Click the name of the workflow to go to the workflow details page. On the Overview tab, view the list of task instances.

Click the ID of a running instance in the workflow to go to the execution details page of the instance. On the page that appears, view the execution status of each task. Wait until the execution of the workflow is complete.
View the execution result of the workflow.
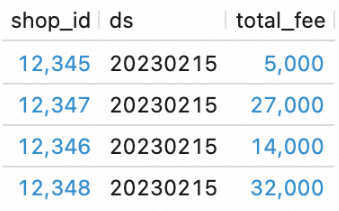
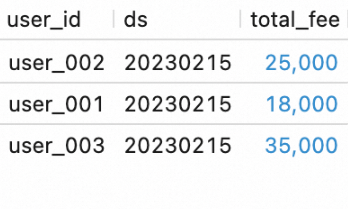
In the script editor of the Scripts tab, enter and select the following SQL statements and click Run on the left side of the script editor.
SELECT * FROM `my_catalog`.`order_dw`.`dws_shops`;
SELECT * FROM `my_catalog`.`order_dw`.`dws_users`;
View the execution result of the workflow.
The new data at the ODS layer is processed and written to the tables at the DWS layer.
References
For more information about the principles and configuration optimization of batch processing of Realtime Compute for Apache Flink, see Optimize batch processing of Realtime Compute for Apache Flink.
For more information about how to build a real-time data warehouse by using Realtime Compute for Apache Flink and Apache Paimon, see Build a streaming data lakehouse by using Realtime Compute for Apache Flink, Apache Paimon, and StarRocks.
You can perform operations, such as draft development, in the development console of Realtime Compute for Apache Flink and in your on-premises environment. For more information, see Develop a plug-in in the on-premises environment by using VSCode.