Alibaba Cloud Logstash uses pipelines to ingest, transform, and ship data. This guide covers how to create, modify, and manage these pipelines.
Prerequisites
Elasticsearch setup:
Auto indexing is enabled for the cluster (See Configure Elasticsearch cluster settings via YML file); or the target index and mapping are manually created (See Beginner's guide: From instance creation to data retrieval).
Logstash setup: An Alibaba Cloud Logstash instance is created.
Limitations
Capacity: Supports up to 20 parallel pipelines per instance.
Network: Source and destination instances must reside in the same VPC. For external data, a NAT Gateway is required. See Configure NAT for public network data transmission.
Deployment impact: Saving and deploying a pipeline triggers a Logstash cluster restart. Plan for maintenance windows accordingly.
Required plugin: To use the file_extend parameter in the output, you must install the logstash-output-file_extend plugin. For more information, see Install or uninstall plugins.
Create a pipeline
Console
Go to the Logstash Clusters page.
Navigate to the target cluster.
In the top navigation bar, select the region where the cluster resides.
On the Logstash Clusters page, find the cluster and click its ID.
In the left navigation menu, click Pipelines.
Click Create Pipeline.
Enter a Pipeline ID and define the Config Content.
Example:
The following template uses the
beatsinput andelasticsearchoutput. It also includes thefile_extendplugin for easier debugging.input { beats { port => 8000 } } filter { } output { elasticsearch { hosts => ["http://es-cn-o40xxxxxxxxxx****.elasticsearch.aliyuncs.com:9200"] index => "logstash_test_1" password => "es_password" user => "elastic" } file_extend { path => "/ssd/1/ls-cn-v0h1kzca****/logstash/logs/debug/test" } }Parameters:
Parameter
Description
input
Specifies the input data source. For more information, see Input plugins.
NoteTo define plugins, drivers, or other files in the input, click Show Third-party Libraries. In the Third-party Libraries dialog box, click Upload and upload the corresponding file as prompted. See Configure extension files.
filter
Specifies the plugin to filter the input data. See Filter plugins.
output
Specifies the destination data source type. For more information, see Output plugins.
file_extend: Optional. Enables the debug log feature and uses the path parameter to configure the output path for debug logs. Configure this parameter to view output results directly in the console. If this parameter is not configured, go to the destination to confirm the output results and then return to the console to make changes, which is time-consuming. For more information, see Use the Logstash pipeline configuration for debugging.
NoteBefore using the file_extend parameter, install the
logstash-output-file_extendplugin. For more information, see Install or uninstall plugins. The path parameter defaults to a system-specified path. Do not modify it. Click Start Configuration Debug to get the path value.For more information, see Structure of a Config File.
ImportantJDBC security: If using a JDBC input, you must append
allowLoadLocalInfile=false&autoDeserialize=falseto your connection string to pass security validation.State tracking: If using parameters like
last_run_metadata_path, use the provided path:/ssd/1/<Logstash_ID>/logstash/data/.Ports: Any input plugin listening for data must use a port within the 8000–9000 range.
Network security: To access Alibaba Cloud Logstash from the public network, configure network and security settings. For more information, see Configure NAT for public network data transmission.
Log printing: Use
file_extendfor log printing during testing. Do not use stdout.
Click Next and configure the pipeline parameters.
Parameter
Description
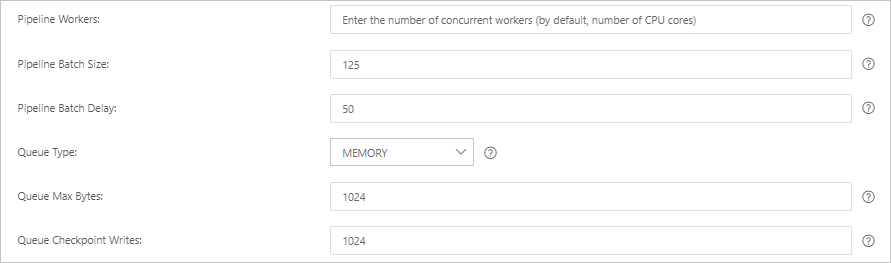
Pipeline Workers
The number of worker threads to run the filter and output stages of the pipeline in parallel. If events are backlogged or the CPU is not saturated, consider increasing the number of threads to better use CPU processing power. Default value: The number of CPU cores of the instance.
Pipeline Batch Size
The maximum number of events that a single worker thread can collect from the input before trying to execute the filter and output. A larger batch size can cause higher memory overhead. You can increase the JVM heap size by setting the LS_HEAP_SIZE variable to use this value effectively. Default value: 125.
Pipeline Batch Delay
The duration in milliseconds to wait for each event before dispatching a small batch to a pipeline worker thread. Default value: 50 ms.
Queue Type
The internal queuing model for event buffering. Valid values:
MEMORY: Default. A traditional in-memory queue.
PERSISTED: A disk-based ACKed queue (persistent queue).
Queue Max Bytes
The maximum amount of data that the queue can store, in
MB. The value must be an integer from1to2<sup>53</sup>-1. The default value is1024 MB.NoteEnsure that this value is smaller than the total disk capacity.
Queue Checkpoint Writes
When the persistent queue is enabled, this is the maximum number of events that can be written before a checkpoint is forced. A value of 0 means no limit. Default value: 1024.
WarningDeploying or updating a pipeline triggers a Logstash cluster restart. Ensure this aligns with your maintenance window.
Click Save or Save and Deploy.
Save: Saves the pipeline configuration in Logstash. The configuration does not take effect until it is deployed. After saving, you are returned to the Pipelines page. Click Deploy Now in the Actions column to restart the instance and apply the configuration.
Save and Deploy: Saves and deploys the configuration. This restarts the instance and applies the configuration.
In the success message, click OK. The newly created pipeline appears on the Pipelines page.
The pipeline task is created after the instance is restarted.
API
See CreatePipelines.
Modify a pipeline
On the Pipelines page, find the target pipeline, and in the Actions column, click Modify.
On the Modify page, update Config Settings. Pipeline ID cannot be modified.
Click Save or Save and Deploy. The pipeline is updated after the instance restarts.
Copy a pipeline
On the Pipelines page, find the target pipeline and select
 > Copy in the Actions column.
On the Copy page, change the Pipeline ID and keep the other configurations unchanged.
Click Save or Save and Deploy. After the instance restarts, the pipeline is copied.
Delete a pipeline
Deleted pipelines cannot be restored, and running pipeline tasks will be interrupted. Confirm the operation before you proceed.
On the Pipelines page, find the pipeline to delete and select
> Delete in the Actions column.In the Delete Pipeline dialog box, review the warning.
Click Continue. The pipeline will be deleted after the instance change is complete.