Configure Lightweight Directory Access Protocol (LDAP) authentication for an Alibaba Cloud Elasticsearch cluster so that LDAP users can log in to Kibana and access the cluster with role-based permissions.
How it works
Elasticsearch uses X-Pack security realms to authenticate users against an external LDAP directory. When an LDAP user logs in:
The user submits a username and password.
X-Pack searches the LDAP directory for the user's distinguished name (DN) based on the username.
X-Pack binds to the LDAP server with the found DN and the provided password.
If the bind succeeds, the user is authenticated and assigned Elasticsearch roles through role mapping.
Two authentication modes are available:
| Mode | How it works | When to use |
|---|---|---|
| User search mode (recommended) | A bind user searches the LDAP directory for the authenticating user's DN, then X-Pack binds with that DN and the user's password. | Most LDAP environments. Flexible for complex directory structures. |
| DN template mode | X-Pack constructs the user's DN directly from a template, then binds with that DN and the user's password. No search is performed. | Simple directory structures with a predictable DN format. |
This guide covers user search mode, the most common configuration.
Prerequisites
Before you begin, ensure that you have:
An Alibaba Cloud Elasticsearch cluster. This guide provides configuration examples for V6.7 and V7.10 or later.
For more information, see Create an Alibaba Cloud Elasticsearch cluster
An LDAP server running in the same virtual private cloud (VPC) as the Elasticsearch cluster. This guide uses OpenLDAP 2.4.44 as an example
For more information, see OpenLDAP quick start guide
LDAP user data prepared with
cnandGroupattributes
The ou attribute is not supported for LDAP authentication configuration. Only cn and Group attributes are available.
Network connectivity
The network architecture of Alibaba Cloud Elasticsearch changed in October 2020. Your connectivity setup depends on when your cluster was created.
Clusters created before October 2020 (original architecture)
Only single-zone clusters support LDAP authentication.
To connect the cluster to the internet, use an Elastic Compute Service (ECS) instance with SNAT enabled, or configure an NGINX proxy to forward requests.
Clusters created in October 2020 or later (new architecture)
In the new network architecture, the LDAP authentication feature is limited. You must use the PrivateLink service to establish private connections between VPCs.
Clusters in the new architecture reside in the VPC of the Elasticsearch service account, not in your VPC. To connect the Elasticsearch cluster to your LDAP server, establish a private connection through PrivateLink. To connect the cluster to the internet, configure an NGINX proxy to forward requests.
For details about the architecture change, see Network architecture adjustment notice.
Set up PrivateLink connectivity
Create a Classic Load Balancer (CLB) instance in the same VPC as your Elasticsearch cluster. The CLB instance must support PrivateLink. For more information, see Create and configure a CLB instance.
Configure the CLB instance. Add your LDAP server as the backend server and set the listening port to 389. For more information, see Configure a private connection for an Elasticsearch cluster.
Create an endpoint service. For more information, see Create an endpoint service.
Create a private connection to the Elasticsearch cluster. For more information, see Create a private connection for the Elasticsearch cluster.
Obtain the endpoint domain name. Record the domain name -- you need it for the LDAP URL in the YML configuration. For more information, see Obtain the endpoint domain name.
Step 1: Configure the LDAP realm
Add the following LDAP realm configuration to the YML file of your Elasticsearch cluster. For more information about editing the YML file, see Configure the YML file.
V6.7 configuration
xpack.security.authc.realms.ldap1.type: ldap
xpack.security.authc.realms.ldap1.order: 2
xpack.security.authc.realms.ldap1.url: "ldap://<ldap-host>:389"
xpack.security.authc.realms.ldap1.bind_dn: "<bind-user>@<domain>"
xpack.security.authc.realms.ldap1.bind_password: "<bind-password>"
xpack.security.authc.realms.ldap1.user_search.base_dn: "<user-search-base-dn>"
xpack.security.authc.realms.ldap1.user_search.filter: "(cn={0})"
xpack.security.authc.realms.ldap1.group_search.base_dn: "<group-search-base-dn>"
xpack.security.authc.realms.ldap1.unmapped_groups_as_roles: false
V7.10 or later configuration
xpack.security.authc.realms.ldap.ldap1.order: 2
xpack.security.authc.realms.ldap.ldap1.url: "ldap://<ldap-host>:389"
xpack.security.authc.realms.ldap.ldap1.bind_dn: "<bind-user>@<domain>"
xpack.security.authc.realms.ldap.ldap1.bind_password: "<bind-password>"
xpack.security.authc.realms.ldap.ldap1.user_search.base_dn: "<user-search-base-dn>"
xpack.security.authc.realms.ldap.ldap1.user_search.filter: "(cn={0})"
xpack.security.authc.realms.ldap.ldap1.group_search.base_dn: "<group-search-base-dn>"
xpack.security.authc.realms.ldap.ldap1.unmapped_groups_as_roles: falseIn V7.10 and later, the realm type (ldap) is embedded in the configuration path (realms.ldap.ldap1), so the type parameter is not needed.
Replace the following placeholders with your values:
| Placeholder | Description | Example |
|---|---|---|
<ldap-host> | LDAP server hostname or IP address. Use ldap:// for port 389 (plain) or ldaps:// for port 636 (SSL-encrypted). For clusters in the new network architecture, use the PrivateLink endpoint domain name obtained in the previous section. | ep-bp1dhpobznlgjhj9****-cn-hangzhou-i.epsrv-bp1q8tcj2jjt5dwr****.cn-hangzhou.privatelink.aliyuncs.com |
<bind-user>@<domain> | DN of the user that performs LDAP searches. Valid only in user search mode. | admin@example.com |
<bind-password> | Password of the bind user. | - |
<user-search-base-dn> | Base DN under which to search for users. | dc=example,dc=com |
<group-search-base-dn> | Base DN under which to search for groups. If omitted, Elasticsearch uses the user_group_attribute parameter to determine group membership. | dc=example,dc=com |
Parameter reference
| Parameter | Description | Default |
|---|---|---|
type | Realm type. Set to ldap. Required for V6.7 only. | - |
order | Realm priority. Lower values are evaluated first. For V8.X clusters, this value must be unique across realms. Recommended value: 2. | Integer.MAX_VALUE |
url | LDAP server URL and port. ldap:// uses port 389 (plain). ldaps:// uses port 636 (SSL-encrypted). | - |
bind_dn | DN of the bind user for LDAP searches. Used in user search mode only. | - |
bind_password | Password of the bind user. | - |
user_search.base_dn | Base DN for user searches. | - |
user_search.filter | LDAP search filter. {0} is replaced with the login username. | (uid={0}) |
group_search.base_dn | Base DN for group searches. If not set, Elasticsearch falls back to the user_group_attribute parameter. | - |
unmapped_groups_as_roles | Whether to use unmapped LDAP group names as Elasticsearch role names. | false |
For a full parameter reference, see LDAP realm settings in the Elastic documentation.
The Elastic V6.7 documentation is no longer updated. For newer versions, see the Elastic V8.x LDAP realm documentation.
Step 2: Map LDAP users to Elasticsearch roles
After you configure the LDAP realm, map LDAP users or groups to Elasticsearch roles so they have appropriate permissions.
Log in to the Kibana console of your Elasticsearch cluster. For more information, see Log on to the Kibana console.
NoteThe following steps use an Elasticsearch V6.7.0 cluster as an example. The interface may differ for other versions.
In the left-side navigation pane, click Dev Tools.
On the Console tab, run a role mapping command.
V8.X
POST _security/role_mapping/ldap_admin
{
  "roles": [ "superuser" ],
  "enabled": true,
  "rules": {
    "any": [
      {
        "field": {
          "username": "zhang*"
        }
      }
    ]
  }
}
V6.7 and V7.X
POST _xpack/security/role_mapping/ldap_admin
{
  "roles": [ "superuser" ],
  "enabled": true,
  "rules": {
    "any": [
      {
        "field": {
          "username": "zhang*"
        }
      }
    ]
  }
}
This example maps all usernames matching
zhang*to thesuperuserrole. For more information about the role mapping API, see Role mapping APIs.
Step 3: Verify the configuration
Log in to the Kibana console with an LDAP user account (for example,
zhang*).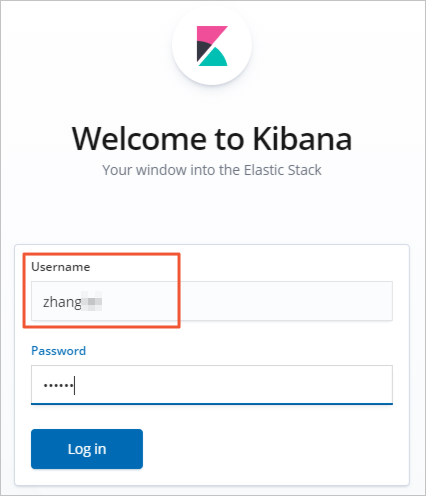
In the left-side navigation pane, click Dev Tools.
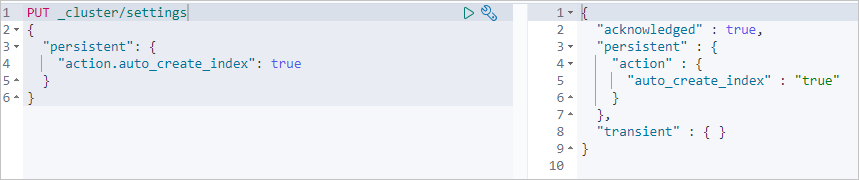
On the Console tab, run the following command to confirm that the LDAP user has the expected permissions:
PUT _cluster/settings
{
  "persistent": {
    "action.auto_create_index": true
  }
}
If the command returns a successful response, the LDAP user has been authenticated and has the assigned
superuserrole.