Third-party Python libraries are often used to enhance the data processing and analysis capabilities of interactive PySpark jobs that run in notebooks. This topic describes how to install third-party Python libraries in a notebook.
Background information
When you develop interactive PySpark jobs, you can use third-party Python libraries to enable more flexible and easier data processing and analysis. The following table describes the methods to use third-party Python libraries in a notebook. You can select a method based on your business requirements.
Method | Scenario |
You want to process variables that are not related to Spark in a notebook, such as the return values calculated by Spark or custom variables. Important You must reinstall the libraries after you restart a notebook session. | |
Method 2: Create a runtime environment to define a custom Python environment | You want to use third-party Python libraries to process data in PySpark jobs, and you want the third-party libraries to be preinstalled each time a notebook session is started. |
Method 3: Add Spark configurations to create a custom Python environment | You want to use third-party Python libraries to process data in PySpark jobs. For example, you use third-party Python libraries to implement Spark distributed computing. |
Prerequisites
A workspace is created. For more information, see Create a workspace.
A notebook session is created. For more information, see Manage notebook sessions.
A notebook is developed. For more information, see Develop a notebook.
Procedure
Method 1: Run the pip command to install Python libraries
Go to the configuration tab of a notebook.
Log on to the E-MapReduce (EMR) console.
In the left-side navigation pane, choose .
On the Spark page, find the desired workspace and click the name of the workspace.
In the left-side navigation pane of the EMR Serverless Spark page, click Data Development.
Double-click the notebook that you developed.
In a Python cell of the notebook, enter the following command to install the scikit-learn library and click the
 icon.
icon. pip install scikit-learnAdd a new Python cell, enter the following command in the cell, and then click the
 icon.
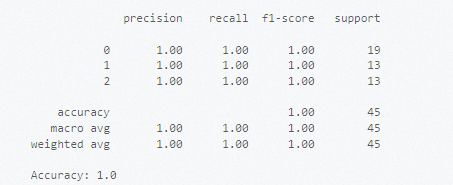
icon. # Import datasets from the scikit-learn library. from sklearn import datasets # Load the built-in dataset, such as the Iris dataset. iris = datasets.load_iris() X = iris.data # The feature data. y = iris.tar get # The tag. # Divide datasets. from sklearn.model_selection import train_test_split # Divide the datasets into training sets and test sets. X_train, X_test, y_train, y_test = train_test_split(X, y, test_size=0.3, random_state=42) # Use the support vector machine (SVM) model for training. from sklearn.svm import SVC # Create a classifier instance. clf = SVC(kernel='linear') # Use a linear kernel. # Train the model. clf.fit(X_train, y_train) # Use the trained model to make predictions. y_pred = clf.predict(X_test) # Evaluate the model performance. from sklearn.metrics import classification_report, accuracy_score print(classification_report(y_test, y_pred)) print("Accuracy:", accuracy_score(y_test, y_pred))The following figure shows the results.

Method 2: Create a runtime environment to define a custom Python environment
Step 1: Create a runtime environment
Go to the Runtime Environments page.
Log on to the EMR console.
In the left-side navigation pane, choose .
On the Spark page, find the desired workspace and click the name of the workspace.
In the left-side navigation pane of the EMR Serverless Spark page, click Runtime Environments.
Click Create Runtime Environment.
On the Create Runtime Environment page, configure the Name parameter. Then, click Add Library in the Libraries section.
For more information, see Manage runtime environments.
In the Create Library dialog box, set the Source Type parameter to PyPI, configure the PyPI Package parameter, and then click OK.
Specify the library name and version in the required format for the PyPI Package parameter. If you do not specify a version, the library of the latest version is installed. Example:
scikit-learn.Click Create.
The system starts to initialize the runtime environment after you click Create.
Step 2: Use the runtime environment
You must stop a session before you modify the session.
Go to the Notebook Sessions tab.
In the left-side navigation pane of the EMR Serverless Spark page, choose .
Click the Notebook Sessions tab.
Find the desired session and click Edit in the Actions column.
Select the created runtime environment from the Runtime Environment drop-down list and click Save Changes.
In the upper-right corner of the page, click Start.
Step 3: Use the Scikit-learn library to classify data
Go to the configuration tab of the desired notebook.
In the left-side navigation pane of the EMR Serverless Spark page, click Data Development.
Double-click the notebook that you developed.
Add a new Python cell, enter the following command in the cell, and then click the
 icon.
icon. # Import datasets from the scikit-learn library. from sklearn import datasets # Load the built-in dataset, such as the Iris dataset. iris = datasets.load_iris() X = iris.data # The feature data. y = iris.tar get # The tag. # Divide datasets. from sklearn.model_selection import train_test_split # Divide the datasets into training sets and test sets. X_train, X_test, y_train, y_test = train_test_split(X, y, test_size=0.3, random_state=42) # Use the SVM model for training. from sklearn.svm import SVC # Create a classifier instance. clf = SVC(kernel='linear') # Use a linear kernel. # Train the model. clf.fit(X_train, y_train) # Use the trained model to make predictions. y_pred = clf.predict(X_test) # Evaluate the model performance. from sklearn.metrics import classification_report, accuracy_score print(classification_report(y_test, y_pred)) print("Accuracy:", accuracy_score(y_test, y_pred))The following figure shows the results.

Method 3: Add Spark configurations to create a custom Python environment
If you use this method, make sure that ipykernel of 6.29 or later is installed, and jupyter_client of 8.6 or later is installed. The Python version is 3.8 or later, and the environment is packaged in Linux.
Step 1: Create and deploy a Conda environment
Run the following commands to install Miniconda:
wget https://repo.continuum.io/miniconda/Miniconda3-latest-Linux-x86_64.sh
chmod +x Miniconda3-latest-Linux-x86_64.sh

./Miniconda3-latest-Linux-x86_64.sh -b
source miniconda3/bin/activate
Create a Conda environment for using Python 3.8 and NumPy.
# Create a Conda environment and activate the environment.
conda create -y -n pyspark_conda_env python=3.8
conda activate pyspark_conda_env
# Install third-party libraries.
pip install numpy \
ipykernel~=6.29 \
jupyter_client~=8.6 \
jieba \
conda-pack
# Package the environment.
conda pack -f -o pyspark_conda_env.tar.gz
Step 2: Upload the resource file to OSS
Upload the pyspark_conda_env.tar.gz package to Object Storage Service (OSS) and copy the complete OSS path of the package. For more information, see Simple upload.
Step 3: Configure and start the notebook session
You must stop a session before you modify the session.
Go to the Notebook Sessions tab.
In the left-side navigation pane of the EMR Serverless Spark page, choose .
Click the Notebook Sessions tab.
Find the desired session and click Edit in the Actions column.
On the Modify Notebook Session page, add the following configurations to the Spark Configuration field and click Save Changes.
spark.archives oss://<yourBucket>/path/to/pyspark_conda_env.tar.gz#env spark.pyspark.python ./env/bin/pythonNoteReplace
<yourBucket>/path/toin the code with the OSS path that you copied in the previous step.In the upper-right corner of the page, click Start.
Step 4: Use the Jieba tool to process text data
Jieba is a third-party Python library for Chinese text segmentation. For information about the license, see LICENSE.
Go to the configuration tab of the desired notebook.
In the left-side navigation pane of the EMR Serverless Spark page, click Data Development.
Double-click the notebook that you developed.
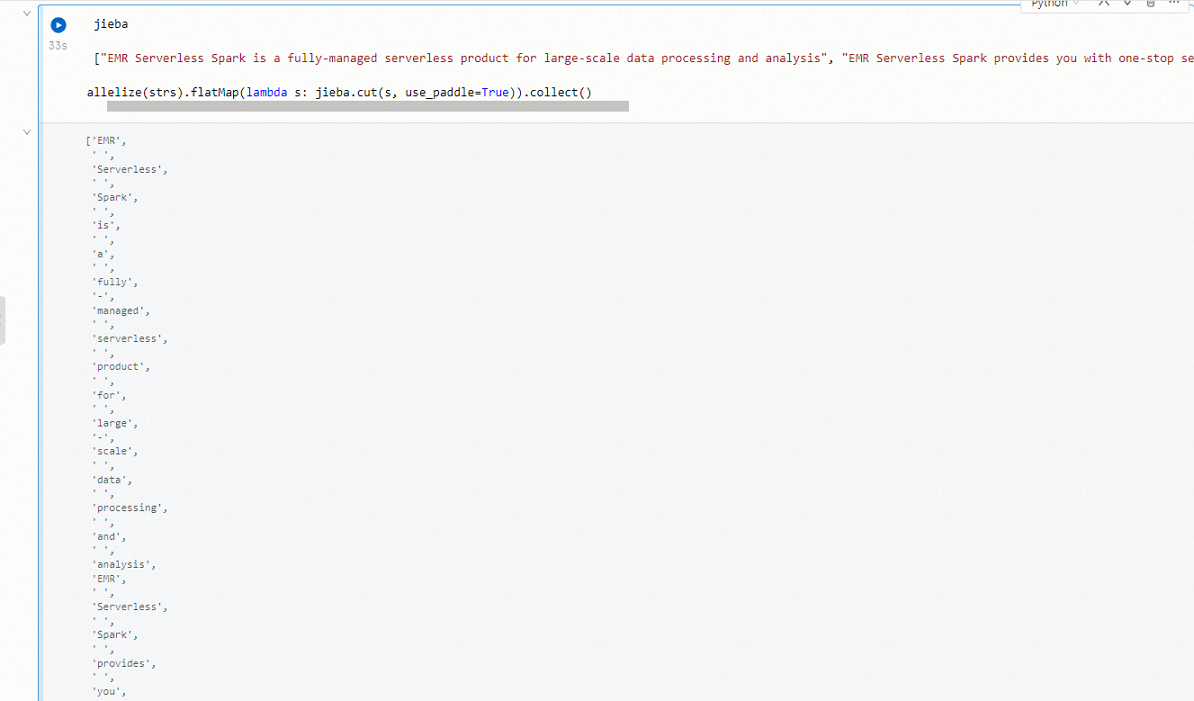
In a new Python cell, enter the following command to use the Jieba tool to segment the Chinese text and click the
 icon.
icon. import jieba strs = ["EMR Serverless Spark is a fully-managed serverless service for large-scale data processing and analysis.", "EMR Serverless Spark supports efficient end-to-end services, such as task development, debugging, scheduling, and O&M.", "EMR Serverless Spark supports resource scheduling and dynamic scaling based on job loads."] sc.parallelize(strs).flatMap(lambda s: jieba.cut(s, use_paddle=True)).collect()The following figure shows the results.
