WordPress is a free, open-source content management system (CMS) that allows you to easily create and manage websites, including blogs, news websites, e-commerce websites, and social media websites. WordPress has a rich library of themes and plug-ins that allows you to customize the appearance and functionality of your websites. This topic describes how to build a WordPress website on Elastic Compute Service (ECS) instances that run different Linux operating systems.
Preparations
To build a WordPress website on an existing Linux ECS instance, make sure that the instance meets the following requirements:
A public IP address is automatically assigned to the ECS instance. Alternatively, an elastic IP address (EIP) is associated with the ECS instance. For instructions on how to enable public bandwidth, see Enable public bandwidth.
Inbound rules are added to a security group of the Linux ECS instance to open ports 22 and 80. For information about how to add a security group rule, see Add a security group rule.
ImportantFor security reasons, only ports that are required to deploy and test the LNMP stack and the WordPress website are open. LNMP is the acronym for the names of the following open source components: Linux operating system, NGINX web server, MySQL relational database management system, and PHP programming language. You can open other ports based on your business requirements. For example, if you want to connect to a MySQL database that is deployed on an ECS instance, you must add an inbound rule to a security group of the instance to open port 3306, which is the default port for MySQL.
Procedure
The commands that you must use to build a WordPress website on a Linux ECS instance may vary based on the operating system of the instance. Use the commands that are suitable for the operating system of your Linux ECS instance. Otherwise, you may be unable to build the WordPress website. In this topic, ECS instances that run Alibaba Cloud Linux 2, Alibaba Cloud Linux 3, CentOS 7, and CentOS 8 are used to deploy WordPress 6.4.
Deploy an LNMP stack. For more information, see Deploy an LNMP stack.
ImportantFor information about the methods for deploying an LNMP stack, see Deploy an LNMP stack. Each WordPress version requires specific PHP and MySQL versions. If the PHP or MySQL version is incompatible with the WordPress version that you want to install, WordPress may fail to be installed. For information about PHP and MySQL versions that are compatible with each WordPress version, see WordPress Compatibility.
In this topic, NGINX is used, which is a web server. If Apache is installed on your Linux ECS instance, WordPress is inaccessible because port 80 is used by Apache.
Connect to an ECS instance.
For more information, see Use Workbench to connect to a Linux instance over SSH.
Configure a database for WordPress.
Log on to MySQL.
NoteUse the
rootuser and enter the password of the user to log on to MySQL. The password is the password you configured for MySQL when you built the LNMP stack.mysql -u root -pCreate a database named
wordpressfor the WordPress website that you want to build.create database wordpress;Create a user named
userto manage the wordpress database and set the password of the user toPASSword123.to increase data security.create user 'user'@'localhost' identified by 'PASSword123.';NoteYou can run the
show variables like "%password%";command to query the MySQL password strength rules. In this example, the following strength rules apply to MySQL passwords: The password must be 8 to 30 characters in length and contain uppercase letters, lowercase letters, digits, and special characters. Supported special characters include( ) ` ~ ! @ # $ % ^ & * - + = | { } [ ] : ; ‘ < > , . ? /By default, the validate_password plug-in is installed in MySQL 5.7 and later versions to validate the strength of passwords.
Grant the user named user all permissions on the
wordpressdatabase.grant all privileges on wordpress.* to 'user'@'localhost';Apply the preceding settings.
flush privileges;Exit MySQL.
exit;
Download WordPress and save it to the root directory of the website that you want to build.
Go to the root directory of the NGINX website and download the WordPress package.
NoteIn the example, the Chinese version of WordPress is installed by default. To install the English version of WordPress, run the
wget https://wordpress.org/wordpress-6.4.4.zipcommand to download the package for the English version of WordPress. Replace wordpress-6.4.4-zh_CN.zip withwordpress-6.4.4.zipin commands used in subsequent steps.cd /usr/share/nginx/html sudo wget https://cn.wordpress.org/wordpress-6.4.4-zh_CN.zip(Optional) Install the
unzipcommand.Run the following command in Alibaba Cloud Linux 2, Alibaba Cloud Linux 3, CentOS 7, or CentOS 8:
sudo yum install unzip -yRun the following command in Ubuntu 20.04 or later:
sudo apt install unzip -y
Decompress the WordPress package.
sudo unzip wordpress-6.4.4-zh_CN.zipCopy the content of the
wp-config-sample.phpfile in the WordPress installation directory to thewp-config.phpfile and use thewp-config-sample.phpfile as a backup.cd /usr/share/nginx/html/wordpress sudo cp wp-config-sample.php wp-config.php
Modify the configuration file of WordPress.
Open the
wp-config.phpfile.sudo vim wp-config.phpPress the
Ikey to enter Insert mode.Modify the MySQL-related settings based on the configured database for WordPress as shown in the following code snippet.
NoteThe name of the database for WordPress, MySQL database username, and MySQL database password that you specify in the WordPress configuration file must be the same as those that you configure in the Configure a database for WordPress step.
// ** MySQL settings - Obtain the information from your host. ** // /** The name of the database for WordPress */ define('DB_NAME', 'wordpress'); /** The MySQL database username */ define('DB_USER', 'user'); /** The MySQL database password */ define('DB_PASSWORD', 'PASSword123.'); /** The MySQL hostname */ define('DB_HOST', 'localhost');NoteThe data of the WordPress website is stored by the user named
userin thewordpressdatabase.Press the
Esckey to exit Insert mode. Enter:wqand press theEnterkey to save and close the configuration file.
Modify the NGINX configuration file.
Run the following command to open the NGINX configuration file:
sudo vi /etc/nginx/conf.d/default.confPress the
Ikey to enter Insert mode and modify the configuration file.Alibaba Cloud Linux 2, Alibaba Cloud Linux 3, CentOS 7, or CentOS 8
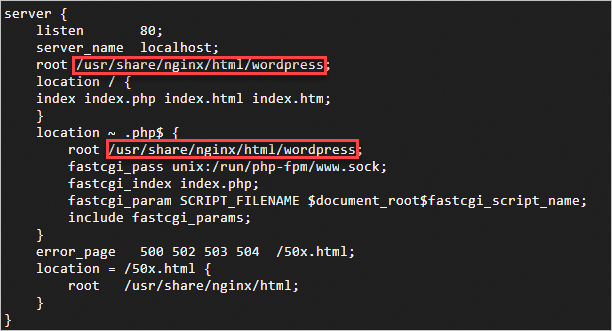
Within the
serverbraces, replace the content afterrootwith the root directory of the WordPress website.In this example, the root directory of the WordPress website is
/usr/share/nginx/html/wordpress.Within the
location ~ .php$braces, replace the content that followsrootwith the root directory of the WordPress website.
NoteWhen you replace the content with the root directory of the WordPress website, append a semicolon (
;) to the root directory. Otherwise, NGINX cannot be restarted.In this example, the
php-fpmlistens on the/run/php-fpm/www.sockaddress. Refer to the actual display for details.

Ubuntu 20.04 or later
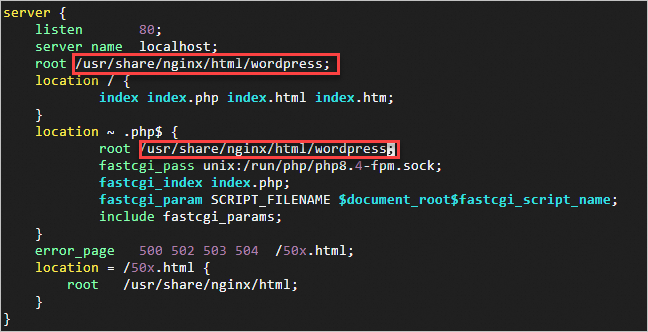
Within the
serverbraces, replace the content afterrootwith the root directory of the WordPress website.In this example, the root directory of the WordPress website is
/usr/share/nginx/html/wordpress.Within the
location ~ .php$braces, replace the content that followsrootwith the root directory of the WordPress website.
NoteWhen you replace the content with the root directory of the WordPress website, append a semicolon (
;) to the root directory. Otherwise, NGINX cannot be restarted.In this example, the
php-fpmlistens on the/run/php/php8.4-fpm/www.sockaddress. Refer to the actual display for details.

Press the
Esckey to exit Insert mode. Enter:wqand press theEnterkey to save and close the configuration file.Run the following command to restart NGINX:
sudo systemctl restart nginx
Install WordPress and log on to the WordPress website.
On your on-premises computer, use a web browser to access
http://<Public IP address of the ECS instance>to go to the WordPress installation page.Configure basic information about the WordPress website and click Run the installation.
Configure the following parameters:
Site Title: the name of the WordPress website. Example: demowp.
Username: the username that you want to use to log on to WordPress. Make sure that the username is secure. Example: testwp.
Password: the password that you want to use to log on to WordPress. We recommend that you specify a strong password. Example: Wp.123456.
Your Email: the email address that you want to use to receive notifications. Example: username@example.com.
Click Install Wordpress.
Enter the
testwpusername and theWp.123456password that you specified when you installed WordPress, and click LOGIN.You are logged on to your WordPress website. For more information about how to use WordPress, see the WordPress documentation.
Related operations
Configure a domain name for the WordPress website
FAQ
Q1: Why am I unable to access the WordPress website by using the public IP address of the ECS instance on which the WordPress website is hosted?
Q2: Why am I unable to access a permalink after I configure the permalink in WordPress?
Q3: Why am I prompted for FTP logon credentials or that the directory cannot be created when I attempt to update the WordPress version or upload a theme or plug-in?
Q4: How do I change the default username and password of the MySQL 5.7 database in a WordPress image?
References
You can use Docker to deploy WordPress. For more information, see Use Docker Compose to deploy applications.
If you want to upload a theme or plug-in to WordPress by using FTP, you must first build an FTP server. For information about how to build an FTP server, see the following topics:
You can build multiple websites on an ECS instance. For more information, see the following topics:
If a domain name is connected to the WordPress website, you can configure encrypted communication over HTTPS for the domain name. For more information, see Installation overview.