For full control over your website's environment, manually deploy an LNMP stack and install WordPress. This approach lets you build a blog or a web portal.
Preparations
Enable public network access: Assign a static public IP address or associate an Elastic IP Address (EIP) with the instance.
Add a security group rule: Configure your instance's Security Group to allow inbound traffic on TCP ports 22 and 80.
Procedure
This topic uses Alibaba Cloud Linux 3 and WordPress 6.4.4 as an example.
Step 1: Deploy the LNMP stack
Log on to the ECS instance.
Go to ECS console - Instances. In the top navigation bar, select the target region and resource group.
Go to the details page of the target instance. Click Connect and select Workbench. Follow the prompts on the page to log on to the terminal.
Install core components such as Nginx, MySQL, and PHP.
WordPress requires specific PHP and MySQL versions. A version mismatch can cause the WordPress installation to fail. For specific dependency information, see WordPress Compatibility.
Step 2: Create the WordPress database
Create a dedicated database and a database user for WordPress.
Log on to MySQL. Use the password you set for the database when you deployed the LNMP stack.
mysql -u root -pCreate the database and user, and grant privileges.
Note the database name, username, and password for later use.
-- Create a database named WORDPRESS_DATABASE
CREATE DATABASE WORDPRESS_DATABASE;

-- Create a dedicated user WORDPRESS_USER and set a password. We recommend that you set a strong password that is at least 12 characters long and contains uppercase letters, lowercase letters, digits, and special characters.
CREATE USER '<span class="var-span" contenteditable="true" data-var="WORDPRESS_USER">WORDPRESS_USER'</span>@'localhost' IDENTIFIED BY '<span class="var-span" contenteditable="true" data-var="WORDPRESS_PASSWORD">WORDPRESS_PASSWORD'</span>;

-- Grant this user all privileges on the wordpress database
GRANT ALL PRIVILEGES ON wordpress.* TO '<span class="var-span" contenteditable="true" data-var="WORDPRESS_USER">WORDPRESS_USER'</span>@'localhost';

-- Flush privileges to apply the settings
FLUSH PRIVILEGES;

-- Exit MySQL
EXIT;
MySQL versions 5.7 and later install a password strength validation plugin by default. The password rules are: 8 to 30 characters in length, must include uppercase and lowercase letters, numbers, and special symbols. The allowed special symbols are
()` ~!@#$%^&*-+=|{}[]:;‘<>,.?/.
Step 3: Download and configure WordPress
Go to the Nginx web root directory and download the Chinese version of WordPress 6.4.4.
To install the English version of WordPress, replace the URL with
https://wordpress.org/wordpress-6.4.4.zip. You must also replace the archive namewordpress-6.4.4-zh_CN.zipwithwordpress-6.4.4.zipin the following steps.sudo cd /usr/share/nginx/html sudo wget https://cn.wordpress.org/wordpress-6.4.4-zh_CN.zipInstall the
unzipcommand and extract the WordPress archive.sudo yum install unzip -y sudo unzip wordpress-6.4.4-zh_CN.zipCopy the
wp-config-sample.phpfile towp-config.php, keeping the original file as a backup.cd /usr/share/nginx/html/wordpress sudo cp wp-config-sample.php wp-config.phpEdit the configuration file to add the database information from Step 2, including the database name, username, and password.
sudo vim wp-config.phpPress
ito enter insert mode./** The name of the database for WordPress */ define('DB_NAME', '<span class="var-span" contenteditable="true" data-var="WORDPRESS_DATABASE">WORDPRESS_DATABASE'</span>); /** MySQL database username */ define('DB_USER', '<span class="var-span" contenteditable="true" data-var="WORDPRESS_USER">WORDPRESS_USER'</span>); /** MySQL database password */ define('DB_PASSWORD', '<span class="var-span" contenteditable="true" data-var="WORDPRESS_PASSWORD">WORDPRESS_PASSWORD'</span>); /** MySQL hostname */ define('DB_HOST', 'localhost');After making the changes, press
Esc, enter:wq, and pressEnterto save and exit.
Step 4: Configure Nginx
Modify the default Nginx site configuration to properly handle PHP requests.
Back up the default configuration and create a new Nginx configuration file.
sudo mv /etc/nginx/conf.d/default.conf /etc/nginx/conf.d/default.conf.bak
sudo vim /etc/nginx/conf.d/default.conf
Modify the Nginx configuration file.
Press
ito enter insert mode. In theserverandlocation ~ \.php$blocks, replace the path afterrootwith the WordPress root directory. In this example, the WordPress root directory is/usr/share/nginx/html/wordpress.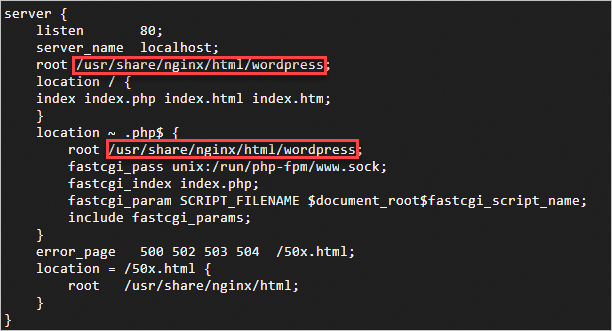
Press
Esc, enter:wq, and pressEnterto save and exit the file.Check the configuration syntax.
If the output is
syntax is ok, you can safely restart the service.sudo nginx -tIf a syntax error is reported, you can restore the default configuration by running
sudo mv /etc/nginx/conf.d/default.conf.bak /etc/nginx/conf.d/default.conf.Restart Nginx to apply the configuration.
sudo systemctl restart nginx
Step 5: Install and log on to the WordPress site
After configuring the server, initialize WordPress in a web browser.
On your local machine, open a web browser and go to
http://<Public IP address of the ECS instance>to access the WordPress installation page.Fill in the basic site information, including Site Title, administrator Username, Password, and Your Email, then click Install WordPress.
After a successful installation, click Log In and use the username and password you just set to log on.
A successful login confirms that your WordPress site is running correctly. For more information, see the official WordPress support documentation.
What to do next
Manage files with FTP
To upload WordPress themes or plugins via FTP, you need to build an FTP site on Linux.
Resolve a domain name and configure HTTPS
Accessing your site via its IP address is unprofessional and insecure. For better security and professionalism, bind a domain name to your site and enable HTTPS.
Register a domain name and complete ICP Filing
If you do not have a domain name, you can register a domain name with Alibaba Cloud.
To host a website with a domain name on an Alibaba Cloud server in the Chinese mainland, you must complete the ICP Filing process.For more information, see ICP filing process.
Resolve your domain name to the public IP address of your ECS instance.
Replace the instance's public IP address with the new domain name.
Remotely connect to the instance and log on to the MySQL database.
mysql -u root -pSwitch to the WordPress database and set the domain name.
Replace
public_ipwith the instance's public IP address andDOMAINwith your domain name.USE wordpress; UPDATE wp_options SET option_value = replace(option_value, 'http://PUBLIC_IP', 'http://DOMAIN') WHERE option_name = 'home' OR option_name = 'siteurl'; EXIT;
Configure an SSL certificate (HTTPS)
Deploying an SSL certificate enables encrypted HTTPS data transmission for your website. This protects user privacy and improves browser trust and SEO rankings.
FAQ
Why can't I access my WordPress site using its public IP address?
Check the security group: Confirm that the instance's Security Group allows traffic on port 80.
Check the OS firewall: Confirm that the operating system's internal firewall (such as firewalld) is not blocking port 80.
Check service status: On the ECS instance, run
sudo systemctl status nginxandsudo systemctl status php-fpmto ensure the services are in theactive (running)state.Check port listening: Confirm that the Nginx service is listening on port 80.
For detailed troubleshooting methods, see Troubleshoot issues when you cannot access services on an ECS instance.
After setting a permalink in WordPress, why can't I access the redirected pages?
Using static-style URLs (permalinks) improves search engine indexing. To set a permalink structure in WordPress, you must first configure static rules in your Nginx server.
Remotely connect to the instance and open the Nginx configuration file.
sudo vim /etc/nginx/conf.d/default.confPress
ito enter insert mode. In thelocation /block, add the following code.try_files $uri $uri/ /index.php?$args;Press
Esc, enter:wq, and pressEnterto save and exit the file.Restart the Nginx service to apply the configuration.
sudo systemctl restart nginx
Why am I prompted for FTP credentials or see a "could not create directory" error when updating WordPress, or uploading themes or plugins?
This issue is often caused by incorrect file permissions for WordPress. You can resolve it by following these steps.
Log on to the ECS instance and open the WordPress configuration file.
sudo vim /usr/share/nginx/html/wordpress/wp-config.phpPress
ito enter insert mode. At the bottom of the file, add the following code.define("FS_METHOD","direct"); define("FS_CHMOD_DIR", 0777); define("FS_CHMOD_FILE", 0777);Press
Esc, enter:wq, and pressEnterto save and exit the file.Return to the WordPress dashboard and refresh the page. This should resolve the FTP credential prompt.
If the 'could not create directory' error persists, change the owner of the web root directory to the Nginx user,
nginx.sudo chown -R nginx /usr/share/nginx/html/wordpress
How do I change a username and password in MySQL 5.7?
Remotely connect to the ECS instance and log on to the MySQL database.
mysql -u root -pSwitch to the
mysqldatabase and view the usernames.use mysql; select user from mysql.user;Change the database username and password.
Change the database username.
UPDATE user SET user='NEW_USER_NAME' WHERE user='USER_NAME';For example, to change the username
roottoadmin:UPDATE mysql.user SET user='admin' WHERE user='root';Change the password of a database user.
ALTER USER 'USER_NAME'@'localhost' IDENTIFIED BY 'PASSWORD';For example, to change the password for the
rootuser toPassword@2025!:ALTER USER 'root'@'localhost' IDENTIFIED BY 'Password@2025!';
Flush the privileges to apply the changes and then exit the MySQL database.
FLUSH PRIVILEGES;
EXIT;
References
To deploy WordPress in Docker, see Use Docker Compose to deploy an application.
To build multiple websites on a single ECS instance, see Configure multiple websites with Nginx.