An error may occur when you use PyTorch on a GPU-accelerated Linux instance because the version of Compute Unified Device Architecture (CUDA) installed on the instance is incompatible with the version of PyTorch. This topic describes the cause of and the solutions to this issue.
Problem description
The following error message is displayed when you use PyTorch on a GPU-accelerated Linux instance that runs an Alibaba Cloud Linux 3:
>>> import torch
Traceback (most recent call last):
  File "<stdin>", line 1, in <module>
  File "/usr/local/lib/python3.8/dist-packages/torch/__init__.py", line 235, in <module>
    from torch._C import *  # noqa: F403
ImportError: /usr/local/lib/python3.8/dist-packages/torch/lib/../../nvidia/cusparse/lib/libcusparse.so.12: undefined symbol: __nvJitLinkAddData_12_1, version libnvJitLink.so.12
Cause
The preceding error may be caused by the incompatibility between the version of CUDA installed on the GPU-accelerated instance and the PyTorch version. For more information about the mappings between the CUDA version and the PyTorch version, see Previous PyTorch Versions.
The version of PyTorch installed by running the sudo pip3 install torch command is 2.1.2, and the compatible CUDA version is 12.1. However, the CUDA version automatically installed on the purchased GPU-accelerated instance is 12.0. This version does not match the CUDA version that is compatible with the installed PyTorch version.
Solution
If you selected Auto-install GPU Driver on the Public Images tab in the Image section when you purchased the GPU-accelerated instance in the Elastic Compute Service (ECS) console, you can change the CUDA version to 12.1 by using one of the following methods:
Method 2: Install CUDA by using a custom script
Release the existing GPU-accelerated instance.
For more information, see Release instances.
Purchase a new GPU-accelerated instance.
For more information, see Create a GPU-accelerated instance. Take note of the following parameters:
On the Public Images tab in the Image section, do not select Auto-install GPU Driver.
In the User Data part of the Advanced Settings(Optional) section, enter a custom script to install the NVIDIA Tesla driver of version 535.154.05 and CUDA of version 12.1.1. The following code shows a sample custom script:
Sample custom script
#!/bin/sh

#Please input version to install
DRIVER_VERSION="535.154.05"
CUDA_VERSION="12.1.1"
CUDNN_VERSION="8.9.7.29"
IS_INSTALL_eRDMA="FALSE"
IS_INSTALL_RDMA="FALSE"
INSTALL_DIR="/root/auto_install"

#using .run to install driver and cuda
auto_install_script="auto_install_v4.0.sh"

script_download_url=$(curl http://100.100.100.200/latest/meta-data/source-address | head -1)"/opsx/ecs/linux/binary/script/${auto_install_script}"
echo $script_download_url

rm -rf $INSTALL_DIR
mkdir -p $INSTALL_DIR
cd $INSTALL_DIR && wget -t 10 --timeout=10 $script_download_url && bash ${INSTALL_DIR}/${auto_install_script} $DRIVER_VERSION $CUDA_VERSION $CUDNN_VERSION $IS_INSTALL_RDMA $IS_INSTALL_eRDMA
Method 3: Modify the instance user data and change the OS
Stop the GPU-accelerated instance.
For more information, see Stop instances.
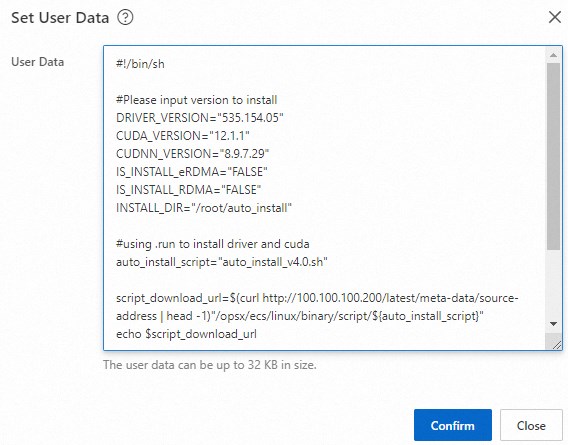
On the Instance page, find the stopped GPU-accelerated instance and click the  icon in the Actions column. In the Instance Settings section, click Set User Data.
Modify the user data and click OK.
Change the values of the DRIVER_VERSION, CUDA_VERSION, and CUDNN_VERSION parameters to the following versions:
...
DRIVER_VERSION="535.154.05"
CUDA_VERSION="12.1.1"
CUDNN_VERSION="8.9.7.29"
...

Change the OS of the GPU-accelerated instance.
For more information, see Replace the operating system (system disk) of an instance.
After the GPU-accelerated instance is restarted, the system re-installs the new versions of the NVIDIA Tesla driver, CUDA, and CUDA Deep Neural Network library (cuDNN).
 icon in the Actions column. In the Instance Settings section, click Set User Data.