You can use cGPU to isolate GPU resources. This allows multiple containers to share a single GPU. cGPU provides external services as a component of Container Service for Kubernetes (ACK) and is applicable to scenarios that require high performance computing (HPC) capabilities, such as machine learning, deep learning, and scientific computing scenarios. You can use cGPU to efficiently utilize GPU resources and accelerate computing tasks. This topic describes how to install and use cGPU.
If you use cGPU to isolate GPU resources, you cannot request GPU memory by using Unified Virtual Memory (UVM). Therefore, you cannot request GPU memory by calling cudaMallocManaged() of the Compute Unified Device Architecture (CUDA) API. You can request GPU memory by using other methods. For example, you can call cudaMalloc(). For more information, see Unified Memory for CUDA Beginners.
Prerequisites
Before you perform operations, make sure that your GPU-accelerated instance meets the following requirements:
The instance belongs to one of the following instance families: gn7i, gn6i, gn6v, gn6e, gn5i, gn5, ebmgn7i, ebmgn6i, ebmgn7e, and ebmgn6e.
The OS that is run by the instance is CentOS, Ubuntu, or Alibaba Cloud Linux (Alinux).
The Tesla driver of version 418.87.01 or later is installed on the instance.
Docker of version 19.03.5 or later is installed on the instance.
Install cGPU
We recommend that you install and use cGPU by using the Docker runtime environment of ACK, regardless of whether you are an enterprise user or an individual user.
If you install cGPU of version 1.5.7, the cGPU kernel driver may be locked because parallel processes interfere with each other. As a result, a Linux Kernel Panic issue is caused. To prevent kernel issues from your new business, we recommend that you install cGPU of version 1.5.8 or later, or update cGPU to version 1.5.8 or later.
Create a cluster.
For more information, see Create an ACK managed cluster.
On the Clusters page, find the cluster that you want to manage and click its name. In the left-side pane, choose .
In the Basic Capabilities section, select Scheduling Policy Extension (Batch Task Scheduling, GPU Sharing, Topology-aware GPU Scheduling).
At the bottom of the page, click Deploy Cloud-native AI Suite.
After cGPU is installed, you can view that the ack-ai-installer component is in the Deployed state on the Cloud-native AI Suite page.
On the Cloud-native AI Suite page, click Deploy.
Use cGPU
This section provides an example on how to use cGPU to allow two containers to share one GPU. In this example, an ecs.gn6i-c4g1.xlarge instance is used.
Run cGPU
Run the following commands to create containers and specify the GPU memory that is allocated to the containers.
In this example,
ALIYUN_COM_GPU_MEM_CONTAINERthat specifies the GPU memory allocated to the container andALIYUN_COM_GPU_MEM_DEVthat specifies the total GPU memory are configured. The following containers are created:gpu_test1: This container is allocated 6 GiB of GPU memory.
sudo docker run -d -t --gpus all --shm-size=1g --ulimit memlock=-1 --ulimit stack=67108864 --name gpu_test1 -v /mnt:/mnt -e ALIYUN_COM_GPU_MEM_CONTAINER=6 -e ALIYUN_COM_GPU_MEM_DEV=15 nvcr.io/nvidia/tensorflow:19.10-py3gpu_test2: This container is allocated 8 GiB of GPU memory.
sudo docker run -d -t --gpus all --shm-size=1g --ulimit memlock=-1 --ulimit stack=67108864 --name gpu_test2 -v /mnt:/mnt -e ALIYUN_COM_GPU_MEM_CONTAINER=8 -e ALIYUN_COM_GPU_MEM_DEV=15 nvcr.io/nvidia/tensorflow:19.10-py3
NoteIn the preceding commands, the TensorFlow image
nvcr.io/nvidia/tensorflow:19.10-py3is used. Replace the image with your container image based on your business requirements. For more information about how to use the TensorFlow image to build a TensorFlow deep learning framework, see Deploy an NGC environment for deep learning development.Run the following command to view the GPU information about the container such as the GPU memory:
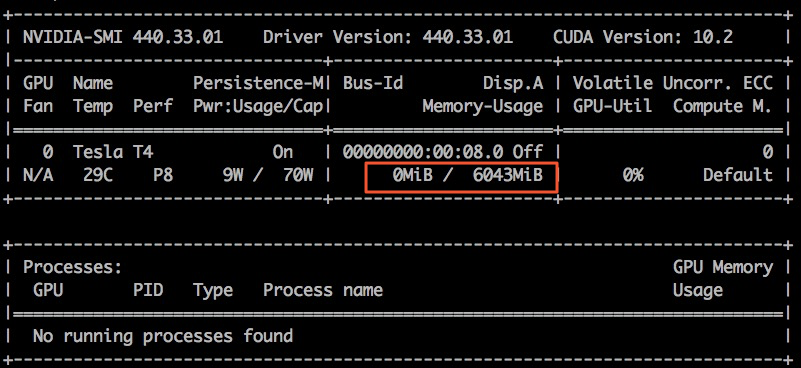
sudo docker exec -i gpu_test1 nvidia-smiIn this example, the gpu_test1 container is used. The following figure shows that the GPU memory of the container is 6,043 MiB.
View cGPU by using procfs nodes
The cGPU runtime generates multiple proc filesystem (procfs) nodes in the /proc/cgpu_km directory and automatically manages the nodes. You can view cGPU information and configure cGPU settings by using the procfs nodes.
Run the following command to view information about the procfs nodes:
ls /proc/cgpu_km/The following figure shows the command output.

Run the following command to view the parameters in the directory of the GPU.
In this example, the 0 GPU directory is used.
ls /proc/cgpu_km/0The following figure shows the command output.

Run the following command to view the parameters in the directory of the container.
In this example, the 012b2edccd7a container directory is used.
ls /proc/cgpu_km/0/012b2edccd7aThe following figure shows the command output.

(Optional) Run the following commands to configure cGPU:
After you are familiar with procfs nodes, you can run commands on the GPU-accelerated instance to perform operations. For example, you can change the scheduling policy and change the weight. The following table describes sample commands.
Command
Effect
echo 2 > /proc/cgpu_km/0/policy
Changes the scheduling policy to weight-based preemptive scheduling.
cat /proc/cgpu_km/0/free_weight
Queries the available weight on the GPU. If
free_weightis set to 0, the weight of the newly created container is 0. In this case, the container cannot obtain GPU computing power and cannot be used to run applications that require GPU computing power.cat /proc/cgpu_km/0/$dockerid/weight
Queries the weight of a specified container.
echo 4 > /proc/cgpu_km/0/$dockerid/weight
Changes the weight based on which the container obtains the GPU computing power.
View cGPU containers by using cgpu-smi
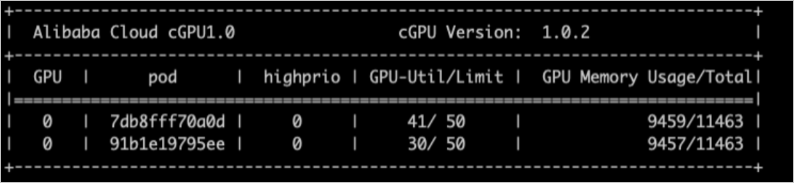
You can use cgpu-smi to view information about a container for which cGPU is used. The information includes the container ID, GPU utilization, computing power limit, GPU memory usage, and total allocated memory.
cgpu-smi provides sample monitoring information about cGPU. When you deploy Kubernetes applications, you can refer to or use the sample monitoring information to perform custom development and integration.
The following figure shows the sample monitoring information provided by cgpu-smi.
Update or uninstall cGPU
Update cGPU
cGPU supports cold updates and hot updates.
Cold update
If cGPU is not used for Docker, you can perform a cold update on cGPU. Perform the following operations:
Run the following command to stop all running containers:
sudo docker stop $(docker ps -a | awk '{ print $1}' | tail -n +2)Run the following command to update cGPU to the latest version:
sudo sh upgrade.sh
Hot update
If cGPU is used for Docker, you can perform a hot update on the cGPU kernel driver. Specific limits are imposed on the updatable versions. If you require assistance, contact Alibaba Cloud after-sales engineers.
Uninstall cGPU
For more information about how to uninstall cGPU of an earlier version from a node, see Upgrade the cGPU version on a node by using a CLI.
Usage examples of cGPU
Use cGPU to schedule computing power
When cGPU loads the cgpu_km module, cGPU sets time slices (X ms) for each GPU based on the maximum number of containers (max_inst) to allocate GPU computing power to the containers. In the following examples, Slice 1, Slice 2, and Slice N time slices are used. The following examples show how GPU computing power is allocated by using different scheduling policies.
Fair-share scheduling (policy = 0)
When you create containers, cGPU allocates time slices to the containers. cGPU starts scheduling from Slice 1. The scheduling task is submitted to the physical GPU and executed in the container within a time slice (X ms). Then, cGPU moves to the next time slice. Each container obtains the same computing power, which is
1/max_inst. The following figure shows the details.
Preemptive scheduling (policy = 1)
When you create containers, cGPU allocates time slices to the containers. cGPU starts scheduling from Slice 1. However, if no container is used within Slice 1 or if the GPU device is not started by a process in the container, cGPU skips scheduling within Slice 1 and moves to the next time slice.
Examples:
You create only a container named Docker 1, and allocate Slice 1 to and run two TensorFlow processes in the container. In this case, Docker 1 can obtain the computing power of the entire physical GPU.
Then, you create a container named Docker 2 and allocate Slice 2 to the container. If the GPU device is not started by a process in Docker 2, cGPU skips scheduling for Docker 2 within Slice 2.
If the GPU device is started by a process in Docker 2, cGPU performs scheduling within Slice 1 and Slice 2. Docker 1 and Docker 2 can obtain up to half of the computing power of the physical GPU. The following figure shows the details.

Weight-based preemptive scheduling (policy = 2)
If ALIYUN_COM_GPU_SCHD_WEIGHT is set to a value greater than 1 when you create a container, weight-based preemptive scheduling is used. cGPU divides the computing power of the physical GPU into max_inst portions based on the number of containers (max_inst). If ALIYUN_COM_GPU_SCHD_WEIGHT is set to a value greater than 1, cGPU combines multiple time slices into a larger time slice and allocates the time slice to the containers.
Sample configurations:
Docker 1: ALIYUN_COM_GPU_SCHD_WEIGHT = m
Docker 2: ALIYUN_COM_GPU_SCHD_WEIGHT = n
Scheduling results:
If only Docker 1 is running, Docker 1 preempts the computing power of the entire physical GPU.
If Docker 1 and Docker 2 are running, Docker 1 and Docker 2 obtain the computing power at a theoretical ratio of m:n. Compared with preemptive scheduling, Docker 2 consumes n time slices even if the GPU device is not started by a process in Docker 2.
NoteThe running performance of the containers differs when m:n is set to 2:1 and 8:4. The number of time slices within 1 second when m:n is set to 2:1 is four times the number of time slices within 1 second when m:n is set to 8:4.

Weight-based preemptive scheduling limits the theoretical maximum GPU computing power that containers can obtain. However, for GPUs that provide strong computing power such as an NVIDIA V100 GPU, a computing task can be completed only within a single time slice if small GPU memory is used. In this case, if m:n is set to 8:4, the GPU computing power becomes idle during the remaining time slices and the limit on the theoretical maximum GPU computing power becomes invalid.
Fixed scheduling (policy = 3)
You can use ALIYUN_COM_GPU_SCHD_WEIGHT together with max_inst to fix the percentage of computing power.
Soft scheduling (policy = 4)
When you create containers, cGPU allocates time slices to the containers. Compared with preemptive scheduling, soft scheduling isolates GPU resources in a softer manner. For more information, see Preemptive scheduling (policy = 1).
Native scheduling (policy = 5)
You can use this policy to isolate only GPU memory. When the policy is used, computing power is scheduled based on the built-in scheduling methods of NVIDIA GPU drivers.
The scheduling policies for computing power are supported for all Alibaba Cloud heterogeneous GPU-accelerated instances and NVIDIA GPUs that are used for the instances, including Tesla P4, Tesla P100, Tesla T4, Tesla V100, and Tesla A10 GPUs. In this example, two containers that share a GPU-accelerated instance configured with a Tesla A10 GPU are tested. The computing power ratio of the containers is 1:2. Each container obtains 12 GiB of GPU memory.
The following performance test data is provided for reference only.
Test 1: The performance data of the ResNet50 model that is trained by using the TensorFlow framework at different batch_size values is compared. The FP16 precision is used. The following section shows the test results.
Framework
Model
batch_size
Precision
Images per second of Docker 1
Images per second of Docker 2
TensorFlow
ResNet50
16
FP16
151
307
TensorFlow
ResNet50
32
FP16
204
418
TensorFlow
ResNet50
64
FP16
247
503
TensorFlow
ResNet50
128
FP16
257
516
Test 2: The performance data of the ResNet50 model that is trained by using the TensorRT framework at different batch_size values is compared. The FP16 precision is used. The following section shows the test results.
Framework
Model
batch_size
Precision
Images per second of Docker 1
Images per second of Docker 2
TensorRT
ResNet50
1
FP16
568.05
1132.08
TensorRT
ResNet50
2
FP16
940.36
1884.12
TensorRT
ResNet50
4
FP16
1304.03
2571.91
TensorRT
ResNet50
8
FP16
1586.87
3055.66
TensorRT
ResNet50
16
FP16
1783.91
3381.72
TensorRT
ResNet50
32
FP16
1989.28
3695.88
TensorRT
ResNet50
64
FP16
2105.81
3889.35
TensorRT
ResNet50
128
FP16
2205.25
3901.94
Use cGPU to allocate memory to multiple GPUs
In the following example, four GPUs are configured. GPU 0, GPU 1, GPU 2, and GPU 3 are separately allocated 3 GiB, 4 GiB, 5 GiB, and 6 GiB of memory. Sample code:
docker run -d -t --runtime=nvidia  --name gpu_test0123 --shm-size=1g --ulimit memlock=-1 --ulimit stack=67108864 -v /mnt:/mnt -e ALIYUN_COM_GPU_MEM_CONTAINER=3,4,5,6 -e ALIYUN_COM_GPU_MEM_DEV=23 -e NVIDIA_VISIBLE_DEVICES=0,1,2,3 nvcr.io/nvidia/tensorflow:21.03-tf1-py3
docker exec -i gpu_test0123   nvidia-smi
The following command output shows the memory details of the GPUs.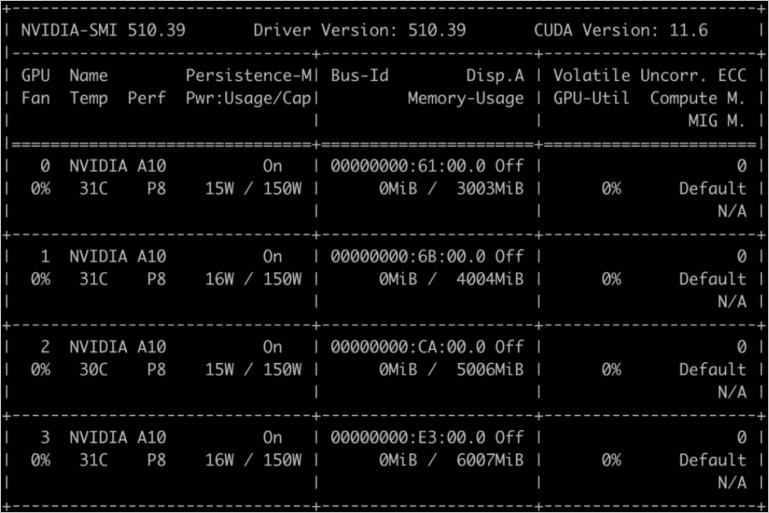
You can use ALIYUN_COM_GPU_MEM_CONTAINER to allocate memory to multiple GPUs. The following table describes the values of ALIYUN_COM_GPU_MEM_CONTAINER.
Value | Description |
ALIYUN_COM_GPU_MEM_CONTAINER=3 | The memory of each of the four GPUs is set to 3 GiB. |
ALIYUN_COM_GPU_MEM_CONTAINER=3,1 | The memory of the four GPUs is set to 3 GiB, 1 GiB, 1 GiB, and 1 GiB in sequence. |
ALIYUN_COM_GPU_MEM_CONTAINER=3,4,5,6 | The memory of the four GPUs is set to 3 GiB, 4 GiB, 5 GiB, and 6 GiB in sequence. |
ALIYUN_COM_GPU_MEM_CONTAINER not specified | cGPU is disabled. |
ALIYUN_COM_GPU_MEM_CONTAINER=0 | |
ALIYUN_COM_GPU_MEM_CONTAINER=1,0,0 |