Each Elastic Compute Service (ECS) instance has one primary Elastic Network Interface (ENI). You can attach one or more secondary ENIs for high availability or traffic isolation.
Create an ENI
Console
In the ECS console, go to the ENIs page and click Create ENI.
Configure the following key parameters and leave the others at their default settings:
VPC and vSwitch: Specifies the network where the ENI is located.
To attach the ENI to an instance, both must be in the same Virtual Private Cloud (VPC) and vSwitch.
Security Group: You can associate one or more security groups to control inbound and outbound traffic.
API
Call the CreateNetworkInterface operation to create an ENI.
Attach an ENI to an ECS instance
When you create a new instance, you can specify an existing ENI as either the primary ENI or a secondary ENI. The instance inherits the ENI's network configuration, such as its IP address, routes, MAC address, and security groups.
When you attach an ENI to an existing instance, it can only be a secondary ENI. This allows you to expand the instance's networking capabilities, such as by isolating traffic or adding IP addresses.
The number of ENIs that can be attached to an instance varies by instance family.
Prerequisites
The ENI and the instance must be in the same VPC and vSwitch.
Some instance types must be stopped before attaching an ENI.
Attach an ENI when you create an instance
Console
If you select an existing Security Group or create a new one, the system automatically creates a new Primary ENI, and you cannot attach an existing ENI.
Go to the Custom Launch page in the ECS console.
After you select a Network and Zone, go to the Network and Security Groups section. In the ENI section, select Existing ENI for the Primary ENI or a Secondary ENI.

API
Call RunInstances. In the NetworkInterface parameter, use NetworkInterfaceId to specify the Elastic Network Interface (ENI) and InstanceType to define it as the primary or secondary ENI.
Attaching an ENI to an existing instance
Console
Go to the Instances page in the ECS console and click the ID of the target instance to open its details page.
On the instance details page, click the ENIs tab and then click Bind Secondary ENI.
Select the target ENI and click Confirm.
API
Call the AttachNetworkInterface operation to attach an ENI to an existing instance.
Configure the ENI in the OS
The primary ENI is typically configured automatically after the instance is created. When you attach one or more secondary ENIs to an ECS instance, you must verify that they are recognized and active in the operating system (OS).
Step 1: Verify that the ENI is active in the instance
If a secondary ENI is not correctly configured in the operating system, it cannot communicate. Follow these steps to verify the ENI's status.
Linux instance
Example OS: Alibaba Cloud Linux 3.2.
Connect to the Linux instance.
For more information, see Log on to a Linux instance using the SSH tool in Workbench.
View and confirm the ENI information of the instance.
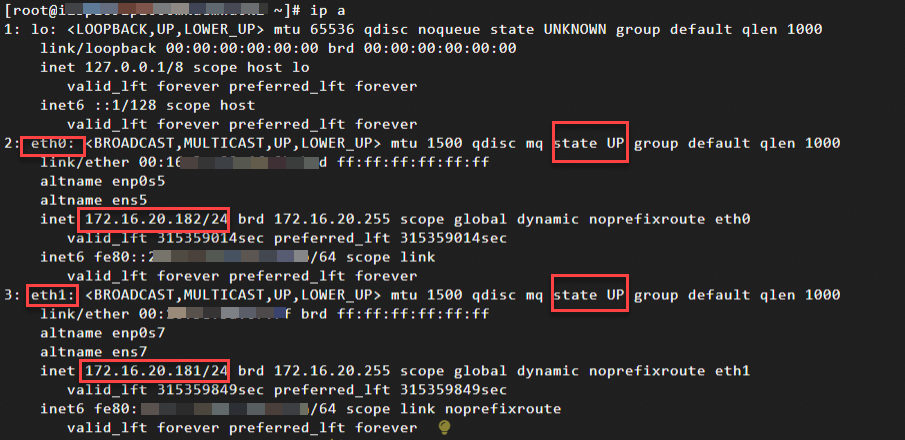
ip aThe output shows the ENI information for the current instance:
ENI identifier: eth0, eth1. In this example, the instance has two ENIs: a primary ENI (eth0) and a secondary ENI (eth1).
ENI status: state UP. This indicates that the ENI is in the Normal state and is active within the instance.
 Important
If you see
state DOWNas shown in the figure below, the interface has not loaded successfully and cannot be used. You must configure the Linux operating system to recognize the ENI to ensure the interface is active.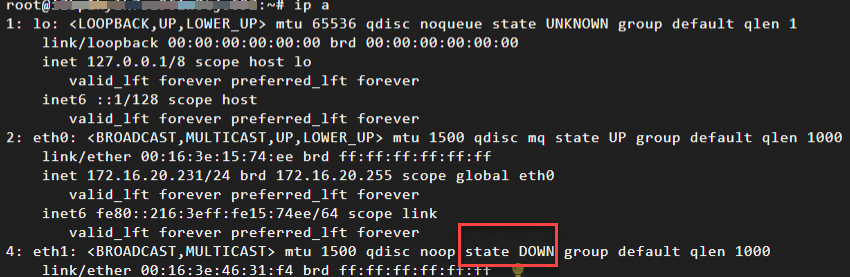
Primary private IP address of the ENI: After an ENI becomes active, you can see its primary Private IP Address. For more information, see Primary private IP addresses.
If you assigned a secondary private IP address to the ENI but it is not recognized by the OS. For more information, see Configure the operating system to recognize a secondary private IP address.
View the routing information of the ENI.
route -n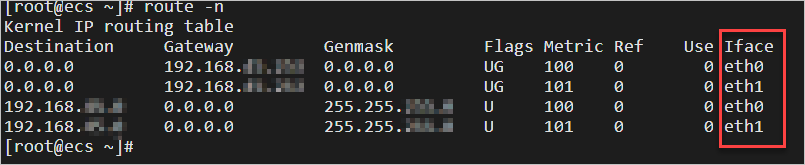
Typically, the system configures two routes for the secondary ENI (eth1):
Route with a destination of 192.168.xx.xx: This is a subnet-specific route. This ensures that the instance can directly communicate with other hosts within the same subnet without going through an additional router.
Route with a destination of 0.0.0.0: This is the default route. When a packet's destination address does not match a more specific route entry in the route table (such as a route for a specific subnet or host), the system uses the default route. The packet is then sent to the next-hop
Gatewaythrough the network interface specified byIface.ImportantWhen multiple default routes exist, the route with the lowest Metric value has the highest priority.
If you need to precisely control traffic paths and require that traffic returns through the same ENI that received it, you can configure a policy-based route for the ENI.
Some older operating systems, such as Ubuntu 16, may not automatically configure a default route for the Secondary ENI. The route table may appear as shown below. This can cause communication issues with the ENI. We recommend using a newer operating system distribution. Alternatively, you can configure it manually. For more information, see Configure a default route for an ENI.

Windows instance
Example OS: Windows Server 2022.
Connect to the Windows instance.
For more information, see Log on to a Windows instance using the RDP tool in Workbench.
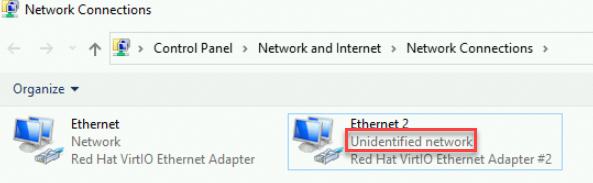
Open the Network and Sharing Center.
Click Change adapter settings.
In this example, the instance has two ENIs attached (one primary and one secondary). f you see information similar to the following, the ENIs are active in the OS, and no further configuration is needed.
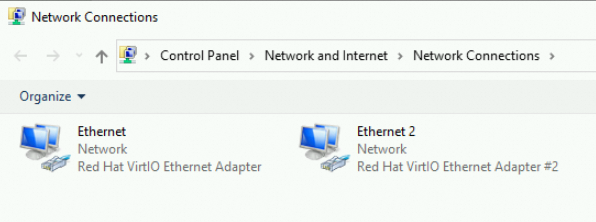
If the secondary ENI is not recognized for other reasons, you might see the following. In this case, refer to Troubleshoot ENI configuration failures on Windows instances.
View the status and details of the ENI.
Double-click the ENI name to view its status.
Take the primary ENI Ethernet as an example:
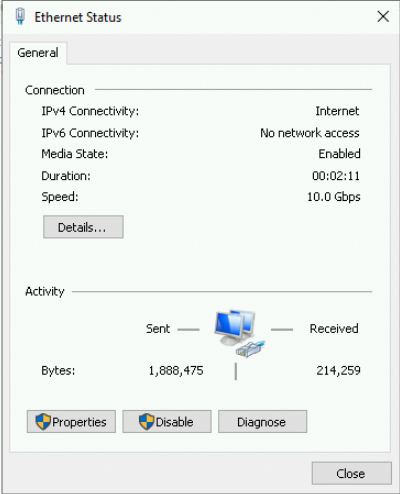
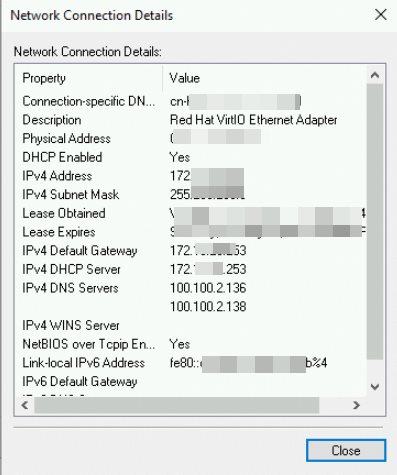
Click Details to view the ENI properties.
In the dialog box that appears, you can see the primary private IPv4 address, subnet mask, default gateway, and other information of the ENI:
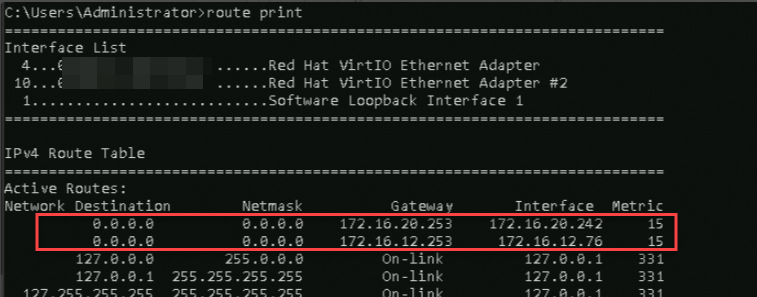
Open the Command Prompt.
Use the Win+R keyboard shortcut to open the Run dialog box. Enter cmd and click OK.
Run the following command to view the routing information of the ENI.
Step 2: Configure the Linux OS to recognize the ENI
If the ENI is not active, you can use one of the following two methods to configure it in the OS.
Most Windows operating systems can automatically recognize ENIs. If you encounter an issue where an ENI is not active, see Troubleshoot ENI configuration failures on Windows instances.
Method 1: Automatic configuration with the multi-nic-util tool
Systems running Alibaba Cloud Linux 3, CentOS 8, or later versions use the NetworkManager service by default, which enables secondary ENIs automatically. This tool is not required.
The multi-nic-util tool is for Alibaba Cloud Linux 2, CentOS 6 (6.8 and later), CentOS 7 (7.3 and later), and Red Hat.
Do not use the multi-nic-util tool in Docker or other containerized environments.
Using the multi-nic-util tool will overwrite the existing network configuration of the ECS instance. Be aware of this risk.
If you cannot use this tool for any of the reasons above, refer to Method 2: Manual configuration using network configuration files.
Download and install the multi-nic-util tool. Internet access is required.
wget https://image-offline.oss-cn-hangzhou.aliyuncs.com/multi-nic-util/multi-nic-util-0.6.tgz && \
tar -zxvf multi-nic-util-0.6.tgz && \
cd multi-nic-util-0.6 && \
bash install.sh
Restart the ENI service.
sudo systemctl restart eni.serviceView the ENI within the instance again to confirm that its status is Normal.
Method 2: Manual configuration using network configuration files
Network configuration files vary depending on the Linux distribution and version, as well as the tools used for network management.
Back up the original network configuration file before editing it.
If you cannot connect to the instance using Workbench after modifying the network configuration file, you can connect to the instance using VNC to compare the changes and repair the file.
In this example, we assume the network interface is configured to use the Dynamic Host Configuration Protocol (DHCP) to obtain its primary Private IP Address. If you want to configure the interface with a static IP address, see Configure the operating system to recognize a secondary private IP address.
Ensure that the IP address, MAC address, gateway, and other information in the configuration file match the actual settings. Incorrect network configurations can cause communication failures.
After attaching or detaching an ENI, update the network configuration file accordingly to avoid network connectivity issues or configuration conflicts.
Connect to the ECS instance.
For more information, see Log on to a Linux instance using the SSH tool in Workbench.
Create and edit the network configuration file for the ENI based on your Linux distribution and version.
The configuration file for the primary ENI is typically generated automatically. The following examples focus on configuring a secondary ENI.
RHEL/CentOS family
Applicable operating systems: Alibaba Cloud Linux 2/3, CentOS 6/7/8, Red Hat 6/7/8/9, Anolis 7/8, Fedora 33/34/35, and more.
Network interface configuration file: /etc/sysconfig/network-scripts/ifcfg-*
Each network interface has a corresponding configuration file, such as ifcfg-eth0, ifcfg-eth1, or ifcfg-eth2.
Example configuration: Run the following command to create and edit the configuration file for the secondary ENI (eth1) attached to the instance.
sudo vi /etc/sysconfig/network-scripts/ifcfg-eth1DEVICE=eth1 TYPE=Ethernet BOOTPROTO=dhcp ONBOOT=yes DEFROUTE=noDEVICE: Specifies the network interface identifier, such as eth1 or eth2.
TYPE: The type of the network interface.
Ethernetindicates an Ethernet interface.BOOTPROTO: Sets the method for obtaining an IP address. When set to
dhcp, the interface obtains an IP address from a DHCP server. If changed tostatic, you must manually set the static IP address, subnet mask, and other information.ONBOOT: Controls whether to activate this network interface at system startup. A value of
yesmeans the network interface is automatically enabled at system startup. If the value isno, it is not automatically enabled unless started manually.DEFROUTE: Specifies whether to configure the current network interface as the egress for the default route.
For the primary ENI (eth0), you do not need to configure this parameter. The system usually generates a default route with the highest priority for the primary ENI automatically.
To avoid changing the active default route of the ECS instance when starting the secondary ENI, do not set eth1 as the default route. If you do, eth1 might replace eth0 as the default route egress, causing communication failures for your primary ENI. In a multi-ENI environment, you can configure a policy-based route for the ENI to control the traffic forwarding path.
Ubuntu 18 and later
Netplan is a newer network configuration framework that has been the default network configuration method in Ubuntu since Ubuntu 18.04 LTS.
Applicable operating systems: Ubuntu 18/20/22/24
Network interface configuration file: /etc/netplan/*.yaml
The system recognizes YAML files in the /etc/netplan folder. You can set up a separate YAML file for each network interface.
The default network configuration file for the primary ENI, 50-cloud-init.yaml, is automatically generated by cloud-init at system startup.
Example configuration: Run the following command to create and edit the configuration file for the secondary ENI (eth1) attached to the instance.
sudo vi /etc/netplan/eth1-netcfg.yamlNoteThe network configuration file for the primary ENI already exists by default. To ensure the YAML file format is correct, you can run
cp 50-cloud-init.yaml ethX-netcfg.yamlto generate the configuration file for the secondary ENI, and then modify the information as shown below.network: version: 2 ethernets: eth1: dhcp4: true match: macaddress: 00:16:3e:xx:xx:xx set-name: eth1dhcp4: Specifies whether to enable DHCP for IPv4 for this interface. Valid values are true and false.
match: Matches the properties of the network interface, such as its MAC address.
You can view the MAC address of the ENI in the console or by calling an API operation.
Traditional Debian-based Linux (early Ubuntu)
Applicable operating systems: Debian, early versions of Ubuntu such as Ubuntu 14/16, Debian 8/9/10, and more.
Network interface configuration file: /etc/network/interfaces
By editing this file, users can manually configure the IP address, subnet mask, gateway, DNS, and other information for a network interface, and set modes such as static IP or DHCP.
With the popularization of Systemd and its network management tools, this method has been gradually replaced in newer versions of Ubuntu and some other distributions.
Main configuration items: The file contains configurations such as the interface type, IP address, subnet mask, gateway, and DNS information.
Example configuration: Run the following command to edit the network configuration file.
sudo vi /etc/network/interfacesNoteThe configurations for the primary ENI (eth0) and the secondary ENI (eth1) are maintained in the same file. Make sure not to omit the information for the primary ENI.
auto lo
iface lo inet loopback

auto eth0
iface eth0 inet dhcp

auto eth1  # Indicates the newly configured network interface.
iface eth1 inet dhcp
auto <interface>: Automatically activates the network interface at system startup.
iface <interface> inet <method>: Defines the configuration method for the network interface.
inet: Identifies that IPv4-related configurations are being defined.
method: Sets the method for obtaining an IP address. When set to
dhcp, the interface uses DHCP to automatically obtain an IP address, subnet mask, default gateway, and other necessary network parameters. If changed tostatic, you must manually set the static IP address, subnet mask, and other information.
SLES family
Applicable operating systems: SUSE Linux 11/12/15, OpenSUSE 15, and more.
Network interface configuration file: /etc/sysconfig/network/ifcfg-*
Each network interface has a corresponding configuration file, such as ifcfg-eth0, ifcfg-eth1, or ifcfg-eth2.
Example configuration: Run the following command to create and edit the configuration file for the secondary ENI (eth1) attached to the instance.
sudo vi /etc/sysconfig/network/ifcfg-eth1BOOTPROTO='dhcp' STARTMODE='auto'BOOTPROTO: Specifies how to obtain an IP address.
dhcpmeans the interface will automatically obtain an IP address and other related network configuration information (such as subnet mask, default gateway, and DNS server address) from a DHCP server on the network.STARTMODE: Defines how this network interface is handled at system startup. Setting it to
'auto'means that the system will try to activate this network interface if it is detected as available at startup.
Run the following command to restart the network service.
Return to Step 1: Verify that the ENI is active in the instance to confirm that the ENI is in the Normal state.
Assign a private IP address for internal communication
When an ENI is created in a specific VPC and vSwitch, it is assigned a primary private IPv4 address from the vSwitch's CIDR block. The ECS instance uses this Private IP Address for internal network communication.
If you require multiple IP addresses for use cases such as multi-application hosting, failover, or load balancing, you can assign multiple secondary Private IP Addresses to the ENI. For more information, see Assign a secondary private IP address to an ENI.
Attach a public IP address for Internet communication
Single primary ENI scenario: You can assign a static public IP address to the instance (primary ENI) for Internet communication. For more information, see Static public IP addresses.
Multiple ENIs or flexible management scenarios: You can associate an Elastic IP Address (EIP) with an ENI for Internet communication. Compared with static public IP addresses, EIPs can be flexibly associated and disassociated. For more information, see Associate an EIP with an ENI.
You can also attach one or more ENIs to an ECS instance and associate EIPs with multiple private IP addresses on those ENIs. This allows an ECS instance to have multiple Public IP Addresses. For instructions, see Associate multiple EIPs with an ECS instance in NAT mode.
ImportantAfter you associate an EIP with a secondary ENI, you must make sure that the ENI is attached to an instance and is active within the instance. This ensures that the EIP can be used. For more information, see Configure the ENI in the OS.
When you use a secondary ENI with an EIP or a NAT Gateway, outbound traffic may not flow through the ENI that is configured with the public IP address. This can cause EIP communication to fail. In this case, you can configure a policy-based route to force traffic to return through the same ENI that received it. This ensures that the inbound and outbound paths are consistent. For more information, see Configure a policy-based route for an ENI.
If you still cannot ping the public IP address after the ENI and routes are correctly configured, you may need to check the security group and firewall configurations. For more information, see Troubleshoot the issue of being unable to ping the public IP address of an ECS instance.
Associate an ENI with a security group
Associating an ENI with a security group provides network-layer security control.
An ECS instance's security group rules apply to its primary ENI. The primary ENI always belongs to the same security group as the instance and you cannot change its security group association independently. To change it, you must modify the security group association of the ECS instance. For details, see Add an instance to, remove an instance from, or change the security group of an instance.
A Secondary ENI attached to an ECS instance can be associated with any security group in the same VPC and zone, which can be different from the instance's security group. You can specify the security group association when you create the ENI, or you can change the security group associated with the ENI after it is created.
If you have configured multiple secondary IPv4 or IPv6 addresses for an ENI, these addresses are also protected by the rules of the security group associated with that ENI. You can configure precise security group rules based on source IP address, application-layer protocol, port, and other criteria to control traffic to each ENI. For details, see Manage security group rules.